How to Boost Conversions with Smart WooCommerce Popups for Cart and Checkout
Remember those moments when you wanted to leave a store and the salesperson stopped you to offer you the product at 10% discount or even buy one get one free?
Surely, you have experienced it more than once, and most likely you ended up buying the product, right?
In those situations, the salesperson was not just selling you the product, they were reducing the likelihood of losing the sale and grabbing your attention at the right moment.
And you can do exactly the same thing in your WooCommerce store. Yes, I don’t joke!
If you are running a WooCommerce store, this is very easy with smart WooCommerce pop-ups.
When a customer attempts to close the product page, leaves items in the carts, or reaches the checkout page without completing the purchase, you can stop them and tell them they can buy the product with 10% discount, or buy one get one free, simply by using tools like ” WooCommerce Popups: Cart, Add to Cart, Checkout Notices to Popups”
These Smart WooCommerce Popups are small messages that appear when a customer attempts to leave the page or abandon their cart.
The goal? To grab attention, reduce lots of sales, and motivate the customer to take the purchase step.
So, what you can offer in these popups?
Anything that is considered valuable to your customers, such as a discount, buy one get one free, a reminder that loyalty points can be earned or redeemed, or even a subtle nudge like “only one item left in stock”, to create urgency and trigger action.
And now, let’s go to see how easy it is to get started with these Smart WooCommerce Popups!
Step1:
➡ Download the Plugin
To get started, you will need to download the ” WooCommerce Popups: Cart, Add to Cart, Checkout Notices to Popups” plugin, which allows you to set maximum quantities based on your store’s needs.
After downloading the plugin from your WPFactory account, upload it to your WordPress site.
Step2:
➡ Access the Plugin
Once the plugin is installed and activated, you can tailor it to fit your business needs.
Go to WooCommerce > Settings > “Pop-up Notices”
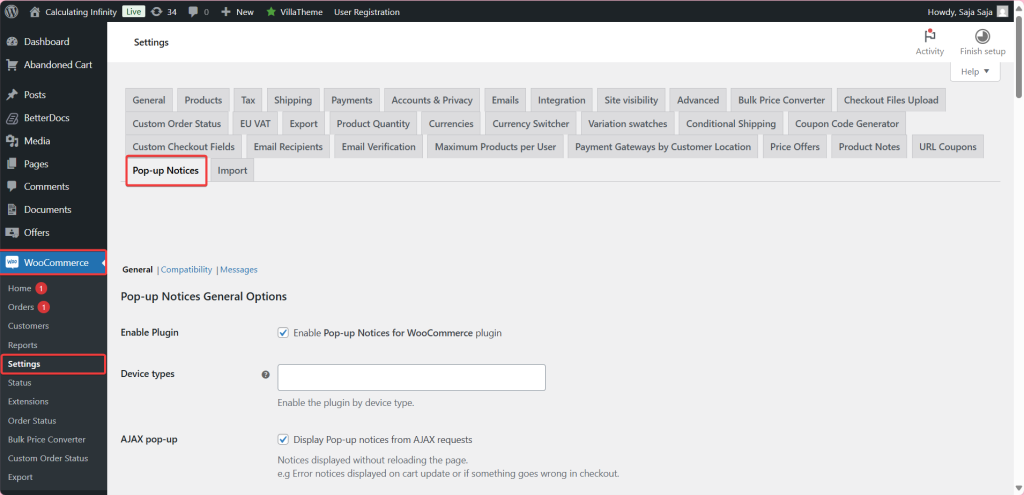
Step3:
➡Pop-up Notices General Options
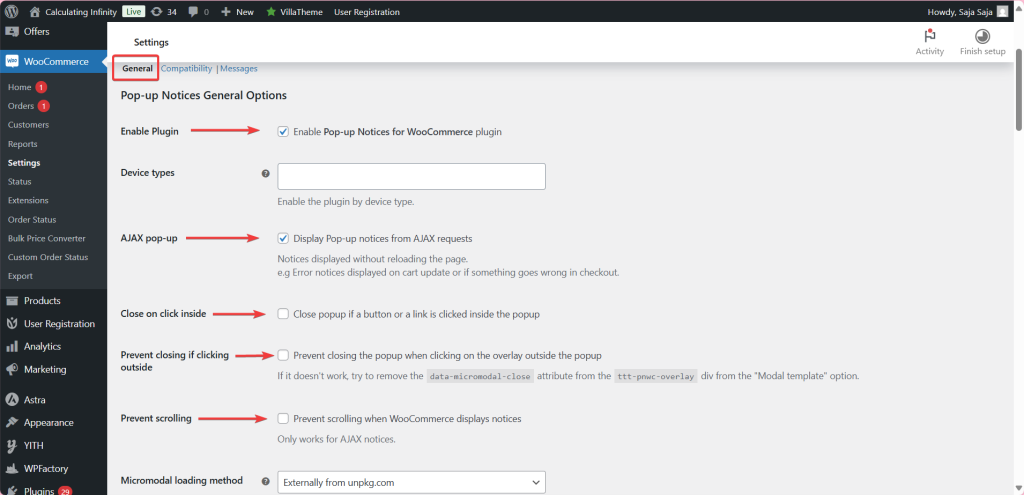
- Enable plugin
The first thing you should do is enable the plugin by check the box.
- Device types
From here, you can choose whether you want to display popup notification on mobile, desktop, or both.
- Close on click inside
If you enable this option, the notification will be closed if the user clicks on button or link within the notification.
- Prevent closing if clicking outside
This option means that the notification will not be closed if the user clicks outside the pop-up window (background).
- Prevent scrolling
This option prevents page scrolling when displaying a pop-up notification (only works with AJAX notification).
- Notice types
From here you can choose the types of notifications you want to display in pop-up windows.
✔Error notices
✔Success notices
✔Info notices
- Notice hiding
From here, you can hide the original WooCommerce notifications and replace them with pop-up notifications.
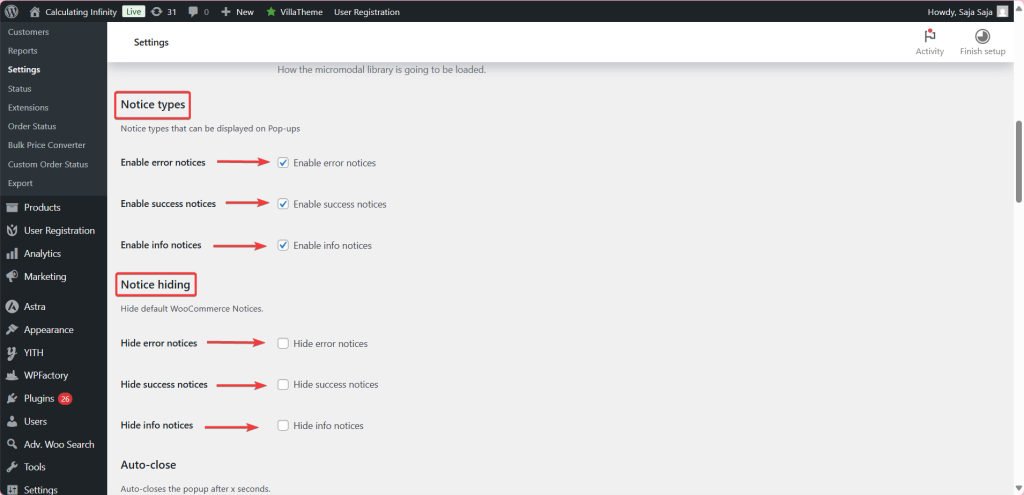
- Auto-close
You can enable the pop-up window to automatically close after a certain number of seconds. You can enter the number of seconds in the box.
- Restrictive Loading
This option allows you to choose the pages on which you want to activate pop-up notification (carts-payment-store-etc.)
- Conditional(s)
From here you can choose the conditional cases in which the add-on is activated, such as if it a product page, a cart, etc.
- AJAX add to cart notice
When a customer adds a product to the cart from the WooCommerce products page, a notification is displayed stating that the product was successfully added. This setting allows you to display a pop-up notification at that moment.
- AJAX add to cart notice
This option enables or disables the add to cart notification via AJAX.

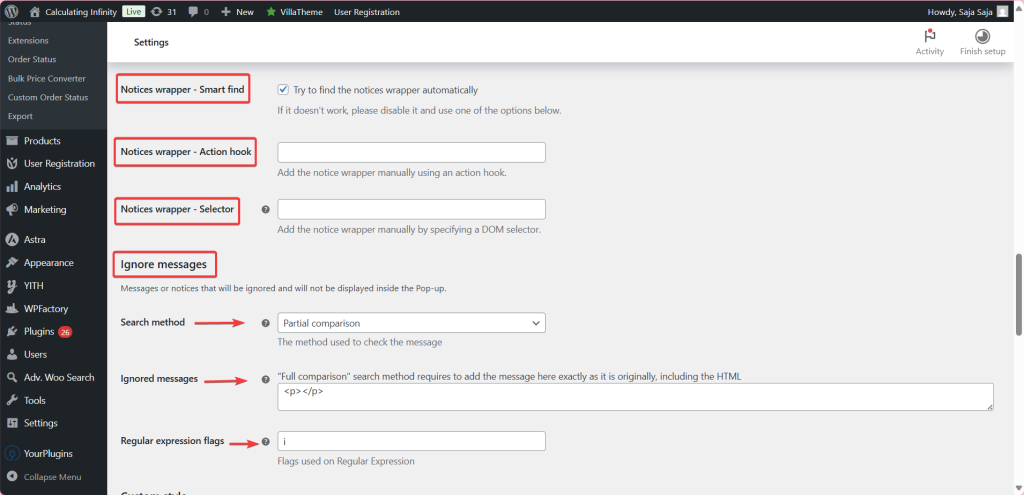
- Notices wrapper – Smart find
This option automatically tries to find the right place on the page to display the notification.
- Notices wrapper – Action hook
In WooCommerce and WordPress, the Action Hook is a point within the code where you can ‘hook’ your own instructions.
When you implement add-to-cart notifications via AJAX, you need to tell the plugin: “Where should I display the notification?” If the Smart Find option can’t find the location on its own, you need to provide a manual hook so it knows where to display the notification.
- Notices wrapper – Selector
CSS selector: It is simply the name or path of an element on the page (HTML element) that you use to specify the desired location.
Here, instead of using an Action Hook like the previous developer method, we use a CSS selector to determine the location of the notification on the page. This is a simpler and easier method for both regular users and designers.
- Ignore messages
From here, you can specify which notifications you don’t want to appear in pop-ups. That option is useful if you have annoying or unnecessary messages.
- Regular expression flags
These are additional settings that you use when writing regular expressions, and their purpose is to change the way text is searched.
For Example:
If you want to write a regular expression (Regex) that captures the phrase ‘Added to cart’, but sometimes it appears in forms like:
-
added to cart.
-
ADDED TO CART.
-
Added To Cart.
You will face a problem if you write the expression in this way:
-
Added to cart
Because it will only recognize what exactly matches it.
Here comes the role of the Flag i:
If you apply i, the Regex will ignore the difference between:
-
Uppercase letters (Capital).
-
lowercase letters (Small).
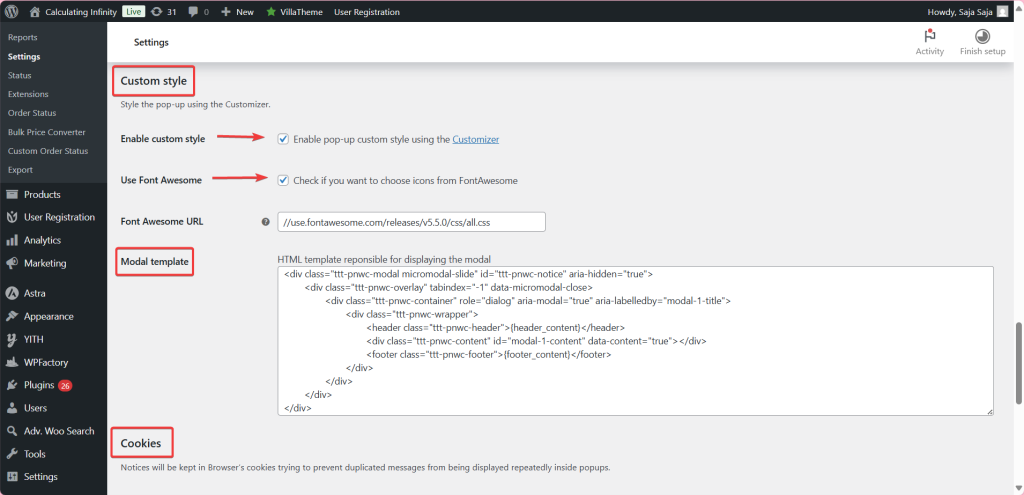
- Custom style
From here, you can customize the shape as you like, colors, fonts, etc.
- Use Font Awesome
From here, you can activate Font Awesome icons in the notification.
- Modal template
This is where the HTML code used to build the pop-up window is created. You can modify it if you’re a developer and want to change the structure or content.
- Cookies
From here you can activate saving messages in cookies so that the same messages is not repeated.
- Message origin
This setting determines the type of messages you want to save in cookies.
🔸Static message: These are messages that are known in advance, such as: “The product has been added to the shopping cart.”
They do not change based on the product, time, or customer.
🔸Dynamic Messages: It means messages that change according to the situation.
Example: “A blue T-shirt has been added to the cart.”Or”Added Product X to your cart.”
These messages contain the product name or different information each time, so it’s hard to recognize them unless the software is smart enough.

Step4:
➡Compatibility options
This section shows you the tools and plugins that compatible with ” WooCommerce Popups: Cart, Add to Cart, Checkout Notices to Popups”.

Step5:
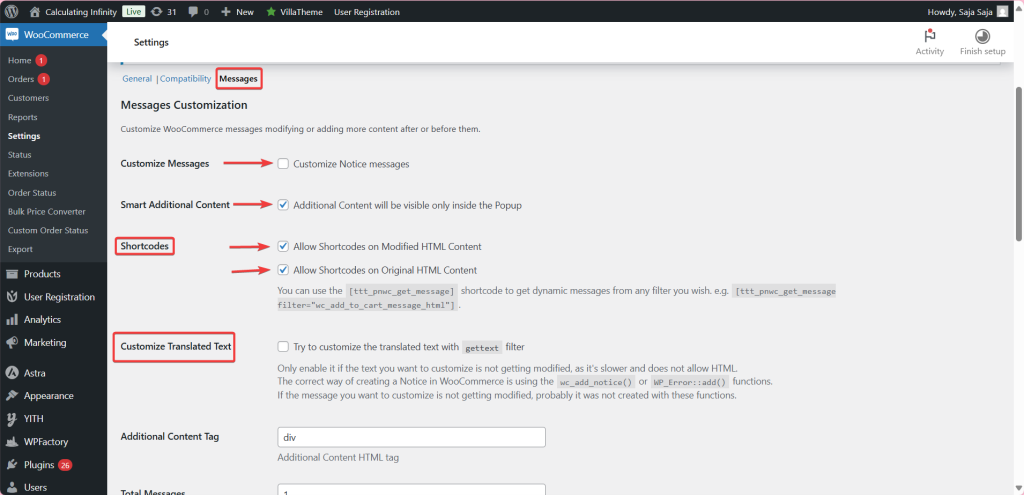
➡ Messages Customization
This section allows you to modify the notification messages that appear in WooCommerce, such as:
“Product added to cart”
You can enable or disable customization. When enabled, you can customize messages as you want.
- Smart Additional Content
Additional content, such as a button or link, will only appear inside the popup and not in the regular WooCommerce notification.
- Shortcodes
Allow Shortcodes on Modified HTML Content: When enabled, it allows the use of the shortcode in the modified messages.
- Allow Shortcodes on Original HTML Content
Allows interpretation of the shortcode in the original message text. Which means, if the original message (Original HTML Content) contains a shortcode, this setting allows it to be executed instead of appearing as plain text.
If “Allow Shortcodes on Original HTML Content” is enabled, the system will understand this shortcode and execute it, thus displaying the resulting content from this shortcode to the user, rather than the shortcode as text.
- Total Messages
From here, you can specify how many messages you want to customize.
- Message #1
-
Original HTML Content: Here give you the original message text.
-
Modified HTML Content: From here you can replace the entire text with a single message.
-
Additional Content Before / After: From here you can add something before or after the massage, such as a button or I agree.
-
Comparison method: Method of comparing the original message with what appears on the site:
– Contains: If it contains the text.
– Equals: Complete match.

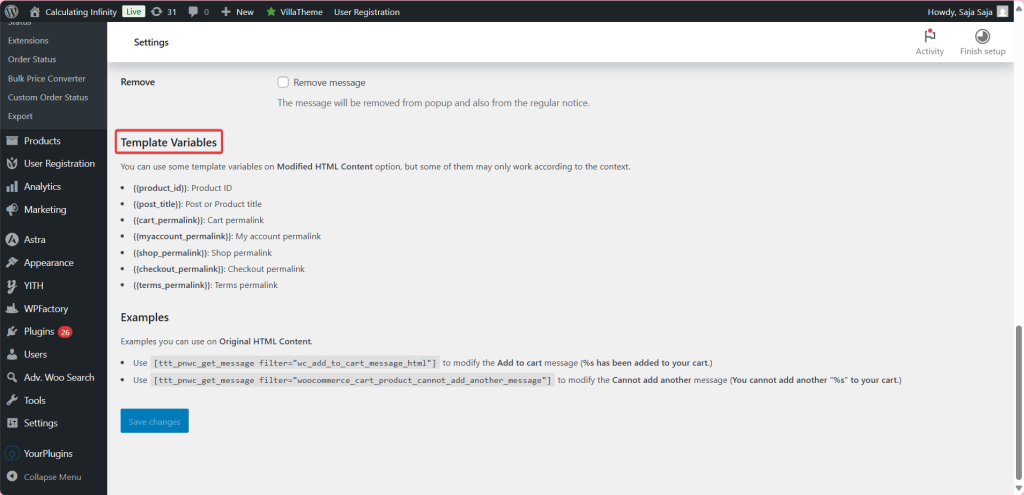
- Template Variables
These are ready-to-use variables for modified messages.
Conclusion
And just like that, you turned the missed sales using ” WooCommerce Popups: Cart, Add to Cart, Checkout Notices to Popups” into successful conversion.
In today’s competitive world, capturing your customer’s attention isn’t easy or simple task, but with smart WooCommerce pop-ups, you are not just displaying messages, you are interacting and engaging with them to encourage immediate action, which reduces cart abandonment and lost sales.
Therefore, each pop-up is an opportunity to reconnect with your customers, whether through a discount, free shipping, or any other valuable offer. The magic wand is in your hand now.
Prefer watching? This short video summarizes the article in just a few minutes.