WooCommerce PDF Invoices & Packing Slips: Auto-Generate on Every Order
Did you know that you can automatically generate PDFs for your store’s invoices and packing slips without any extra effort or time?
We all know that manually creating invoices, packing slips and other document can be very exhausting, time consuming, and easy to make a lot of errors. Therefore, it’s necessary to find a solution that help you reduce errors and save effort and time.
This is exactly what the “PDF Invoices & Packing Slips Generator for WooCommerce” plugin provides.
This tool isn’t just a tool that helps you create PDFs for your invoices and other documents, this plugin allows you to generate customized PDF documents that match your store’s branding and give your customers a seamless experience. Also, with the possibility to attach them automatically to emails, or in your customer’s accounts.
So, in this guide, I will walk you through how to set up and use “PDF Invoices & Packing Slips Generator for WooCommerce” plugin effectively.
Let’s get started!
Step1:
➡ Download the Plugin
To get started, you will need to download the “PDF Invoices & Packing Slips Generator for WooCommerce” plugin, which allows you to generate PDF invoices and packing slips easily through simple steps.
After downloading the plugin from your WPFactory account, upload it to your WordPress site.
Step2:
➡ Access the Plugin
Once the plugin is installed and activated, you can tailor it to fit your business needs.
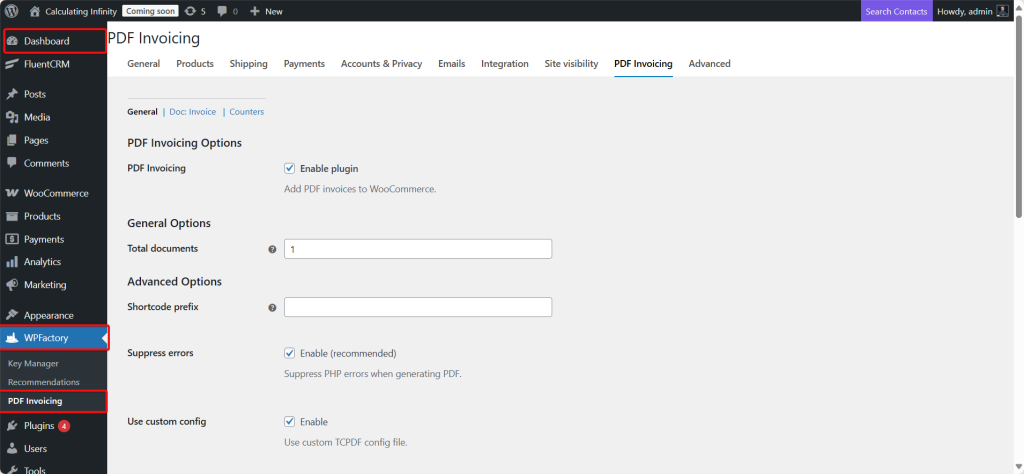
Go to WordPress dashboard > WPFactory > “PDF Invoicing”.
Step3:
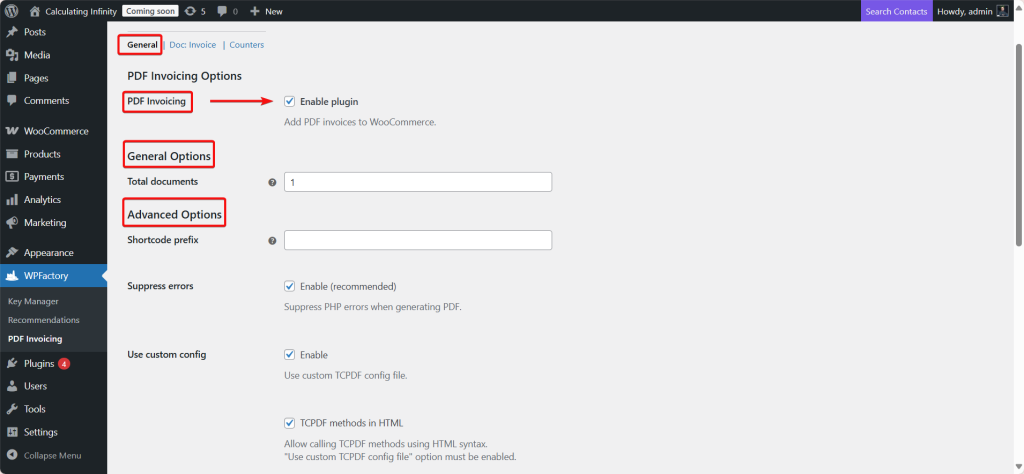
➡ General
- Enable plugin
The first thing, from this option, you can activate or deactivate the plugin. When activated, the plugin will add the ability to create PDF invoices for your WooCommerce store.
- General Options
Total documents: Here, you specify the number of documents or types that you want to support.
- Advanced Options
Shortcode prefix: If you want to use a specific shortcode for the plugin, you can put a prefix here to distinguish it.
For example, if you wrote pdf_, the shortcode will become like: (pdf_invoice).
- Suppress errors
When you activate this option, the plugin will hide PHP error messages that may appear during the creation of PDF files. This option is recommended so that technical errors don’t appear to the customer.
- Use custom config
If you enable this option, the plugin will use a custom settings file for the TCPDF library (The library responsible for generating PDF files).
- TCPDF methods in HTML
If you enable it, it allows you to use TCPDF codes within HTML when you build the invoice layout.
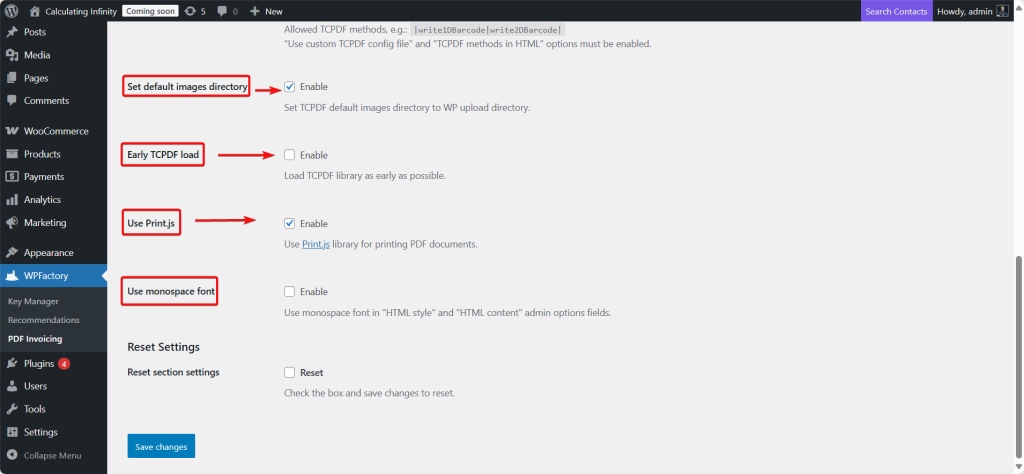
- Set default images directory
When you enable this option, the TCPDF library will consider the default images folder to be the uploads folder in WordPress (the place where all images for your site are downloaded).
The benefit, when you use the images in invoices (Logo, product, stamp, etc), you don’t need to specify the full path, it will be ready.
- Early TCPDF load
When you enable this option allows the TCPDF library to load and download earlier during the running of WordPress.
The Benefit, it helps to solve some problems or conflicts with other plugins and ensures that the library is ready before any calls to it.
- Use Print.js
If you enable this option, the plugin will use the Print.js library (a JavaScript library for printing) to print PDF files.
The Benefit, it makes printing directly from the browser easier and cleaner without opening a PDF file in a new tab.
- Use monospace font
It makes the HTML content fields in the invoice’s settings use a monospace.
The Benefit, the monospace font makes it easier to read organized codes or text (like tables or invoices that are column-aligned).
Step4:
➡Doc: Invoice Options
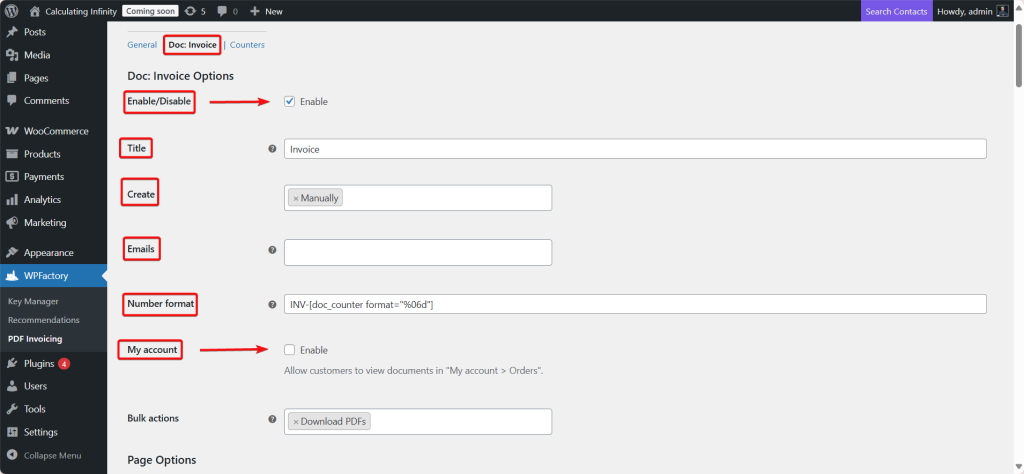
- Enable/Disable
To enable or disable PDF invoice. You can keep an invoice enabled, and in the future, disable it without uninstalling the plugin.
- Title
The title that appears on the invoice. For example, “invoice”, or you can change it to “payment notice”.
- Create
You can choose when to automatically generate the invoice.
Manually → Manual.
On new order → When creating the order.
On payment complete → When payment is complete.
On checkout order processed → When the order is completed from the payment page.
On order status … → According to the order status (Pending, Processing, Completed, Cancelled… etc).
- Emails
You specify which WooCommerce emails the PDF invoice is sent to.
- Number format
The form in which the invoice number will appear.
Default: INV-[doc_counter format=”%06d”]
This means the invoice will be like: INV-000001, and the number increases for each new invoice.
You can change the format, for example, you can set the date: INV-[Y]-[doc_counter format=”%04d”] → the result: INV-2025-0001
- Mt Account
If you enable this option, customers will be able to view and download invoices from the “My account” > Orders page on your store.
- Bulk actions
Here, you can add options to WooCommerce commands list:
-
PDFs: View invoices
-
Download PDFs: download all invoices at once.
- Page Options
From here, you can set the page size and orientations as you want.
Orientation: Page direction (Portrait = Vertical, Landscape = Horizontal).
Format: Paper size (default A4).
Custom width/height: If you need a custom size.
Margins: Margins (Top, Left, Right).
RTL: Here you can set the writing direction from right to left.
Page background image: Background image for the invoice (like official paper).
Page foreground image: Transparent foreground image (like a stamp).

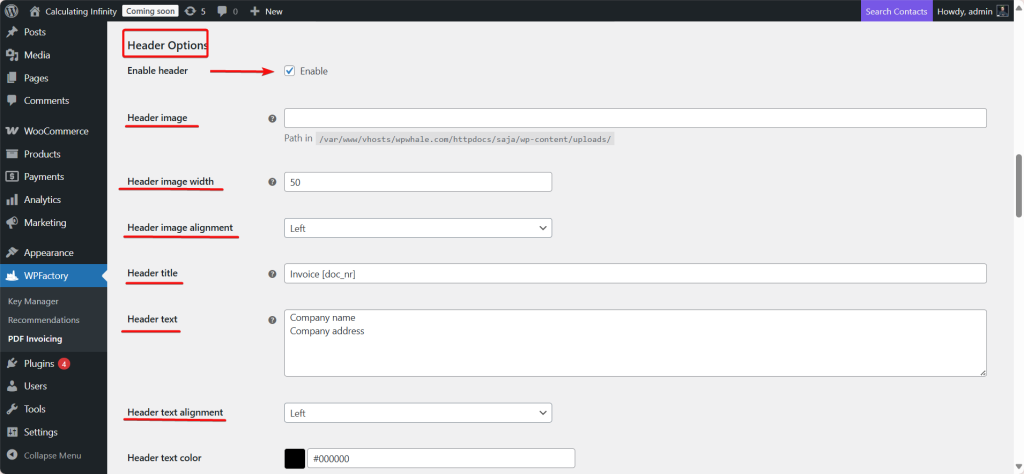
- Header Options
From here, you can customize the invoice header as you want. But the first thing you should enable it.
- Header image: Here you place the image you want. Usually your company’s logo.
- Header image width & alignment: image size and direction (Right/Left/Centre).
- Header title: like “Invoice [doc_nr]” → automatically adds the invoice number.
- Header text: your company’s information (Name + Address).
- Alignment & Colors: text direction and colors.
- Font & size: header font and size.
- Footer Options
And here the same settings are applied, but for the footer.
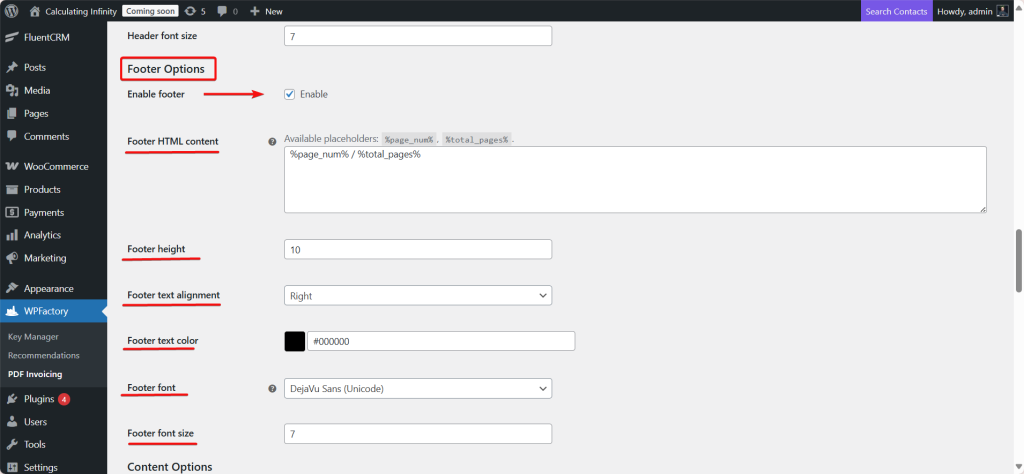
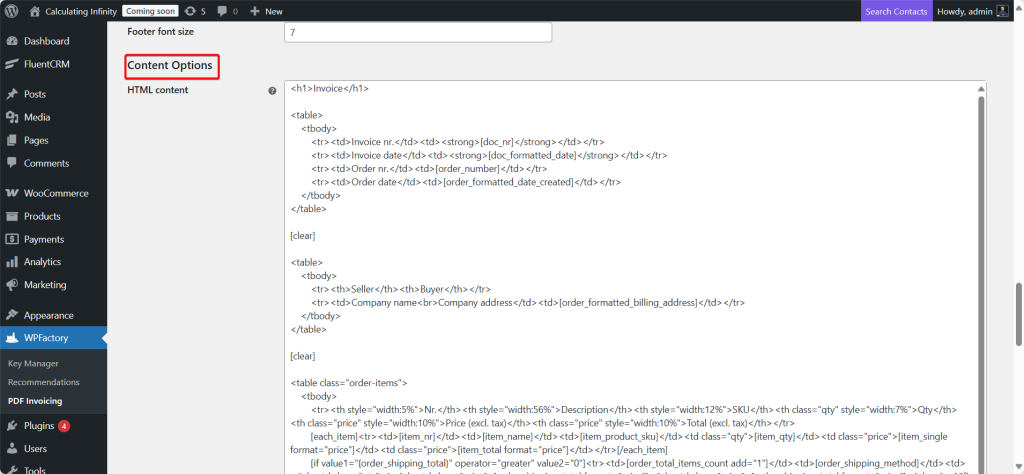
- Content Options
From here, you can customize the invoice content as you wish, the font type, color, size, and the content itself.
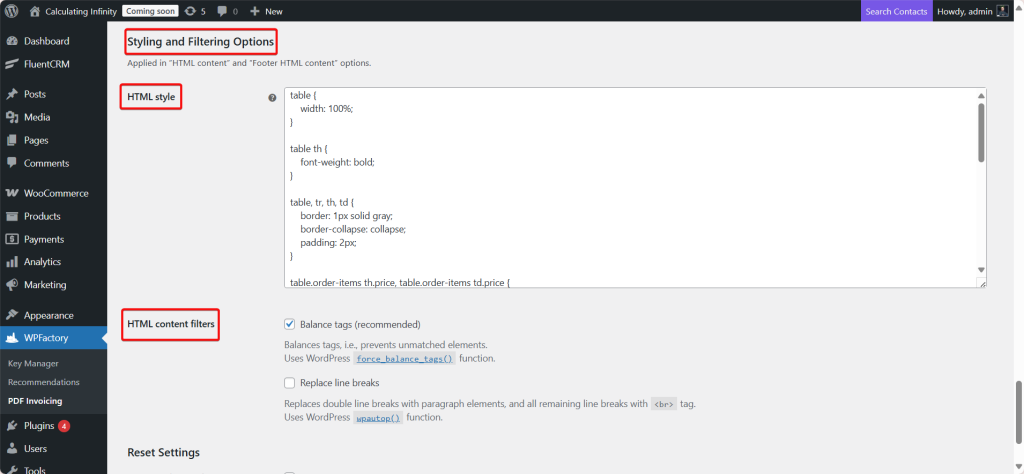
- Styling and Filtering Options
These settings are in the section for Styling and Filtering Options, meaning the styles (CSS) applied to the PDF invoice and how the system interacts with the HTML content.
1. HTML style
This section is dedicated to writing CSS to format the invoice.
2. HTML content filters
These options affect how the plugin deals with the HTML content you put in the Header, Footer, or Body of the invoice.
- Balance tags (recommended): It creates a balance for the tags to prevent issues from missing or unclosed codes.
For example: If you forget to close a <p>, the system automatically completes it.
- Replace line breaks: It converts two empty lines into <p> paragraphs. And the remaining lines to <br> tags. It makes the texts appear neatly in the invoice instead of showing as a single line.
Step5:
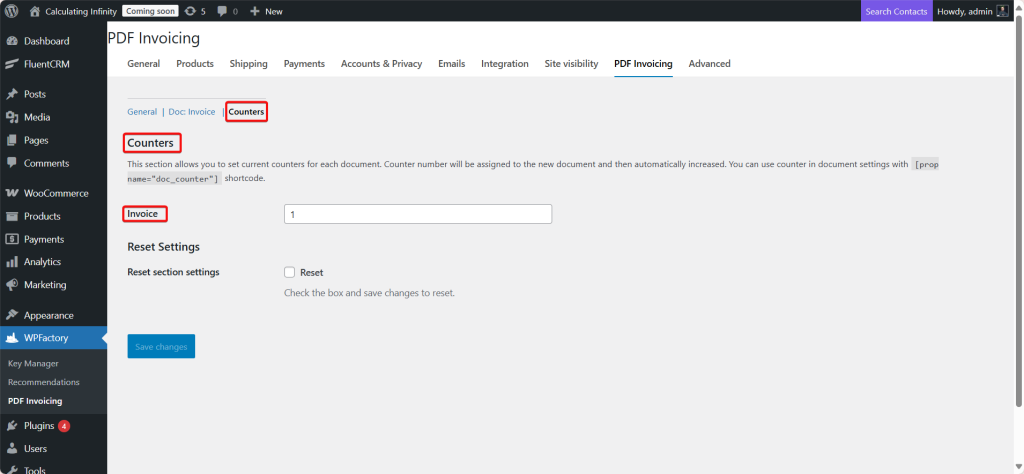
➡Counters
This section allows you to control the current document number (like the invoice number). Every time a new document (new invoice) is created, the system takes the current number and automatically increases it by +1.
Example: If you have Invoice counter = 25
➡️The next invoice will have the number 25.
➡️ After it is created, the counter will automatically become 26.
How do you use it?
In the invoice settings, you can add the number using a short code: [prop name=”doc_counter”]
Usually, you put it inside the Number format with a prefix. Example:
INV-[prop name=”doc_counter”]
The benefit:
-
It ensures a sequence of invoice numbers without interruption.
-
You can reset or change the number if you want to start from a different number (for example, if you want the first invoice to start from 1000).
-
It is suitable for stores that need legal or sequential invoice numbers according to tax requirements.
Final Thoughts
Now, you can easily create PDF documents such as invoices, packing slips, and credit notes within a few minutes. “PDF Invoices & Packing Slips Generator for WooCommerce” simplifies your billing process by automating the essential PDF documents, with the options to create them manually or automatically.
And it doesn’t end here, this tool also enhances customer communication by allowing you to add these documents directly to email attachment, or to the “my account page”. Also, don’t forget the full customization feature, which allows youto tailor the design to perfectly match your brand identity. Set it up once and let the plugin handle the rest.
Prefer watching? This short video summarizes the article in just a few minutes.