How to Add a Support Ticket System to Your WooCommerce Store
Are you still relying on email or using an external support system to manage customer support?
This may lead to lost messages, delayed responses, and a poor overall support experience. But what if you could streamline and enhance your entire support workflow within your WooCommerce store? What I mean you don’t need to any an external support system, just one powerful tool that puts everything in your hands!
By Helpdesk Support Ticket System for WooCommerce you can:
- Keep your support system inside your WooCommerce store.
- Your customers can submit and track their tickets from their “My accounts section“.
- Send email notifications to both customers and the support team, to keep everyone informed.
- Keep all communication organized in one place.
- Increase customers satisfaction by reduce response time and avoid losing customers messages.
- No technical knowledge or coding required, it’s all built in and easy to use.
Now let’s go to see how easy it is to get started with this smart tool!

Step1:
➡ Download the Plugin
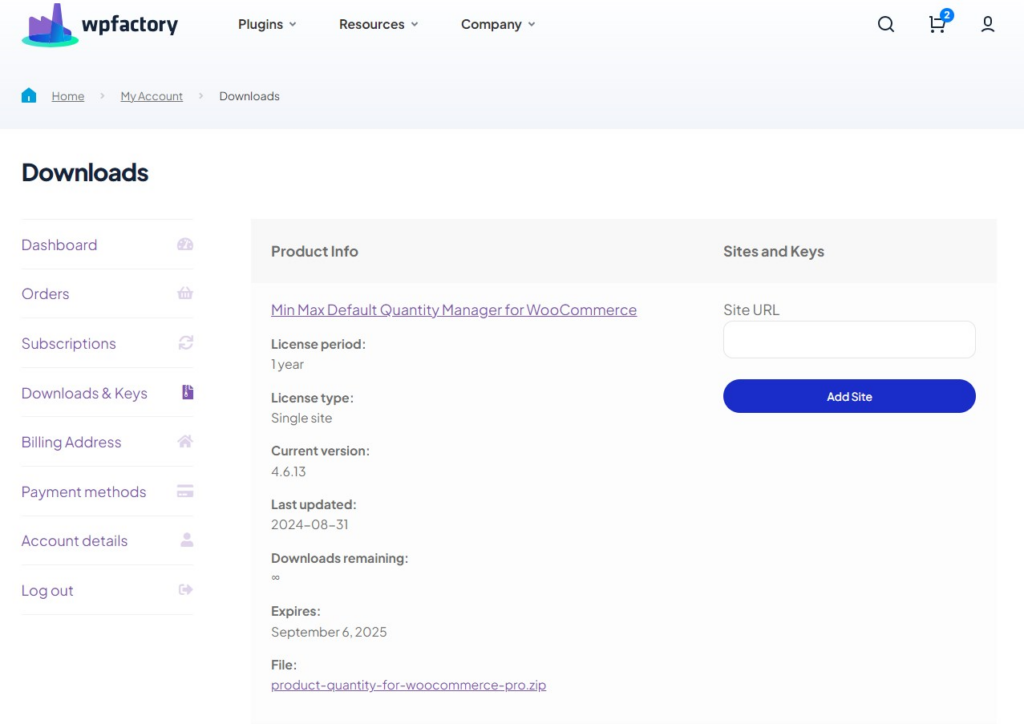
To get started, you will need to download the “Helpdesk Support Ticket System for WooCommerce” plugin, which allows you to track and support your customers’ inquiries easily.
After downloading the plugin from your WPFactory account, upload it to your WordPress site.
Step2:
➡ Access the Plugin
Once the plugin is installed and activated, you can tailor it to fit your business needs.
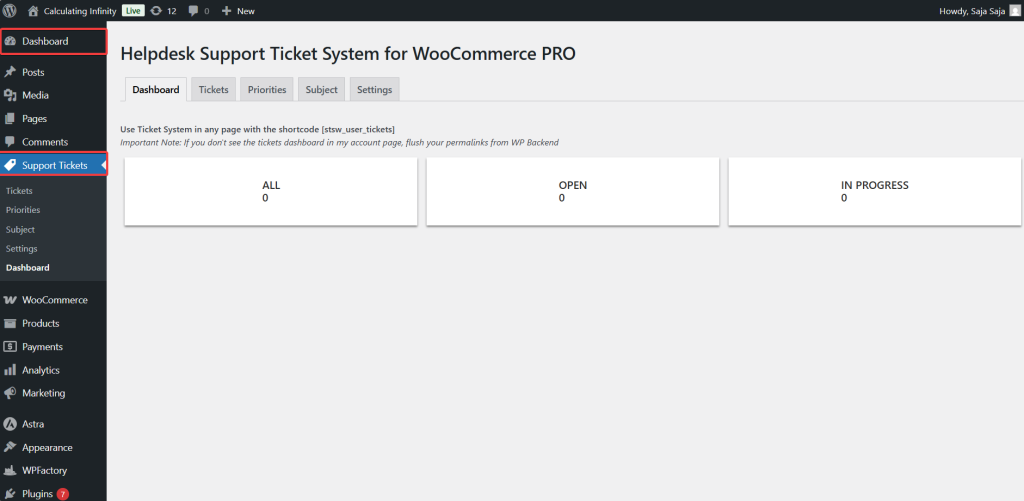
Go to WordPress dashboard > “Support tickets”
This list is the main one for full control of the ticketing system.
Step3:
➡ Dashboard
This is the general control panel. It provides you a general overview of the support tickets on your WooCommerce sites.
- All: It shows you all the open and closed tickets.
- Open: It shows you the new or unprocessed tickets.
- In progress: Shows you the tickets that are currently being work on.
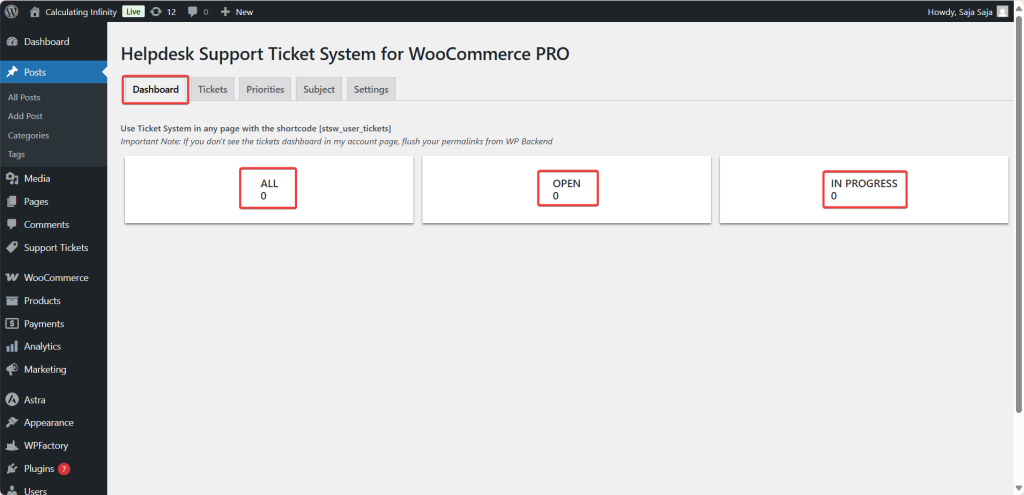
➡Use Ticket System in any page with the shortcode [stsw_user_tickets]
To display the tickets to the customers, all you need to do is take the shortcode and enter is on any page on your website.
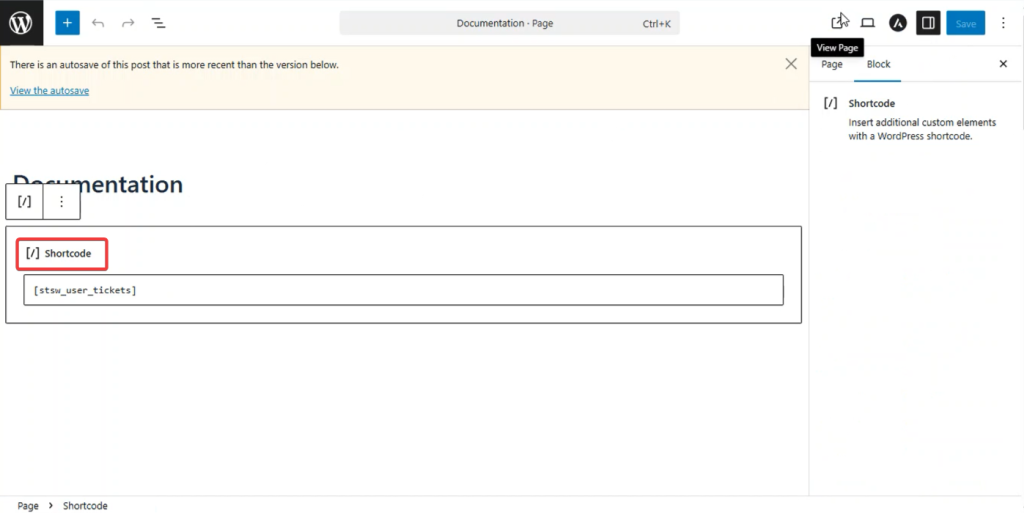
Then the ticket tab will be displayed on the customer’s account page, where they can track previous tickets and create a new one.

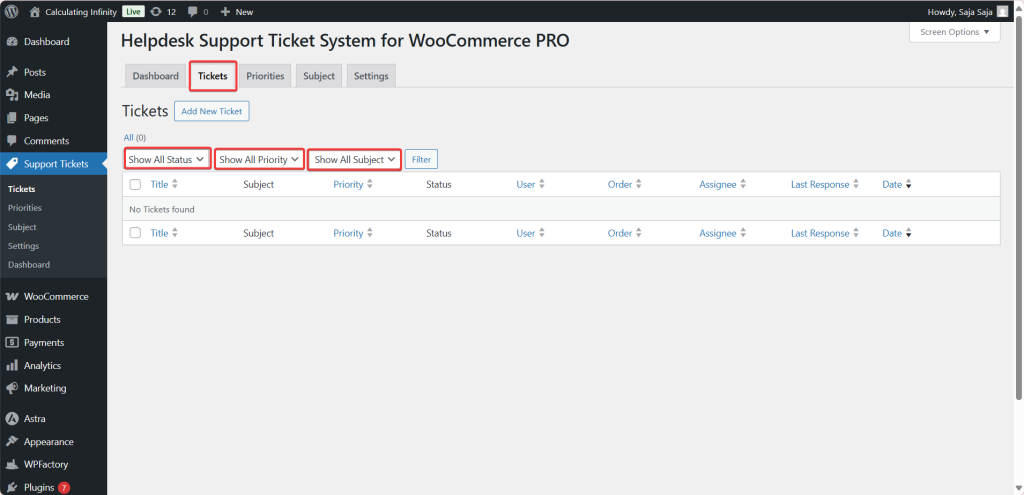
Step4:
➡ Tickets
Ticket Management Department.
Here you will find all the tickets submitted by your customers. You can reply to them, edit their details, or change their statuses as needed.
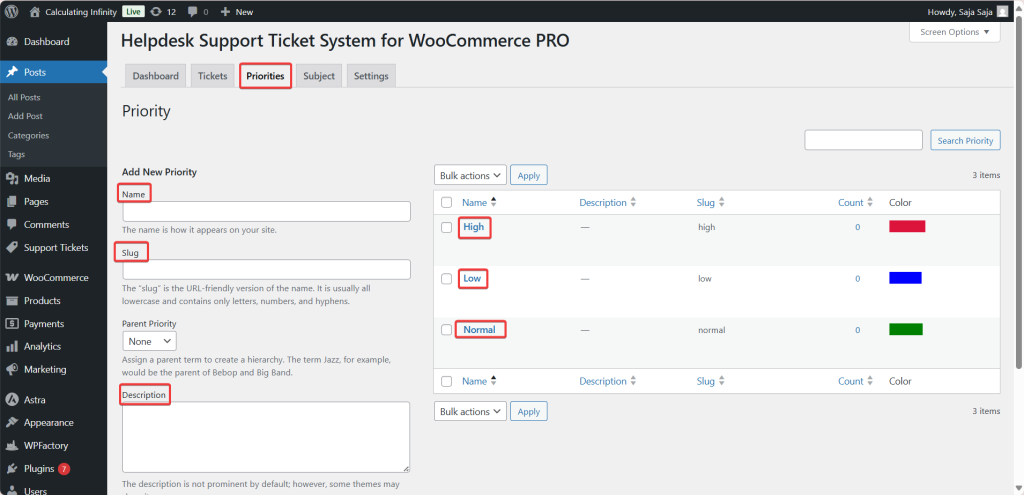
Step5:
➡ Priority
This section allows you to create and customize priority levels:
-
Normal
-
Low
-
High
To determine the importance of each ticket. You can customize the color, name, description, and slug as you want.
Step6:
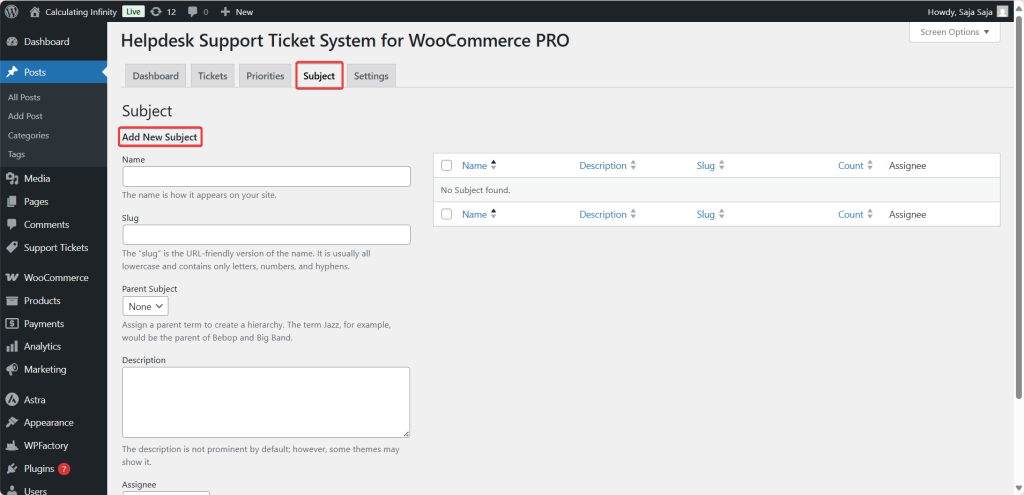
➡ Subjects
From this section, you can specify classifications or topics for tickets, such as:
-
Shipping
-
Payment
-
Technical issues
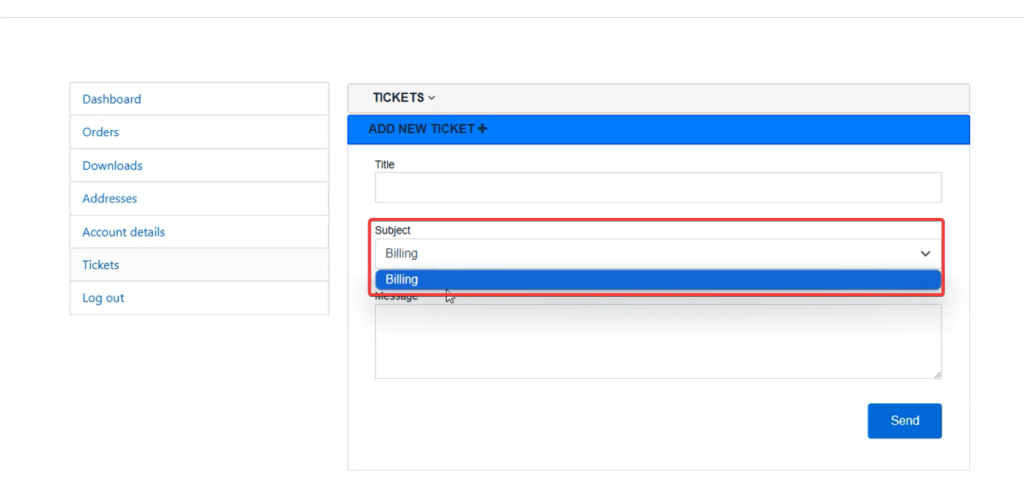
To help you organize requests better. This also makes it easier for customers to specify the subject when submitting the ticket.
The subjects will appear like this to the customer when they want to submit a ticket.
Step7:
➡ Settings
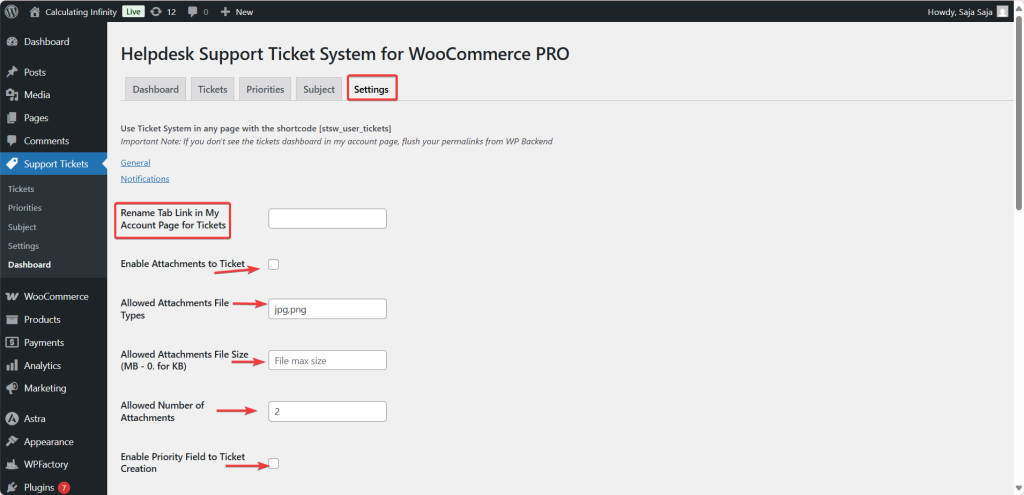
- Rename Tab Link in My Account Page for Tickets
From this option, you can change the name of the “Ticket Tab” on the customer account page to any other name, such as:
-
Support
-
Help
-
Center support
- Enable Attachments to Ticket
When this option is activated, the customer can attach files when submitting the ticket. It helps clarify some matters when they are not clear in the texts.
- Allowed Attachments File Types
From here, you can specify the types of files that can be uploaded by customers, such as JPG, PNG.
- Allowed Attachments File Size (MB – 0. for KB)
And here, you can specify the allowed file size.
For example: 2 = allows up to 2 megabytes per file
- Enable Priority Field to Ticket Creation
From this option, you can enable the priority field in the ticket submission form. So, customer can choose one of them:
-
Normal
-
Low
-
High
This helps you determine which tickets are of higher importance or urgent to start with.
- Rename Button on Orders Table in My Account Page for Tickets
From here, you can change the name of the button next to each order on the “My orders”, which links the order to support ticket.
- Show only Open in Frontend
When this option is enabled, the customer can only see the open tickets from their account and doesn’t see the closed tickets or those that have been responded to.
- Default User Role for Ticket Assignment
This option allows you to specify a default user role, such as store manager, to automatically assign new tickets if no specific support agent is set. It helps ensure no ticket goes unassigned.
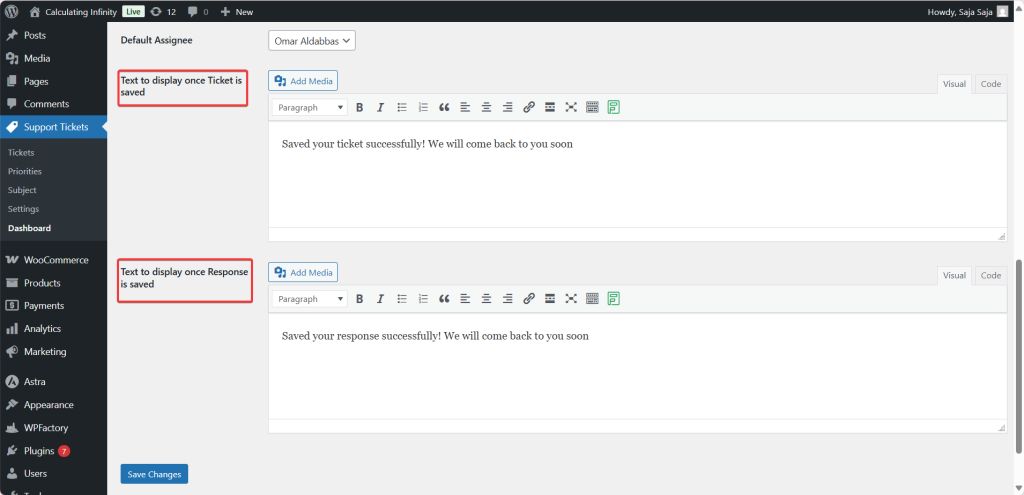
- Default Assignee
This means the default person to whom the ticket will be automatically assigned.
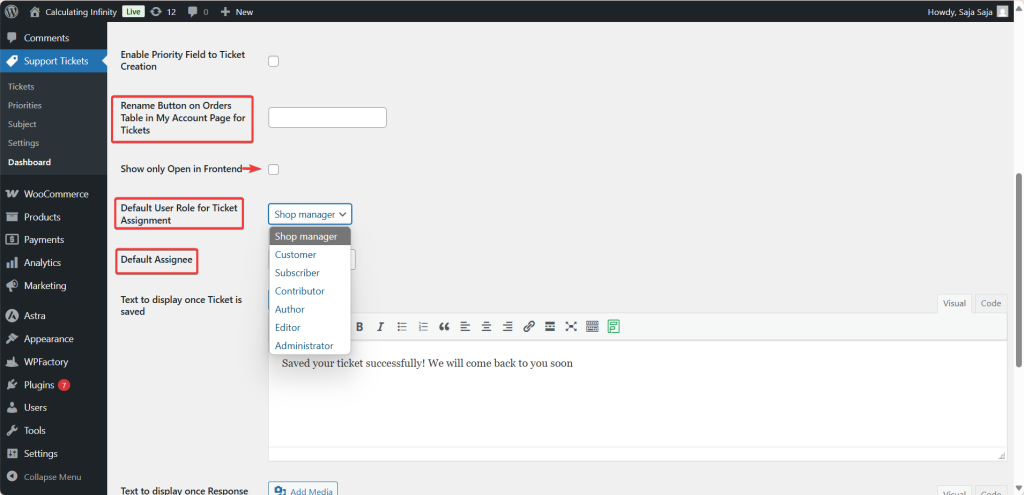
- Text to display once Ticket is saved
This option shows you the text that appears to the customer after the ticket has been successfully submitted. You can customize it as you want.
For example: Thank you! Your ticket has been submitted successfully.
- Text to display once Response is saved
From here, you can customize the text that appears after sending the response to the ticket.
Final Thoughts
Now, managing customer support process doesn’t have to be complicated anymore. The support system now in your hands without needing to any technical skills or coding.
All you need to do is install the “Helpdesk Support Ticket System for WooCommerce” plugin and follow the steps above, and the entire support system will be up and running inside your WooCommerce store in just few minutes, from ticket tracking and email notification to full customization, a user-friendly interface, and all the tools you need to make the support process easier and faster.
Prefer watching? This short video summarizes the article in just a few minutes.