How to Add WooCommerce to WordPress
So you’ve decided to upgrade your store from just a simple blog into a fully functioning e-commerce store, and now you’re wondering how to do it?
Turning your website into e-commerce is a move in the right direction, as the e-commerce industry revenues are steadily increasing year over year, so why don’t you get your share of the cake?

In this article we will discuss every detail you need to know to add WooCommerce to WordPress and expert tips for running a successful e-commerce store, so let’s start.
What is WooCommerce?
WooCommerce is a powerful and popular WordPress plugin that empowers users to transform their standard WordPress websites into fully functional and feature-rich online stores.
Developed by WooThemes and later acquired by Automattic, the company behind WordPress.com, WooCommerce provides a seamless and customizable e-commerce solution that caters to a wide range of businesses, from small startups to large enterprises.
WooCommerce is an open-source plugin, which means it is freely available for anyone to download, use, and modify. Its open nature encourages a robust community of developers and contributors, resulting in regular updates, improved features, and a wealth of extensions.
Built specifically for WordPress, WooCommerce seamlessly integrates into the existing structure of your WordPress website. This integration ensures a user-friendly experience for both site owners and visitors.
One of WooCommerce’s strengths lies in its intuitive and user-friendly interface. It simplifies the process of setting up and managing an online store, making it accessible even to those without extensive technical expertise.
WooCommerce is an extremely powerful and highly customizable e-commerce platform that offers lots of features and flexibility and allows for customization so it fulfills your needs properly.
Requirements and Installation of WooCommerce
The requirements of WooCommerce to be installed on your site are pretty simple, you will need to have a WordPress site that is up to date to the latest version to avoid any conflicts or issues.
Installation of WooCommerce is also an easy process:
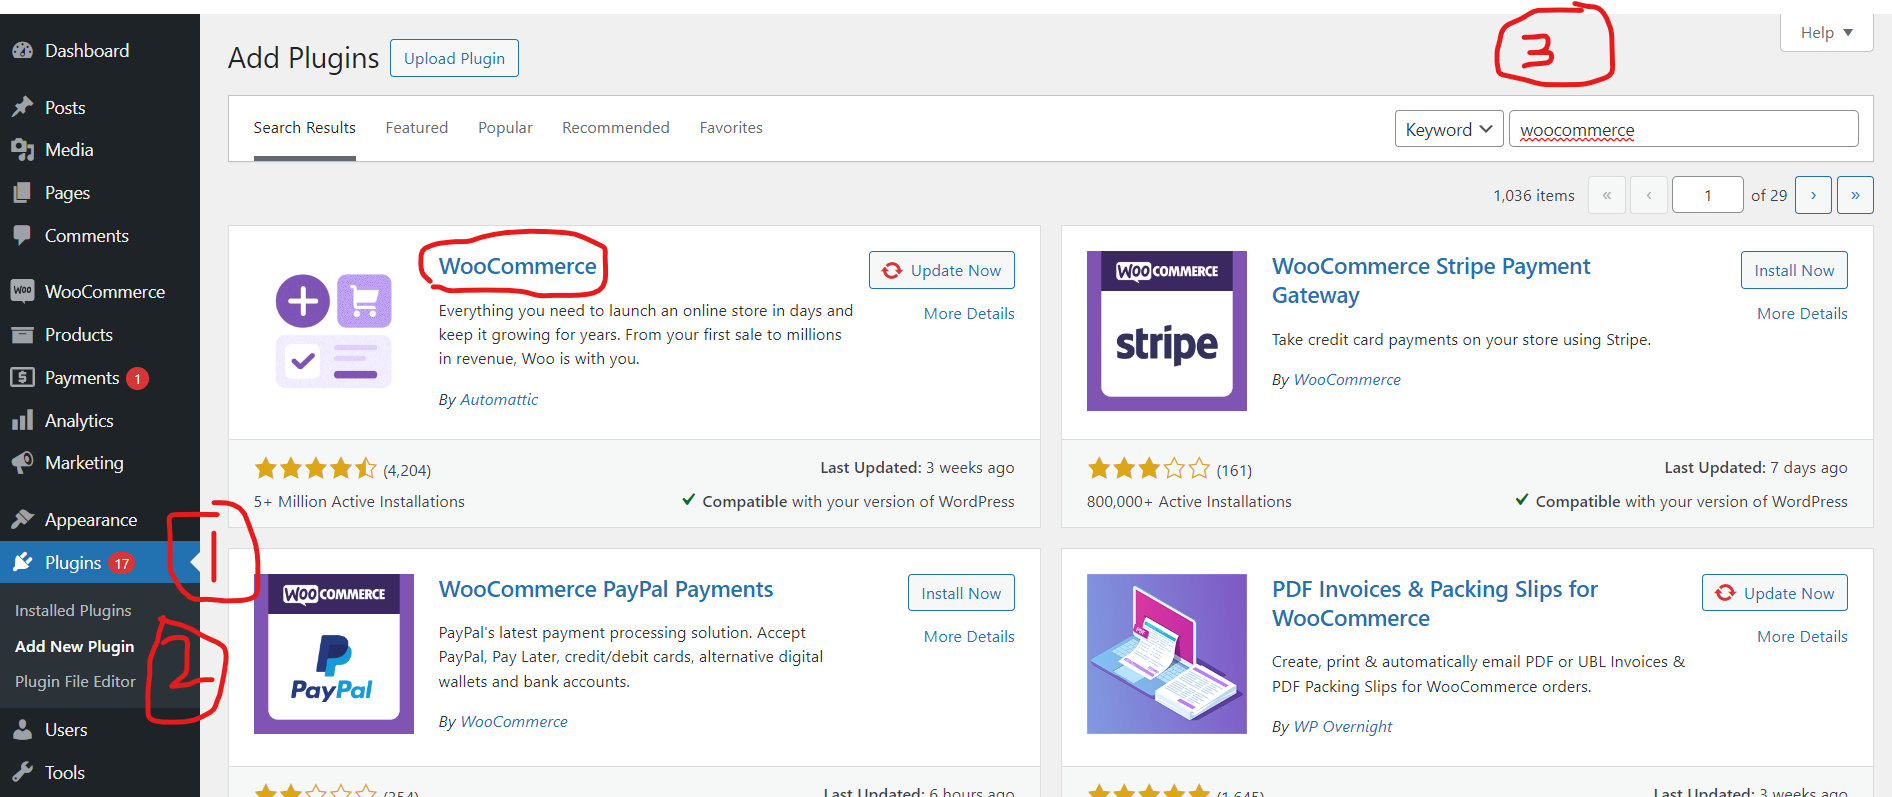
- Login to your WordPress dashboard
- Go to plugins -> add new
- Search for “WooCommerce”
- Install and activate the plugin
Upon activation, WooCommerce will automatically launch the Setup Wizard. If not, you can find it by navigating to WooCommerce > Settings. The wizard is usually triggered for first-time users or after major updates.
The wizard will begin by asking for basic information about your store, such as its name, address, and the type of products you plan to sell. Fill in the necessary details.
You might be asked to select your industry type or the category of products you intend to sell. This helps WooCommerce tailor settings based on your business type.
Specify the types of products your store will offer, such as physical goods, digital downloads, or services.
Configure basic shipping settings, including choosing a default shipping method, setting up shipping zones, and determining shipping costs.
Set up payment gateways. Choose from various options like PayPal, Stripe, or other popular gateways, and configure the necessary settings.
And with this, you will have a running WooCommerce store on your WordPress site.
Adding Products to Your E-commerce Store
Adding products to your WooCommerce store involves a straightforward process through the WordPress dashboard. Here’s a step-by-step guide to help you with the product creation process, including product titles, descriptions, images, and pricing:
- Log in to your WordPress admin dashboard.
- In the left-hand menu, go to “WooCommerce” and select “Products.”
- Click the “Add New” button at the top of the Products page.
- Enter the product title in the provided field. This is the name of your product.
- Below the title, there is a larger text box where you can enter a detailed product description. This is where you can provide information about the product, including its features, specifications, and any other relevant details.
- Product Data:
- On the right side of the screen, you’ll find the “Product Data” box. Here, you can configure various settings for your product.
- Product Type: Choose the type of product you are adding, such as Simple Product, Grouped Product, External/Affiliate Product, or Variable Product (if your product has variations like different sizes or colors).
- General Tab: Set the regular price, sale price (if applicable), and tax status.
- Inventory Tab (if applicable): Manage stock levels and enable/disable stock management.
- Shipping Tab: Configure shipping options and weight if your product requires shipping.
- Linked Products Tab: Set up upsells or cross-sells if needed.
- Attributes Tab (for Variable Products): Define product variations, such as different sizes or colors.
- On the right side of the screen, you can assign your product to one or more categories. This helps organize and categorize your products. You can also add tags to further classify your products.
- In the product image box, you can set a featured image for your product. Click on “Set product image,” upload an image from your computer, and set it as the featured image.
- Once you have filled in all the necessary information, click the “Publish” button to make your product live on the website.
- Before publishing, you may want to preview your product by clicking the “Preview” button to ensure everything looks as expected.
- If you need to make changes to a product later, you can always go back to the Products page, find the product, and click on it to edit.
Summary:
WooCommerce is an e-commerce plugin to turn your WordPress site into an e-commerce store, you can install WooCommerce using the plugin section in WordPress, once you install the plugin you will turn to the setup wizard to setup all the necessary information for your store and get it going.
Once you installed the store you can add and manage the products from the “products” section in the left-hand menu on WordPress, you can add new products by clicking on “add new” and filling in all the required details.
Turning your WordPress blog into an eCommerce store is a worthwhile experience and an additional method for monetizing the traffic that already reads your blog, I hope this post helped guide you through the installation process of WooCommerce.