
Table of Contents
Settings
“My Account Customizer for WooCommerce” plugin lets you customize “My account” page in WooCommerce.
Main Features
- Fields – Adds custom fields to the “My account > Account details” tab in frontend, and to the user profile page in backend.
- Tabs – Adds custom tabs to the “My account” page.
- Shortcodes.
- Advanced options.
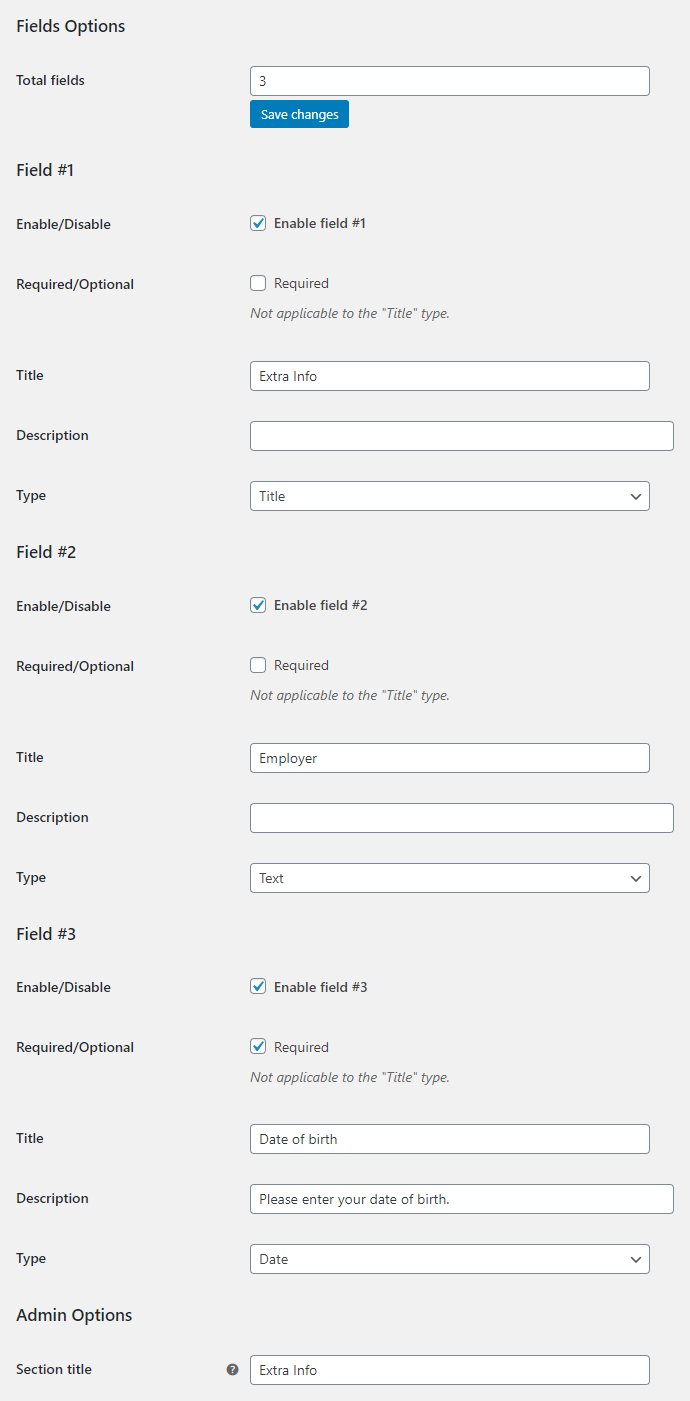
Fields Options
Adds custom fields to the “My account > Account details” tab in frontend, and to the user profile page in backend. Settings are located in “WooCommerce > Settings > My Account Customizer > Fields”.
- Enable section
- Enables/Disables the “Fields” section.
- Default:
no
- Default:
- Total fields
- Sets total number of fields. New settings fields will be displayed if you change this option and “Save changes”.
- Default:
1
- Default:
Field Options
These options are set for each field individually.
- Enable/Disable
- Enables/disables the current field.
- Default:
yes
- Default:
- Required/Optional
- Sets if current field is required or optional. Not applicable to the “Title”, “Gravatar” types.
- Default:
no
- Default:
- Title
- Sets current field title. You can use shortcodes here.
- Default:
Field #X
- Default:
- Description
- Sets optional field description. You can use HTML and shortcodes here.
- Default: None
- Type
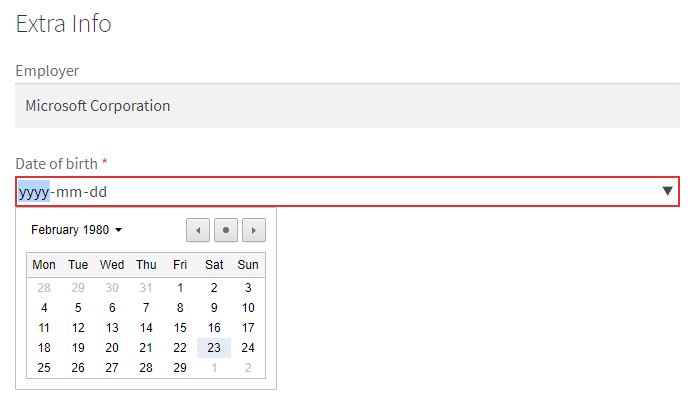
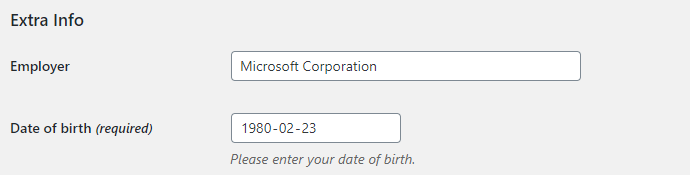
- Sets current field type. Possible values: Color; Date; Email; Month; Number; Password; Range; Tel; Text; Time; URL; Week; Gravatar (Profile Picture); Title.
- Default:
Text
- Default:
Admin Options
Options regarding “Users” menu in admin section.
- Section title
- Fields section title in backend.
- Default:
Extra Profile Fields
- Default:
Notes
As “Gravatar” type is not editable on frontend, we suggest adding something like this to the “Description”:
<a href="https://en.gravatar.com/">You can change your profile picture on Gravatar</a>
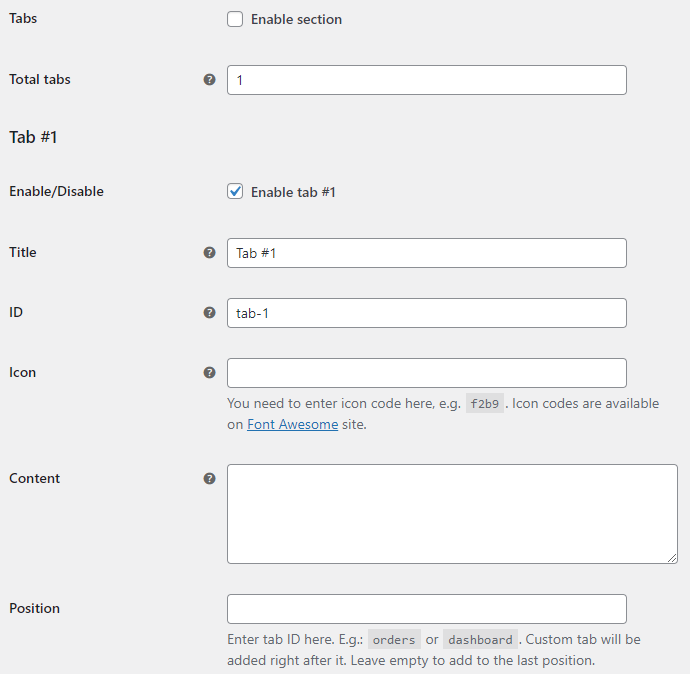
Tabs Options
Adds custom tabs to the “My account” page. Settings are located in “WooCommerce > Settings > My Account Customizer > Tabs”.
- Enable section
- Enables/Disables the “Tabs” section.
- Default:
no
- Default:
- Total tabs
- Sets total number of custom tabs. New settings fields will be displayed if you change this option and “Save changes”.
- Default:
1
- Default:
Tab Options
These options are set for each custom tab individually.
- Enable/Disable
- Enables/disables the current tab.
- Default:
yes
- Default:
- Title
- You can use shortcodes here. E.g.:
[alg_wc_mac_translate].- Default:
Tab #X
- Default:
- ID
- You can use shortcodes here. E.g.:
[alg_wc_mac_translate].- Default:
tab-x
- Default:
- Icon
- Will use the default icon if empty. You need to enter icon code here, e.g.
f2b9. Icon codes are available on Font Awesome site.- Default: None
- Content
- You can use HTML and shortcodes here. E.g.:
[alg_wc_mac_user_comments],[alg_wc_mac_translate], etc.- Default: None
- Position
- Enter tab ID here. E.g.:
ordersordashboard. Custom tab will be added right after it. Leave empty to add to the last position.- Default: None
Shortcodes
Plugin includes these shortcodes:
[alg_wc_mac_user_comments]
[alg_wc_mac_translate]
[alg_wc_mac_user_comments]
[alg_wc_mac_user_comments] shortcode will output all current user’s comments. For example, you could create a custom tab in “My account”, and add this shortcode to the “Content” option.
Shortcode support these attributes:
Query attributes
type – type of comments you want to display, e.g. review, comment, etc. Can be set as comma-separated list of different types.
orderby – sets sorting for the comments.
order – can be ASC or DESC.
number – sets number of comments you want to output (i.e. limit).
Output attributes
before – outputted before the final result. Default value:
</p> <p>Date Content
after – outputted after the final result. Default value:
</p> <p>row – template for the row. Default value:
%comment_date%%comment_content%</p> <p>You can use these placeholders in row:
%comment_nr%
%comment_ID%
%comment_post_ID%
%comment_date%
%comment_content%
%comment_karma%
%comment_approved%
%comment_type%
%comment_parent%
%comment_status%
%comment_link%
%comment_parent_link%
%comment_post_link%
%comment_post_title%
So, for example, if you need to output all “Reviews” posted by current user:
[alg_wc_mac_user_comments type=”review”]
[alg_wc_mac_translate]
[alg_wc_mac_translate] shortcode allows you to translate texts on your multi-language site. It supports WPML and Polylang plugins. For example, if you want field’s text to be different for different languages, you can set field’s “Title” option to something like this:
[alg_wc_mac_translate lang=”EN,DE” lang_text=”Field title for EN and DE” not_lang_text=”Field title for other languages”]
or in more complex form:
[alg_wc_mac_translate lang=”EN,DE”]Field title for EN and DE[/alg_wc_mac_translate][alg_wc_mac_translate not_lang=”EN,DE”]Field title for other languages[/alg_wc_mac_translate]
Advanced Options
Advanced settings are located in “WooCommerce > Settings > My Account Customizer > General”.
- Load shortcodes
- Will load plugin shortcodes, e.g. [alg_wc_mac_user_comments], [alg_wc_mac_translate], etc.
- Default:
yes
- Default:
- Load "Font Awesome"
- Will load “Font Awesome” library on the “My account” page. Only mark this if you are not loading “Font Awesome” anywhere else. “Font Awesome” is responsible for creating icons.
- Default:
no
- Default:
- "Font Awesome" library URL
- Default:
//cdnjs.cloudflare.com/ajax/libs/font-awesome/5.11.2/css/all.min.css
- Default: