How to Set Min & Max Quantity in WooCommerce
Do you run a WooCommerce store and want greater control over the quantities of products your customers can purchase? Whether you want to encourage customers to buy more or set limits on how much they can purchase.
WooCommerce Quantity Manager – Min Max Step Quantities Plugin from WPFactory is the perfect solution. This plugin allows you to set minimum and maximum limits, and default product quantities for customers.
This gives you practical and flexible control over the number of products in your store. So, if you want to manage bulk orders, sell individual units, or enhance the shopping experience for your customers, this plugin provides clear and user-friendly solutions and helps you prevent customers from ordering too few or too many times.
So, in this article I’ll walk you through how to install this plugin and how to use it in a simple way.
Let’s get started!
Step1:
➡ Download the Plugin
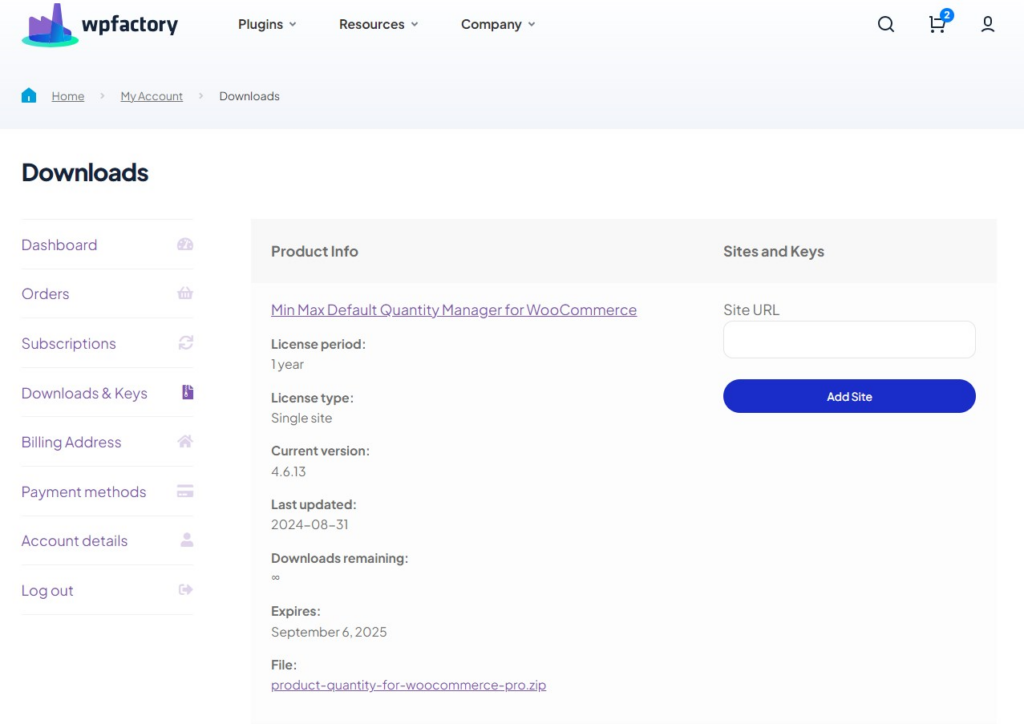
To get started, you will need to download the “WooCommerce Quantity Manager – Min Max Step Quantities Plugin” plugin, which gives you the flexibility to control product quantities through simple steps.
After downloading the plugin from your WPFactory account, upload it to your WordPress site.
Step2:
➡ Access the Plugin
Once the plugin is installed and activated, you can tailor it to fit your business needs.
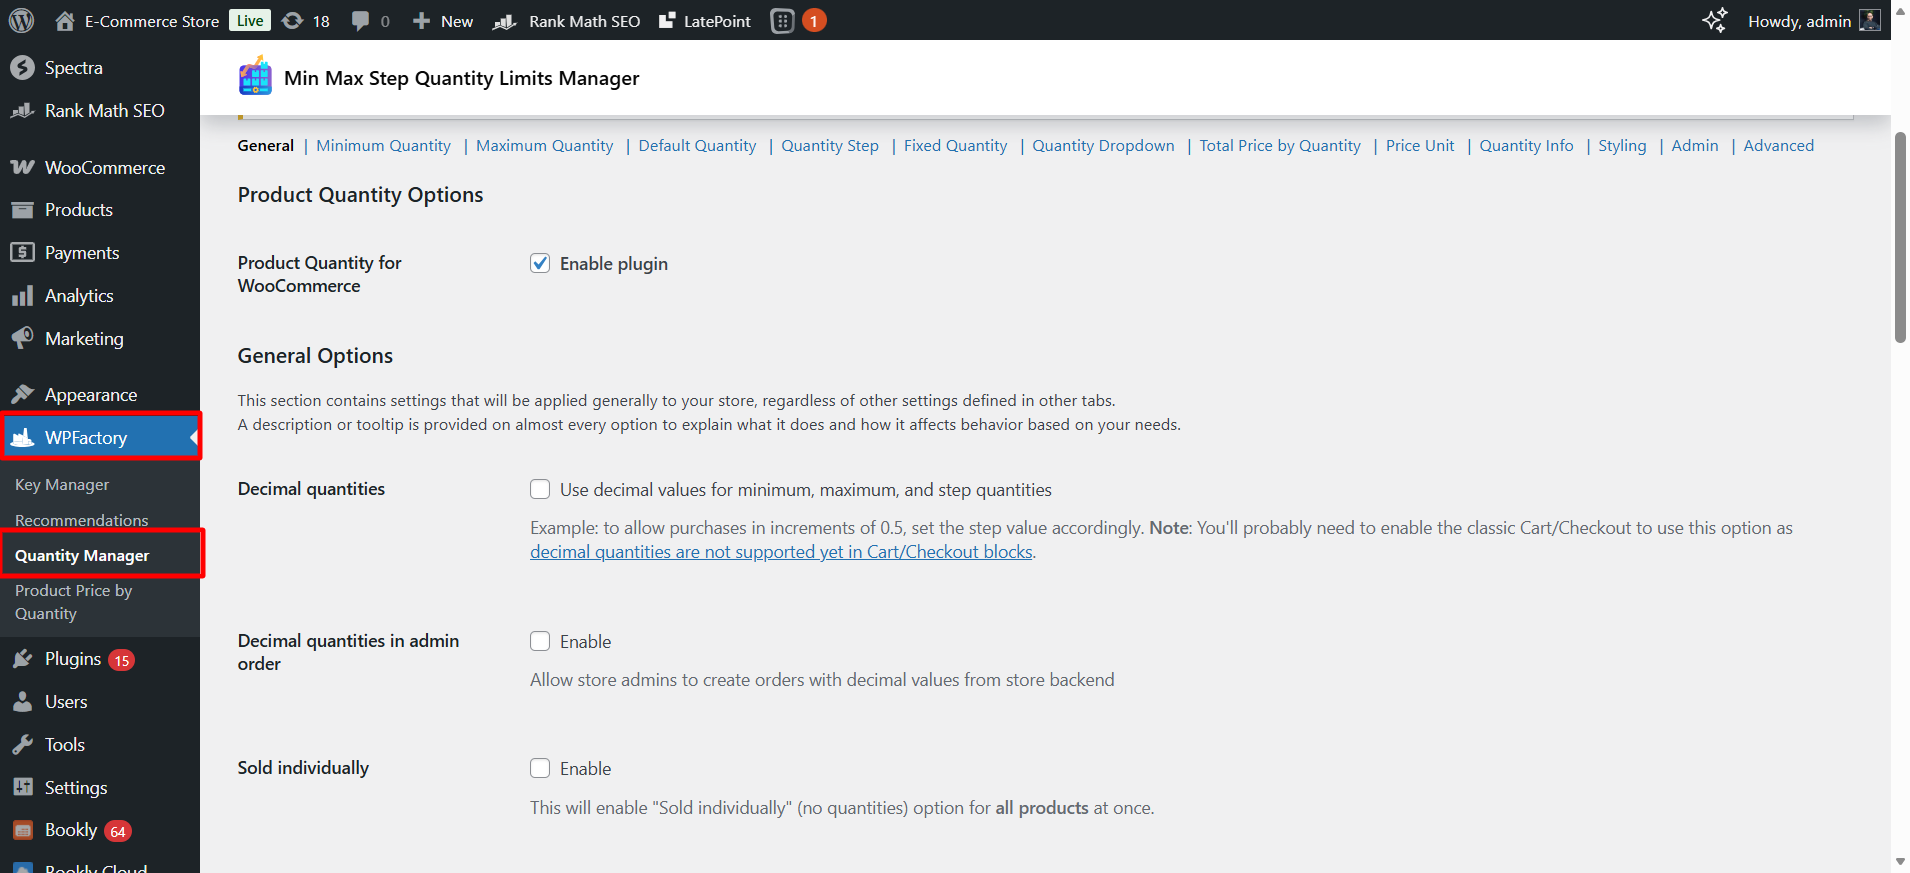
Go to WordPress dashboard > WPFactory > “Quantity Manager”.
Step3:
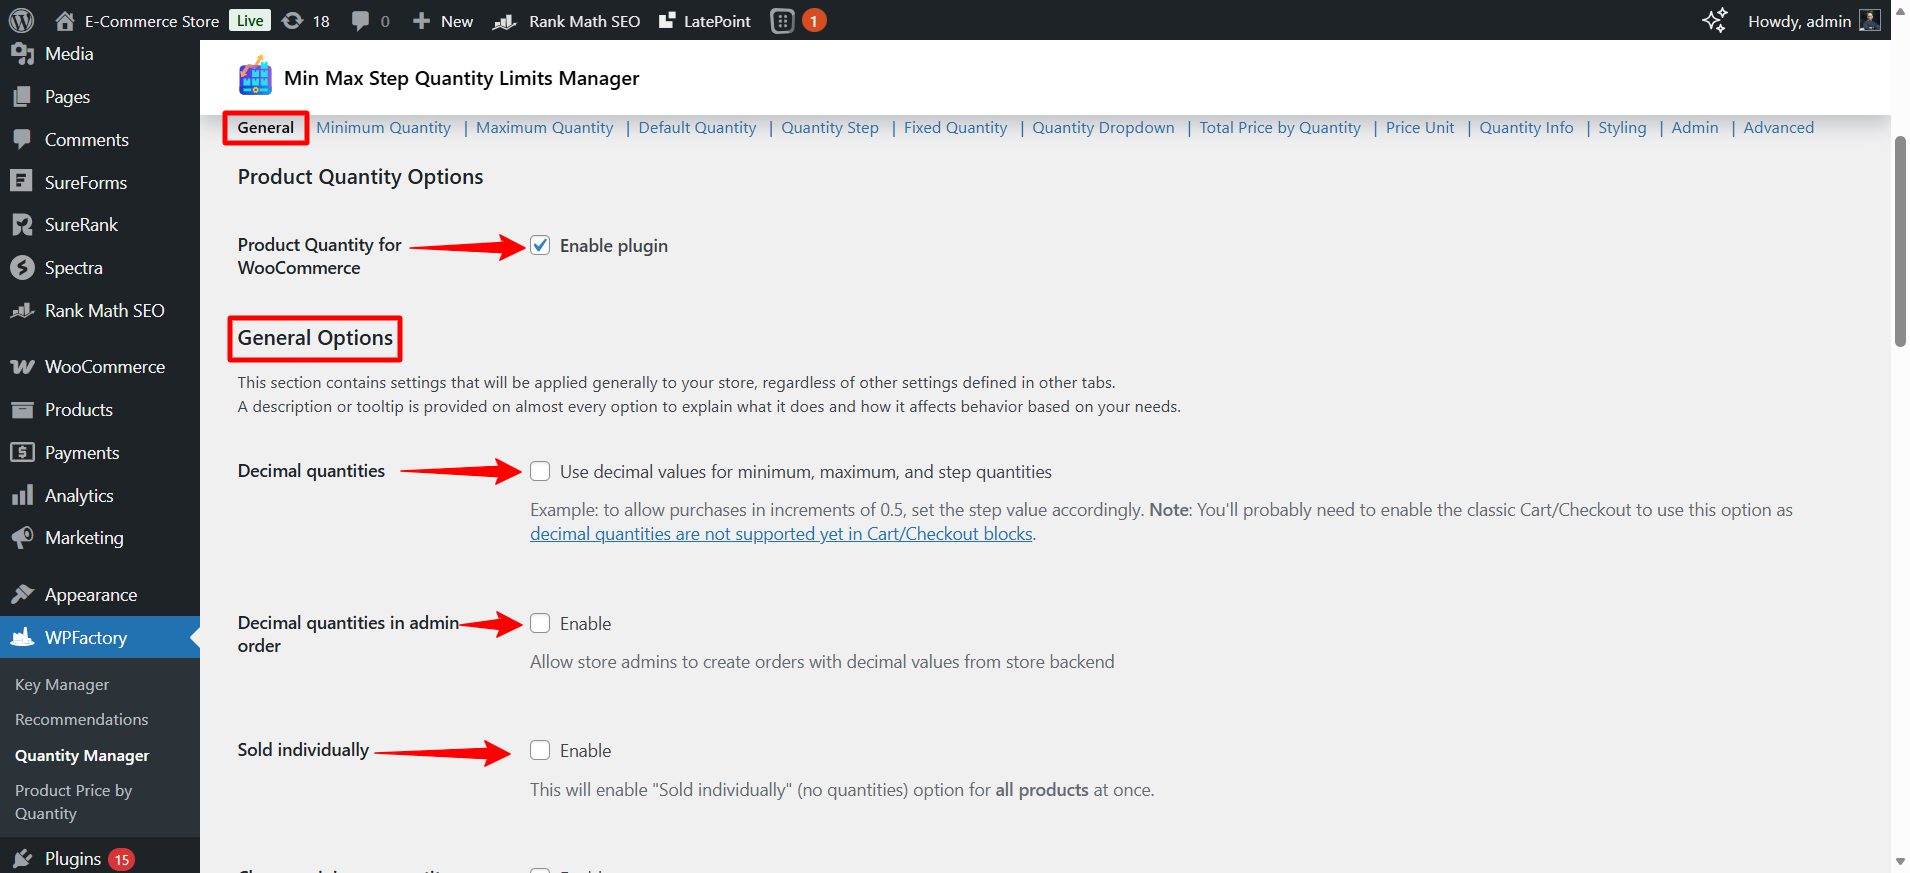
➡ General
These general settings apply to the entire store.
- Enable plugin
First thing, you should activate the plugin to control product quantities on your store.
- Decimal quantities
This option allows you to use decimal numbers in the min/max, and quantity step.
Example: If you want the customer to buy 0.5, 1.5, or 2.5 kilos → set Step = 0.5
- Decimal quantities in admin order
This option allows the store management to handle orders with decimal quantities from the backend. It is useful if you sell products by weight or measurement.
- Sold individually
If you want to sell only one piece of the product per customer, the “Sold individually” option allows you to sell a single item of the product to each customer (Without the possibility of increasing the quantity).
This option is useful for exclusive or limited products.
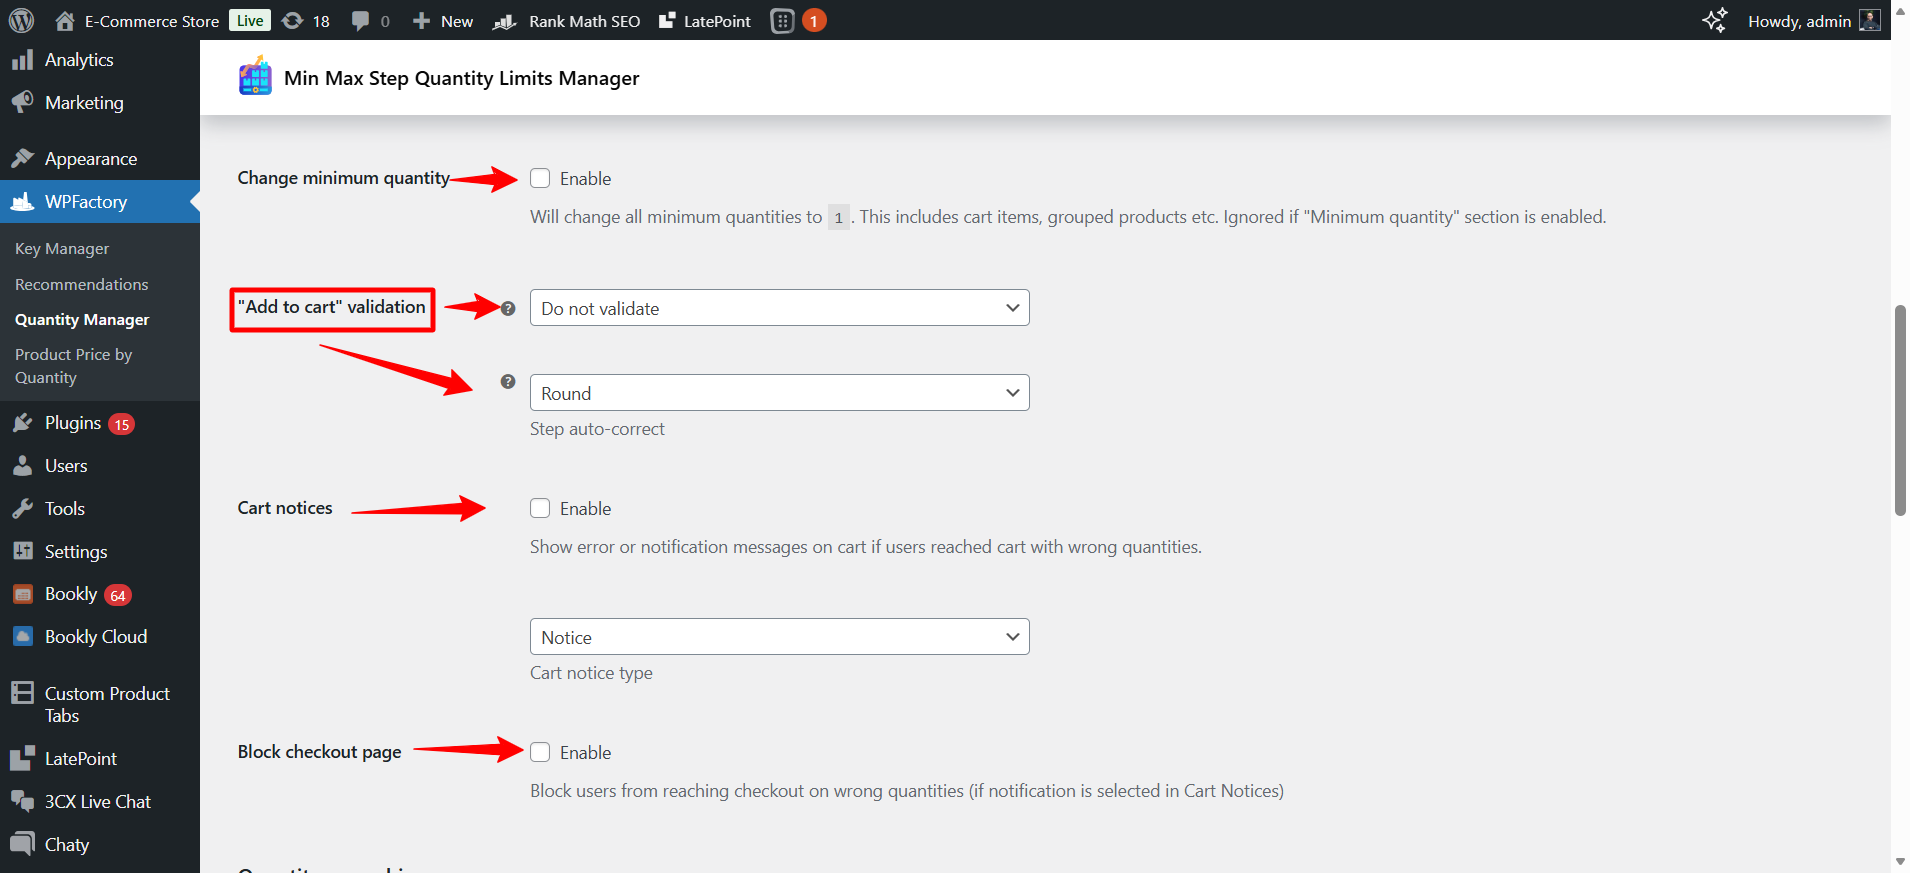
- Change minimum quantity
When you enable this option, it will change the minimum for all products to 1.
This option applies to:
-
Simple products.
-
Grouped products.
-
Cart items.
Note: It will be ignored if you have enabled the Minimum Quantity settings in a separate section.
- “Add to cart” validation
By this option, you can specify how the system should behave if the customer enters an incorrect quantity.
Options:
Do not validate → No validation, accepts any number.
Round → Rounds the number to the nearest integer according to the specified step.
Step auto-correct → Automatically adjusts the quantity to match the step value.
For example: If Step = 5 and the customer entered 7 → the system adjusts it to 5 or 10 depending on the settings.
- Cart notices
If the customer reaches the cart with the wrong quantity, an error message or alert will be shown.
Enable → Enable messages
Cart notice type → Specify message type (error or alert)
- Block checkout page
If you enable this option, it will prevent the customer from accessing the payment page if the quantities are incorrect.
Useful for avoiding orders that violate the rules.
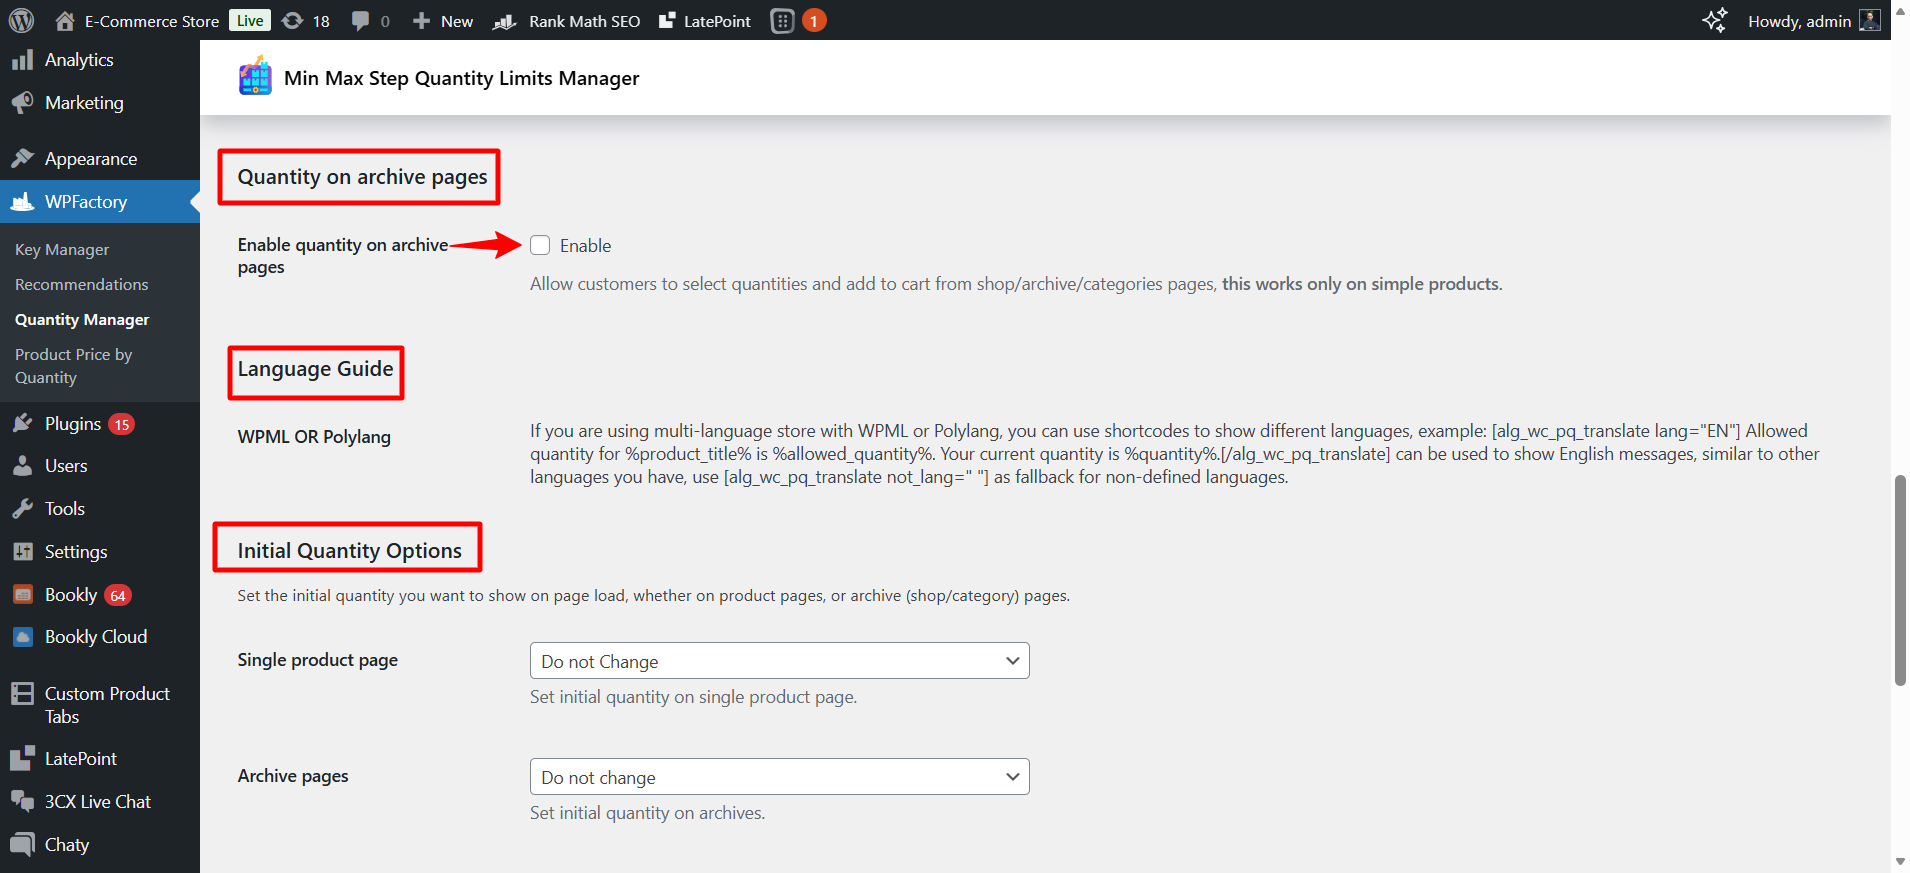
Quantity on archive pages
- Enable quantity on archive pages
This option allows the customer to select the quantity and add it to the cart directly from:
-
The shop page
-
Category pages
-
Archives
Note: Works only with simple products.
Useful for speeding up purchases, especially in wholesale stores.
Language Guide
If your store is multilingual, you can use shortcodes to display different messages depending on the language.
Initial Quantity Options
From here, you can choose which number appears as soon as you open the product page.
- Single product page: Set the default quantity on the product page.
- Archive pages: Set the default quantity on store pages or categories.
Useful if you want the quantity to start, for example, at 5 instead of 1.
Step4:
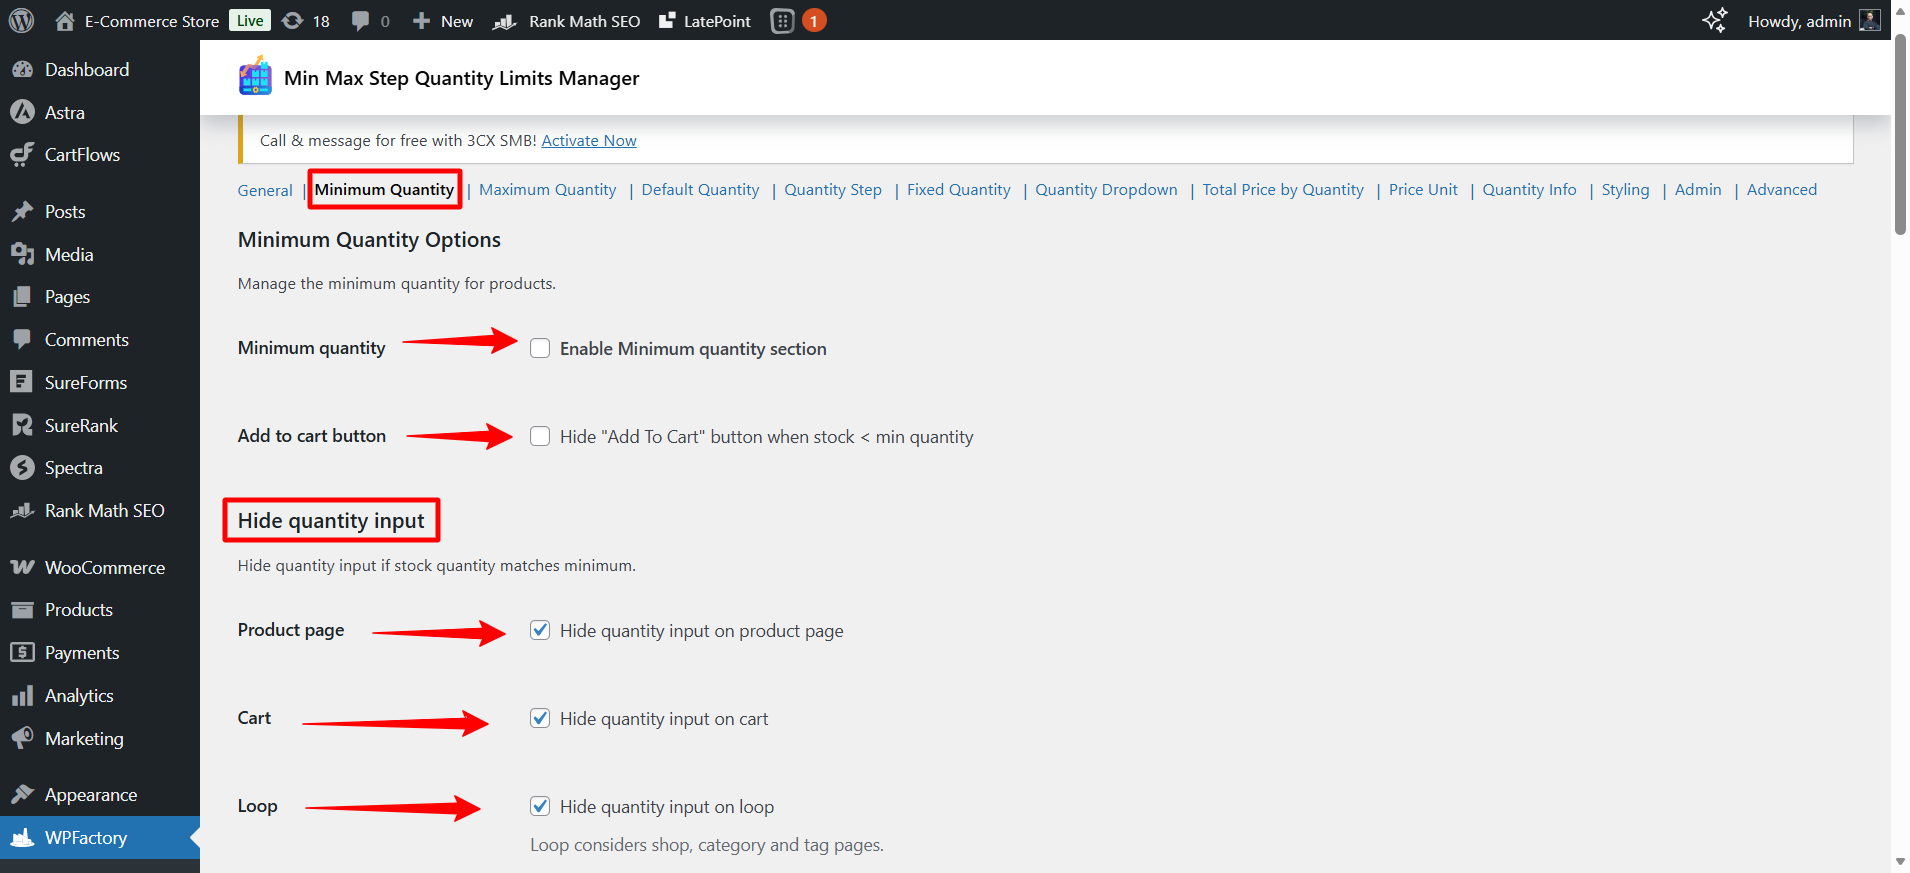
➡Minimum Quantity
This section is dedicated to managing the minimum quantity, whether at the product level, cart, category, or even attributes.
- Minimum quantity
When you enable this option, it activates the minimum quantity control system in the store.
- Add to cart button
If the stock is below the set minimum → hide the “Add to cart” button.
Useful if you don’t want the customer to ask for a smaller quantity than required.
Hide quantity input
If the quantity in the stock is equal to the minimum → the quantity input field is hidden.
This means the customer buys only the available quantity without any modifications.
You can hide the quantity field from certain places:
- Product page: Hide it from the product page.
- Cart: Hide it from the cart page.
- Loop: Hide it from the shop, categories, and tags page.
Useful if you want to set specific quantities without allowing the option to modify them.
Cart Total Minimum Quantity Options
(Minimum total basket)
This option sets a minimum total number of products in the cart, regardless of the number of different products.
For example: An order can only be completed if the total number of items in the cart is at least 20.
- Cart total quantity
This is where the required number is specified
- Message
You can customize the error message using:
%min_cart_total_quantity% → the required minimum
%cart_total_quantity% → the current quantity in the cart
Example:
Minimum allowed order quantity is 20. Your current order quantity is 12.
Per Item Minimum Quantity Options
From here, you can set the minimum limit for each product.
- All products
If you put a number here → all products must be sold at this minimum (separately, not combined).
For example:
Each product must be purchased with a minimum of 5 pieces.
- Per product
If you do it:
– A Meta Box will appear within the edit page of each product.
– You can set a different Minimum for each product.
Very useful if each product has a different quantity policy.
- Messages
You can specify the error message using:
-
%product_title% -
%min_per_item_quantity% -
%item_quantity%
Example:
Minimum allowed quantity for T-Shirt is 5. Your current item quantity is 2.

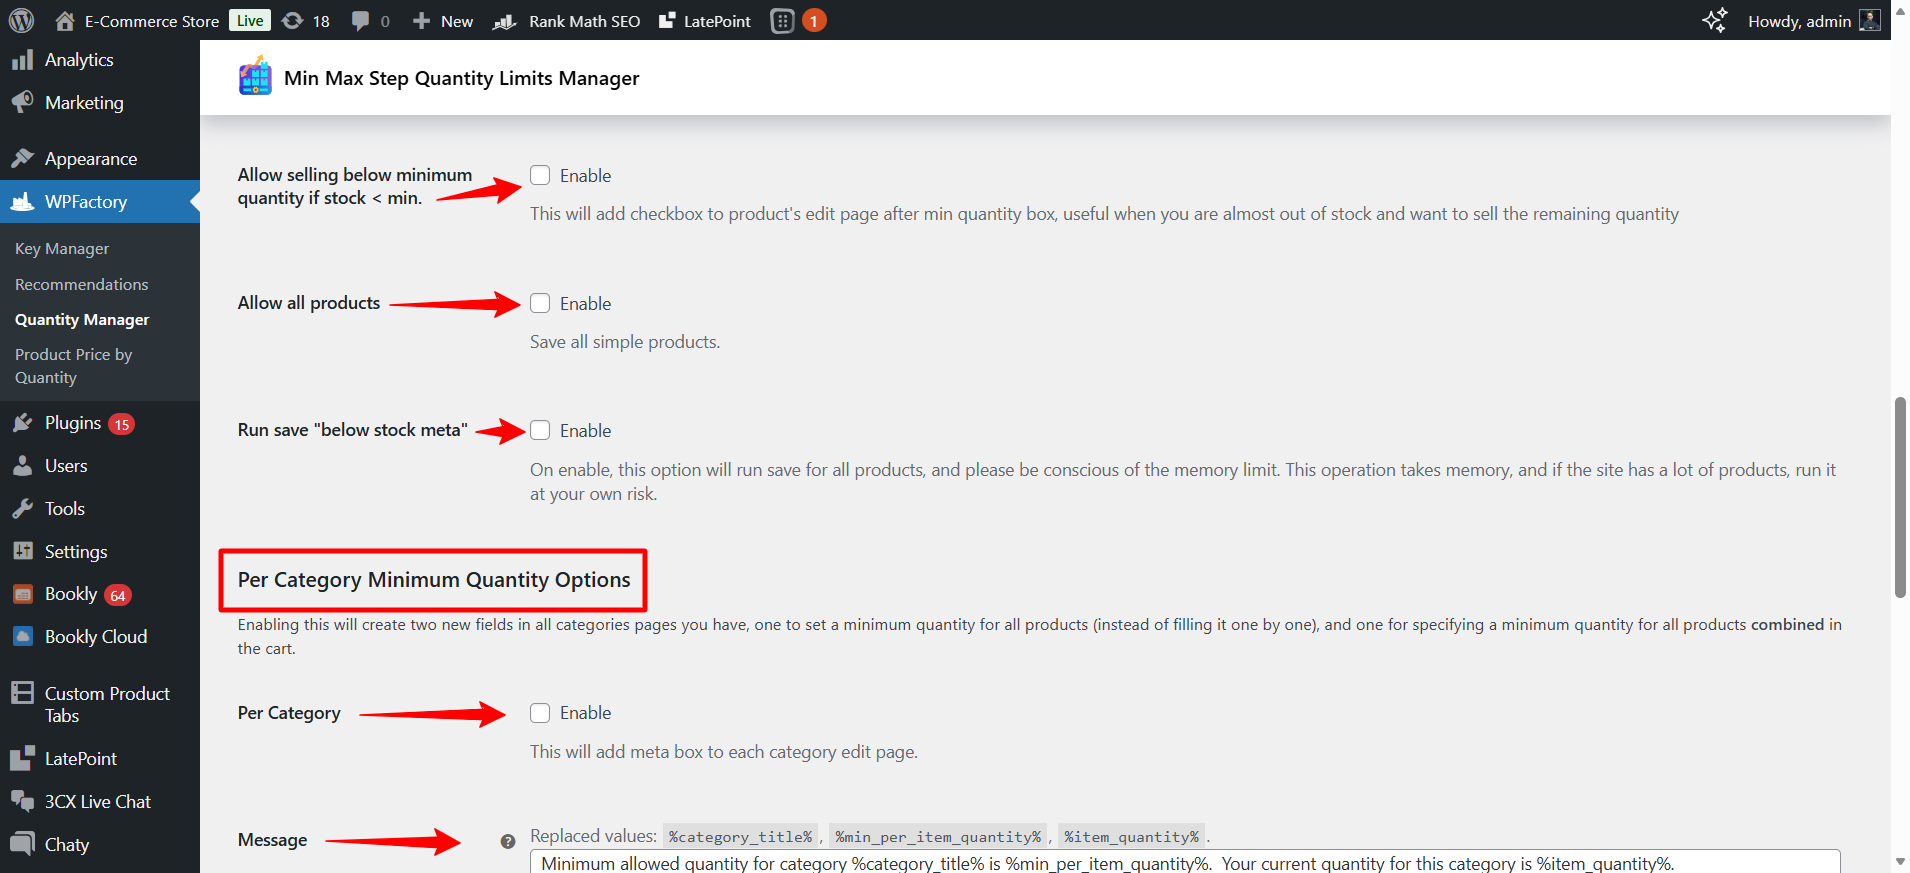
- Allow selling below minimum quantity if stock < min.
If you enable this option, if the stock is below the minimum → it allows selling the remaining quantity.
Useful when the product is about to run out, and you want to sell the rest instead of letting it sit.
- Allow all products
Saves the settings on all simple products at once.
- Run save “below stock meta”
When activated, the “Sell below Minimum’ setting applies to all products.
Per Category Minimum Quantity Options
(Minimum according to classification)
When activated, new fields are added within the edit page of each category.
You can set:
– A minimum for each product within this category
– Or a minimum for the total products of this category in the cart
- Messages
The message can be customized using:
-
%category_title% -
%min_per_item_quantity% -
%item_quantity%
Example:
Minimum allowed quantity for category Shoes is 10.
Useful for wholesale stores according to category.
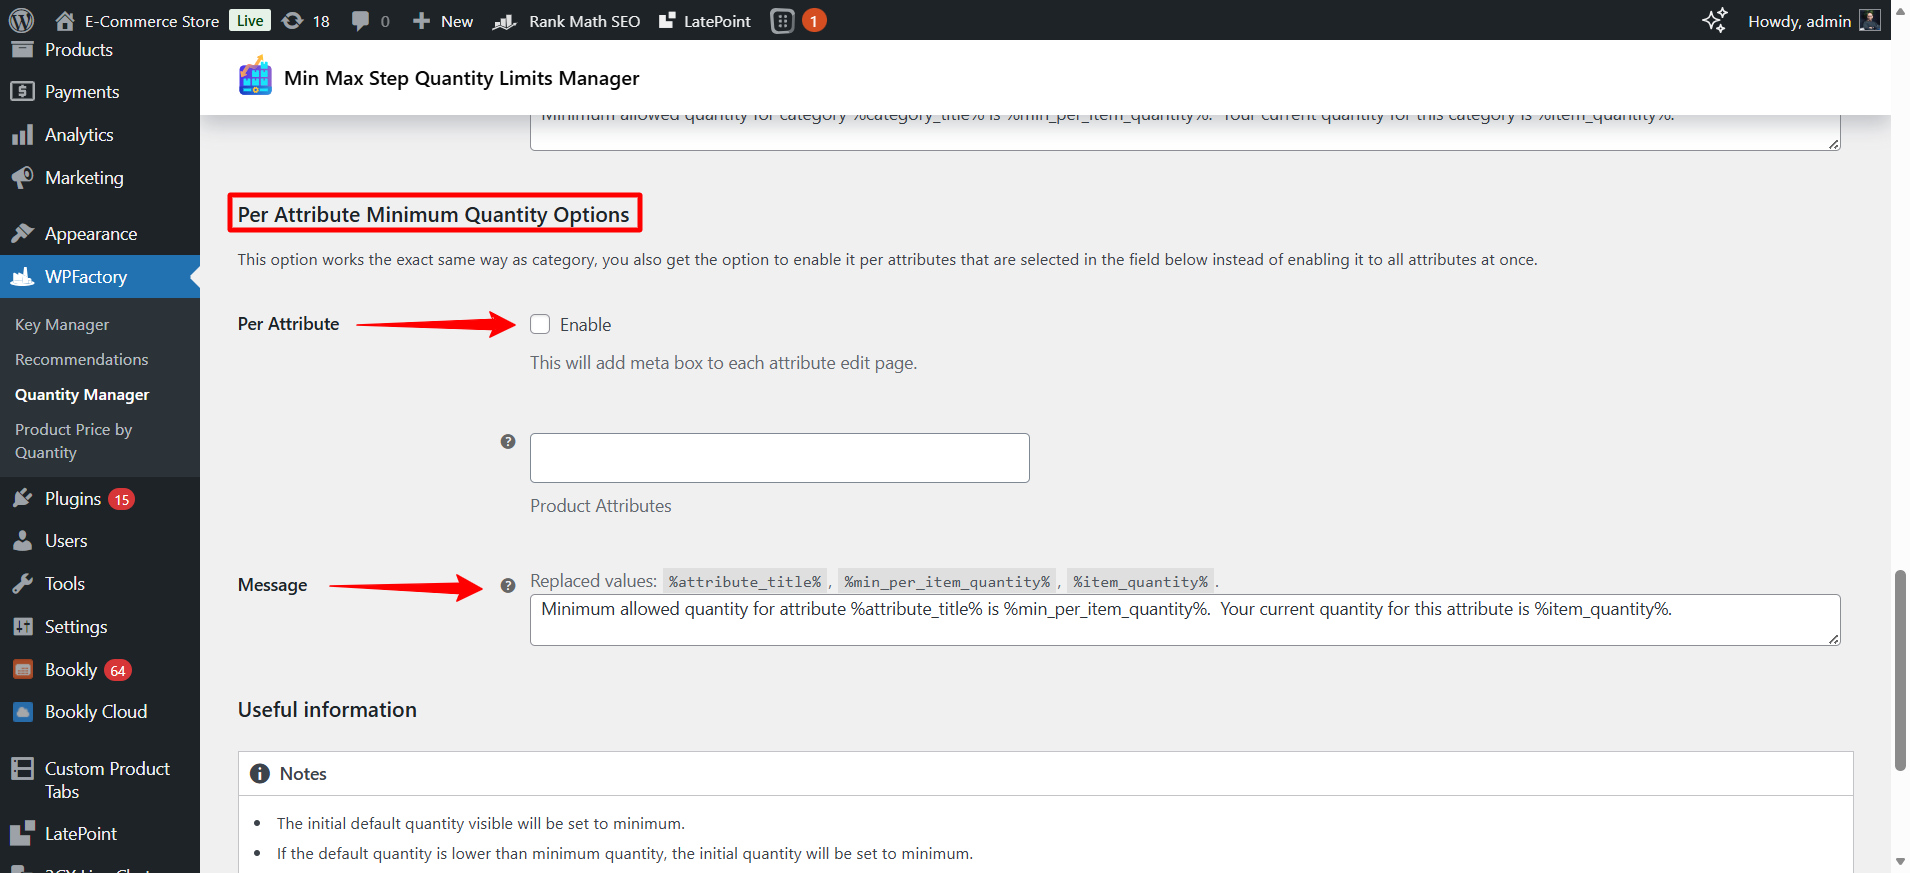
Per Attribute Minimum Quantity Options
(Minimum according to specifications – such as color or size)
It works in the same way as categories.
But the difference:
You can choose certain attributes instead of applying them to everyone.
Example:
All products in size ‘XL’ must be sold in a minimum of 3.
- Message
-
%attribute_title% -
%min_per_item_quantity% -
%item_quantity%
Step5:
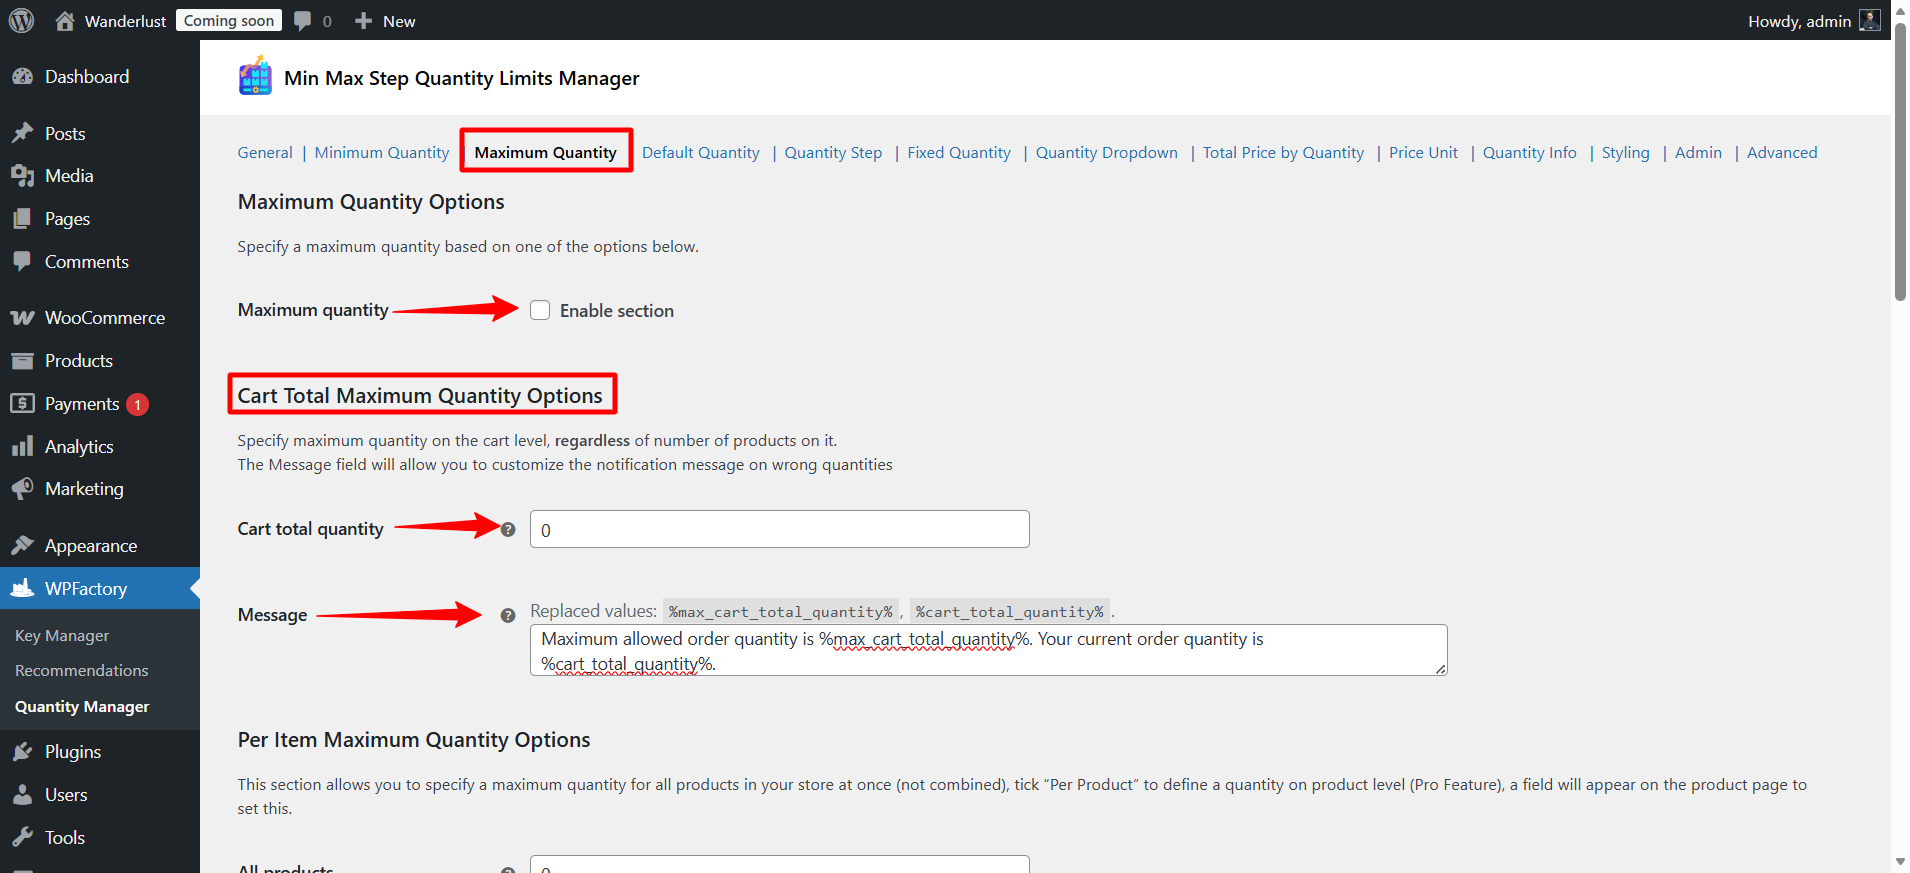
➡Maximum Quantity
These settings allow you to set the maximum quantity of products a customer can purchase in your store, whether at the product, category, or cart level.
When you enable this feature, it allows you to activate the maximum quantity section.
- Cart Total Maximum Quantity Options
This section allows you to set the maximum quantity of products at the cart level, regardless of the number of products in it.
The message can be customized to show the customer what the maximum limit is and how much they have currently requested.
- Per Item Maximum Quantity Options
This option allows you to set the maximum for each product individually, rather than for their total.
Per Product Feature (Pro Feature): You can set a limit for each product individually. When enabled, a field appears on the product edit page to set the limit for each product.
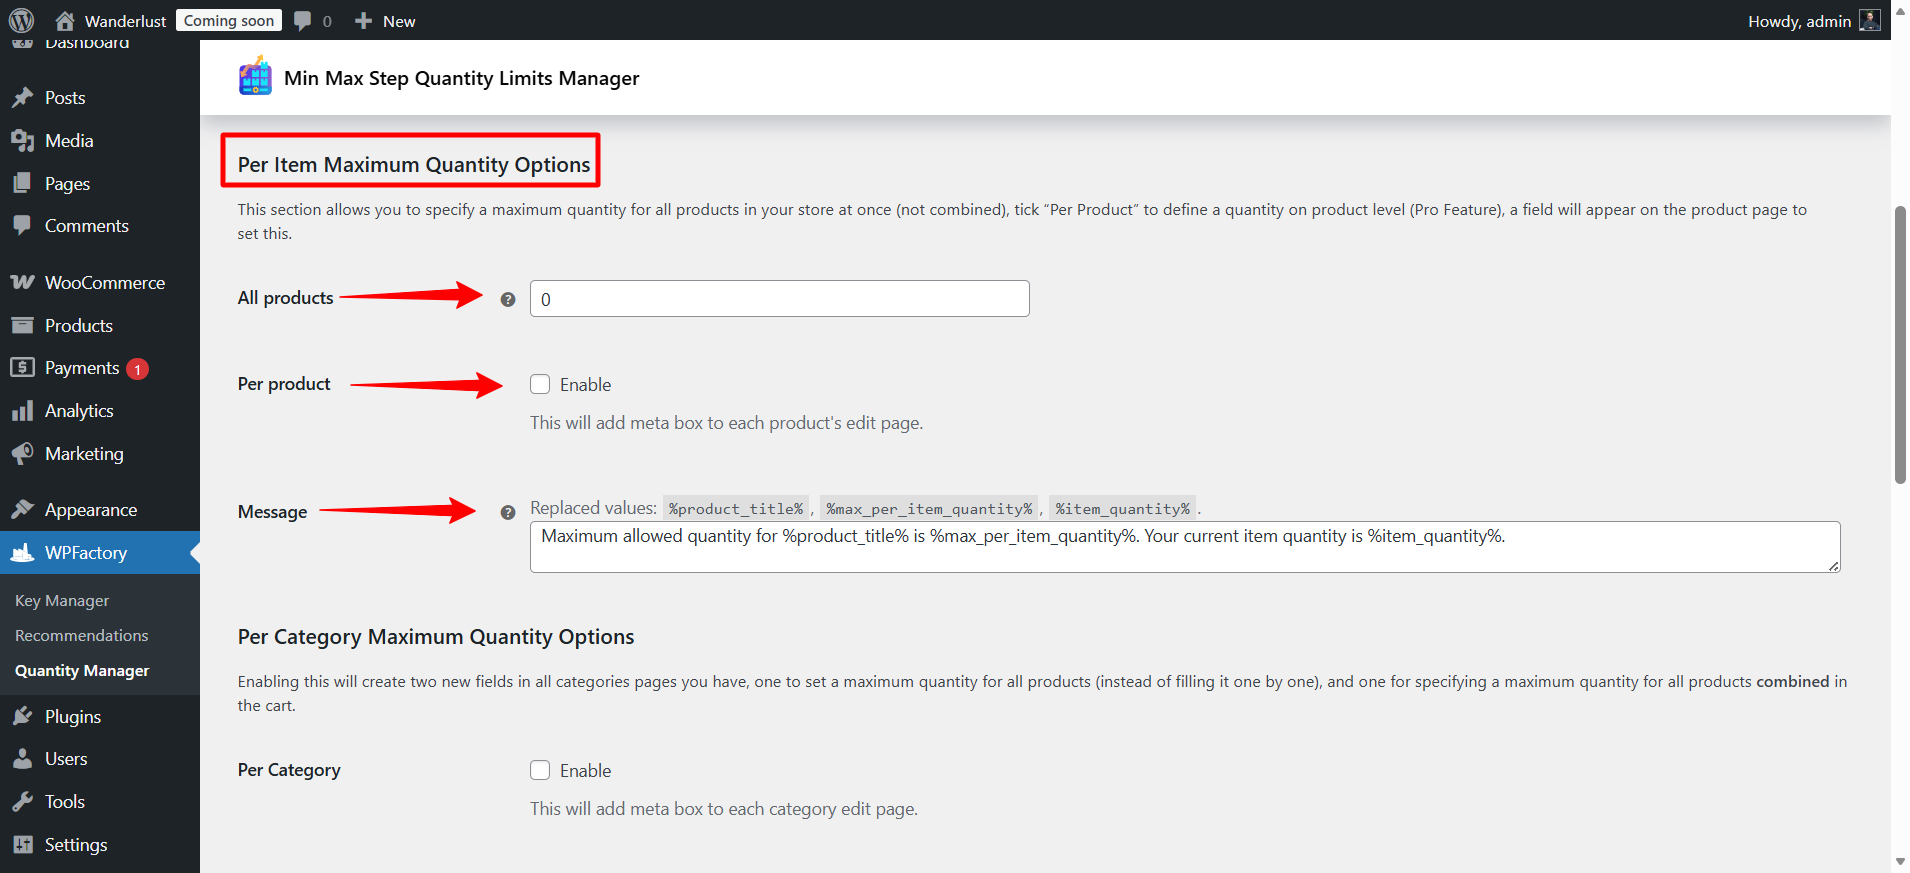
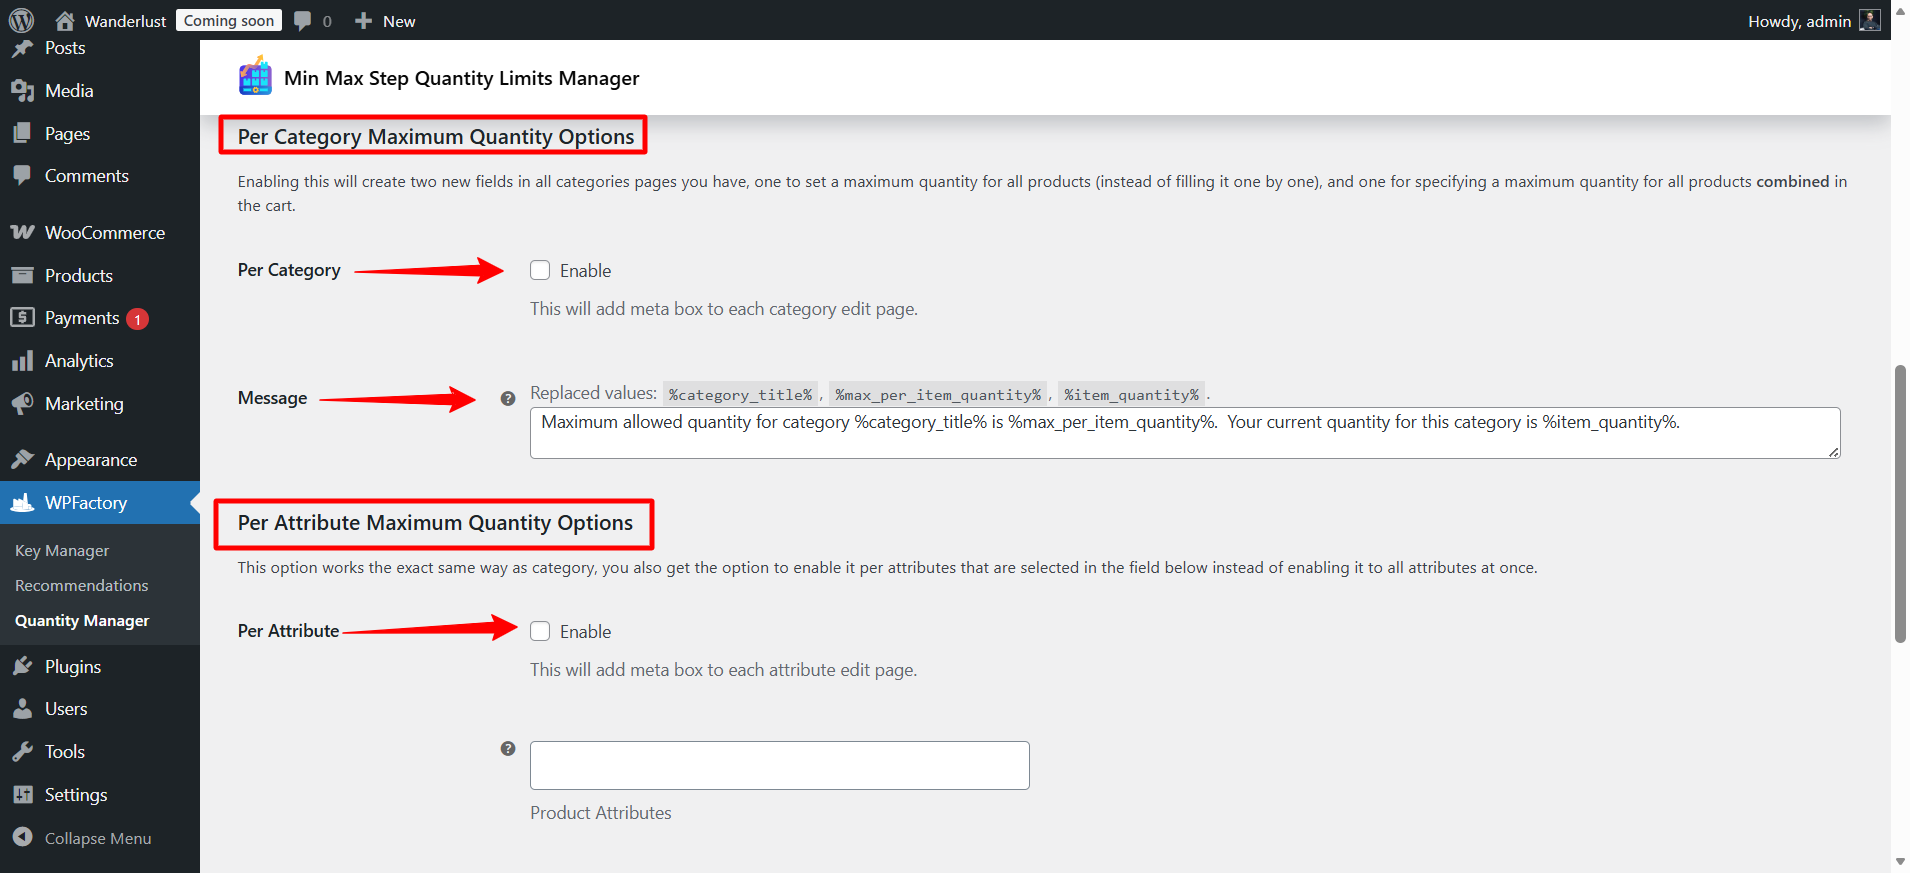
- Per Category Maximum Quantity Options
When activated, it adds two fields to each category page:
1.To set the limit for all products in the category.
2.To set the limit for all products in the category combined in the cart.
- Per Attribute Maximum Quantity Options
It works in the same way as the class maximum, but it can be applied to specific properties like color or size instead of applying it to all properties at once.
➡ Important Notes
- To display the maximum quantity as soon as the product page loads, you need to set the option from General > Initial Quantity Options to Max quantity.
- If the default product quantity is higher than the maximum, the quantity will automatically be set to the maximum when the page loads.
Step6:
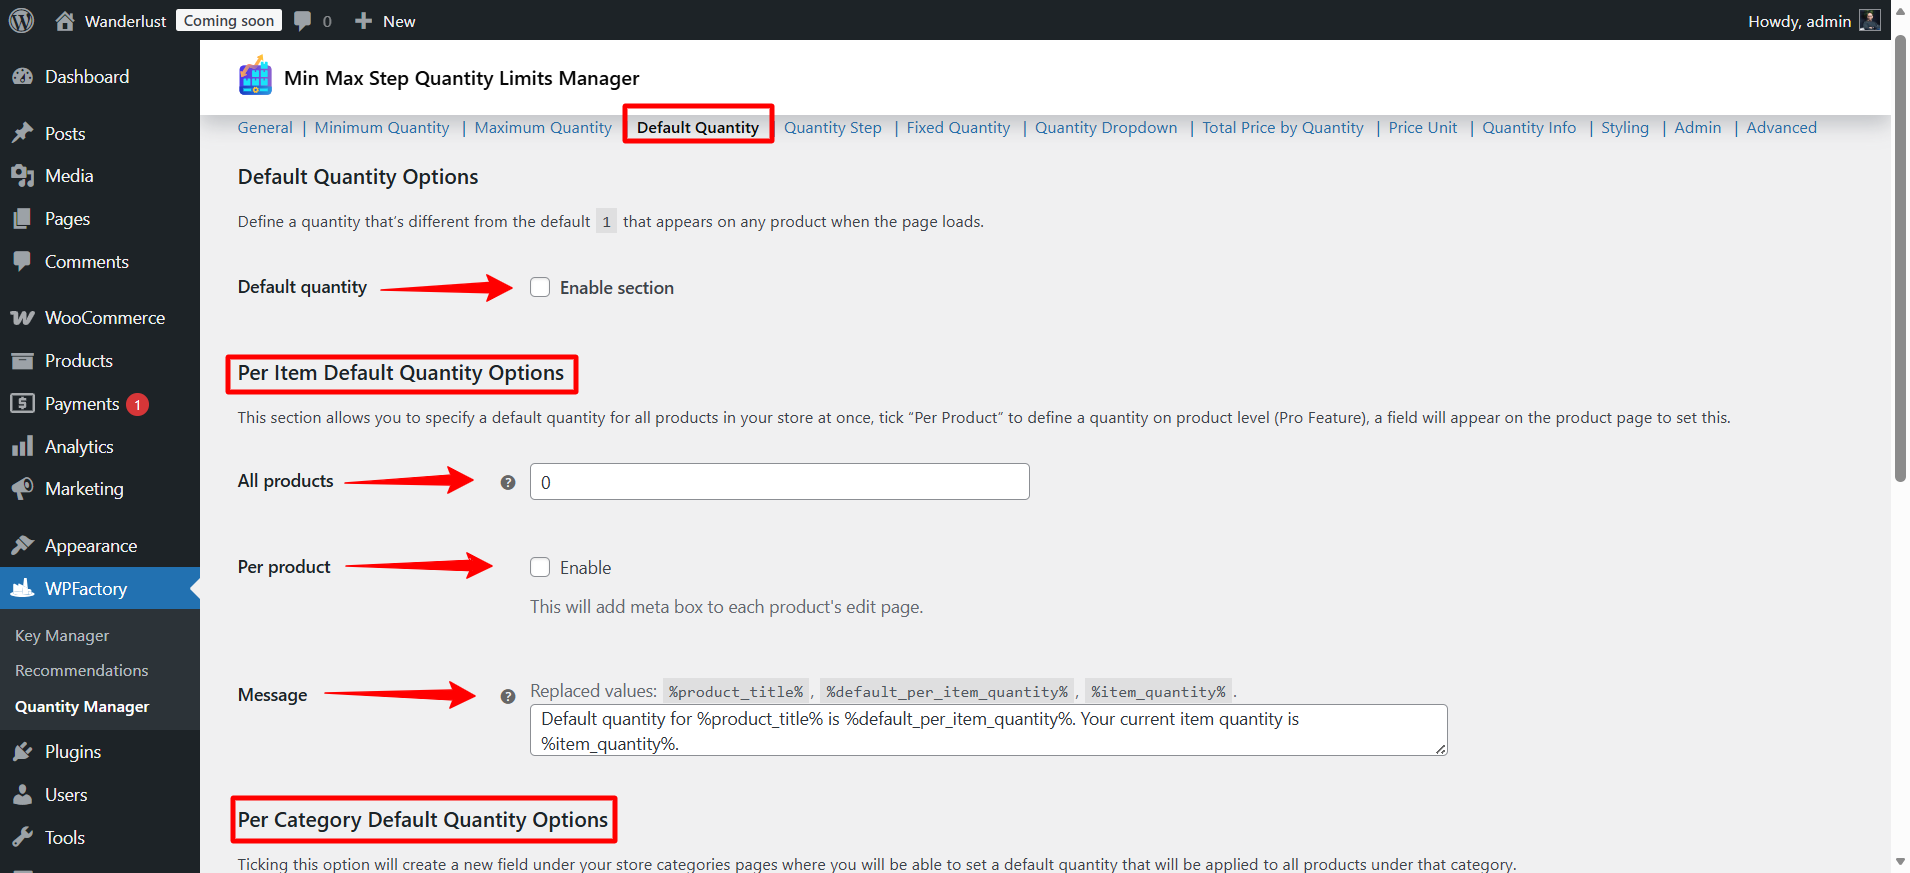
➡Default Quantity
These settings allow you to set a default quantity for the product when the page loads, instead of the default number 1, so that this quantity is automatically displayed to the customer when they open the product page.
- Default quantity
You can enable the section to set a default quantity for all products when the page loads.
Example: Instead of showing the number 1, you can display the number 2 or 3 as the default quantity.
- Per Item Default Quantity Options
From here, you can set a default quantity for all products at once.
Per Product Feature (Pro Feature): You can set a default quantity for each product individually. When enabled, a field appears on the product edit page to specify its default quantity.
- Per Category Default Quantity Options
When enabled, a new field is added to each category page, allowing you to set a default quantity that applies to all products within that category.
This makes it easier to manage default quantities for large categories without needing to adjust each product individually.
Step7:
➡Quantity Step
These settings allow you to specify the increase or decrease when pressing the -/+ buttons in the quantity field. This feature is often used with the minimum quantity, especially if you sell products in specific units.
Example: If you sell bottles in sets of 6, you must specify:
-Step = 6
-Minimum = 6
And if you leave the minimum as 1, the quantities will become 1, 7, 13… and so on, which causes a problem.
- Cart Total Quantity Step Options
This feature ensures that each item in the cart increases or decreases by the specified value, regardless of the quantities of individual products.
Very useful for stores that sell products in fixed pack sizes (such as packs containing 10 units).
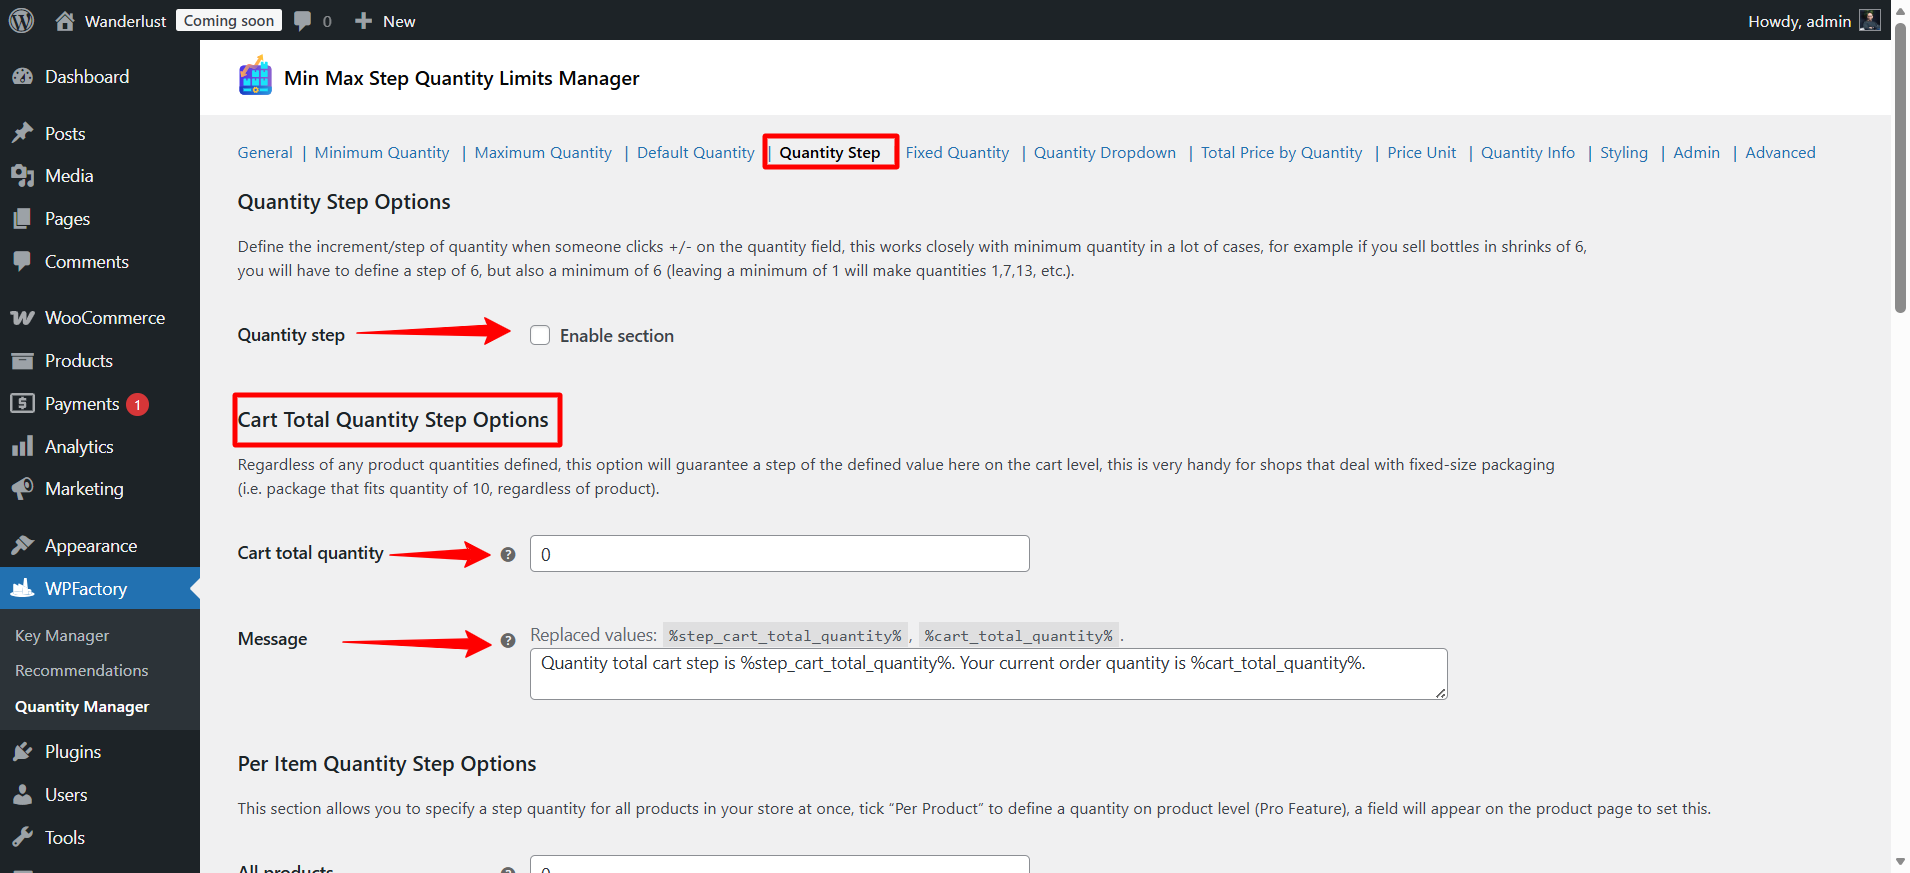
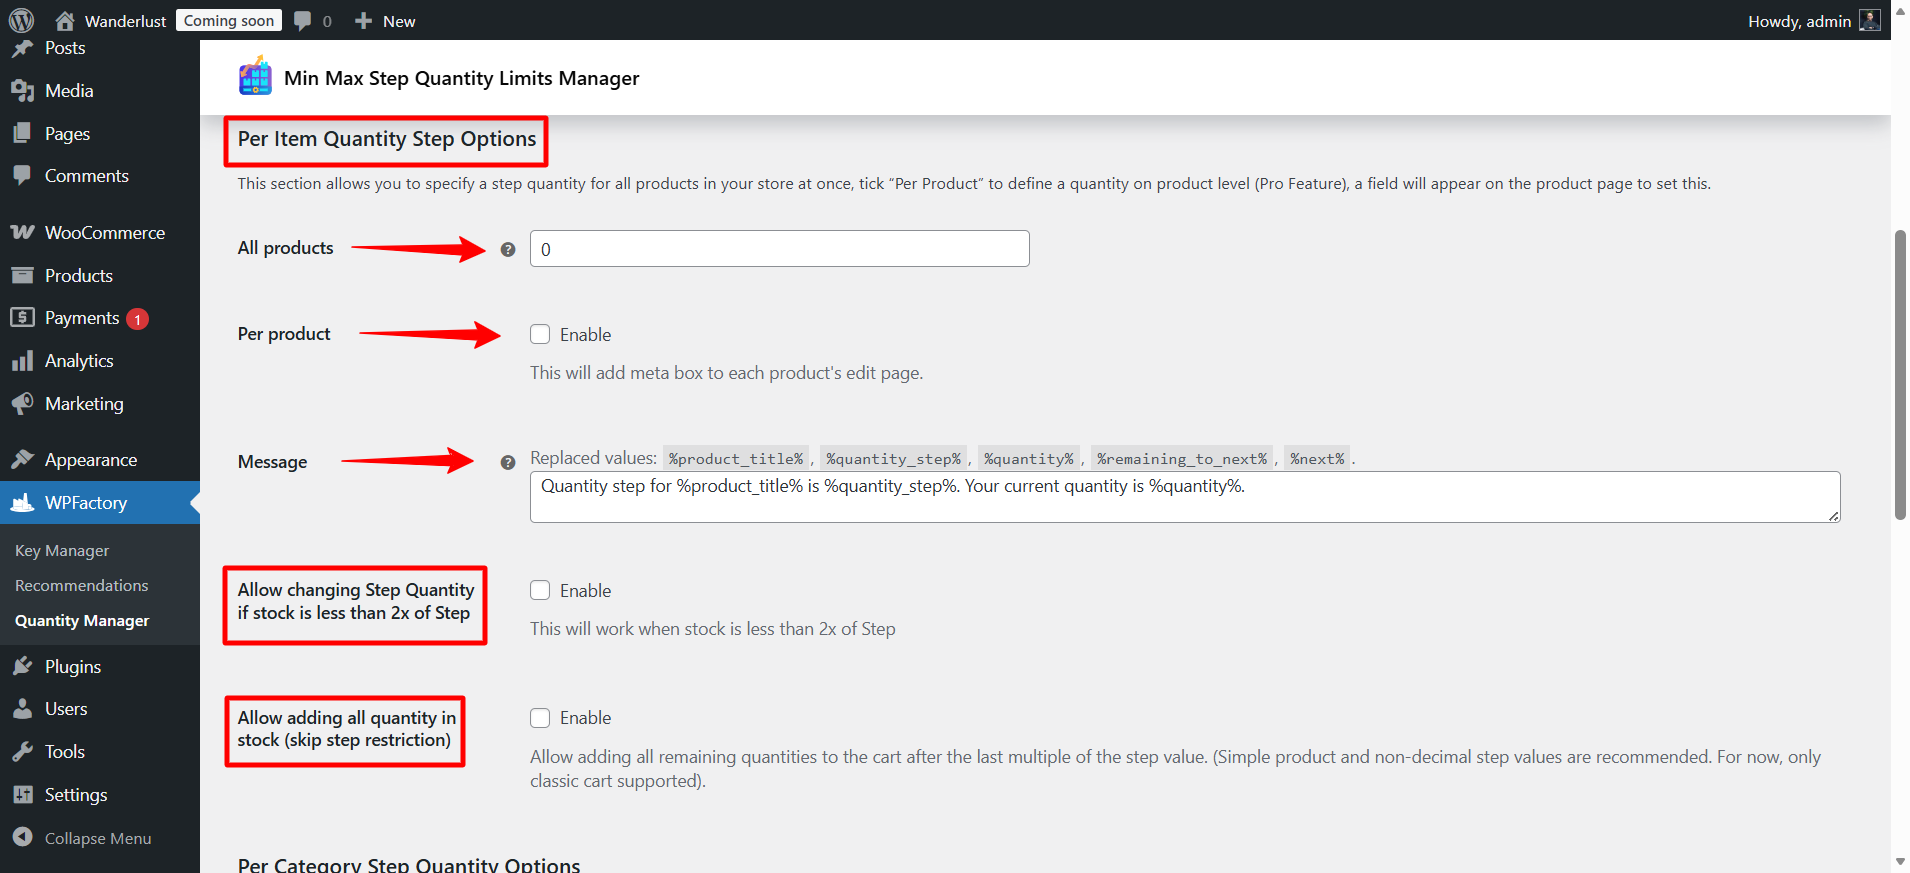
- Per Item Quantity Step Options
You can set a quantity step for all products at once.
Per Product Feature (Pro Feature): You can set a quantity step for each product individually. When enabled, a field appears on the product edit page to specify its quantity step.
Additional options:
- Allow changing the step if the stock is less than twice the step value.
- Allow adding the entire remaining quantity in stock after the last multiple of the step.
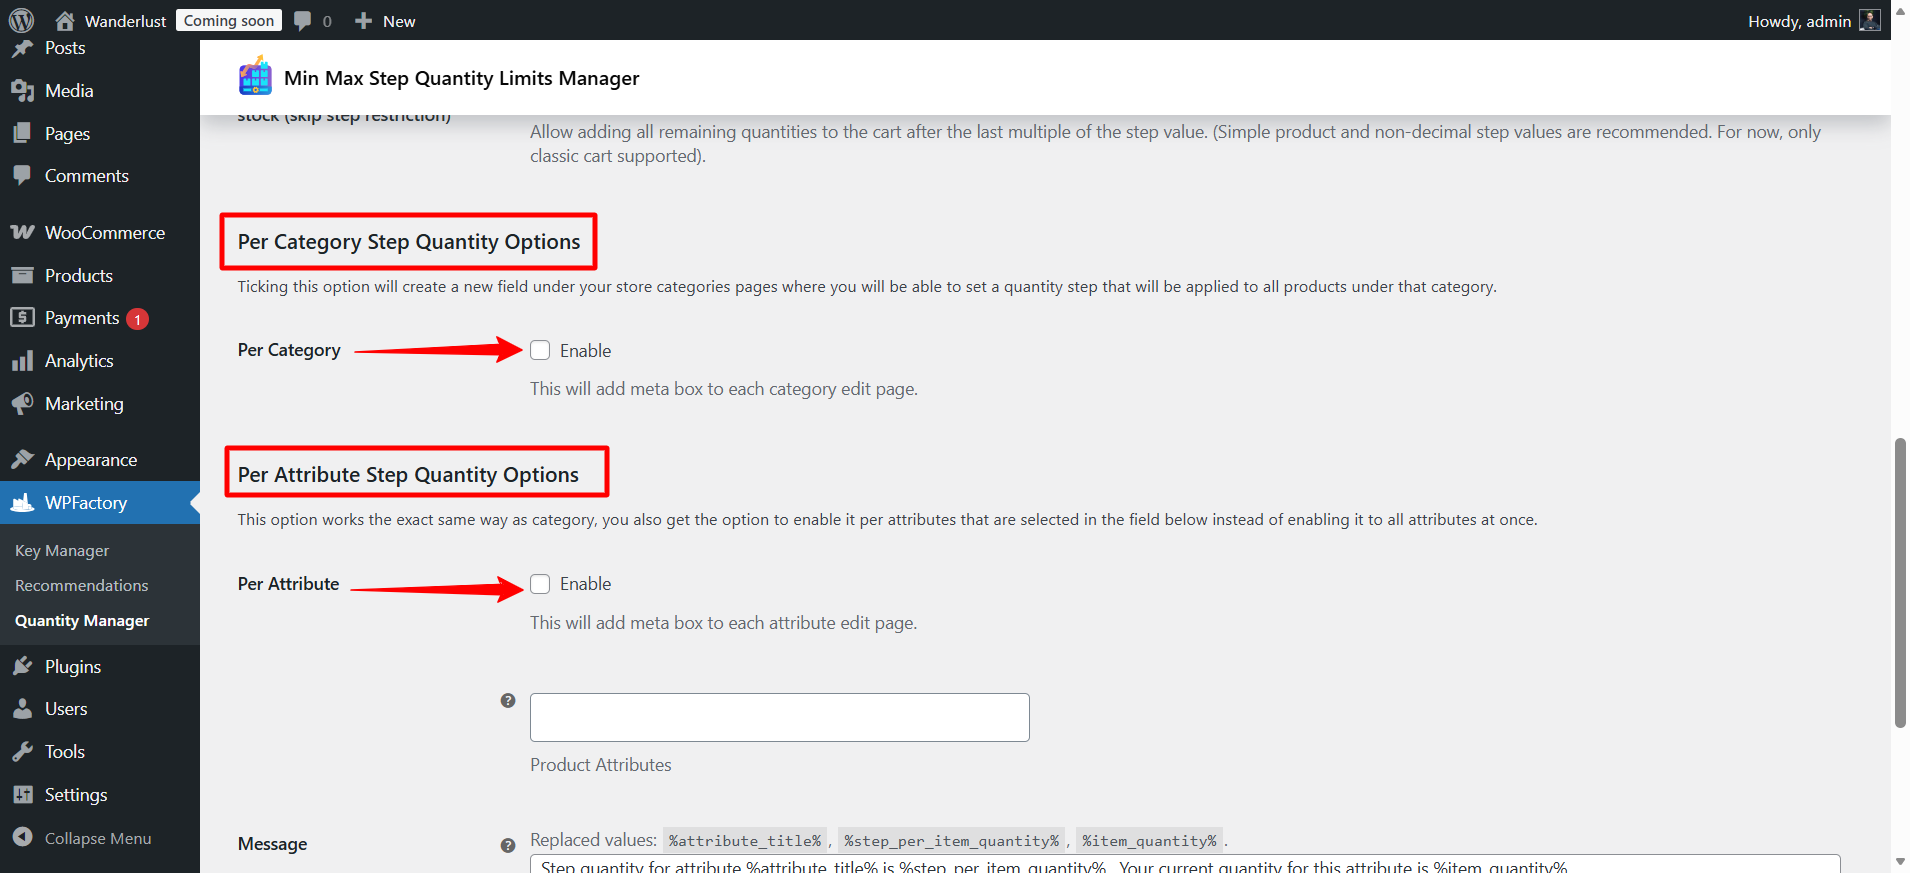
- Per Category Step Quantity Options
When activated, a field appears on the page of each category to set the quantity step for all products within that category.
- Per Attribute Step Quantity Options
It works the same way as the class, but it can be applied to specific properties like color or size instead of applying it to all properties at once.
Step8:
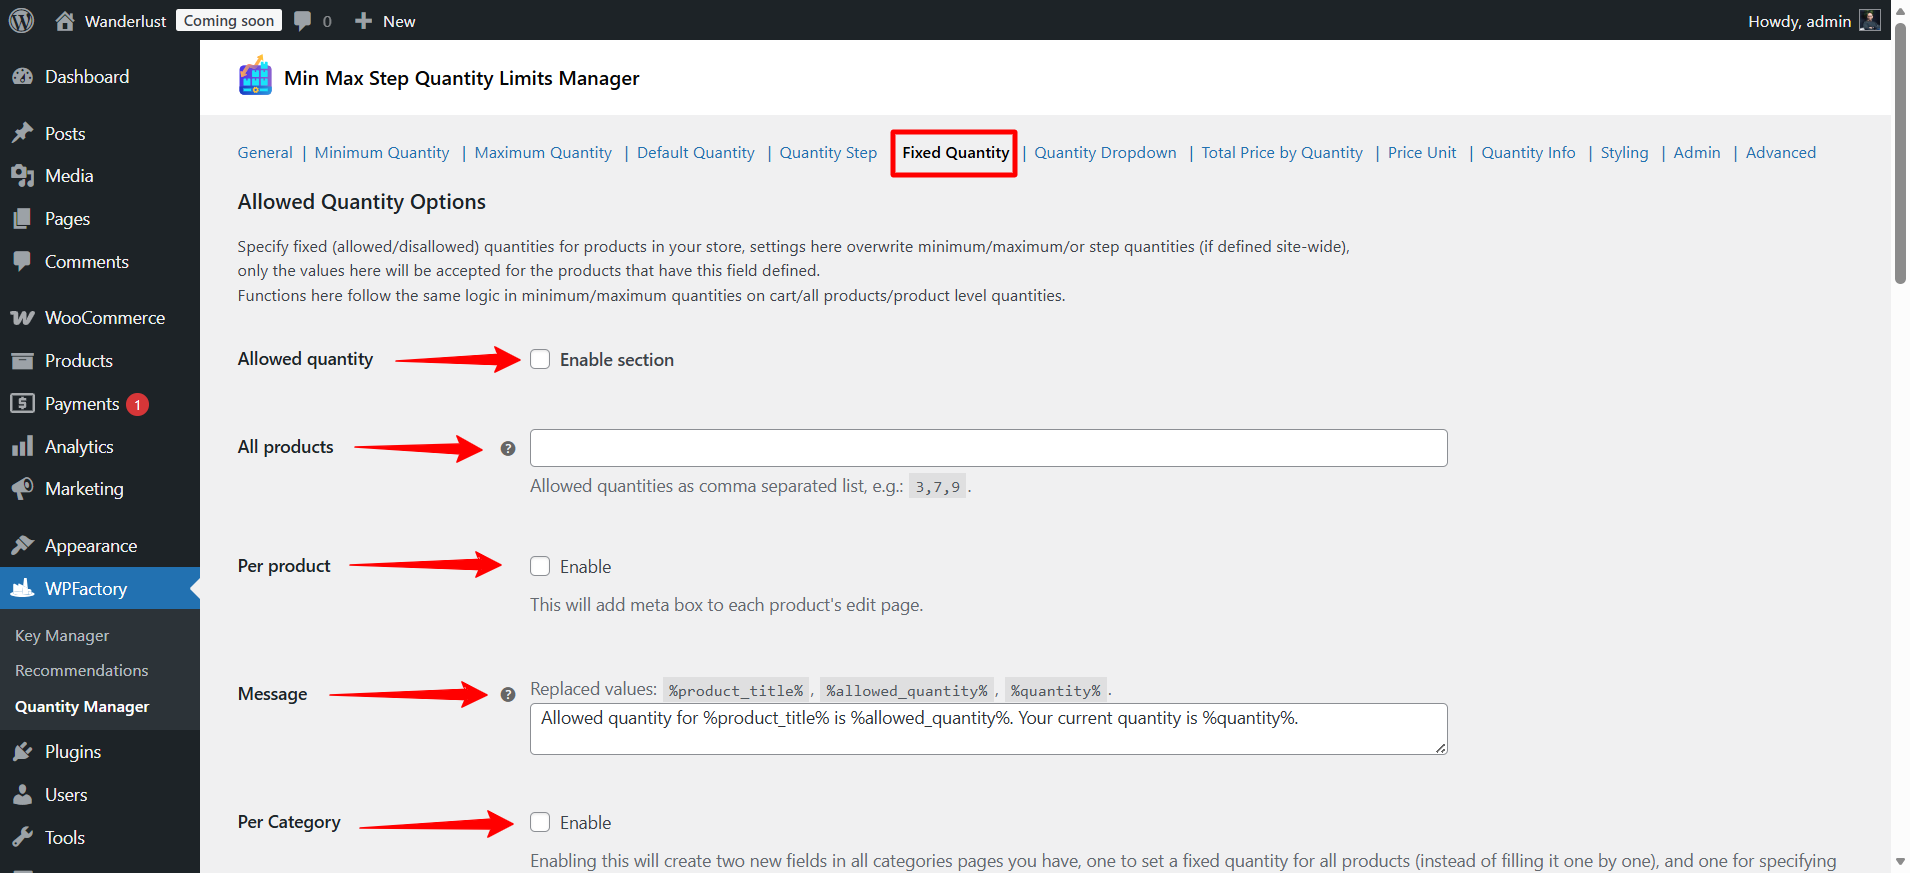
➡Fixed Quantity
These settings allow you to specify only certain quantities that a customer can order or block certain quantities, overriding any other minimum, maximum, or quantity step settings.
- Allowed quantity
Allows you to specify allowed fixed values for products.
If these values are specified, no other quantities will be allowed, even if there is a minimum/maximum or a specified quantity step.
It can be applied to:
All products ➡ list the allowed quantities separated by commas, for example: 3,7,9
Per product ➡a field appears on the product edit page to specify the allowed quantities for this product.
Example of a warning message:
Allowed quantity for %product_title% is %allowed_quantity%. Your current quantity is %quantity%.
- Per Category
Allowable quantities can be set for all products in the category or for the total in the cart.
- Per Attribute
Permissible quantities can be specified for certain characteristics such as color or size.
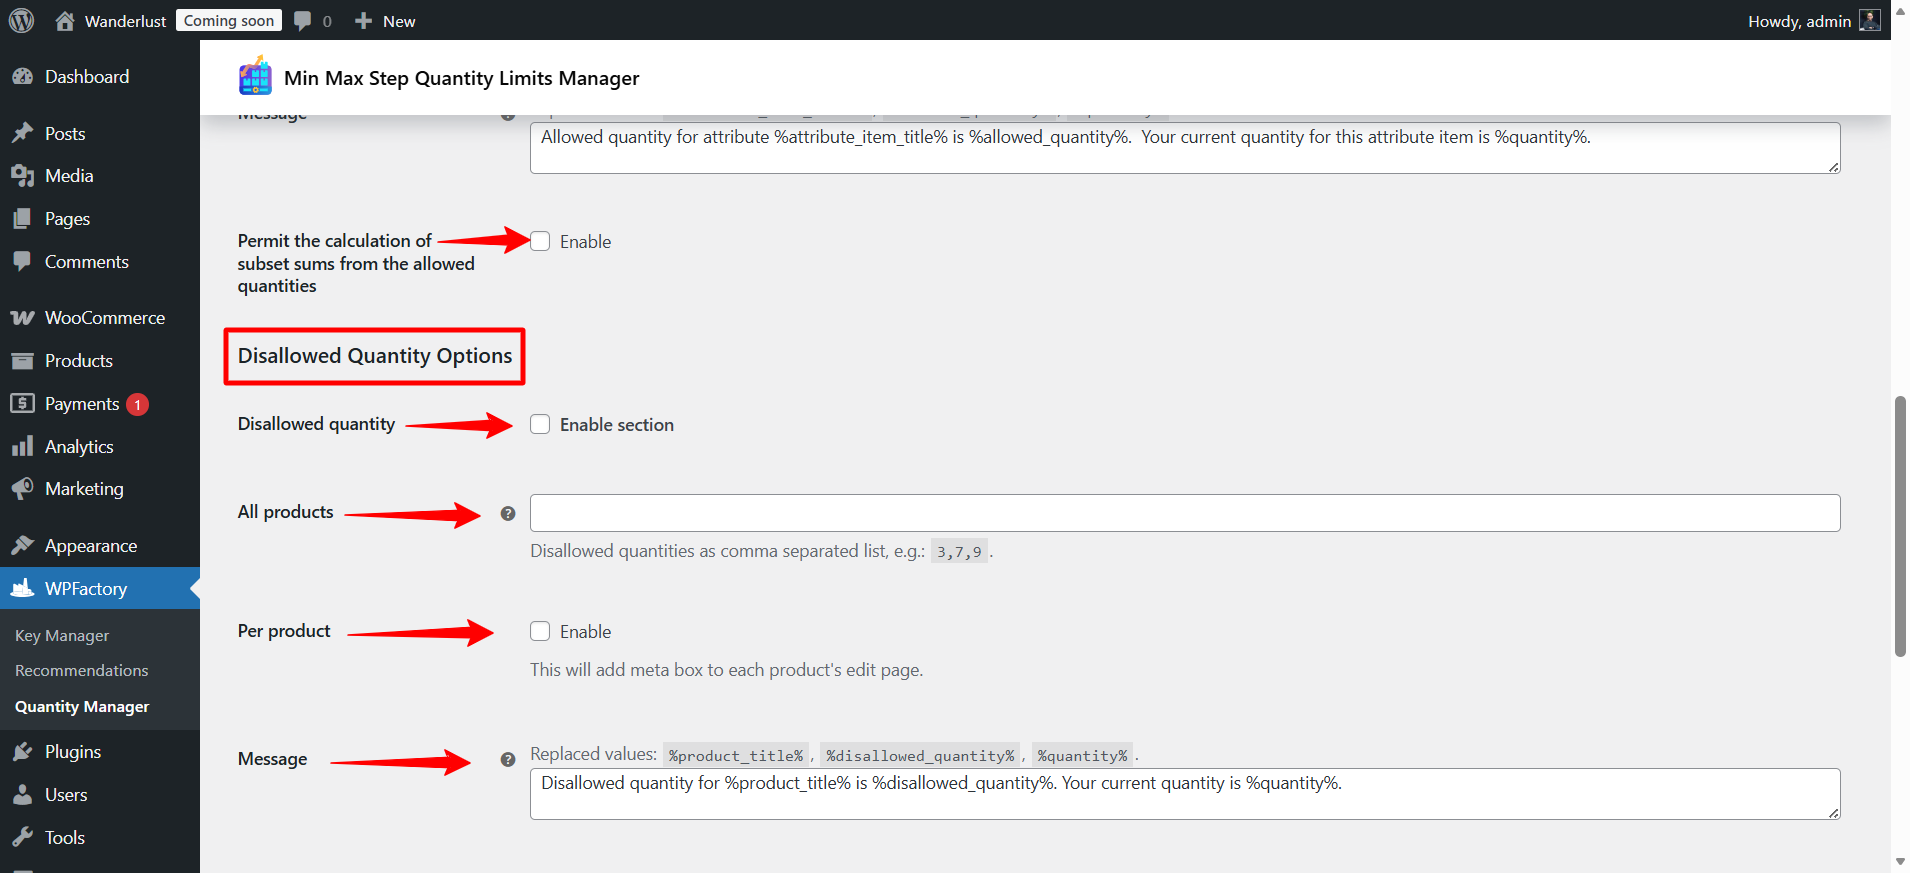
Optional feature: Permit calculation of subset sums ➡ allows the calculation of subsets of allowable quantities (for example: combining different allowed values to form acceptable order totals).
- Disallowed Quantity Options
It allows specifying prohibited quantities so that the customer cannot order them, even if they are within the minimum, maximum, or quantity step.
Can be applied to:
All products ➡ list the prohibited quantities separated by commas, for example: 3,7,9
Per product ➡ a field appears on the product edit page to specify the prohibited quantities for this product.
Example of a warning message:
Disallowed quantity for %product_title% is %disallowed_quantity%. Your current quantity is %quantity%.
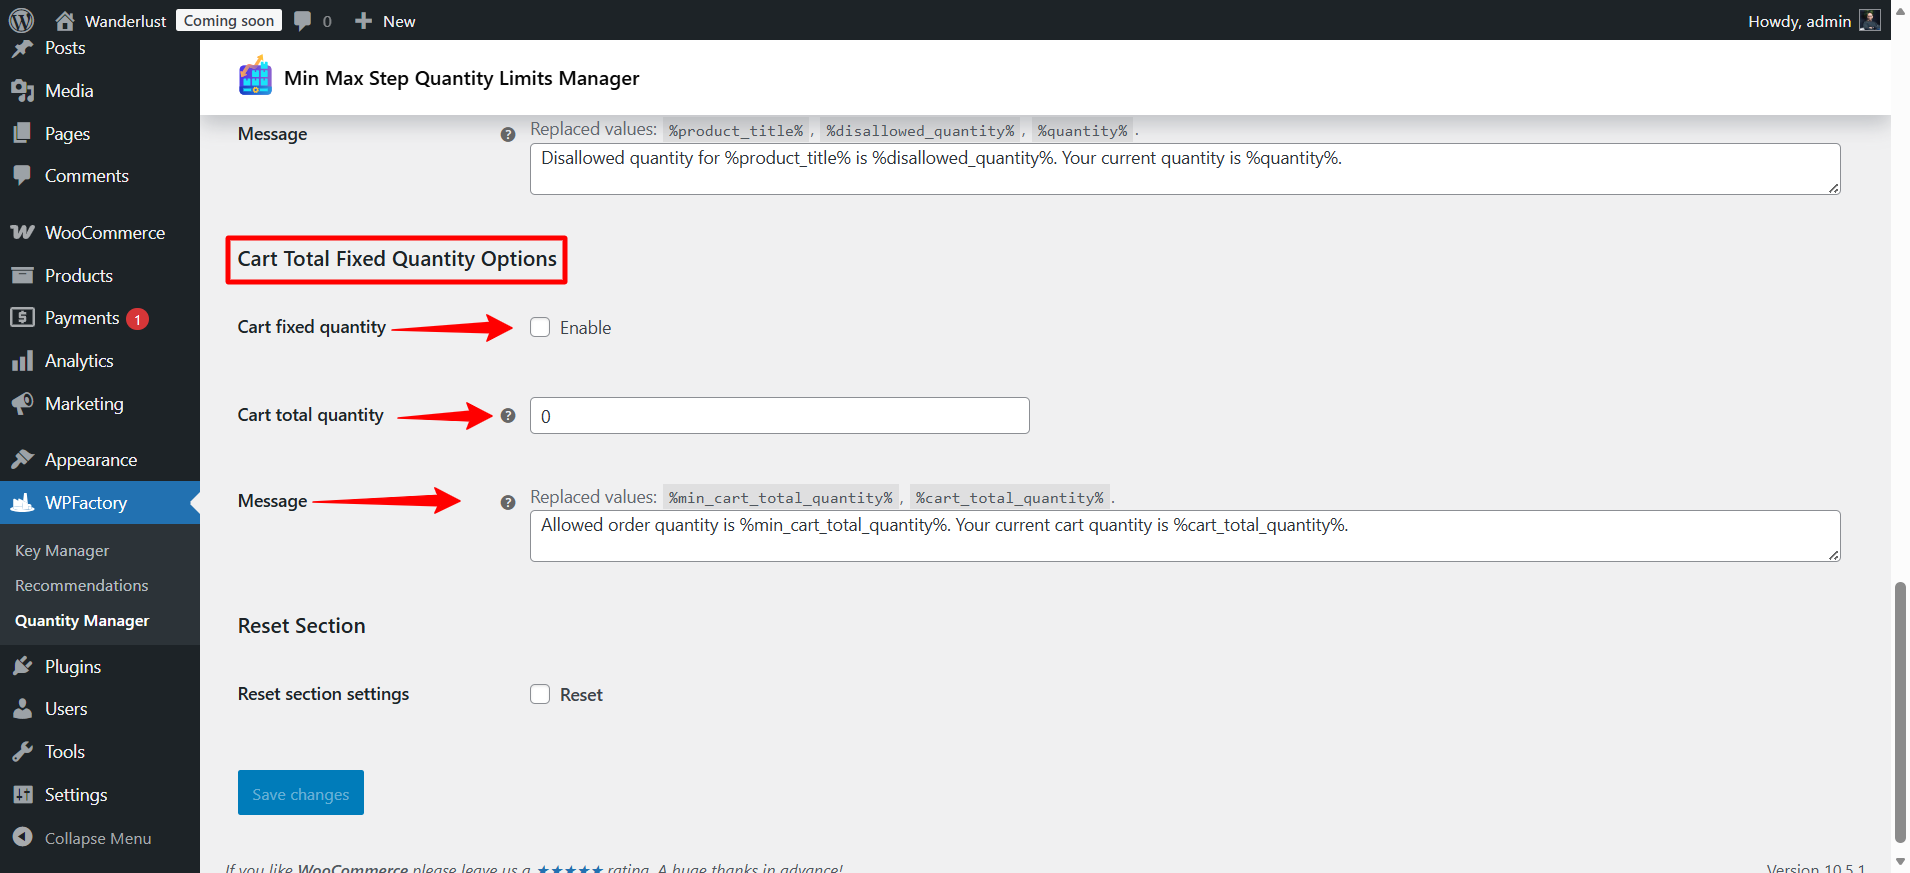
- Cart Total Fixed Quantity Options
A fixed amount allowed for the entire basket can be determined.
Example of a warning message:
Allowed order quantity is %min_cart_total_quantity%. Your current cart quantity is %cart_total_quantity%.
Step9:
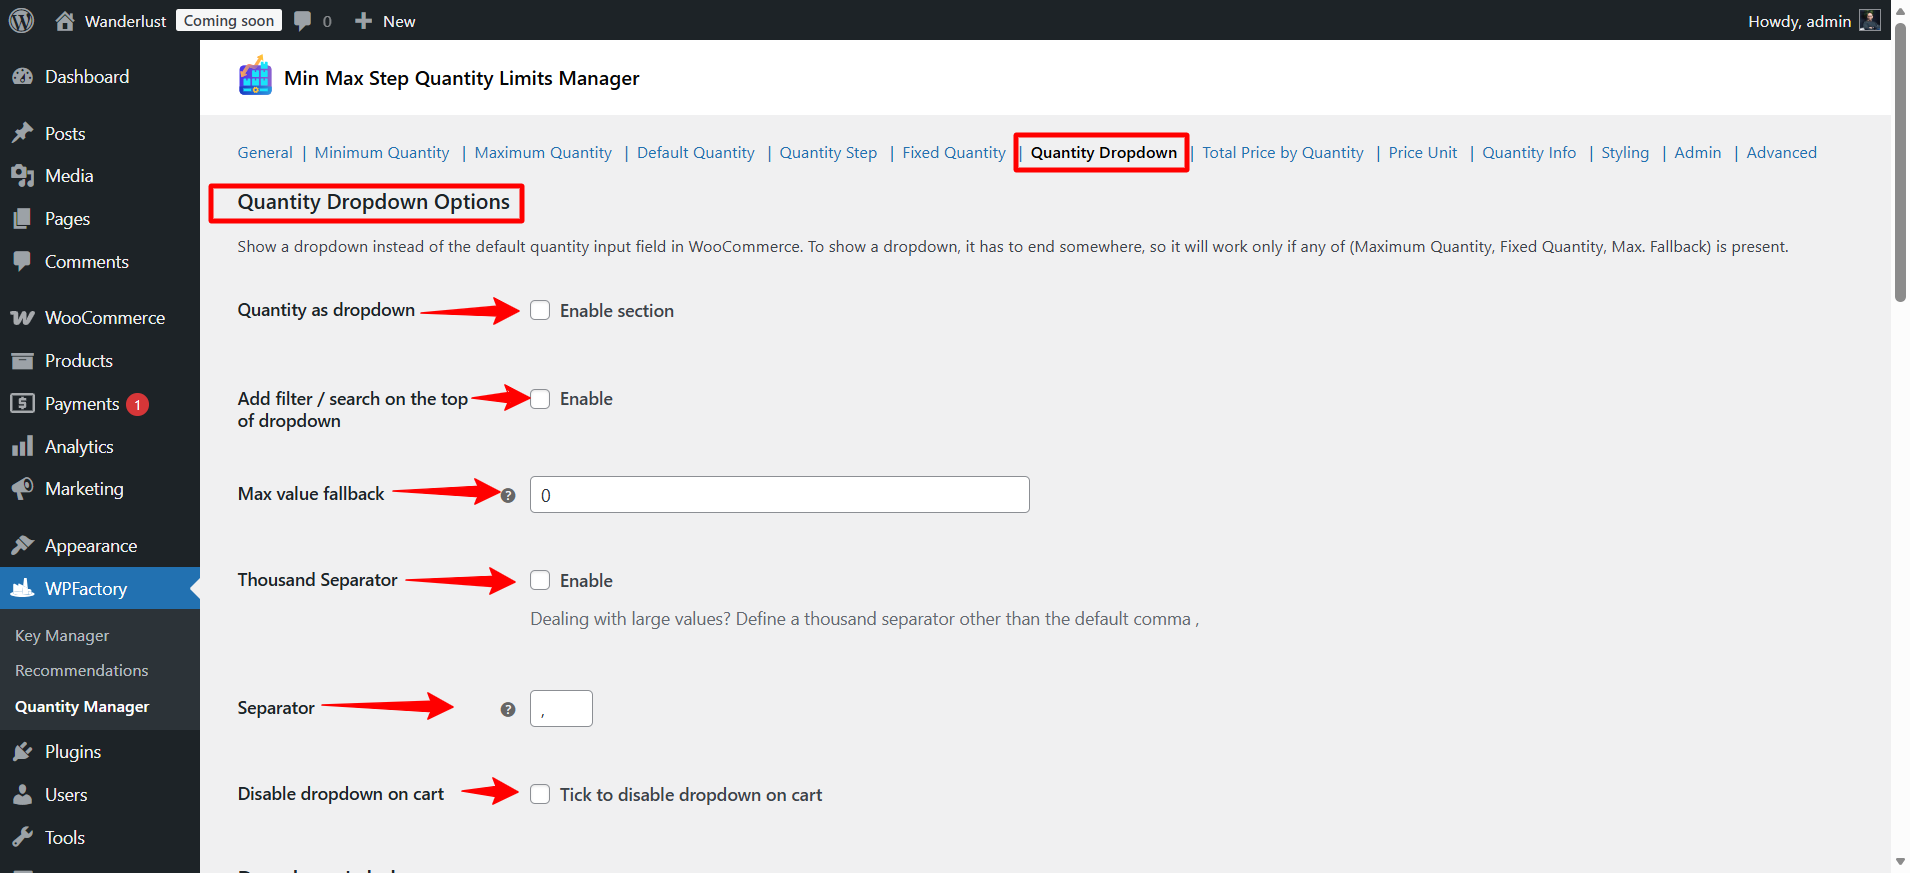
➡Quantity Dropdown
These settings allow you to replace the default quantity field in WooCommerce with a dropdown list, making it easier for customers to quickly select the quantity, especially when there are restrictions such as a maximum limit or field quantity.
Note: For this list to work, there must be a maximum quantity, a fixed quantity, or a specified Max. Fallback.
- Quantity as dropdown
Replace the default quantity input field with a dropdown menu showing all allowed values.
- Add filter / search on the top of dropdown
A search box can be added at the top of the list to make it easier to find the desired quantity when there are many values.
- Max value fallback
If the maximum quantity is not specified, a default value can be set to serve as the end of the dropdown list.
- Thousand Separator
If you are dealing with large quantities, you can set a thousands separator other than the default comma (,)
Example: 1,000 or 1.000 depending on your settings.
- Disable dropdown on cart
You can prevent the drop-down menu from appearing on the cart page if you want.
- Dropdown Labels
The unit of measurement can be displayed next to the values in the list (such as 1 KG, 10 KGs, 20 pieces, 30 liters).
You can specify:
- Singular label – singular form, e.g., 1 KG
- Plural label – plural form, e.g., 10 KGs
You can enable Labels per product to customize the unit for each product individually.
- Dropdown per category
The drop-down list of all products can be displayed, excluding certain categories if you wish.
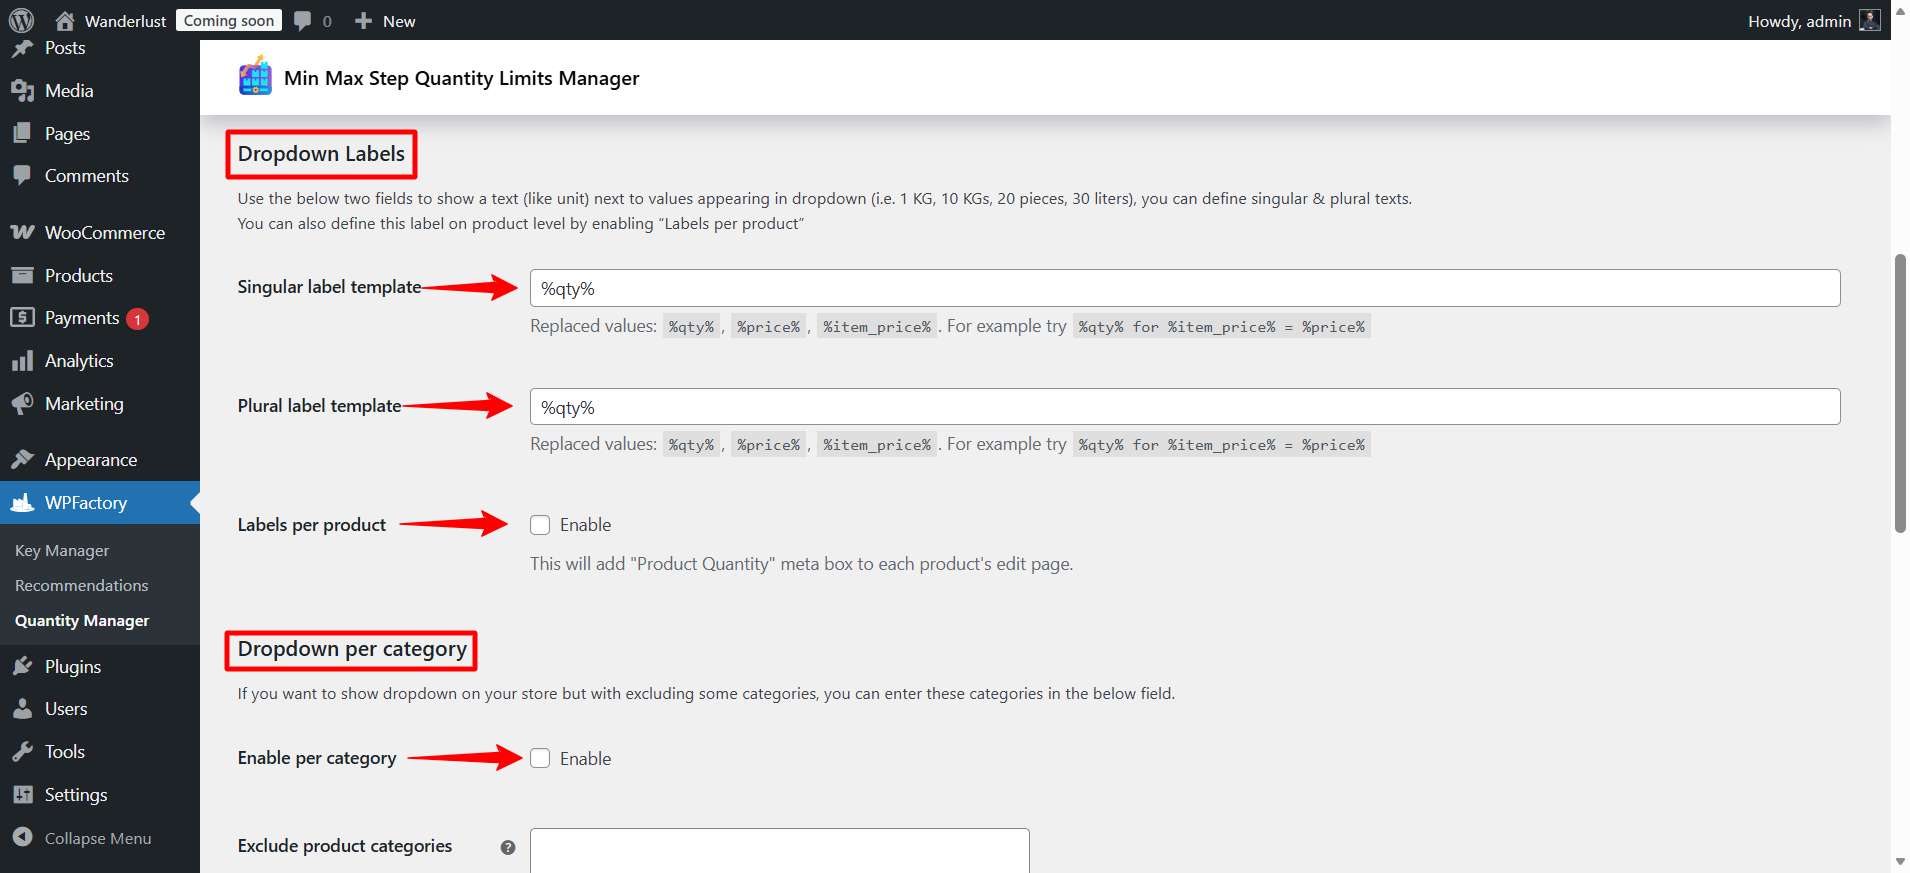
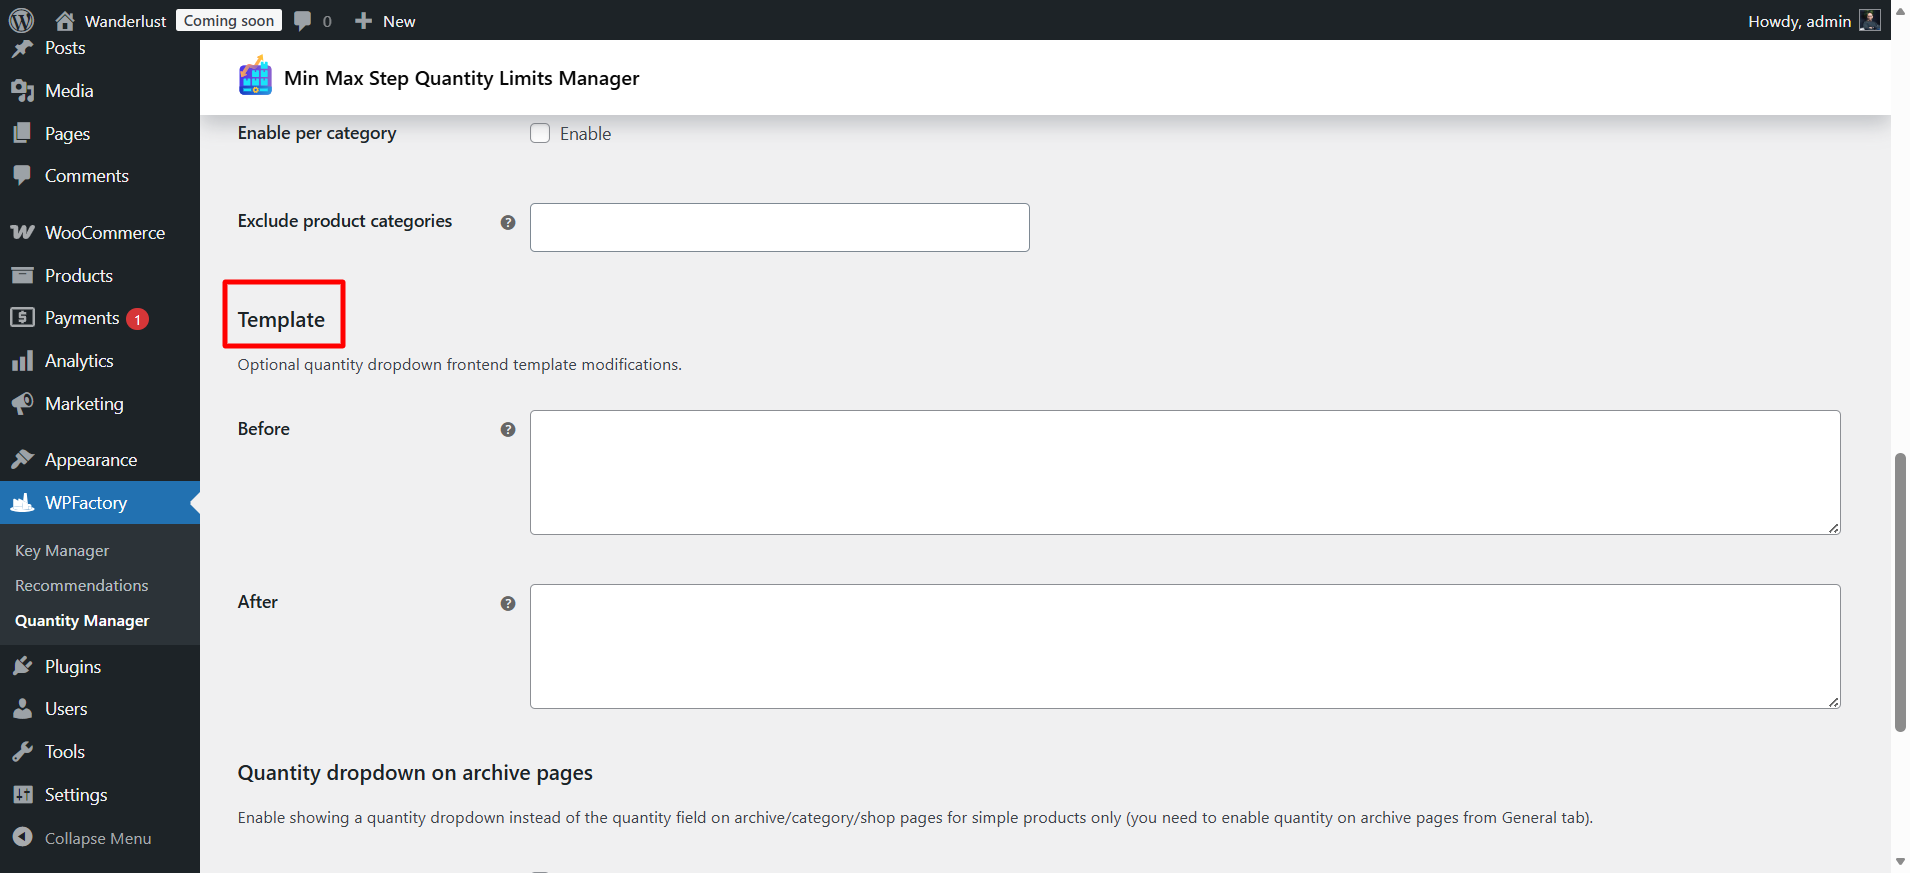
- Template
The template displayed for the dropdown quantity on product pages can be modified, either before or after the field.
- Quantity dropdown on archive pages
The dropdown list can be displayed instead of the default quantity field on archive, category, and shop pages (for simple products only).
The display of the quantity on archive pages must first be enabled from the General tab.
Step10:
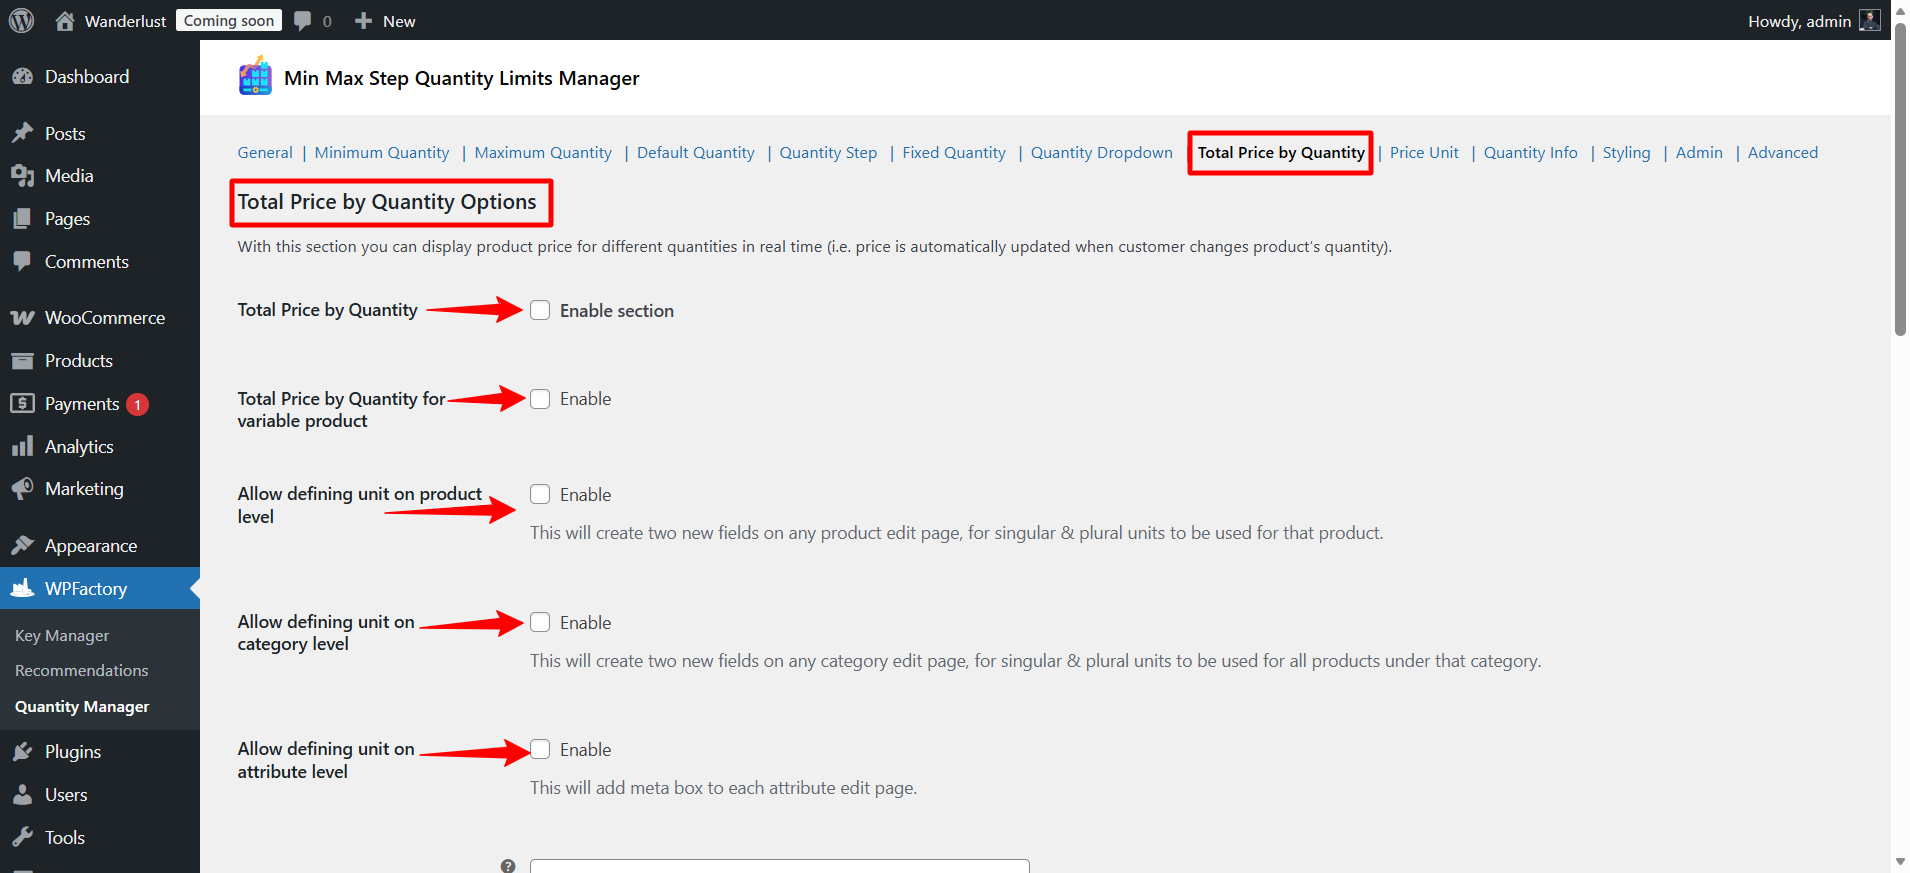
➡Total Price by Quantity
These settings allow you to display the total price of the product according to the quantity chosen by the customer directly on the product page, meaning the price updates automatically when the quantity is changed.
- Total Price by Quantity
You can enable the total price display based on quantity for simple and variable products.
This allows the customer to see the final price directly while adjusting the quantity.
- Total Price by Quantity for variable product
When activated, the feature also works on variable products so that the total price for each variable option appears when the customer makes a selection.
- Allow defining unit on product/category/attribute level
The total price can be displayed with a unit of measurement for each product, category, or specific attribute (such as piece, kg, liter).
You can enter:
- Singular unit: Singular form (1 KG)
- Plural unit: Plural form (10 KGs)
The priority for reading the unit is: Product > Category > General unit.
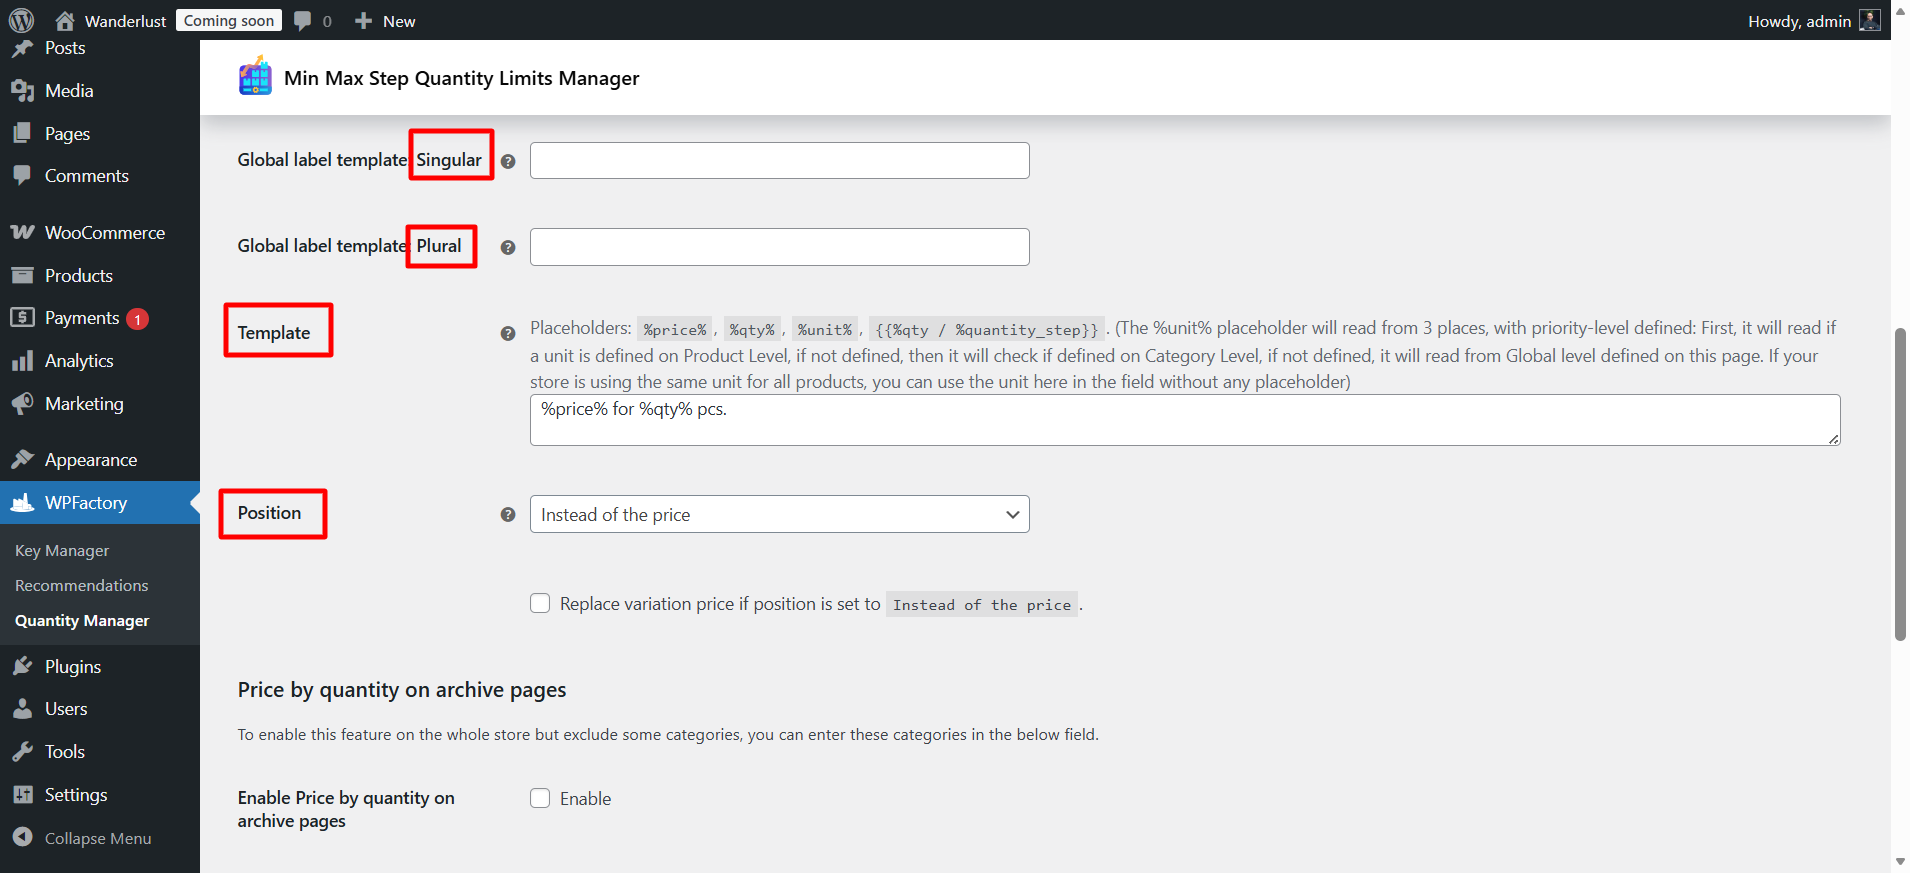
- Global label template
You can determine how to display the total price using placeholders:
%price% = total price
%qty% = selected quantity
%unit% = unit of measurement
{{%qty / %quantity_step}} = quantity divided by the quantity step
- Position
It can be determined whether the total price will appear:
- Instead of the regular price
- Or next to the original price.
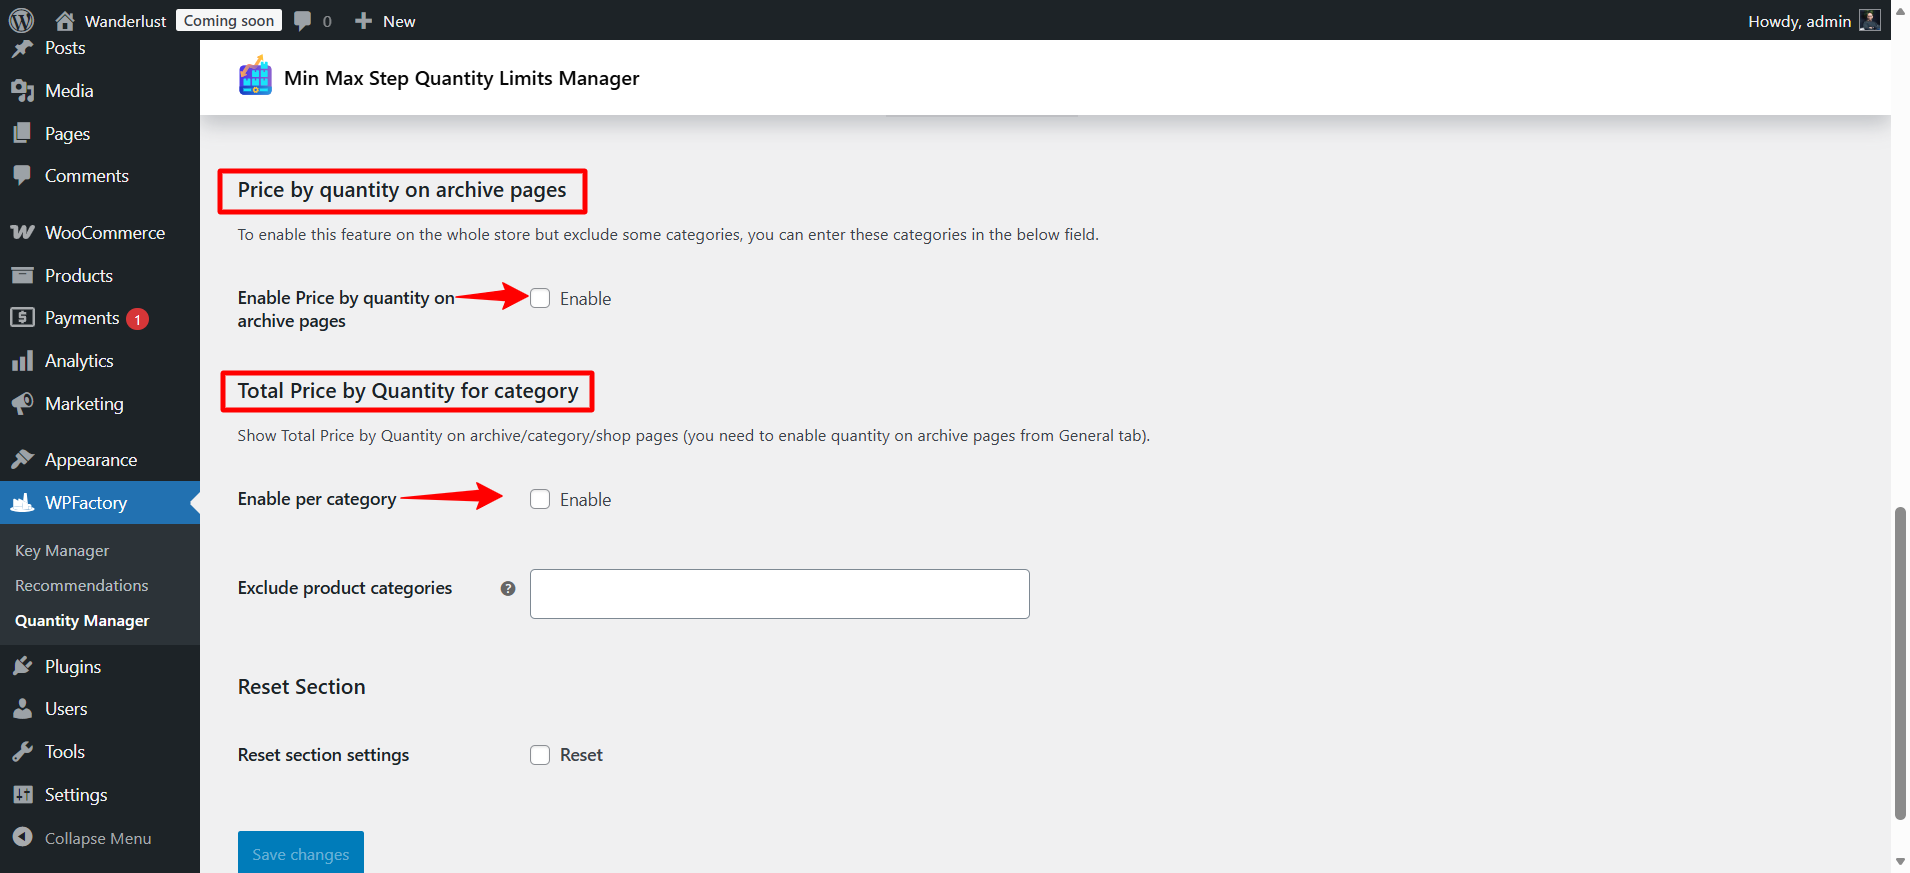
- Price by quantity on archive pages
The feature can be enabled to appear throughout the store on archive pages, categories, and the shop, with the option to exclude certain categories.
The display of quantity on archive pages must first be enabled from the General tab.
- Enable per category
The total price can be displayed by category to make it easier to manage stores that have many products or different categories.
Step11:
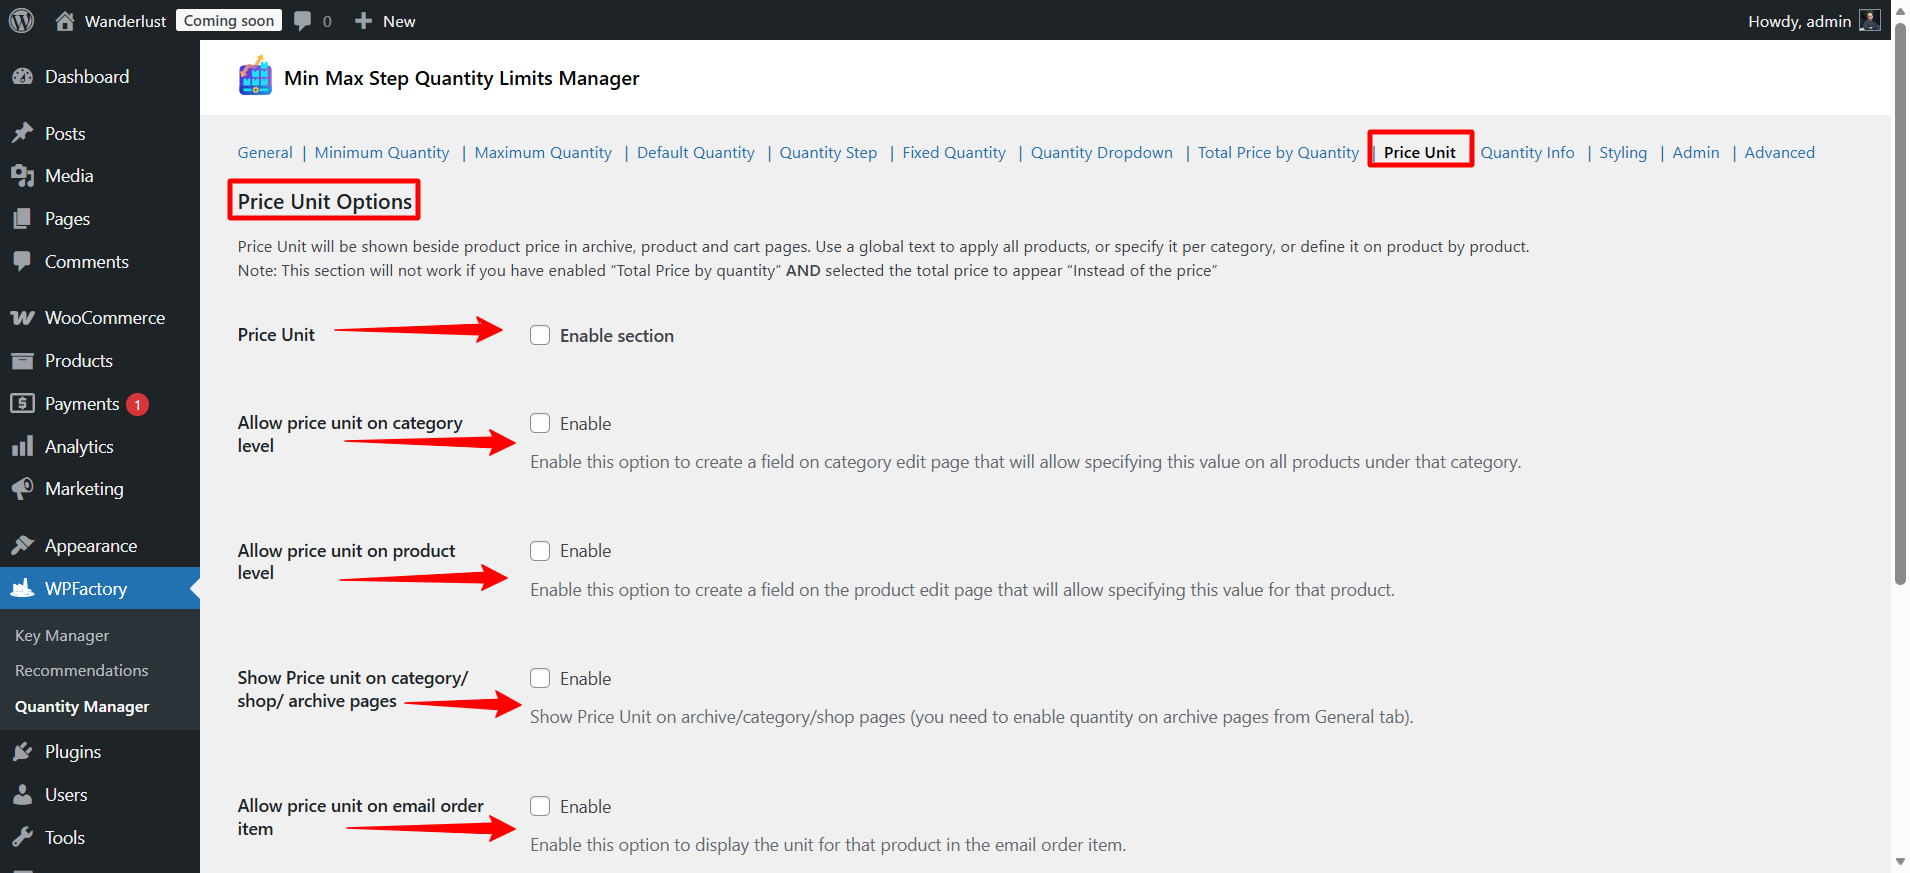
➡Price Unit
These settings allow you to display the price unit next to the product price on product pages, categories, the cart and even in order emails.
Note: This section will not work if you have enabled the Total Price by Quantity feature and chose to display the total price instead of the unit price.
- Price Unit
When activated it, a text or widget will appear next to the price.
Example: “per piece” or “per KG” or “per liter”.
- Allow price unit on category level
When enabled, a field appears on the category edit page to specify the price unit for all products within this category.
Useful for stores that want to apply a fixed price to all products in a specific category.
- Allow price unit on product level
When enabled, a field appears on the product edit page to specify the price unit for each product individually.
It provides greater flexibility when the measurement units differ between products.
- Show Price unit on category/shop/archive pages
The unit price can be displayed next to the product price on archive pages, categories, and the store.
The display of the quantity on archive pages must first be enabled from the General tab.
- Allow price unit on email order item
When activated, the price unit will appear in the product details in the order email, to inform the customer about the price unit on which the price was calculated.
Step12:
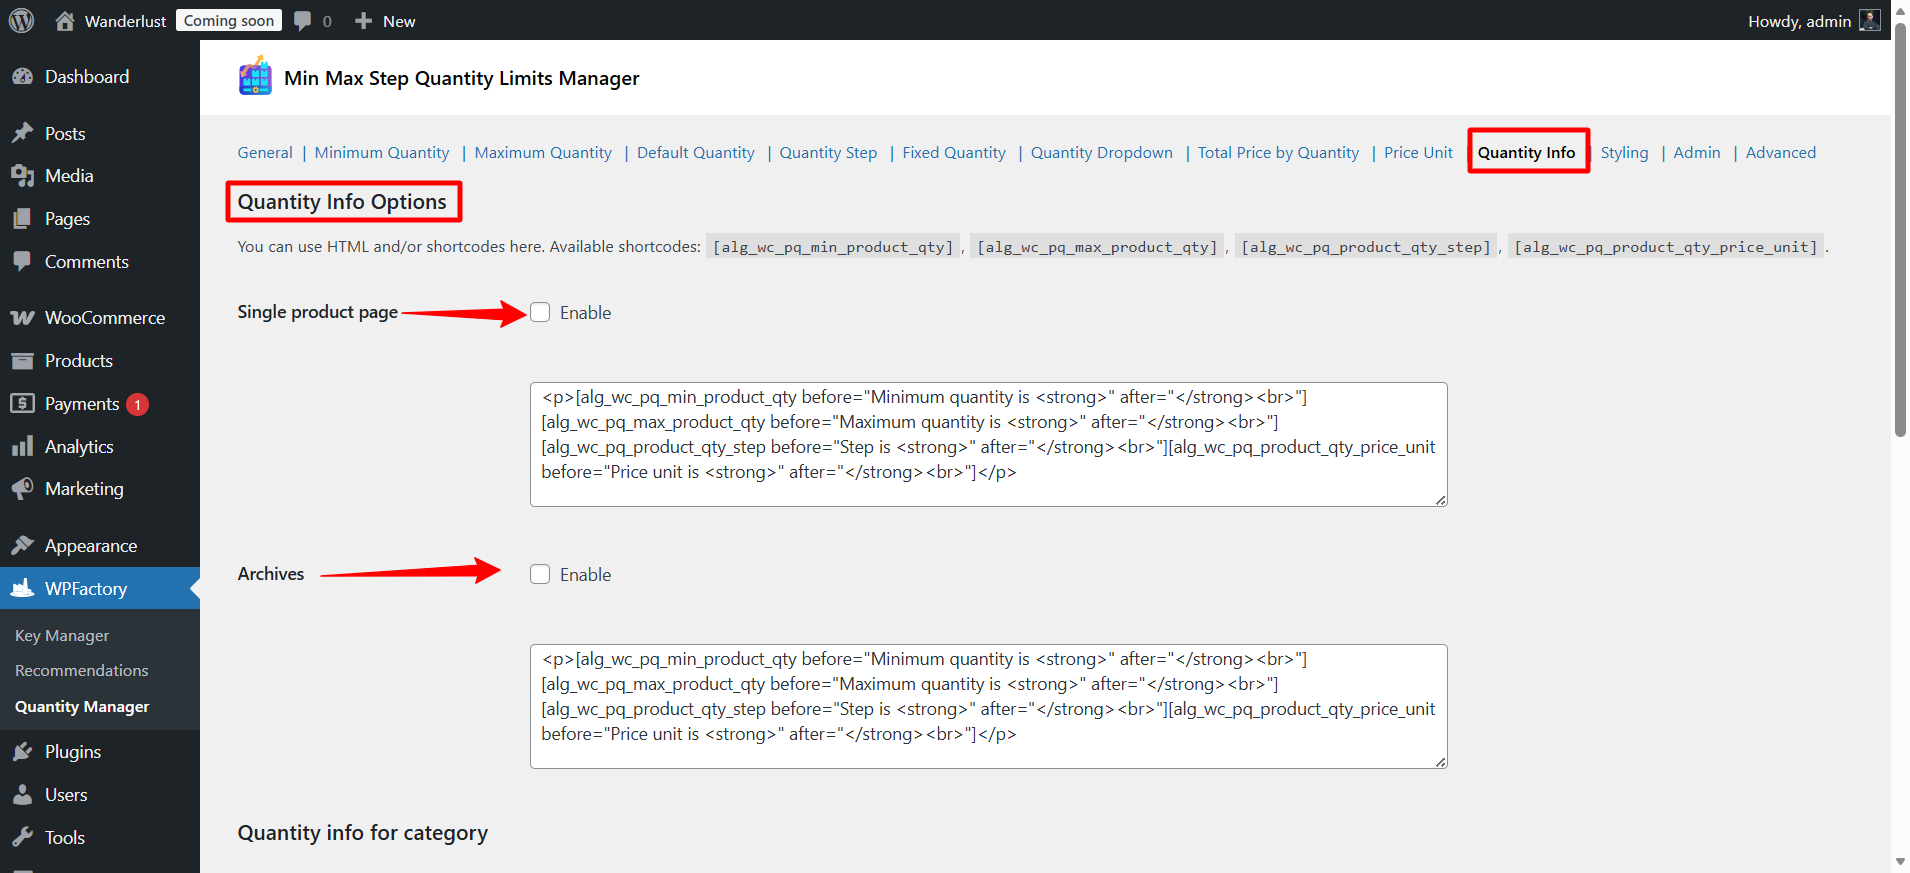
➡Quantity Info
This section allows you to display additional information about the quantity on product or archive pages, such as:
Minimum quantity
Maximum quantity
Step increment
Unit price
You can use HTML and Shortcodes to display this information in the way you want.
- Single Product Page
When activated, the quantity information will be displayed on the product page.
The provided example shows:
Minimum quantity
Maximum quantity
Step
Price unit
inside a <p> paragraph with <strong> formatting to make the values bold.
The result will be like:
Minimum quantity is 5
Maximum quantity is 100
Step is 5
Price unit is pcs
- Archives
When activated, the same quantity information will appear on the pages:
Store
Categories
Archives
Very useful if you want to clarify quantity restrictions before the customer enters the product page.
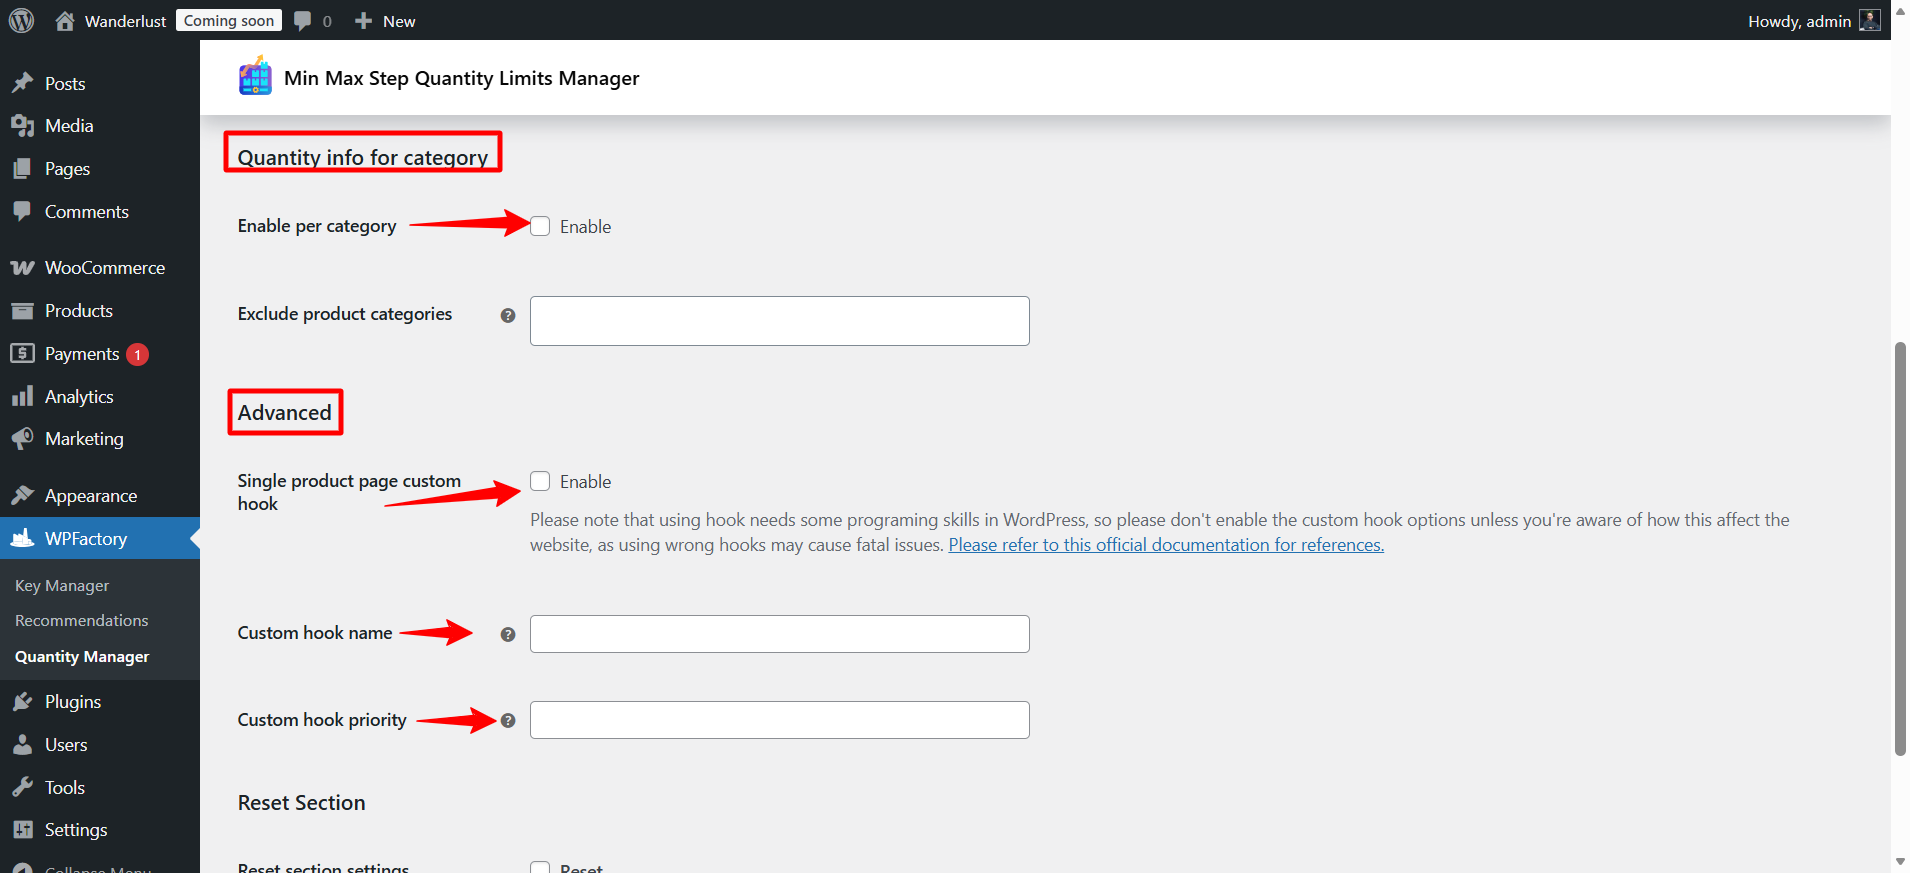
- Quantity info for category
-
You can enable quantity information display for specific categories only.
-
Certain categories (such as Uncategorized) can be excluded.
This gives you greater control if you have products with different quantity rules.
- Advanced
Single product page custom hook
You can specify a custom Hook to display quantity information in a specific location on the product page.
Very important:
This option requires knowledge of WordPress programming.
Using an incorrect hook may cause issues or errors on the site.
- Custom hook name
You write the name of the hook you want to use.
- Custom hook priority
Execution priority is determined (smaller number = appears earlier).
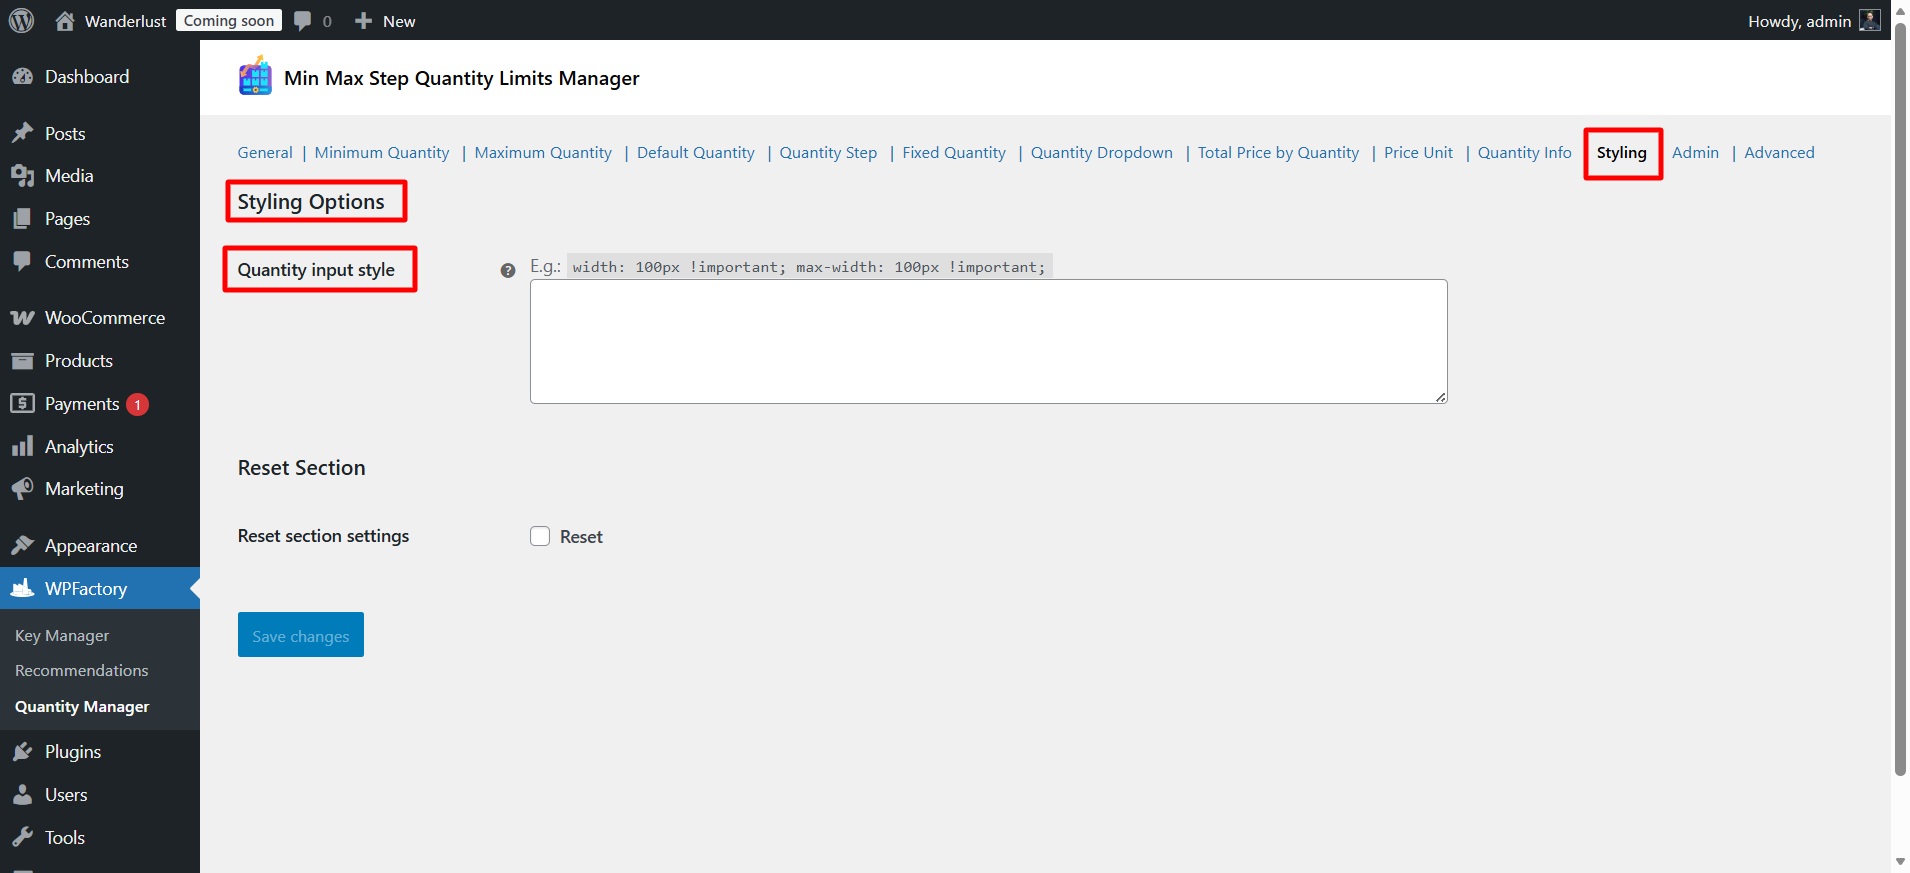
Step13:
➡Styling Options
This section allows you to customize the appearance and design of the Quantity Input field using CSS.
In other words, you can control:
Field width
Maximum width (Max-width)
Height
Font
Colors
Border
Any other CSS styling
- Quantity input style
You can enter CSS code directly into the field to modify the appearance of the quantity field.
Example:
width: 100px !important;
max-width: 100px !important;
In short, the Styling Options section gives you complete freedom to customize the appearance of the quantity field using CSS without modifying the template files.
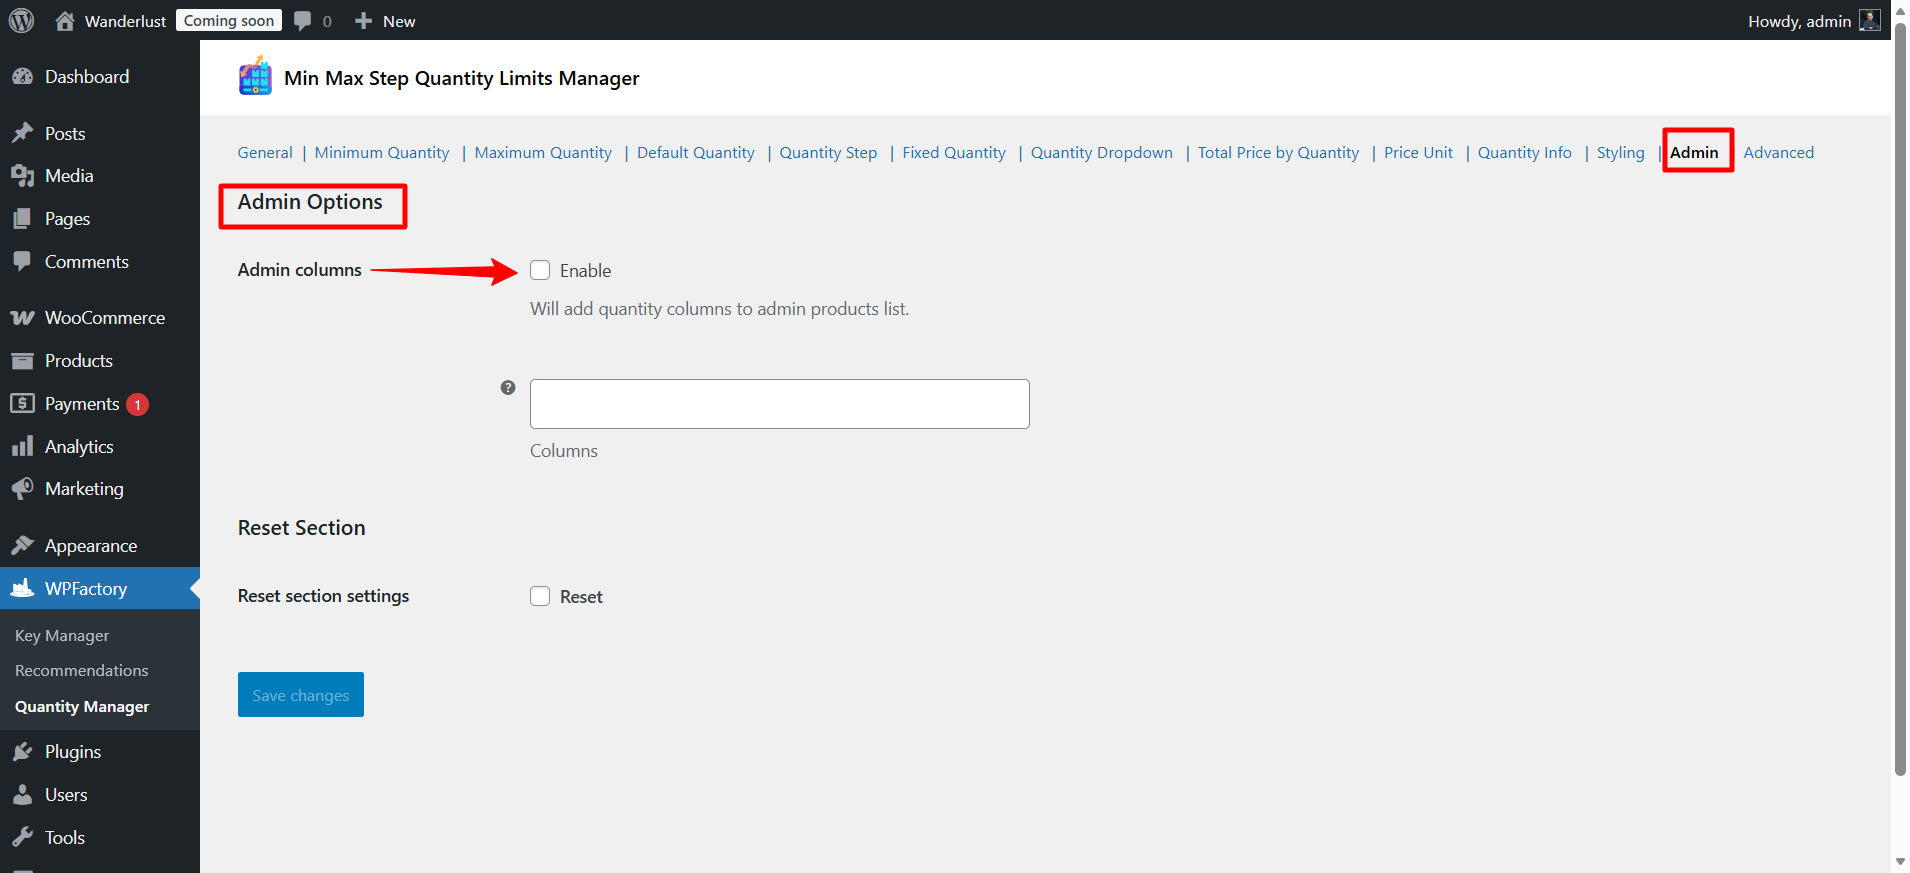
Step14:
➡Admin
This section is dedicated to improving the product management experience within the WordPress dashboard (the Admin).
- Admin Columns
When this option is enabled:
✔ New columns will be added to the Products page in the control panel.
✔ Quantity information will appear directly in the product table without the need to open each product individually.
The columns that will be added:
Min Qty → Minimum Quantity
Max Qty → Maximum Quantity
Qty Step → Step Value
This helps you to:
- Quickly review quantity settings
- Easily detect error
- Manage the store more efficiently, especially if you have a large number of products
Final Thoughts
Managing product quantities in WooCommerce is no longer complicated at all. The WooCommerce Quantity Manager – Min Max Step Quantities Plugin gives you full control over how customers purchase products in your store.
From setting minimum and maximum limits, defining quantity steps and fixed values, to displaying dynamic total pricing and customized dropdown as you want. So, this plugin gives you the flexibility to tailor quantity rules exactly to your business model.
Whether you are running a wholesale store, selling in fixed packs, managing limited stock, or offering products by wight, the WooCommerce Quantity Manager – Min Max Step Quantities is a powerful solution worth implementing.