The Payment Gateways per Products for WooCommerce Pro plugin unlocks the ability to assign specific payment gateways to individual products, offering the most granular control over your checkout experience. This article guides you through configuring payment gateways for individual products.
Steps to Configure (Requires Pro Version)
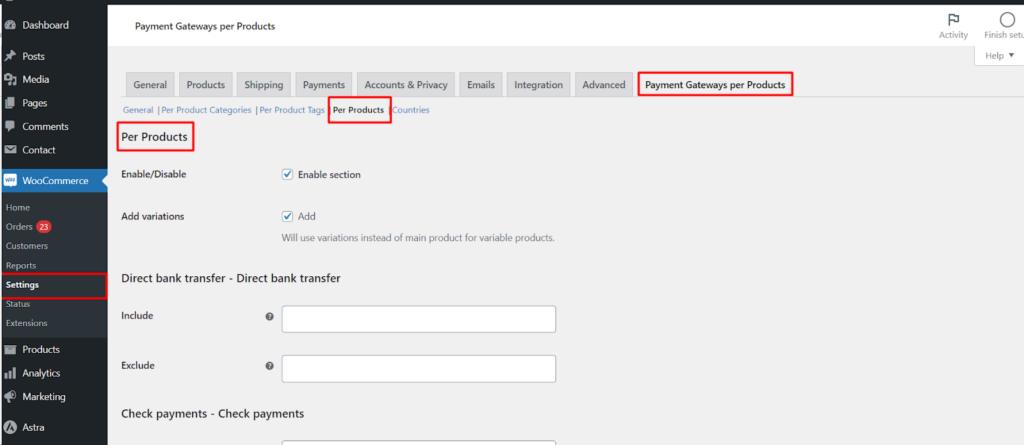
Navigate to the Settings
Select the “Per Products” Section
- Under the Sections tab, choose Per Products.
Configure Payment Gateways
- Enable/Disable: Use the toggle switches next to each payment gateway to enable or disable it for the specific product.
- Include/Exclude: These options are not applicable when assigning gateways to individual products.
Enable “Add Variations” (Optional)
- This feature is relevant for variable products. Tick the checkbox labeled “Add variations” to configure payment gateways for product variations instead of the main product.
Remember
- Click “Save Changes” to apply your configurations.
- You can configure different settings for each payment gateway on a per-product basis.
- This functionality requires the “Payment Gateways per Products for WooCommerce” Pro plugin.
Additional Notes
- The image you provided showcases the settings for the “Per Products” section.
- The “Include” and “Exclude” options are disabled in this section as they are only applicable to product categories and tags.
By strategically assigning payment gateways to individual products, you can cater to specific customer needs and potentially boost your store’s conversion rate
