How to Change Slug in WordPress (Posts, Pages, Products & Categories + WooCommerce)
Need to change a slug in WordPress? Here’s the fastest way to do it for posts, pages, products, and categories.
In WordPress, a slug is the part of the URL that identifies your content. Changing it is simple.. but doing it the right way matters, especially if you want to avoid broken links or SEO issues.
In this guide, you’ll learn:
- How to change slug in WordPress step by step
- How to edit product and category slugs in WooCommerce
- What to watch out for after changing URLs
Quick Start: How to Change a Slug in WordPress
To change a slug in WordPress, open the post, page, or product you want to edit, find the permalink or URL slug field, replace the current slug, and click Update or Publish.
- Go to Posts, Pages, or Products in your dashboard
- Click Edit on the content you want to update
- Find the Permalink / URL slug field
- Enter your new slug
- Click Update, Save Draft, or Publish
For WooCommerce stores, you can also change product slugs, category slugs, and the shop base URL. The detailed steps are below.
What Is a Slug in WordPress (Simple Explanation)
A slug in WordPress is the part of a URL that comes after your domain name and identifies a specific page or post.
For example, in the URL:
yourwebsite.com/change-slug-in-wordpress
The slug is:
change-slug-in-wordpress
Slugs should be short, readable, and relevant to the content. They help both users and search engines understand what the page is about.
Why Change a Slug?
Here are a few common reasons why you might want to edit Slug in WordPress:
1. Improve Readability
Imagine seeing a link like “example.com/post1234” It doesn’t tell you much, right? Now compare it to “example.com/easy-pasta-recipes”.
The second one is clearer, easier to remember, and more inviting to click. So, changing slugs helps visitors understand what your page is about right away.
2. Fix Typos or Errors
Mistakes happen! Maybe you wrote the slug as “example.com/recpies” instead of “example.com/recipes”! correcting typos ensures your website looks polished and professional.
3. Optimize for SEO
Search engines use slugs to understand your page.
Including relevant keywords in the slug, like: “example.com/best-travel-tips” can help your page rank higher in search results.
Updating your slug to include those keywords gives your page a better chance to be found.
4. Make It Shorter
Long slugs can look messy and be harder to share.
If your slug is something like:
“Example.com/how-to-cook-delicious-homemade-lasagna” shortening it to “Example.com/lasagna-recipe” makes it cleaner and more user-friendly.
5. Align with New Content
Sometimes, you might update a page’s content, and the old slug no longer matches.
➡ For example:
If your blog post title changes from “Best Gardening Tips” to “Top Gardening Hacks,” updating the slug to match keeps everything consistent.
Types of Slugs in WordPress
In WordPress, slugs are used across different types of content, not just posts and pages. Understanding where slugs appear helps you manage URLs more effectively.
- Post Slugs – Used for blog articles and standard content
- Page Slugs – Used for static pages like About or Contact
- Product Slugs – Used in WooCommerce product URLs
- Category Slugs – Define URL structure for grouped content
- Tag Slugs – Used for tagging and organizing posts
Each type of slug plays a role in how your URLs are structured and how users and search engines navigate your site.
How do you change Slug in WordPress without breaking links? (Detailed explanation)
Editing a slug in WordPress is simple, and the steps are almost the same whether it’s for a post, page, or product.
👉 Here’s how to do it without breaking a sweat:
1. Log in to Your WordPress Dashboard
Log in to access all your site’s settings and content.
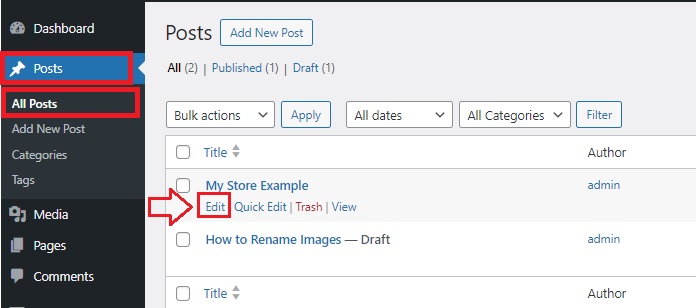
2. Find the Post, Page, or Product You Want to Edit
- For Posts: Go to Posts > All Posts.
- For Pages: Navigate to Pages > All Pages.
- For Products (if using WooCommerce): Go to Products > All Products.
Scroll through the list or use the search bar to find the content you want to update.
3. Open the Content Editor
Click Edit under the post, page, or product title to open the editor.
This is where you can make changes to your content and settings.
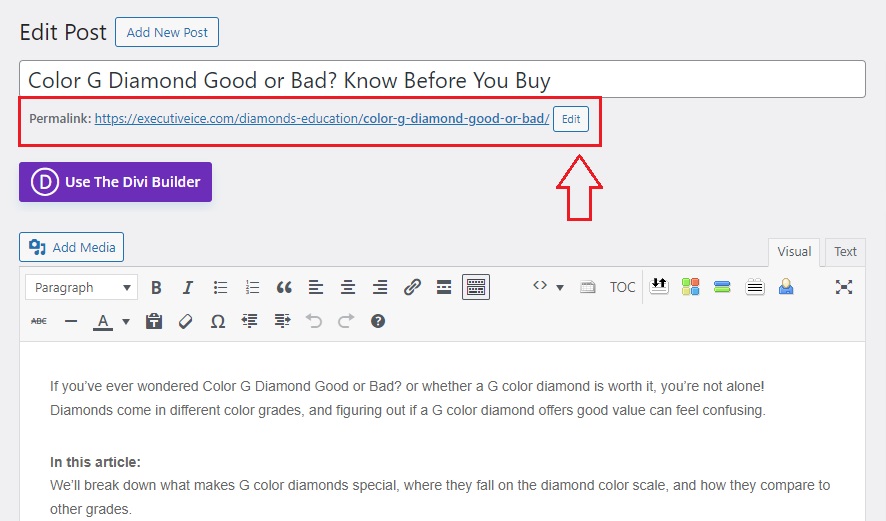
4. Locate the Permalink (Slug) Section
Just below the title field, you’ll see the Permalink section.
This shows the current slug, usually displayed as part of the full URL (e.g., example.com/current-slug).
5. Edit the Slug
- Click inside the slug box to edit it.
- Type your new slug, making it clear, short, and easy to read, use lowercase letters and hyphens to separate words (e.g., new-slug-example).
- Avoid spaces, special characters, or overly long phrases.
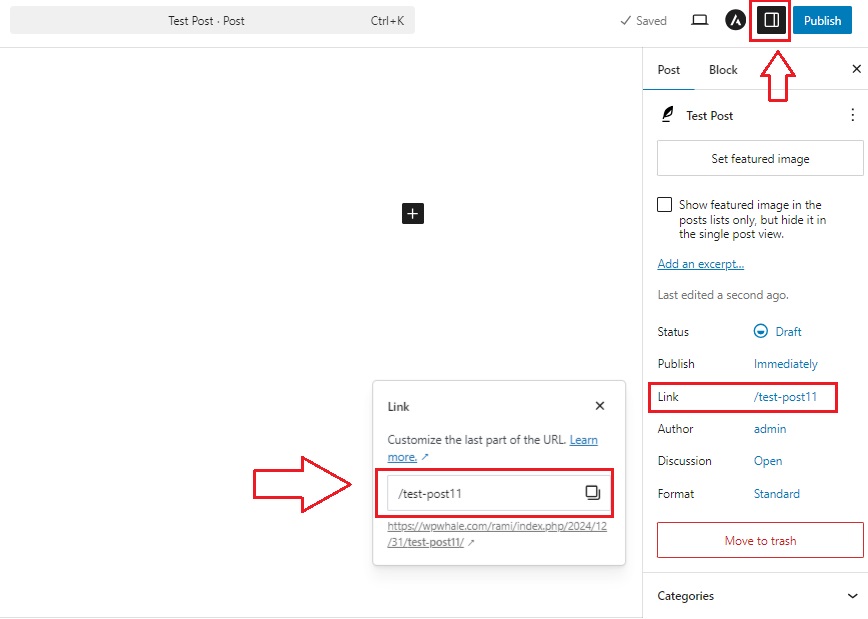
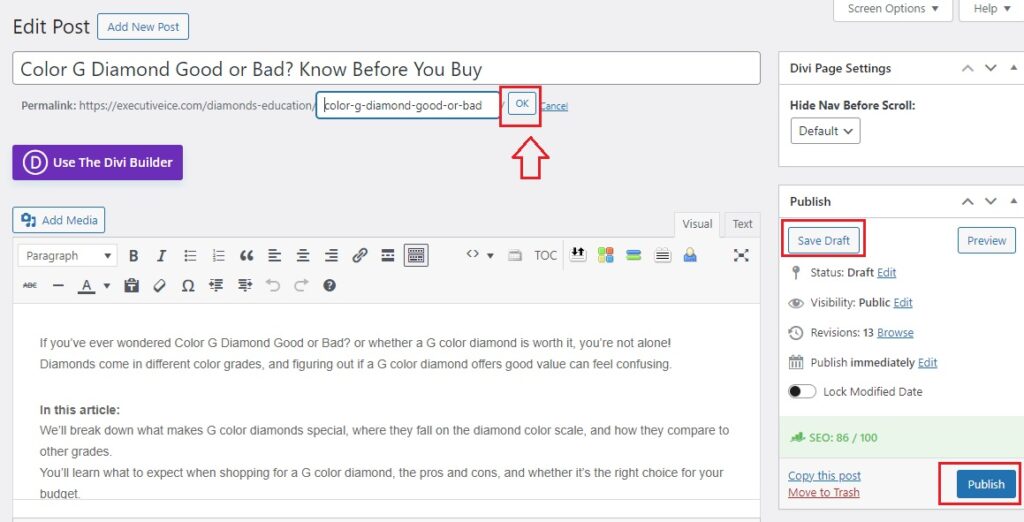
Note: You may have the editor like this 👇
6. Save Your Changes
Once you’ve updated the slug, click Save Draft, Update, or Publish, depending on the status of the content.
This will apply the new slug to your post, page, or product.
Or like this 👇
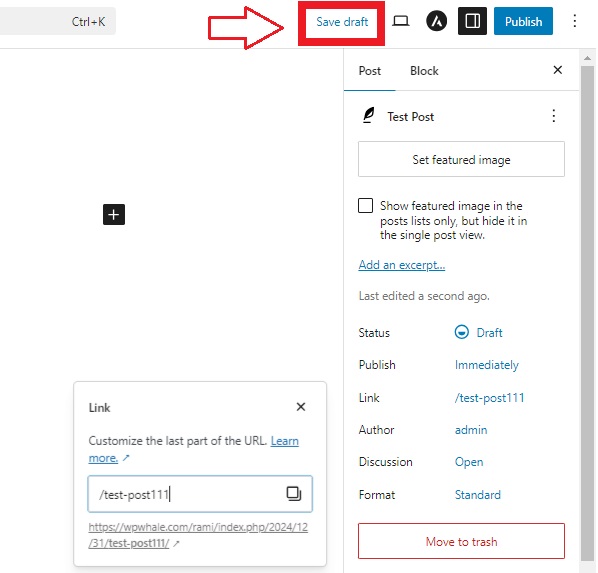
7. Set Up a Redirect for the Old Slug
Modifying a WordPress URL slug means the old URL will no longer work, so you’ll need to set up a redirect.
- Use a plugin like Redirection or Yoast SEO to create a 301 redirect from the old slug to the new one.
- This ensures visitors who use the old link will automatically be sent to the updated page, avoiding a “404 Page Not Found” error.
8. Double-Check the New Link
Once everything is saved, click on the updated link to make sure it works and leads to the right content.
You may be interested in:
Links (URL) Special Characters Removal for WordPress
How to Change Slugs in WooCommerce (Products, Categories & Shop URL)
If you’re running a WooCommerce store, changing slugs isn’t limited to posts and pages. You’ll also need to manage product URLs, category links, and your shop base.
Here’s how to handle each one without breaking your store structure.
1. How to Change Product Slugs in WooCommerce
Product slugs work the same way as post slugs, but they directly affect your product URLs.
To change a product slug:
- Go to Products → All Products
- Edit the product you want
- Find the Permalink / URL slug field
- Update the slug and save
👉 This changes the product URL, so make sure it stays relevant and readable.
2. How to Change Product Category Slugs
Category slugs define the structure of your product URLs, especially in stores with multiple categories.
To change a category slug:
- Go to Products → Categories
- Find the category
- Click Edit
- Update the Slug field
- Save changes
👉 This affects all products inside that category, so plan changes carefully.
3. How to Change the Shop Base Slug (Shop URL)
The shop base slug controls your main store URL structure (e.g., /shop/).
To change it:
- Go to Settings → Permalinks
- Scroll to Product permalinks
- Choose a structure or customize it
- Modify the Shop base if needed
- Save changes
👉 This impacts your entire store URL structure, so avoid frequent changes.
What to Watch Out for When Changing WooCommerce Slugs
Changing slugs in WooCommerce affects more than just URLs.
Keep in mind:
- Old links may stop working
- Search engines may need time to reindex
- Internal links might break if not updated
👉 This is especially important for growing stores with many products and categories.
We’re not done! Old slugs are a problem!
When you change Slug in WordPress, the old slug doesn’t just disappear! Yes, it stays in your database!
At first, this might not seem like a big deal, but old slugs can cause problems if they’re left unmanaged.
👉 Here’s why:
-
Clutters Your Database
Imagine a closet filled with clothes you don’t wear anymore!
It’s harder to find the things you need, and it takes up unnecessary space.
Old slugs work the same way! they pile up in your database, making it bigger and harder for WordPress to work efficiently.
-
Confuses Search Engines
Search engines like Google use your slugs to understand your site’s content.
If old slugs are still hanging around, they might point to non-existent pages or create duplicate content.
This can hurt your search engine rankings and make it harder for people to find your site.
-
Leads to Broken Links
Visitors or search engines might still try to access your old slug, leading to a “404 Page Not Found” error.
-
Wastes SEO Opportunities
Every slug is an opportunity to help your site rank better in search results.
Old slugs that no longer connect to content waste these opportunities and can even create competition between old and new URLs on your site.
-
Harder Site Management
As more old slugs build up, managing your WordPress site becomes more difficult.
Imagine trying to fix an issue or organize your URLs with dozens of unused slugs cluttering your system, it’s time-consuming and frustrating.
A Smart Way to Clean Up Old Slugs
Instead of going through your database manually, you can use a smart tool to manage old slugs like the Slugs Manager plugin to take care of the mess for you.

👉 Why do we recommend this plugin?
1. Automatically Identify Old Slugs
The plugin scans your database and finds all the outdated slugs left behind from changes or deletions.
It’s like having a super-organized assistant who points out exactly what needs cleaning up.
2. Choose What to Remove
With Slugs Manager, you get a clear list of all the old slugs, including details like:
- The original slug.
- The post or page it belonged to.
- The current slug, if it has been updated.
You can decide whether to delete specific slugs or remove everything in one go.
3. Prevent Broken Links
One of the plugin’s best features is its ability to handle redirects.
After cleaning up old slugs, you won’t have to worry about visitors landing on a “404 Page Not Found” error.
The plugin ensures everyone is directed to the correct page automatically.
4. Save Time and Effort
Instead of spending hours manually searching for and deleting old slugs, Slugs Manager does the job in minutes.
It’s especially helpful if you have a large website with lots of posts and pages.
5. Keep Your Site Running Smoothly
By cleaning up old slugs, the plugin helps reduce clutter in your database, which improves your site’s performance and keeps everything running efficiently.
The Slugs Manager WordPress plugin is an easy-to-use tool that takes the stress out of cleaning up old slugs, it’s a smart solution for anyone who wants to save time and keep their site in top shape!
👉 If you’re curious about how to set it up step by step, check out our article: “How do I remove old slugs from WordPress“, where we’ve explained the process in detail!
You may be interested in:
WordPress Bulk Edit Filenames in Seconds!
Common Issues When Changing Slugs in WordPress (And How to Fix Them)
Changing a slug in WordPress is simple, but sometimes things don’t behave as expected. Here are the most common issues users run into and how to fix them quickly.
1. Old Slug Still Redirecting
After updating a slug, you might notice that the old URL still redirects to the new one. This happens because WordPress automatically creates a redirect to avoid broken links.
What to do: In most cases, this is helpful and should be left as is. If you want to remove it, you’ll need to delete old slug data or manage redirects manually using a plugin.
2. Slug Field is Greyed Out
If you can’t edit the slug, it may be locked by your permalink settings, post status, or user permissions.
What to do: Make sure the post is saved as draft or published, check your user role permissions, and confirm that custom permalink structures are enabled in Settings → Permalinks.
3. Slug Not Updating After Saving
You update the slug, click save, but the URL doesn’t change. This can happen due to caching, conflicts, or duplicate slugs.
What to do: Try clearing your site cache, make sure the slug is unique, and refresh the page. If the issue persists, check for plugin conflicts.
4. Duplicate Slug Automatically Changed
If WordPress detects a duplicate slug, it may automatically add a number (like -2) to make it unique.
What to do: Edit or delete the original content using that slug, or choose a different slug that clearly identifies your content.
5. Slug Changes Break Internal Links
After changing a slug, any internal links pointing to the old URL may stop working.
What to do: Update internal links manually or use a plugin to handle redirects and keep your links working properly.
Best Practices When Changing Slugs in WordPress
- Keep your slug short and readable
- Use keywords that match your content
- Avoid changing slugs frequently
- Update internal links after changing a slug
- Monitor traffic after updating URLs
Conclusion
- Why Change a Slug?: Updating slugs improves readability, SEO, and user experience while fixing typos or outdated links.
- How to Do It Right: Changing slugs in WordPress is easy, but setting up redirects is essential to avoid broken links.
- The Problem with Old Slugs: Old slugs can clutter your database, slow down your site, and confuse search engines.
- A Smart Solution: Using tools like the Slugs Manager plugin makes cleaning up old slugs quick and hassle-free.
- Step-by-Step Guide: For detailed instructions on setting up Slugs Manager plugin, check out our article: “How do I remove old slugs from WordPress“.
After all of the above, you will easily change Slug in WordPress and keep your site clean, professional, and running smoothly for both visitors and search engines!
Frequently Asked Questions About Slugs in WordPress
Can I change a slug after publishing?
Yes, you can change a slug in WordPress at any time. However, changing a slug after publishing may affect existing links and search rankings if redirects are not handled properly.
Does changing a slug affect SEO?
Yes, changing a slug can impact SEO because it changes the page URL. If the old URL is already indexed, you should ensure proper redirects are in place to avoid losing traffic.
Why is my slug not updating in WordPress?
If your slug is not updating, it may be due to caching, duplicate slugs, or plugin conflicts. Try clearing your cache, ensuring the slug is unique, and refreshing the page.
Why is the slug field greyed out?
The slug field may be locked due to permalink settings, user permissions, or the post status. Make sure your post is saved and that you have the right permissions to edit it.
What happens to the old slug after I change it?
WordPress may automatically redirect the old slug to the new one to prevent broken links. This helps maintain user experience and avoids 404 errors.
Can I change product slugs in WooCommerce?
Yes, WooCommerce allows you to change product slugs, category slugs, and even the shop URL structure. These changes affect how your product URLs appear to customers.
How do I choose a good slug in WordPress?
A good slug should be short, clear, and relevant to your content. Use simple words, include keywords when appropriate, and avoid unnecessary numbers or symbols.