

4 Best Plugins to Create WordPress Registration (Signup) Forms
By default, there are no modification options available to create Custom WordPress Registration & Login Forms. This means it will have a different appearance from your website. There’s not much you can do to fix this unless you know how to code.
In this post, we’ll demonstrate how to use WordPress plugins, to develop personalized WordPress registration and login forms.
Create Custom WordPress Registration
With WordPress, you may grant special access to specific areas of your website to visitors via the login and registration pages. You can improve several facets of your visitors’ user experience. Additionally, you may use certain membership perks to advertise your company.
Using various plugins is the most popular method for creating and adding a login and registration page in WordPress. You can easily construct login and registration forms using WordPress registration plugins. They also provide extra features like account pages, password recovery, payment integration, and more.
Read this post to learn how to create Custom WordPress Registration & Login Forms. We’ll also explain why WordPress requires a login and registration page.
Benefits of Custom Registration and Login Forms
You may improve the user experience on your website by using personalized login and registration forms, which will make it much simpler for new users to register or sign up.
Let’s discuss some more benefits of Creating Custom WordPress Registration & Login Forms:
Give your website a unique feel:
With custom login and user registration forms, you may alter and personalize the front-end appearance of your website. This helps in giving your website a more distinctive appearance and offers you total control over its appearance and feel. It may therefore assist in making your brand stand out from the competitors.
Provide simple ways for users to register:
It is your goal as a website owner to have user registrations on your site simple to use and intuitive. More individuals will be able to finish their registration in this way.
Make your website easier to use:
You may also improve the usability of your website by utilizing personalized registration and login forms. It facilitates faster account login for users and improves on-site navigation.
Control and oversee users on your website:
You may effectively control and manage registered users on your website by using personalized login and registration forms. This implies that you can provide role-based limitations for your website’s premium content.
One such approach would be to provide three distinct membership tiers Gold, Silver, and Bronze membership plans. You may restrict material according to the user role and charge varying prices for each membership level.
In conclusion, when it comes to creating login and user registration forms, WordPress doesn’t provide you with many options. ProfilePress is the answer.
How to Plan Your Custom Forms Before Starting to Create Custom WordPress Registration?
In theory, there are countless methods for including a registration form on your WordPress website. Every procedure is unique depending on how you build your form, especially if you start adding distinctive custom fields.
Nonetheless, there are four main approaches to including a user registration form, and all of them are achievable with the appropriate skills and resources. But knowing which approach is best for you depends on several factors.
The following techniques can be used to activate a registration module. It might be difficult to decide which approach is best, but factors such as your desired feature set and business structure should be taken into account:
-
WordPress’s default registration
This is the quickest and easiest way to allow users to register on your website. It’s not intended for people who require a complicated or customized registration form.
For smaller websites and blogs that just require the collection of a name and email address, the integrated WordPress registration feature is noteworthy. Remember that the WordPress signup form by default offers few design options.
-
Incorporating an external registration module
Your WordPress website is integrated with an external program or application.
If you find a registration form builder that has the functionality you want but doesn’t have a WordPress plugin, then this procedure makes sense.
Since installing or displaying the registration module on your WordPress website normally requires some effort on your part, like using an embed code, a third-party form might occasionally be more complex than a plugin.
-
Employing a plugin for registration
User registration plugins are appealing to us for two reasons. They do away with the necessity for special coding and tinkering with other people’s tools, to start. Second, large feature lists of reliable plugins make it simple for anybody to create and use elegant registration forms. Therefore, plugins make sense for both developers looking for a simpler solution and newcomers who aren’t familiar with coding.
-
Using unique coding on the registration form
This option is just for companies who need a different user registration interface. Additionally, you must have the funds to hire a developer to create that unique form.
Finally, Mobile accessibility and responsiveness are taken into account with all these techniques.
Tools and Plugins for Creating Custom Forms
Fortunately, you can create custom WordPress registration and login Forms more quickly with WordPress thanks to a variety of form builder plugins.
The top three contact form plugins will be discussed in this paragraph to assist you in selecting the finest option.
WP Forms
With the help of pre-built templates, WPForms is an easy-to-use WordPress plugin that enables users to swiftly construct contact forms. It offers great speed and performance on all platforms, is mobile-responsive, and is ideal for SEO.
Design operations are made simpler using the drag-and-drop builder offered by WPForms. This plugin for contact forms also includes a capability for file uploads. In the WordPress admin panel, you may gather material that users have provided in this manner.
WPForms – Easy Form Builder for WordPress – Contact Forms, Payment Forms, Surveys, & More
From the free version, users may subscribe to one of the premium plans. You may get priority assistance, professional site administration, and extensive customization tools with the premium version.
Important Elements of WPForms
-
- Create as many personalized and basic contact forms as you need with a limitless form creator.
- Spam protection by Google reCAPTCHA and hCaptcha are integrated into this WordPress plugin to prevent spam.
- Form Locker, use passwords and memberships to manage form access and permissions
- Wide-ranging tool integration facilitates the use of several marketing and payment platforms to generate mail lists, collect payments, and manage customer relationships (CRM).
ARForms
ARForms is a versatile and user-friendly WordPress plugin designed to create custom forms with ease. With its drag-and-drop builder, you can quickly design contact forms, registration forms, and more, without any coding knowledge.
ARForms offers a wide range of pre-built templates and customization options to help you create forms that match your website’s design. It also integrates seamlessly with popular email marketing services, payment gateways, and CRM platforms.
Price: The Premium version of ARForms, priced at just $39, offers all premium features and support. WordPress users can download the Lite version for free.
Important Elements of ARForms:
- Utilize conditional logic to dynamically show or hide fields based on user input, enhancing form interactivity.
- Enhance user experience by breaking down lengthy forms into multi-step processes.
- Seamlessly integrate payments through PayPal, Stripe, and other gateways directly from your forms.
- Receive instant email notifications upon form submission for timely follow-ups.
- Gain insights into form performance with detailed analytics.
- Safeguard your forms from spam with Google reCAPTCHA and hCaptcha integration.
- Create forms effortlessly using a drag-and-drop builder with an intuitive interface.
- Ensure GDPR compliance by incorporating consent checkboxes and data privacy notices into your forms.
Gravity Forms
The greatest plugin for creating personalized forms is Gravity Forms. If you were creating a job application form, for example, you might include columns, a place for resumes to be uploaded as a file, and a checkbox for the terms and conditions.
Then, you could distribute these features across several pages to make the process of filling out the form less daunting. Furthermore, designing and creating such sorts of customized forms is made simple for everyone—not just developers—by the drag-and-drop visual builder.
Although Gravity Forms has always been a good option, the most recent iteration keeps everyone satisfied.
For instance, designers may improve form styling using the WordPress block editor rather than bespoke CSS, developers have access to over 100 new components, and the much-expected Conversational Forms add-on allows you to provide your consumers with a more customized and engaging experience.
Important Elements of Gravity Forms:
-
- Create and design more personalized forms.
- Wonderful assortment of accessories.
Profile Builder
The WordPress plugin that combines user registration and profile creation in one is called Profile Builder.
For front-end user registration, login, and profile form editing with custom fields, choose an elegant and dependable plugin.
Additionally, you can utilize the integrated Role Editor to manage user roles and capabilities and limit content depending on logged-in status or user role.
With attractive GDPR-compliant login and registration forms, personalized user profiles, and all the user management features you want in one reliable solution, you can improve user experience and increase sign-ups.
Important Elements of Profile Builder:
-
- Reorder user profile fields by dragging and dropping them.
- Include a space for users to upload and maintain their avatars on your website.
- Turn on Email Verification.
- Select whether to enforce WordPress password requirements by defining a minimum password strength and length, or by allowing users to log in using just their username or email.
- Support for reCAPTCHA on WordPress default forms and Profile Builder.
- Content restriction: limit material according to the role or logged-in state of the user at that moment.
- Limit the goods and store page in WooCommerce.
- Support for invisible reCAPTCHA on both WordPress default forms and Profile Builder forms.
- Create a WordPress private website that is only accessible by members or users that are logged in.
- GDPR: In accordance with the new GDPR legal regulations, get users’ consent before collecting any personal data about them.
Step-by-Step Guide to Creating Custom Forms
Here, we’ll walk you through utilizing the WP Forms plugin to Create a Custom WordPress Registration & Login Forms plan for your website.
-
Set up the plugin for WPForms
The greatest contact form builder for WordPress sign-up forms is WPForms. WPForms Pro comes with expensive plugins that enable more advanced capabilities like user registration, although the free version lets you construct basic contact forms.
The best part is that you can create your own WordPress registration form using WPForms without any prior knowledge of HTML, PHP, or CSS. Anyone may utilize this easy-to-use drag-and-drop form builder.
The WPForms plugin must be installed and activated before you can proceed. Installing this form plugin is fairly easy even for inexperienced users.
We’ll be utilizing the User Registration plugin to construct registration forms, so be sure to get the WPForms Pro plan.
-
Turn on the Addon for User Registration
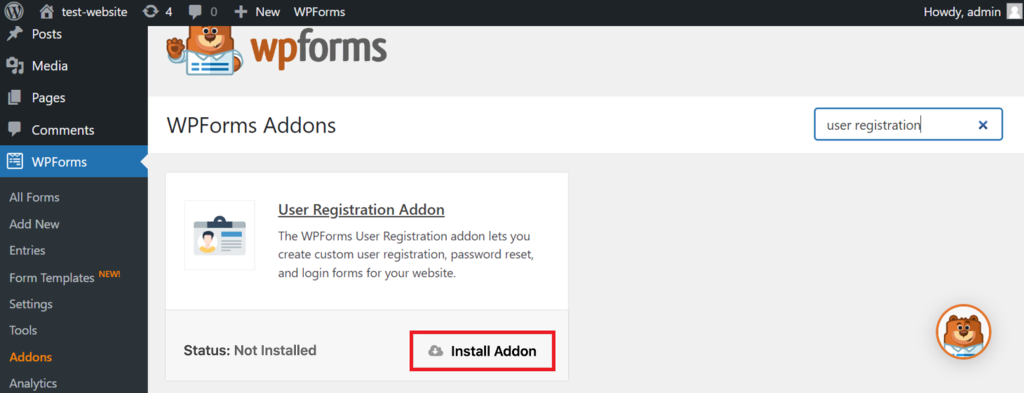
Installing and turning on the User Registration extension is the next step after installing WPForms on your website. Go to WPForms then choose Addons from your WordPress admin area to obtain this extension.
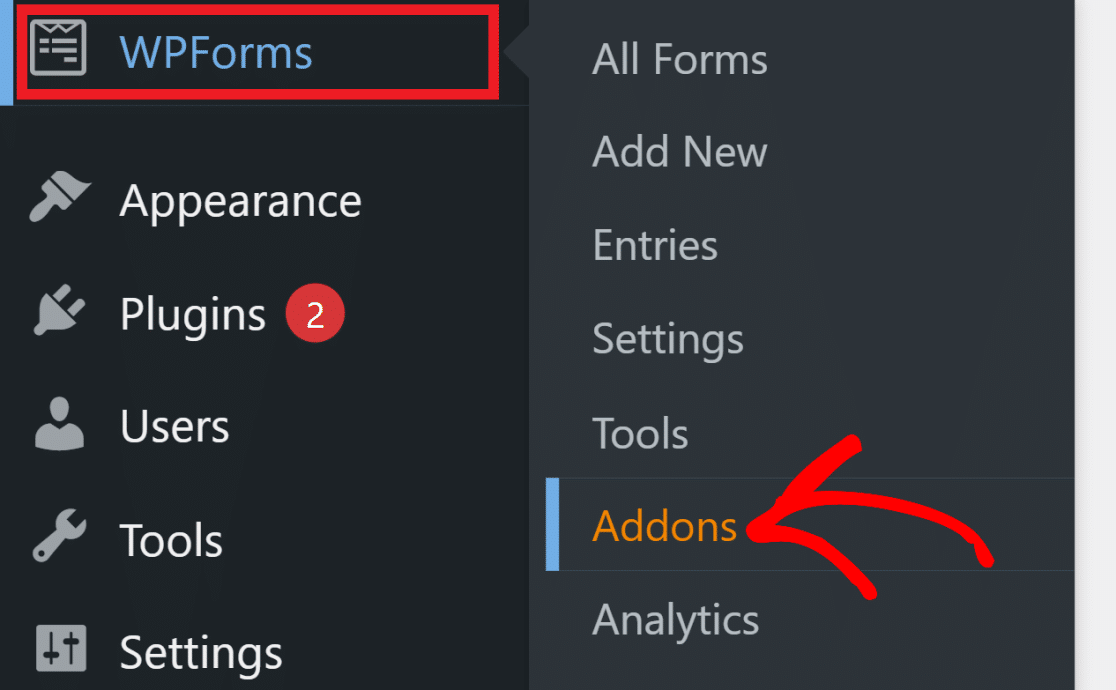
The WPForms Addons page will open as a result. To discover the User Registration addition, either scroll through the list of addons or just put “user registration” into the search bar. To start the installation, click Install Addon.
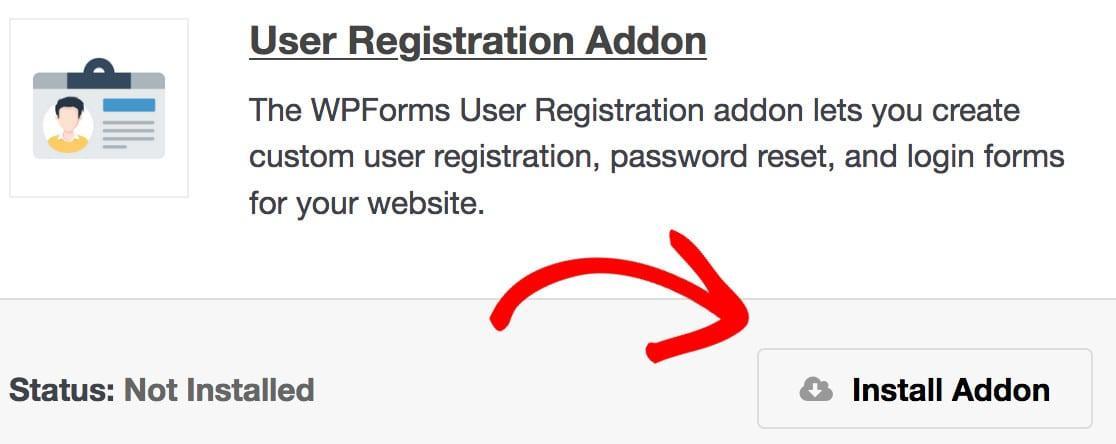
You will now see the status under the User Registration addon as Active. Fantastic work! We may begin utilizing WPForms to create WordPress user registration forms now that the User Registration plugin is available.
-
Establish a WordPress User Registration Form
Select WPForms then choose Add New to start a new registration form creation process. The form setup screen will now appear, allowing you to choose a template and give your form a name.
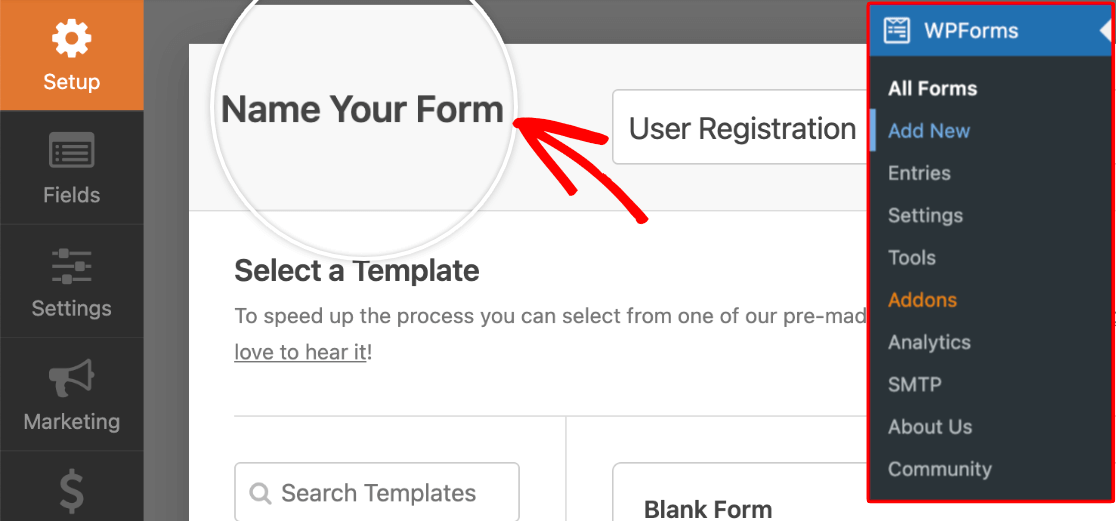
We’ll build the WordPress sign-up form from scratch in this example, which is rather simple. However, you may also create a user registration form using a template if you want to do this task even more quickly. Click the Create Blank Form button now.
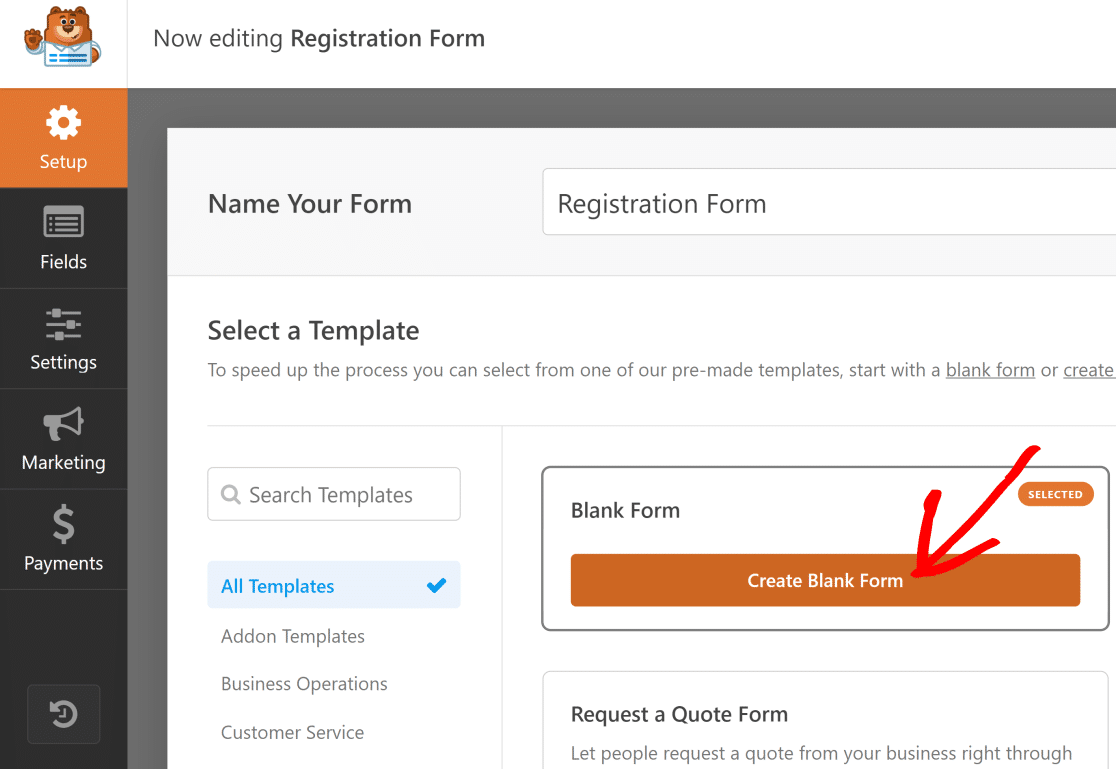
The form builder screen should now be visible to you. Since we selected to create a new form by selecting the Blank Form option, the form will now be empty.
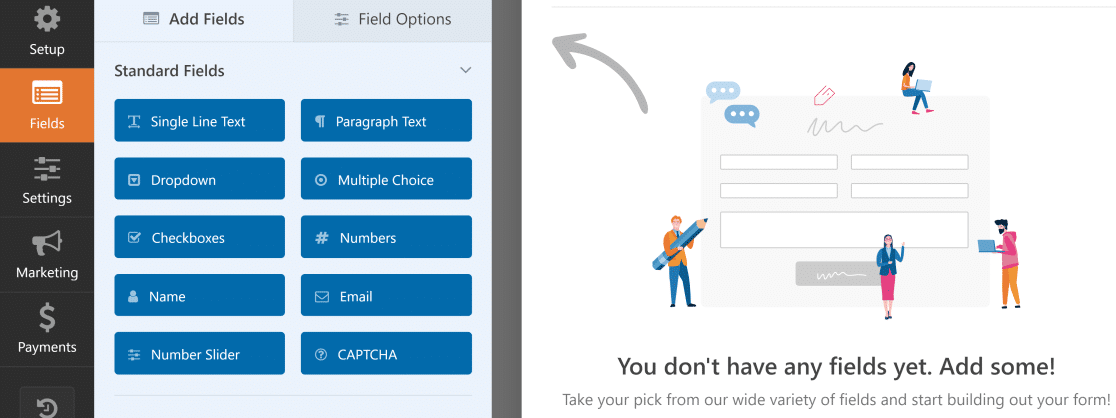
WPForms comes with a ton of custom fields that you may add as required and is quite customizable.
In the next phases, we’ll make use of its numerous registration features.
-
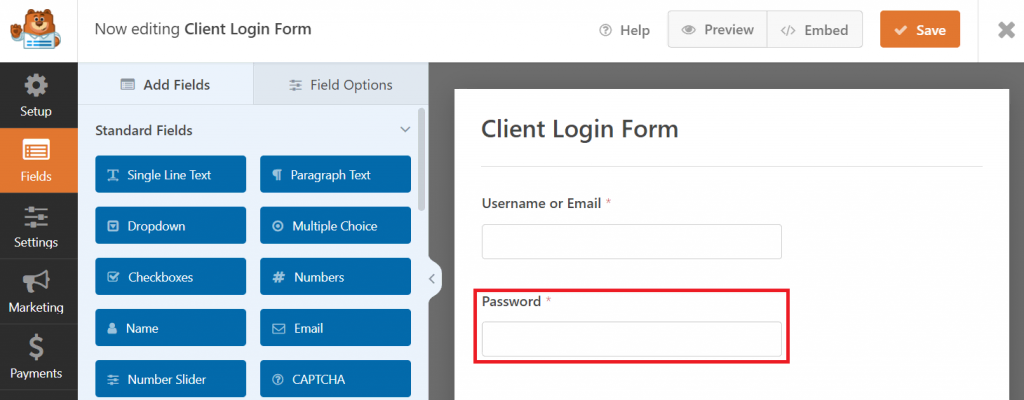
Modify the Fields on the User Registration Form
To gather user data, we’ll construct a very basic registration form and include only the most necessary fields. This is to make the registration procedure as quick and easy as possible.
Although users are far more likely to leave longer forms, you may still collect leads by utilizing the Form Abandonment extension from WPForms.
Let’s now add some fields by utilizing the straightforward drag-and-drop form builder. All you have to do is drag and drop a field onto your form on the right after selecting it in the left-hand pane.
Continue doing this until all the fields you want to add are added. We included the following fields in our form:
- Name
- One Line Text (to be entered as the username)
- Password
Your form fields’ choices are simple to alter. For example, we created an input mask to regulate allowable characters for the username, changed the name of the Single Line Text field to Username, and set a maximum character limit.
Click on any field to bring up the Field Options and start customizing it. You may select whether you want the field to be mandatory, provide a description, and alter the field’s label under the General tab of Field Options.
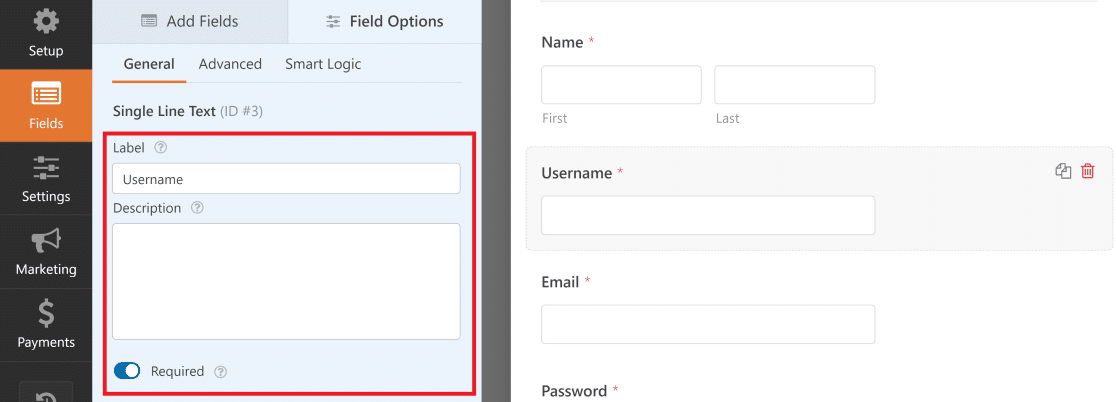
Typically, usernames don’t include any special characters—just alphanumeric characters. You may make the Username field only allow letters or alphabets by enforcing this restriction.
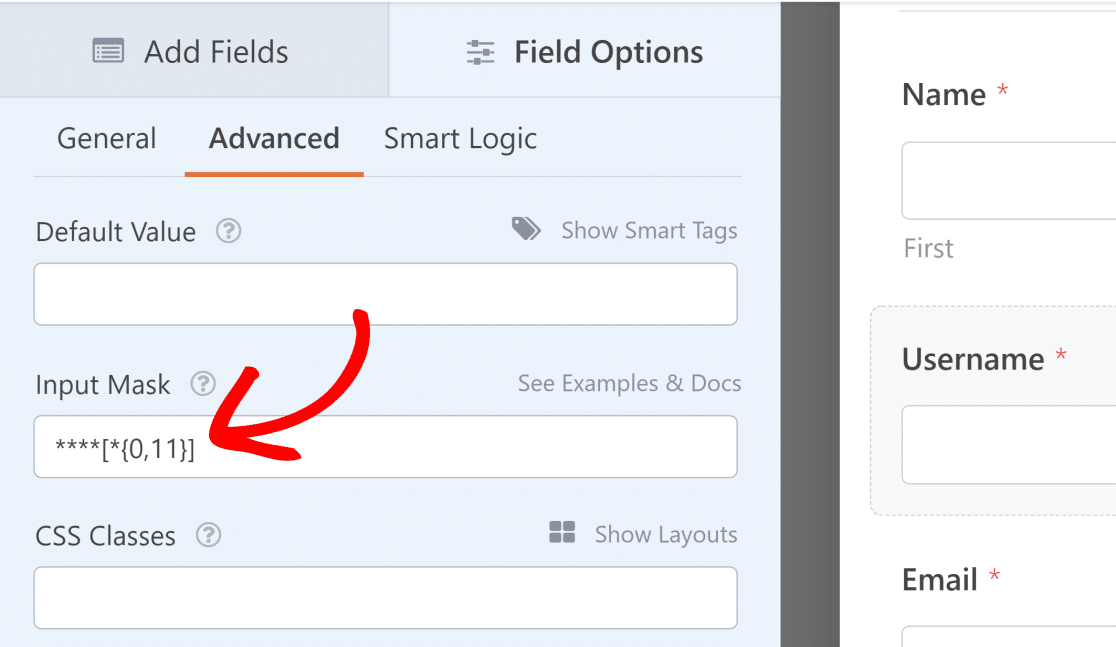
To accomplish this, select the Username field’s Advanced tab under Field Options. Next, locate the Input Mask option by scrolling down.
WPForms generates Input Mask rules using formulae. For our example, we needed to develop a Username field that could hold four to fifteen characters, as well as integers, uppercase, and lowercase letters.
The custom input mask formula to define these WordPress username rules is: ****[*{0,11}].
Custom input masks allow you to define your criteria for WordPress usernames.
In a similar vein, we enabled the Password Confirmation and Password Strength options by customizing the Password field in the Field Options.
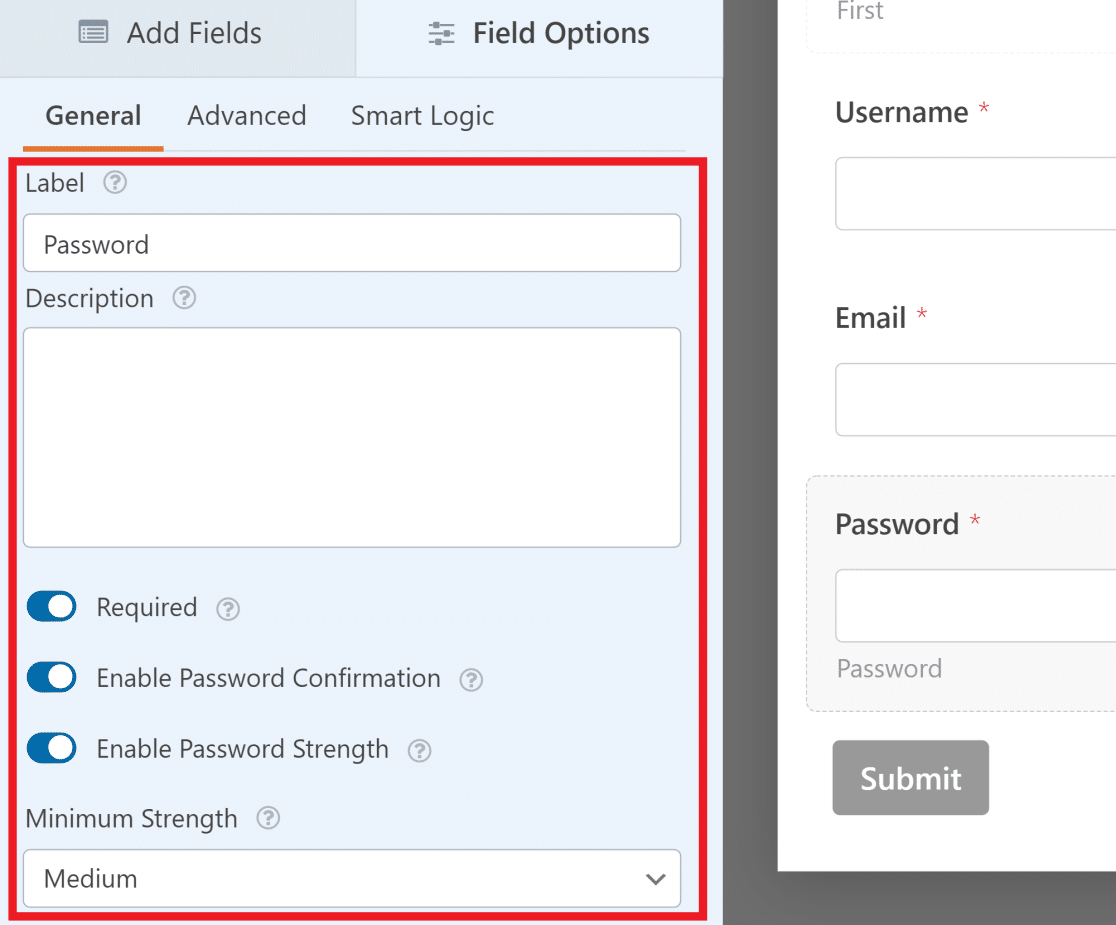
These settings come in quite helpful if you want to ensure that users create secure passwords upon registration and lower the possibility of hacking. Enhancing the user experience is another benefit of the interactive password strength meter.
Additionally, WPForms provides an additional degree of protection by thwarting brute force assaults and spambots with anti-spam measures.
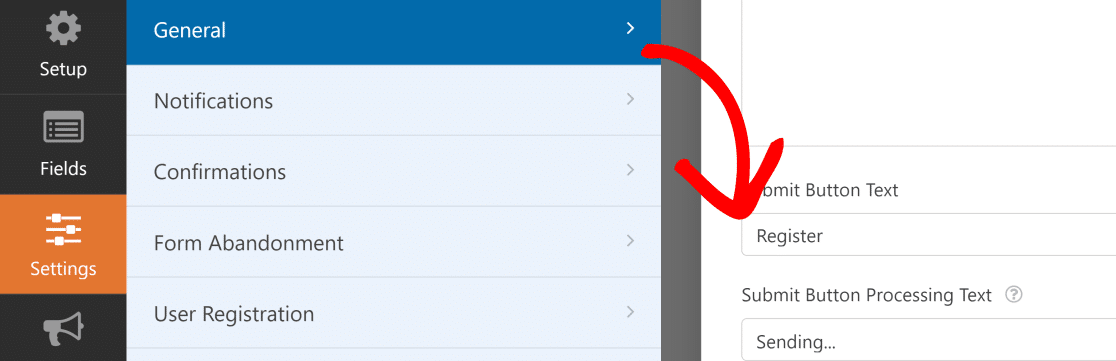
Additionally, you may want to update the label of the form’s Submit button to read Register rather than Submit.
Click the Setting button on the left menu and select General to accomplish this. Simply change the wording in the Submit Button wording box from this point on.
Click Save after you’re done modifying your form.
-
Modify the User Registration Form Settings in WordPress
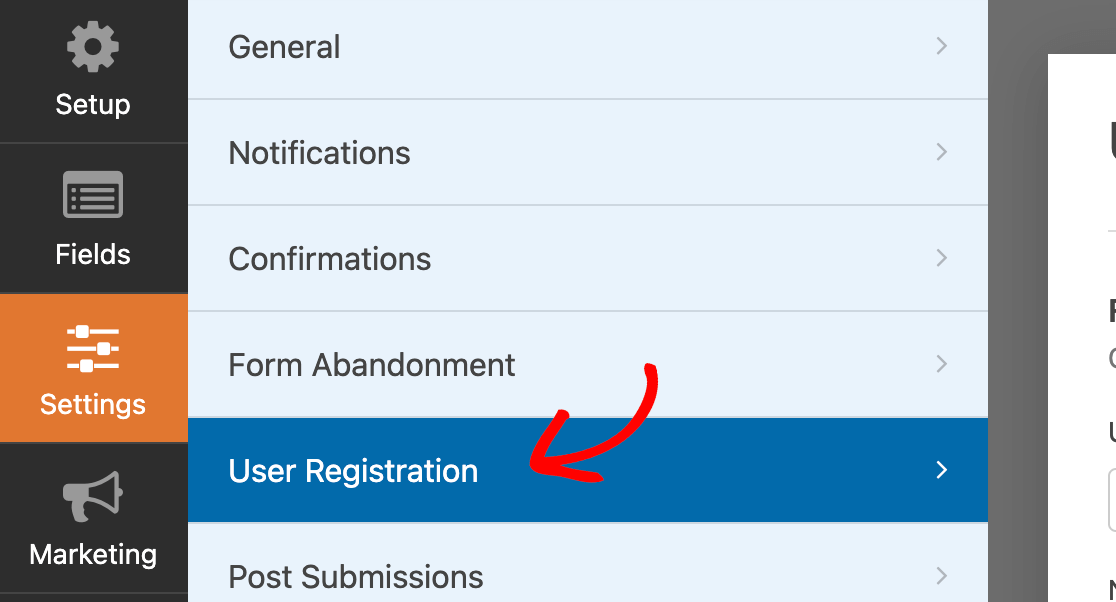
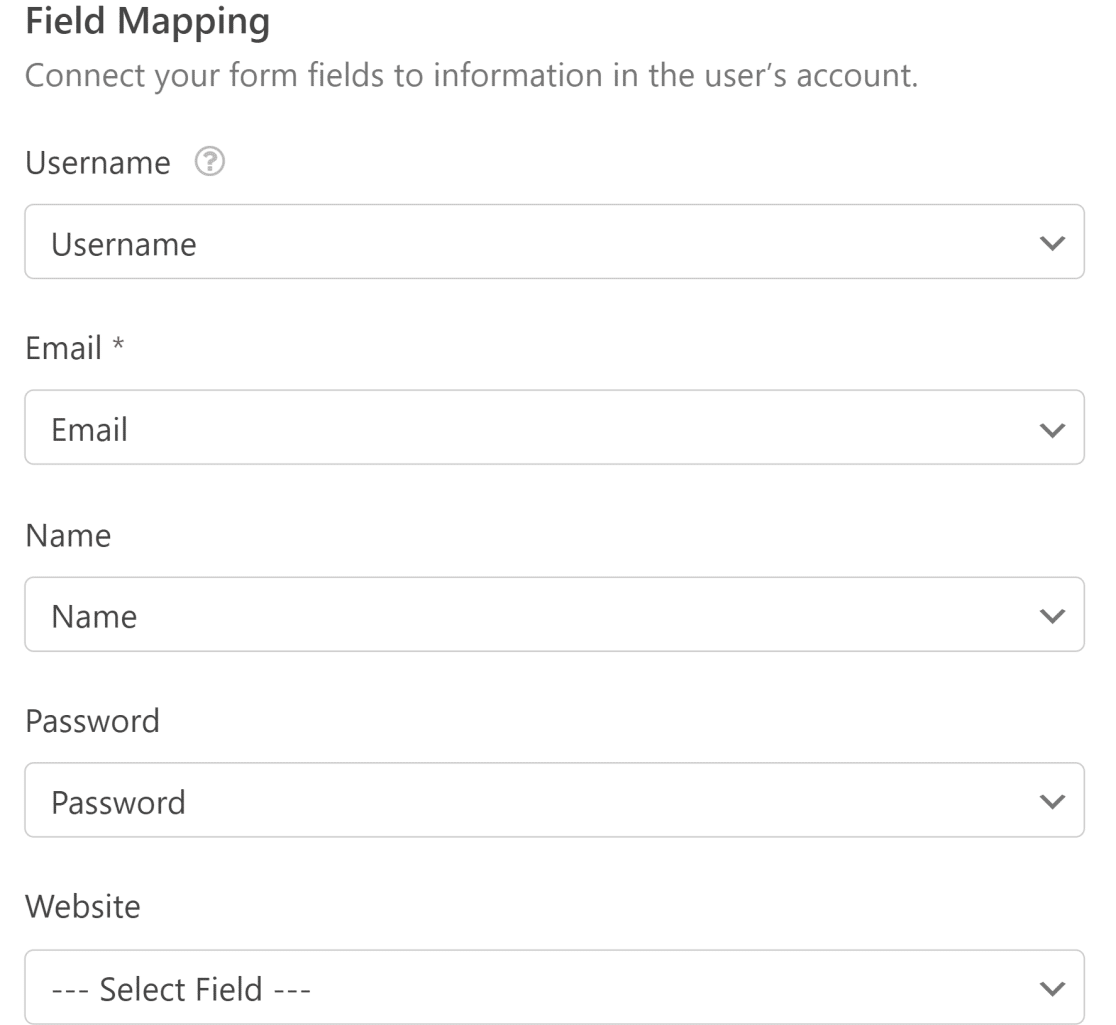
This stage involves assigning a user role to newly created users and mapping our form fields to the WordPress user profile. Click Settings then click User Registration to get started.
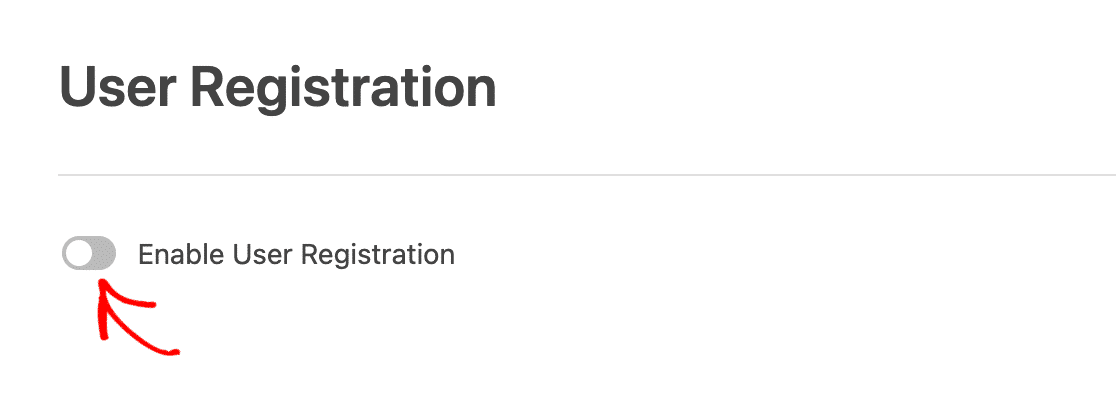
To allow user registration, click the button next to it.
Here are some things you can do with this page:
- Every form field should be mapped.
- Choose the default user roles.
- Turn on alerts.
- Decide which confirmation page users should be sent to.
To do field mapping, just choose a field from your form that matches the user profile information using the dropdown menus.
To assign a predetermined user role to a new user on your WordPress site, scroll down to the User Roles section.

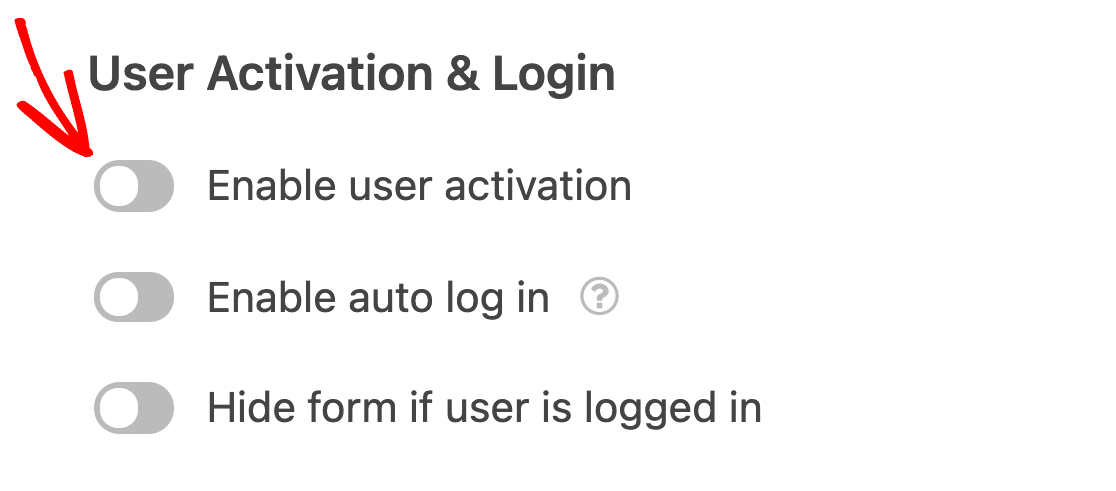
We will configure the user activation mechanism in the following step.
a) Select the Method for User Activation
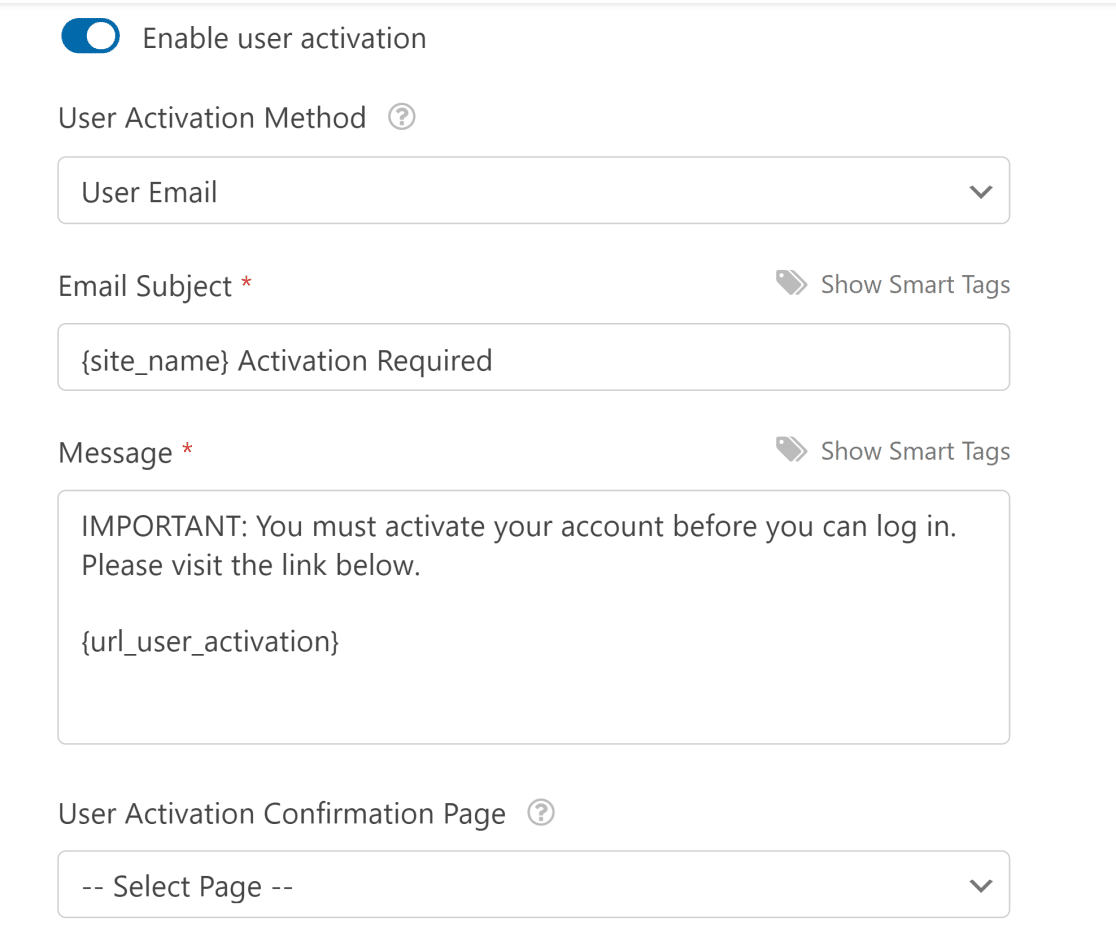
The User Activation & Logins area should be visible if you scroll down from the User Roles section. If you wish to regulate user activations and stop spam signups, we advise turning on the Enable User Activation checkbox.
You have two user activation techniques with WPForms:
- User Email
- Manual Granting of Permission
If a large number of individuals register for your site each day, the User Email technique is more practical.
Additionally, requiring all new users to finish their registration using a unique link delivered to their supplied email address, will assist prevent spam user registrations.
When a user clicks the activation URL in your email, you can choose which User Activation Confirmation Page to show along with the email topic and message.
Note: To choose it from the User Activation Confirmation Page selection, make sure you’ve already constructed the page confirmation page on your WordPress website.
Site administrators must approve each user on the backend to validate registration if you choose the Manual Approval option.
This may need a lot of time.
Click Save to save your configurations when you’ve finished adjusting the user registration settings.
b) Modify the Registration Settings for New Users
You should now be able to locate the Email Notifications area by scrolling down further from the options in the section above.
You may modify the alerts for new user registration by doing this. The following are the alternatives that are available:
Email the administrator as soon as a new user signs up.
Provide the user’s account details via email that they provided throughout the signup process.
After the user’s account has been activated, send them an email.
To edit the template, simply choose the button next to each type of notification if you wish to change the emails’ header and text.
You can refer to this article on repairing WordPress user registration emails if you are experiencing any delivery difficulties with emails.

c) Modify the On-Page Confirmation of Registration Form
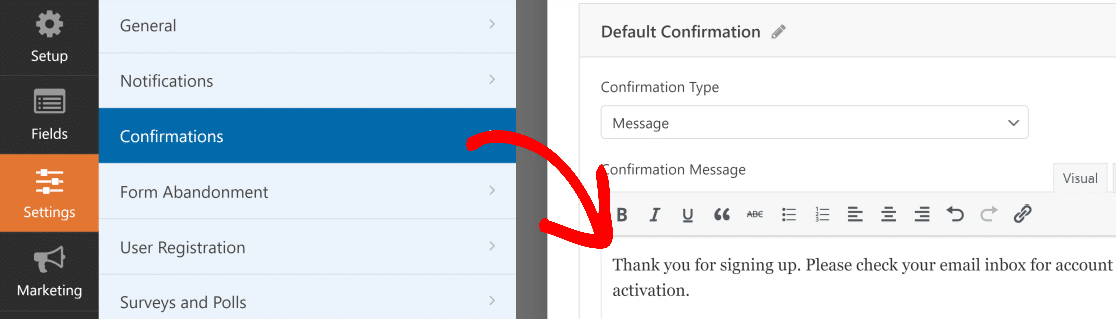
When a user submits a form using WPForms, they also see a confirmation message. Three different confirmation kinds are available in WPForms:
Message
The standard confirmation type is this one. A brief notice informing the user that their registration form has been processed will show up when they finish it. To increase customer satisfaction, check out these fantastic success stories.
Display Page
This kind of confirmation directs visitors to a thank-you page on your website upon registering.
Check out our tutorial on sending consumers to a thank-you page if you need assistance with this step. Additionally, don’t forget to read our piece on how to create thank-you pages that effectively increase customer loyalty.
Visit the (Redirect) URL
When you wish to direct visitors to another website—for example, an eCommerce site you are an associate for—you utilize this option.
By selecting Settings then choosing Confirmations, you may personalize confirmations. In this case, the default Confirmation Type (Message) was utilized; however, we modified the message to provide user instructions.
Remember to save your modifications. We will then publish and embed the form on your website.
-
Include the Form for User Registration on Your Website
You must add your WordPress user registration and login form to your WordPress website after creating it.
Any WPForms form may be embedded using three simple steps. The WPForms embed tool is the most basic.
On the form builder screen, click the Embed button located in the upper-right corner.

Choose Create a New Page now.
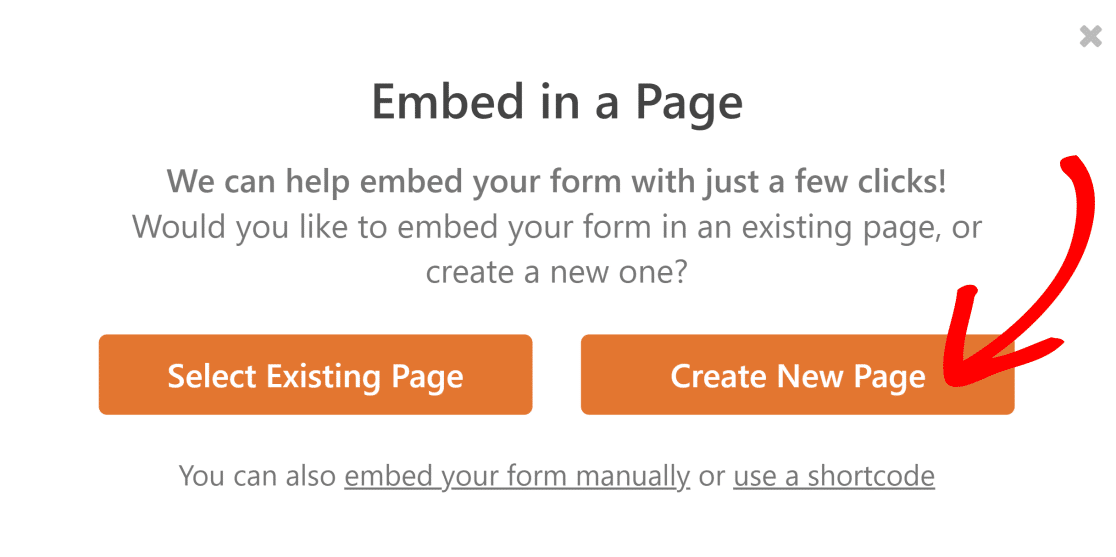
Click Let’s Go after naming your new page.
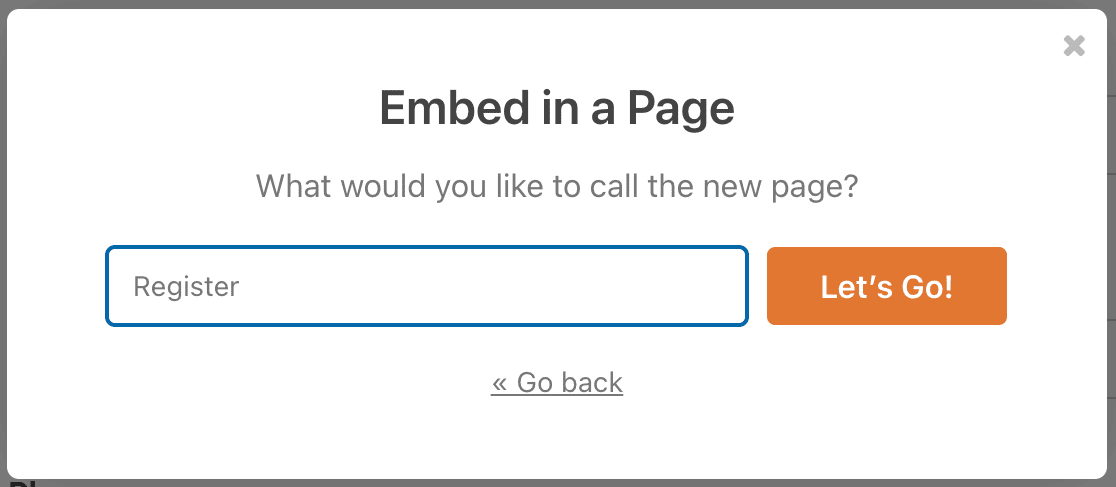
Now that your new registration form is incorporated into your WordPress editor, WPForms will direct you there.
Once you’re prepared, press Publish. This is all that is required to add a registration page to your WordPress website using WPForms.
You may wish to change the WordPress registration URL by default to go to your newly created custom login page.

It may seem inappropriate to utilize WordPress’ default login page since it is overly simple and does not blend in with the WordPress theme of your website.
Users may now utilize your registration form to register on your website. Following their registration, you may modify their responsibilities and other preferences from each user’s default WordPress profile page.
- Include Your Registration Page in the Menu of Your Website
Your new user registration form will be operational as soon as you post it. But to register, users must be able to locate it.
Adding your registration page to your WordPress site’s main menu is the simplest method to make it accessible.
To accomplish this, navigate to Appearance, click Menus, then select your new registration page from the list of alternatives on the left.

You might also need to delete your previous registration page from your site’s menu, depending on which WordPress theme you use. Remember to save your modifications.
We suggest looking at this WordPress menu tutorial if you need assistance with this.
That’s it, too! You now know How to Create a Custom WordPress Registration & Login Forms Plan so that visitors to your website may sign up with ease.
How to Customize Form Appearance
After we know how to Create a Custom WordPress Registration, you may construct any kind of custom form for your website with the WPForms plugin. The ability to customize the login screen is exclusive to the premium User Registration add-on, even if the plugin itself is free.
You must purchase a Pro plan to activate this add-on. Therefore, for those who now have the premium WPForms subscription, we advise using this option.
Apart from personalized login capabilities, WPForms offers various form designs and functionalities. The following are some possible customizations:
- Custom fields. For your login page, WPForms offers many form kinds, including as checkboxes, multiple-choice fields, and drop-down menus. The label, description, and size may all be altered.
- Characteristics for security. Features like reCAPTCHA and anti-spam protection are included in the WPForms login page add-on. They aid in stopping bots from getting past your login screen.
- Personalized confirmations. Use several kinds of confirmation once the user has logged in. For example, display a personalized greeting or send them to a certain URL.
- There are no extensive visual customization options available with this plugin. Without CSS code, you are unable to alter the backdrop of the login form, but you may still add your logo.
Steps before personalizing your WordPress login page:
Before personalizing your WordPress login page, make sure the necessary extension is activated. Open your WordPress admin dashboard and do these actions to accomplish this:
- Select Settings from the WPForms sidebar menu.
- Locate the License Key field under the License category on the General tab.
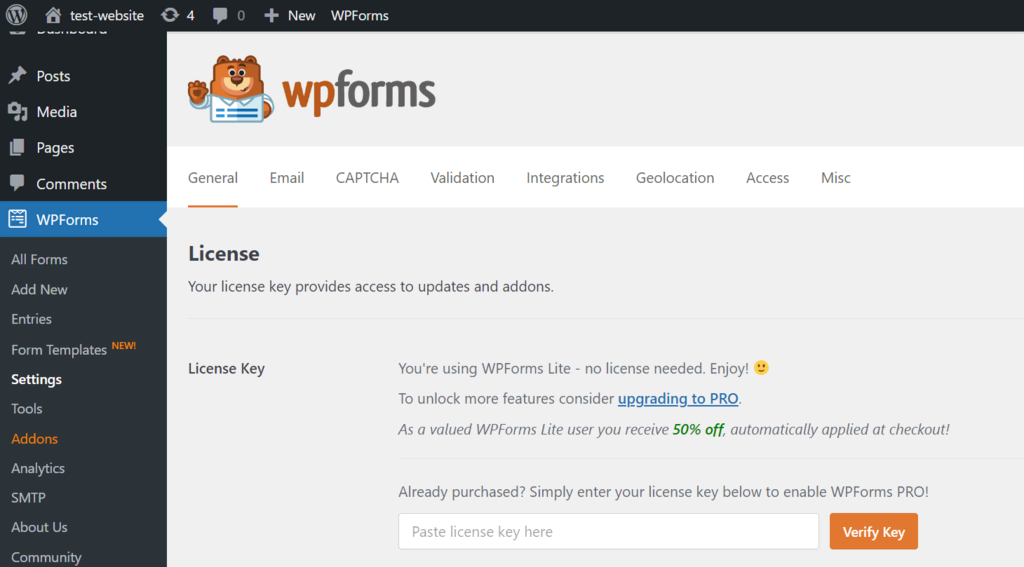
- After pasting your license key, select “Verify Key.”
- Navigate to Addons, then select Install Addon then click User Registration Addon.
- Click Activate after the installation procedure has been completed.
- After it’s active, use the given template to design your login form.
How to activate the redirection and forgot password buttons
We will also demonstrate how to activate the redirection and forgot password buttons in this paragraph:
- Go to Add New under WPForms.
- In the designated field, enter the name of your form.

- Locate the template for the user login form, then select Use Template. The fields for your username and password will be added to your form immediately.
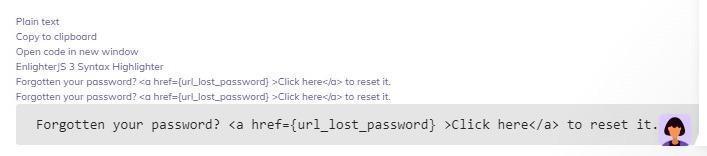
- In the Password area, click.
- Enter the following description on the Field Options tab:
- Go to the WPForms sidebar, then choose Settings, then Confirmations.
- Click the Go to URL (Redirect) drop-down choice under Confirmation Type.
- Input the URL for the confirmation redirect.
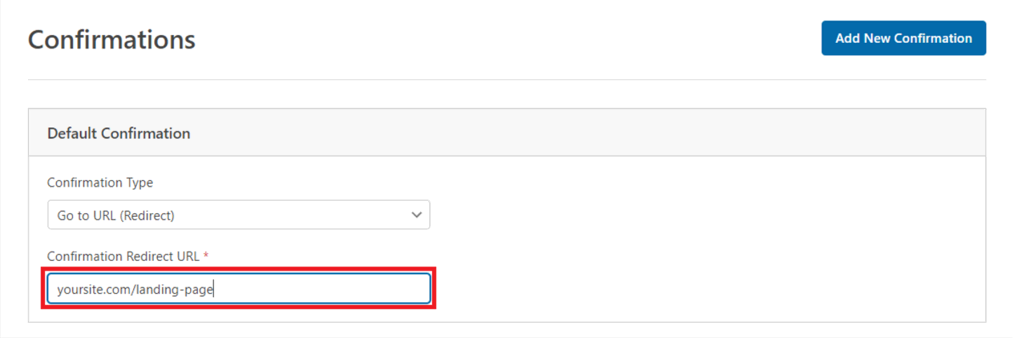
- To save the modifications, click Save.
- Crucial! Keep in mind that the password reset link is only functional if you have a WPForms-created user registration form.
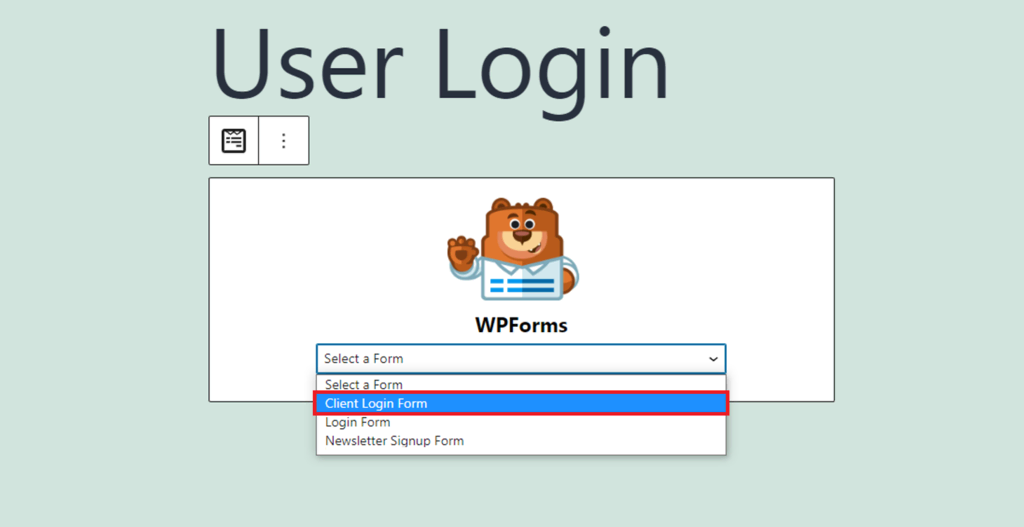
- Using a reusable block or shortcode, WPForms enables you to insert your login form anywhere on the website. This implies that you may design alternative login pages for various user roles.
For instance, we’ll use a custom block to add the form to a newly created client login page:
- Go to Pages then Add New in the WordPress sidebar.

- Enter the title of the page on the editing screen.
- To add a new block, click the addition (+) symbol and choose WPForms.
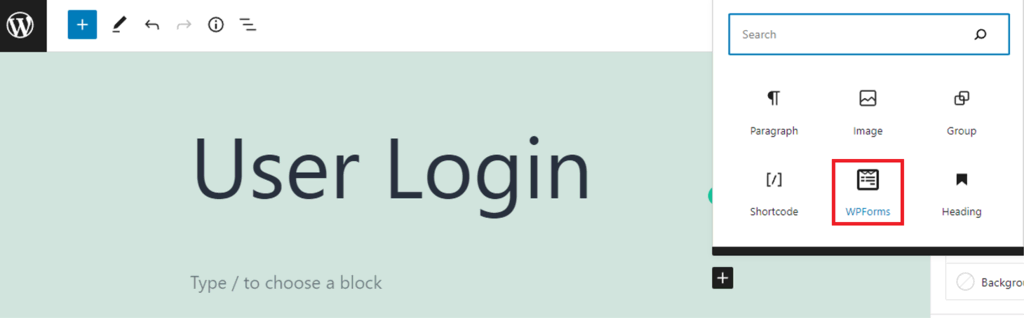
- Select the form for your user login from the drop-down menu.
- When the form is ready to be used, click Publish.
Conclusion
This concludes our brief tutorial on How to Create Custom WordPress Registration & Login Forms. Indeed, a default user registration form is included with WordPress. But with so much more that plugins can accomplish, why restrict yourself to that option?
With a plugin like WPForms, creating personalized user registration forms is a very simple task. You get a basic form, example pages, a ton of form fields, and customization possibilities even with the free edition.
Therefore, if you want to add eye-catching registration forms to your website, we wholeheartedly suggest WPForms.
A registration form is only one kind of form. Depending on your specialization, you may require forms such as online booking forms and contribution forms. Therefore, we advise reading through our blog’s related posts to discover more.
We hope that this guide has enabled you to develop the WordPress registration and login pages of your dreams.
Please don’t hesitate to contact our support staff with any more inquiries. Remember to share this information on social media with your friends as well. We appreciate your visit!


Good luck 🙂