How to Customize Quantity Input Field in WooCommerce?
When it comes to conversion rate optimization (CRO), every detail matters, including quantity inputs.
By customizing quantity inputs you can nudge your customers into buying more quantities from you and increasing your total cart value thus increasing your revenue.
Even if it might not have a direct impact on CRO, you may need to customize quantity input to better suit what you’re selling in your store, whether you sell in packages or don’t accept quantities less than a certain amount or any other reason you might want to customize your inputs for.
In this article, we’ll guide you through everything you need to know to properly customize your quantity input to increase the conversion rates of your store and make more profits out of it.
So let’s get started.
Why the Default WooCommerce Quantity Input Isn’t Enough?
The default WooCommerce quantity input, which typically consists of a simple numeric field with up and down arrows, may be sufficient for many online stores. However, there are several scenarios and user preferences where this default setup falls short, leading to the need for a custom quantity input.
The default quantity input provides a basic numeric field with up and down arrows. For certain products or services, more specific input options may be needed, such as decimal values, fractional quantities, or non-numeric measurements.
Businesses that sell products in bulk quantities may find the default quantity input limiting. Customers might prefer the ability to enter large quantities more efficiently, and a custom input can streamline the ordering process for bulk buyers.
Some customers prefer a more personalized shopping experience. A custom quantity input allows users to input quantities in a way that suits their preferences, contributing to a better overall user experience.
For businesses offering subscription-based services or products, customers may want the flexibility to modify subscription quantities easily. A custom quantity input can cater to the unique needs of subscription-based models.
Businesses may have specific branding or design requirements that the default input doesn’t fulfill. Customizing the quantity input allows for a seamless integration with the overall look and feel of the online store.
Offering a custom quantity input is a way to provide a more dynamic and engaging shopping experience. It allows businesses to adapt to evolving customer expectations and stand out in a competitive market.
How to Implement Custom Quantity Input in WooCommerce?
There are two options you will have if you want to customize the input in WooCommerce, you will either change the code to fit your needs, or you will need to install plugins to implement the customization of the quantity input that you desire.
Editing the code will give you full control over the changes you want to apply in your quantity inputs, but it requires lots of maintenance as with each WordPress update you will need to make sure your code is compatible with the updates, it will take lots of time and energy to hire a developer and communicate with him exactly what you want to do and for him to start building the code and testing it and making sure it’s compatible with WordPress.
Simply put, it requires lots of energy to directly edit the code and it lacks flexibility in the long run as you might not be compatible with each future update of WordPress or any other installed plugin.
Using a plugin on the other hand won’t consume any time, all you’ll need to do is search for the plugin and install and activate it and you will be good to go.
It requires no coding experience; it will be simple and easy to use (unlike the code where you will need to know exactly what you’re doing to not break anything) and it requires way less maintenance hassle as the plugin will handle maintainability issues automatically without you having to take any action.
Customization Steps for Quantity Inputs in WooCommerce
- Login to your WordPress admin dashboard
- Head to plugins -> add new
- Search for “Min Max Default Quantity for WooCommerce”

- Install and activate the plugin
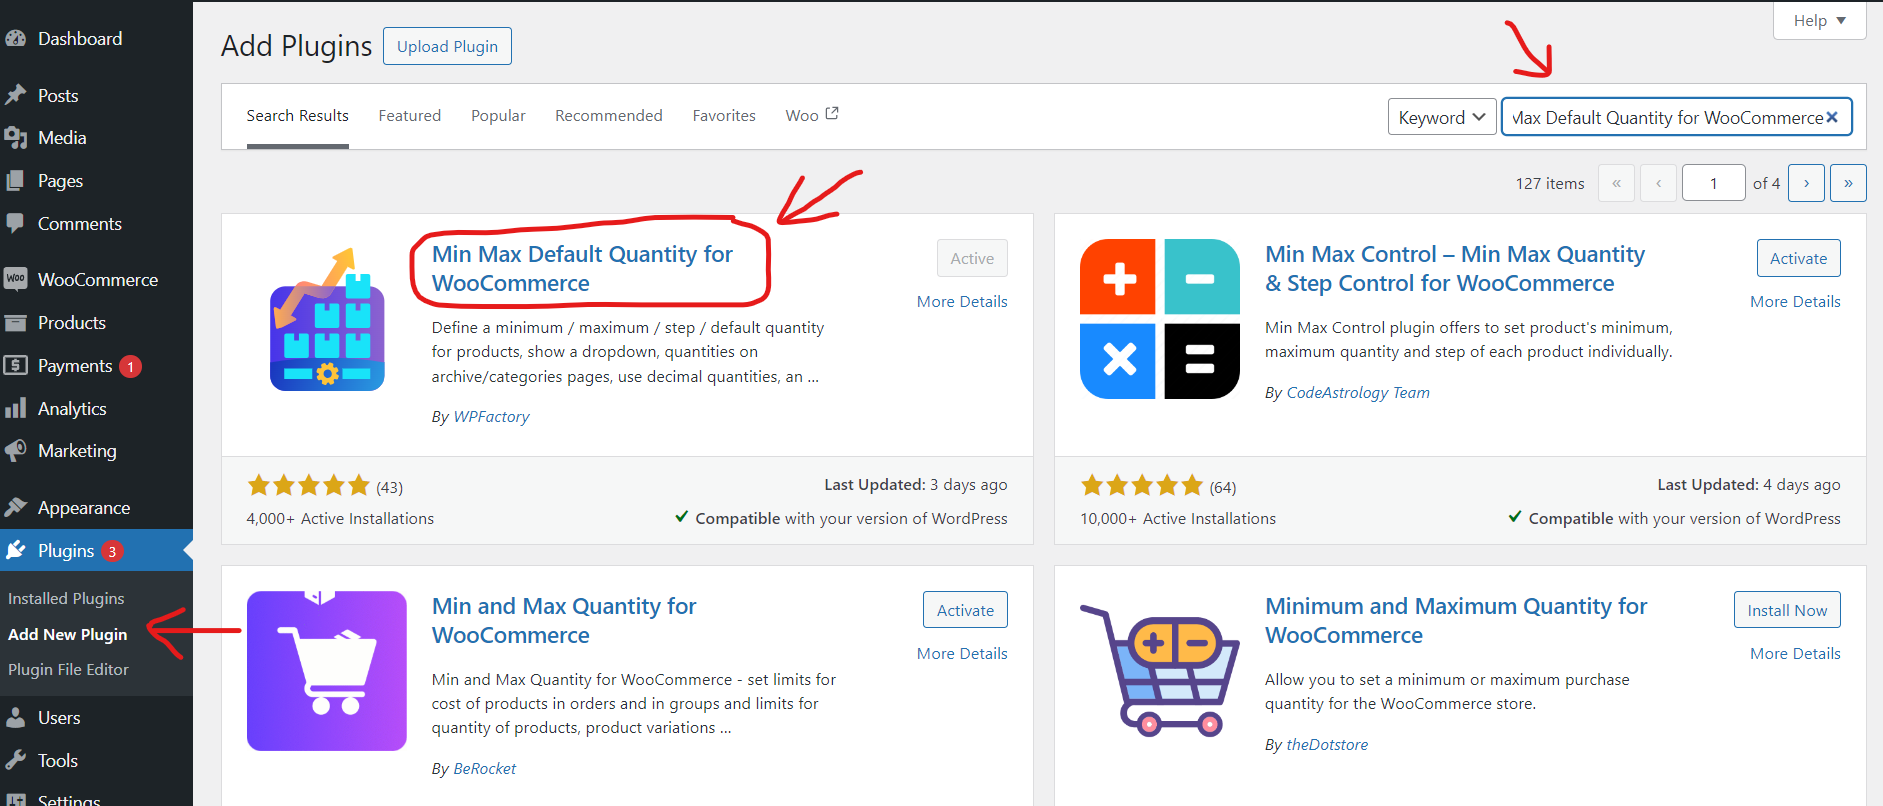
- Head to WooCommerce -> Settings -> Product Quantity tab
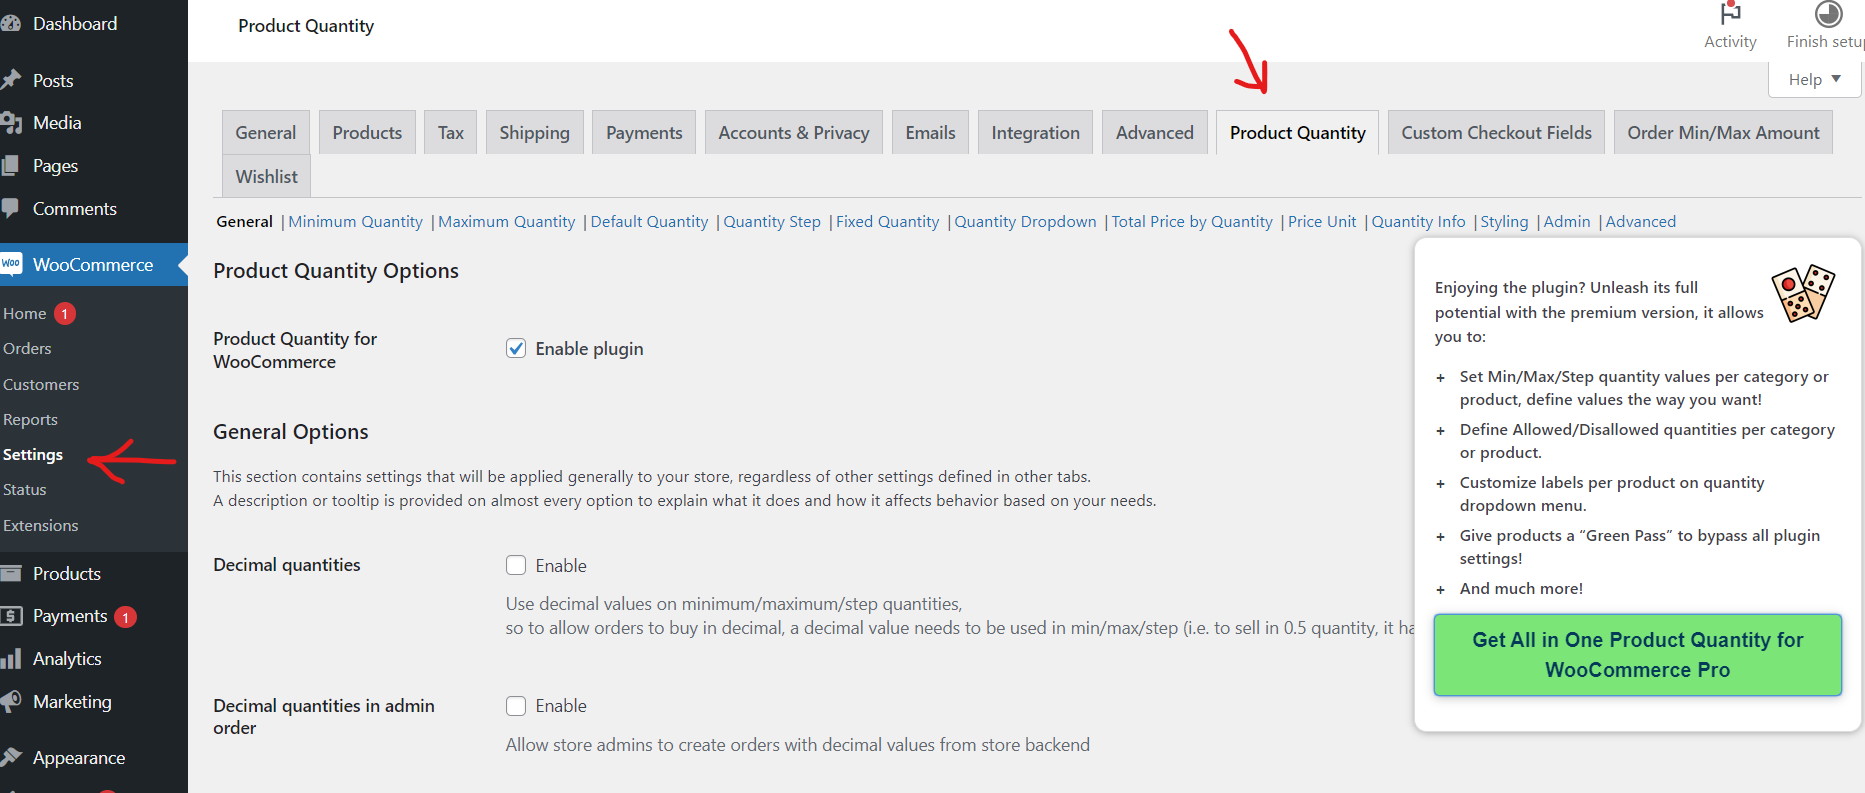
In this tab you will find many customization options to control how the quantity option in your store looks, you can control the minimum default quantity in the “minimum quantity” tab where you can set it to a site-wide condition to not sell beyond minimum quantity or to enable it at each product separately, the same goes for the “maximum quantity” tab where you can set a site-wide rule to not sell beyond certain quantities.
You can also customize the default quantity that appears to the user in the
“Default quantity” tab and you can control the quantity step in the “quantity step” tab if you want the quantity increment to be one by one or 2 by 2 or 3 by 3 or any other step you want to take.
There are lots of customization options in this plugin that will allow you to customize the quantity input as you wish so it can fit your needs and achieve your goals.
Tips for Designing User-friendly Custom Quantity Input Field
When designing a user-friendly custom quantity input field in terms of functionality, it’s important to focus on ease of use, precision, and adaptability.
Allow users to input decimal values for products that may require more precise quantities, especially for items sold by weight or volume.
Include quick entry options for common quantities. For example, provide buttons that allow users to select predefined quantities like “1,” “5,” or “10” for faster input.
Set minimum and maximum quantity limits based on product characteristics or business rules. Communicate these limits to users and provide feedback if they attempt to exceed them.
Use buttons for incrementing and decrementing quantities. Ensure these buttons are easy to click or tap and consider providing visual feedback when users interact with them.
Display clear and concise feedback messages when users update the quantity. Inform them about successful updates, invalid entries, or any changes that may impact the order.
Provide an option for users to set a default quantity, especially if they frequently order the same quantity of a particular product.
Summary
Customizing the quantity input can improve your WooCommerce store functionality and make your store more user-friendly which means increased chances of conversion rates.
Using plugins is faster and easier than editing the code directly to customize the quantity option, but if you still want to hire a developer then it’s your call.
A plugin such as Min Max Default Quantity for WooCommerce will be the best choice to customize your quantity input in your WooCommerce store, it has lots of functionalities that allow for maximum control over the quantity input field and it can help you sell your products in the custom quantities that you prefer for your store.