

How to Limit Min/Max Quantity Per Customer in WooCommerce
WooCommerce is one of the most comprehensive eCommerce solutions. It covers a wide range of use cases and can be used to sell almost anything in any industry. In some cases, users need to limit the maximum products per user.
The Maximum Products Per User for WooCommerce plugin comes in handy in such cases. The plugin lets you limit the maximum products per user by product quantities, product orders, product prices, product weights, and product volumes.
Why & When Limiting Quantity Per User Sounds a Good Idea?
Here are a few examples, of when you need to limit the maximum products per user.
1. Flash Sales / Offers
Sometimes you want to run flash sales or special offers, for a limited period of time, possibly with a huge discount. In such cases it may be helpful to restrict the maximum products per user, to avoid users bogarting products. Often, customers may buy such items in bulk only to resell them later. You may want to limit the maximum quantity of the product each user can buy to give all your customers a fair chance.
2. Limited Edition Products
These will usually be available in low quantity, that is why they are limited edition right? To prevent customers from monopolizing ownership of such items you can set maximum limits per user.
3. Limited stock items
Have you ever walked into a supermarket and seen some notices such as: “Only one per customer” These notices will usually be there for items that are limited in stock or in short supply.
To give a fair chance of purchasing to all customers and avoid upsetting customers, limits are usually placed on the maximum quantity per customer. Just recently during the COVID-19 pandemic, many retail stores in some countries placed restrictions on the purchase of toilet paper.
If you have a WooCommerce store and have some items, that are running out of stock soon, you can add quantity limits per user. This keeps customers happy as at least rather than being out of stock, they can at least buy some items for the time being and possibly more when you have more stock.
4. Custom items
Custom-made goods will usually require time and effort to make. Sometimes the number of custom-made products you can output may be limited, for example, if you are selling handmade goods, you may not have enough production resources to meet demand. In such cases, limiting the maximum products per user in a given time period can come in extremely handy.
5. Limited Production Capacity Businesses
Restaurants can often have limited production capacity. Take a pizza restaurant for example, they can only produce so many pizzas in a day. For such businesses, it would be useful to limit the number of products per user.
6. Membership and Subscription Based Websites
Often, membership websites will have various membership levels. Depending on the membership level a user may have access to a limited number of products. Take an eBook website for example, a commonly seen business structure is a various membership levels with various limits for digital download of eBooks.
7. Shipping Restrictions
In some cases, there can be some shipping restrictions, especially if you are selling heavy or bulky items. You may want to limit the maximum number of products a user can buy based on weight or volume in this case.
The maximum products per user for WooCommerce is an excellent plugin with an ocean of features to help you add purchase limits to your WooCommerce store.

Maximum Products per User Plugin Setup
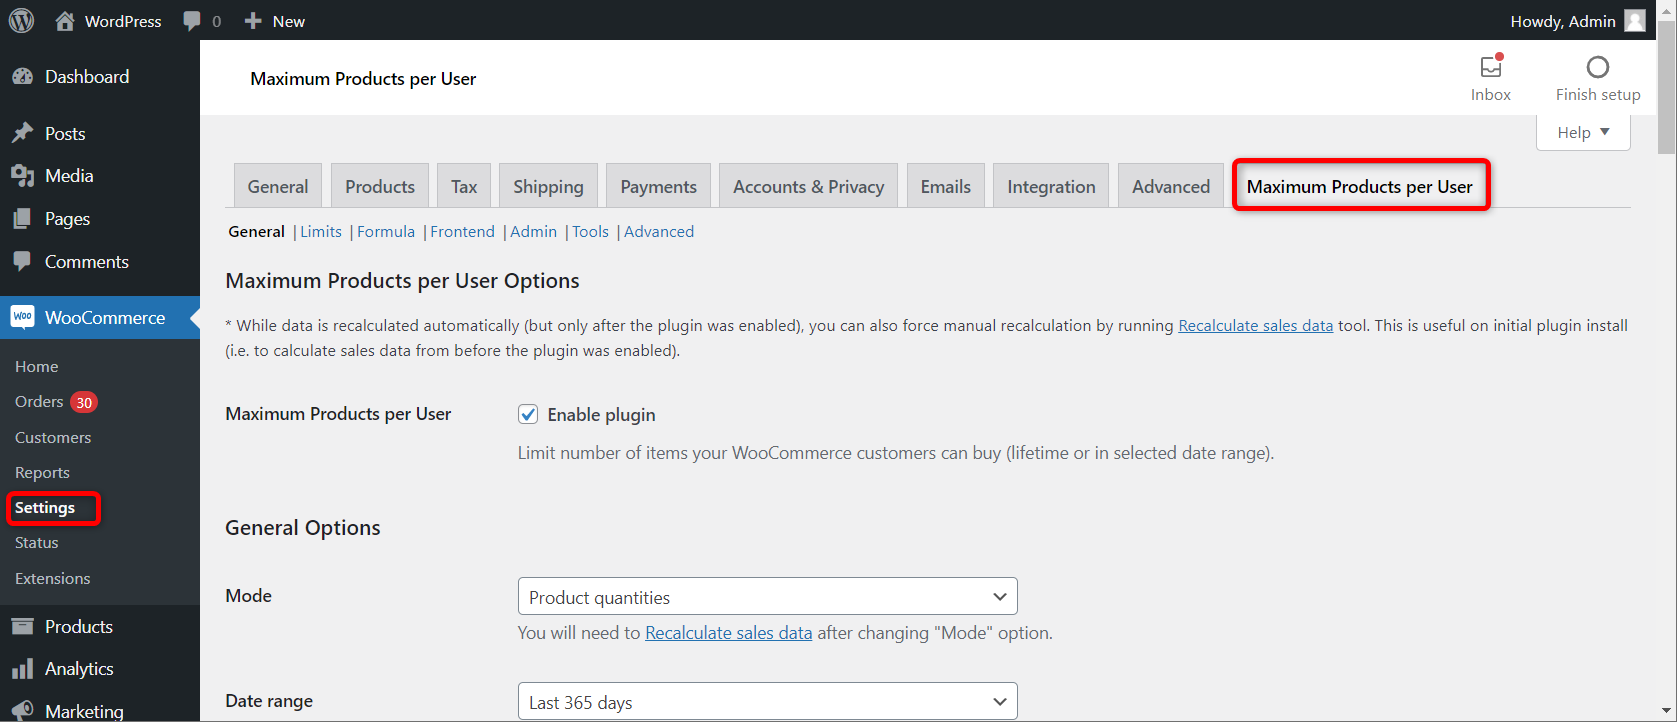
Once installed and activated, you can access the plugin’s settings from your WordPress dashboard. Navigate to WooCommerce > Settings > Maximum Products per User
If you are unsure about installing a plugin you can see our tutorial on how to install a plugin in WordPress.
There are 7 tabs for settings under the plugin’s settings. We will go through all of them and see what features are available for the plugin.
But before that let’s look at a quick example of how the plugin works.
Suppose we want to limit a maximum of 5 products per user per month. Here are the options that we would need to configure in the plugin’s settings, to set this up.
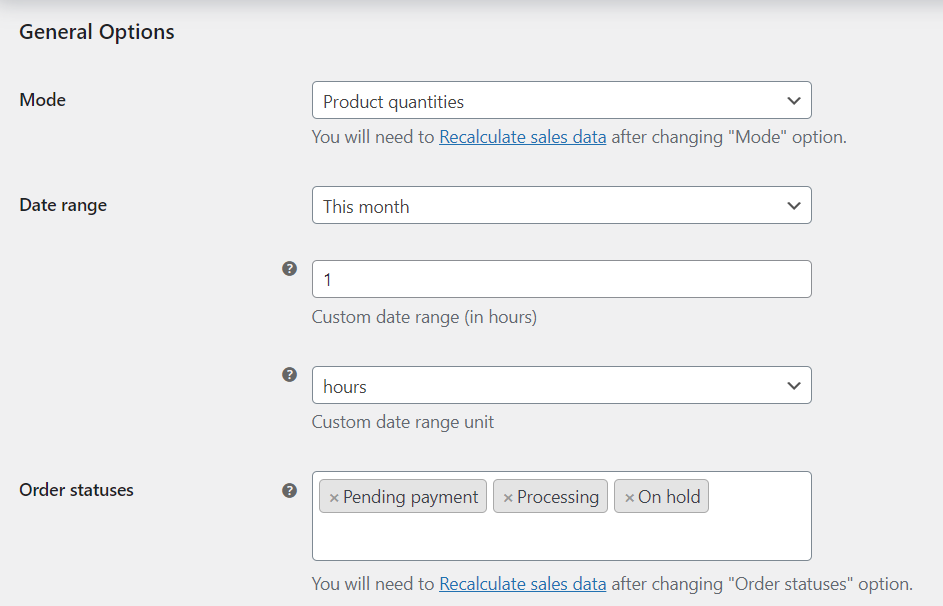
General > Mode > Product Quantities (Restrict users based on product quantities)
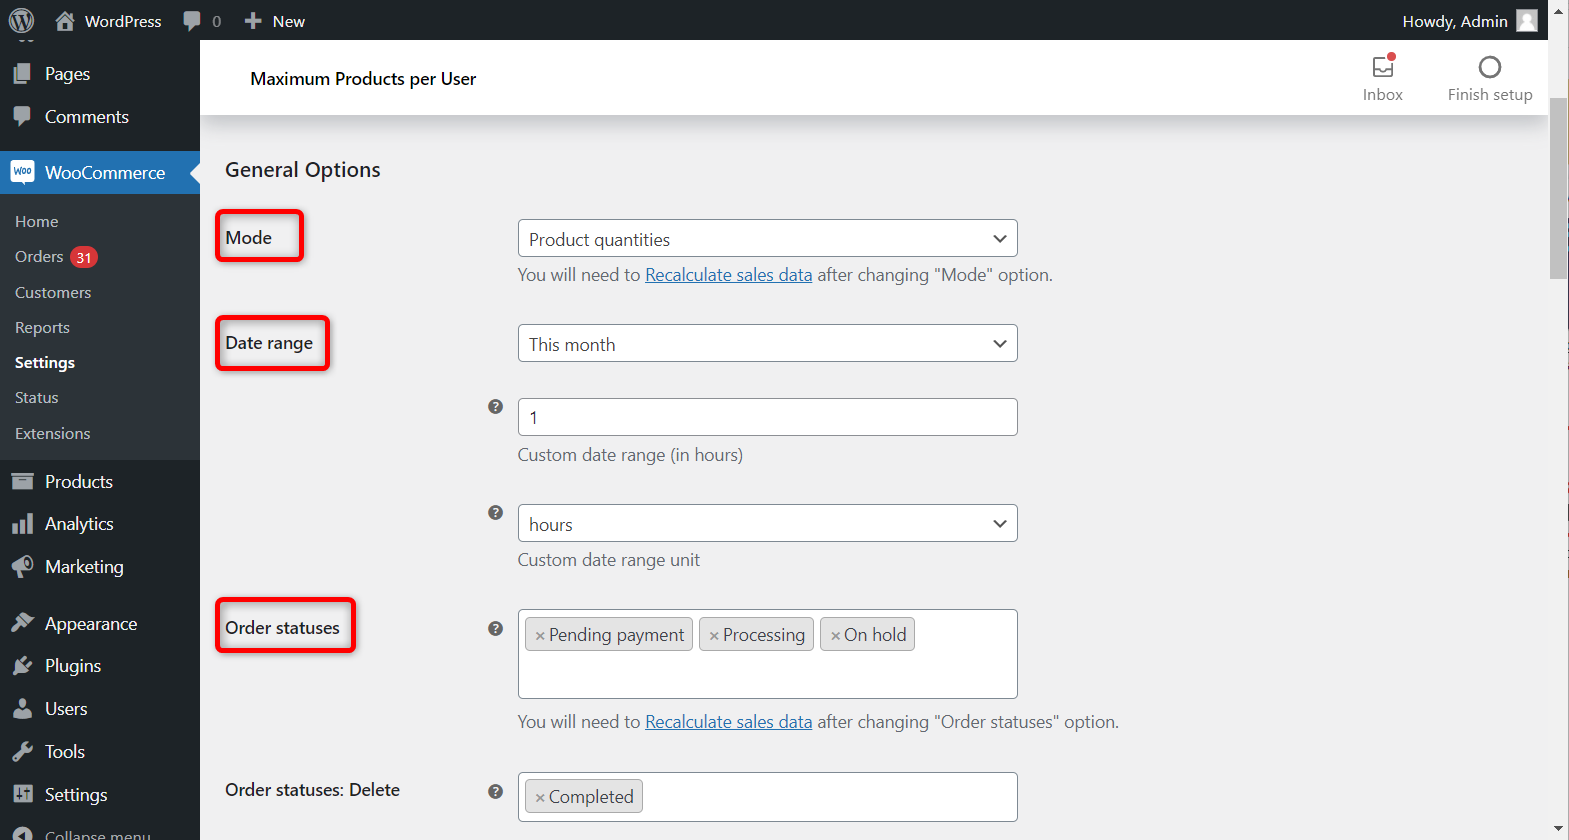
General > Date Range > This Month (Sets the time limit for restrictions)
General > Order Statuses > Pending Payment, Processing, On hold (Sets the order statuses to which the restriction should apply)
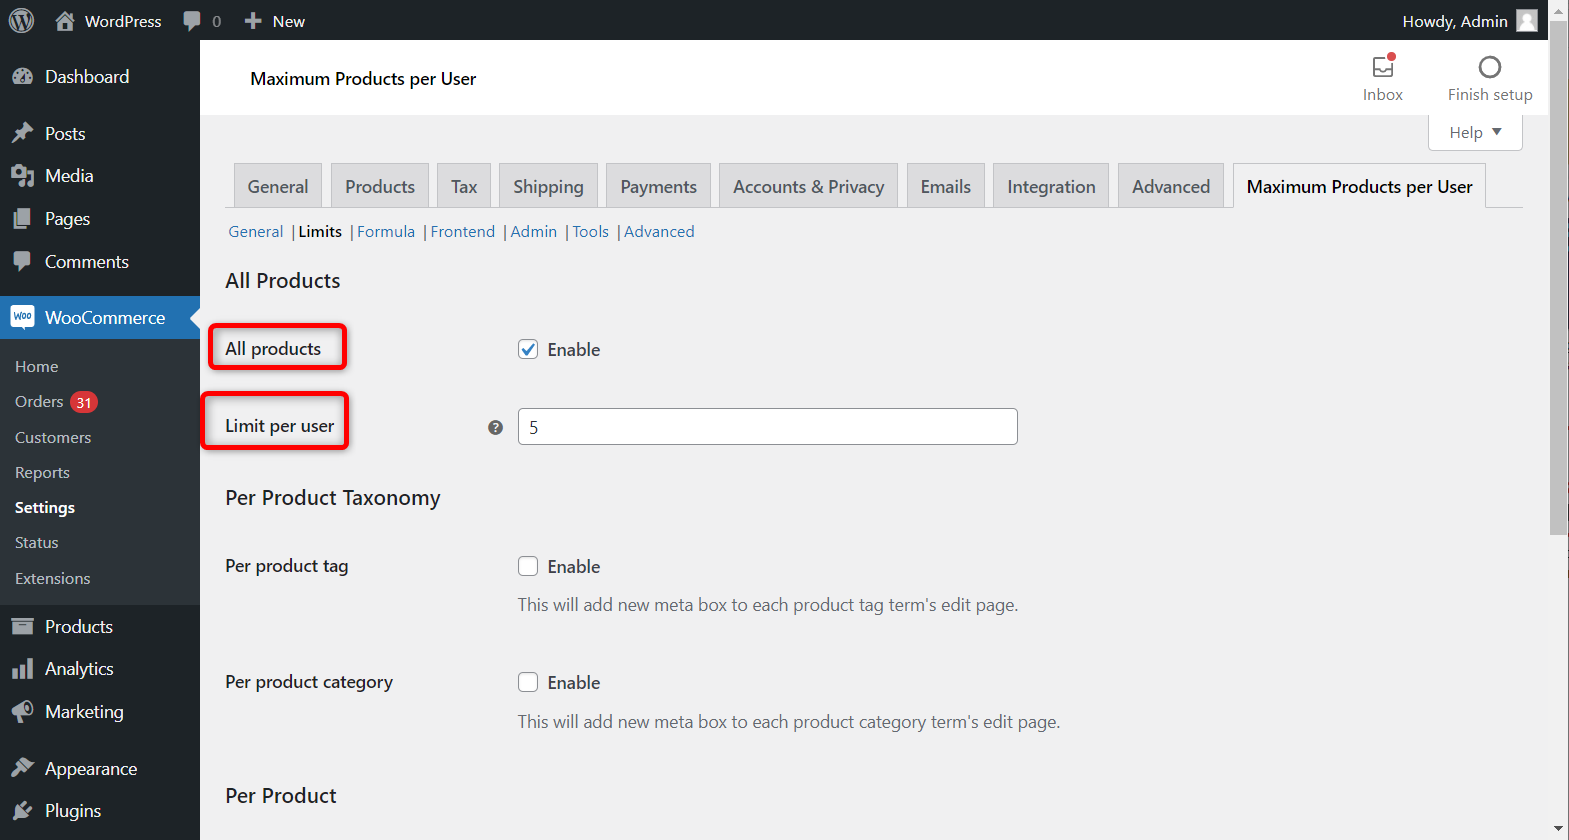
Secondly, in the limits tab, we would enable the All products option and set the limit per user to 5.
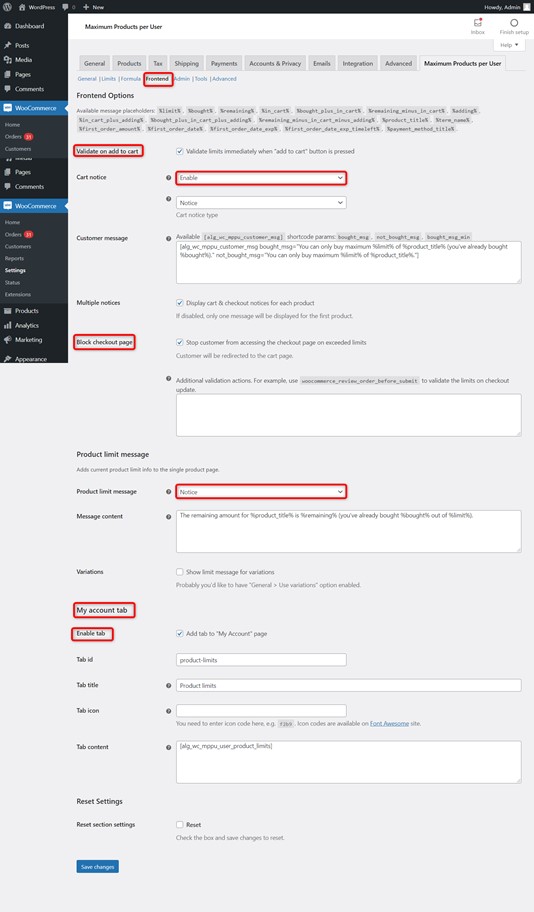
Now we need to configure, where in the Frontend we want the user to be notified of their limits. You can display notices on the single product page, the cart page, and the my-account page.
In the example below, we have enabled notices on all 3 sections.
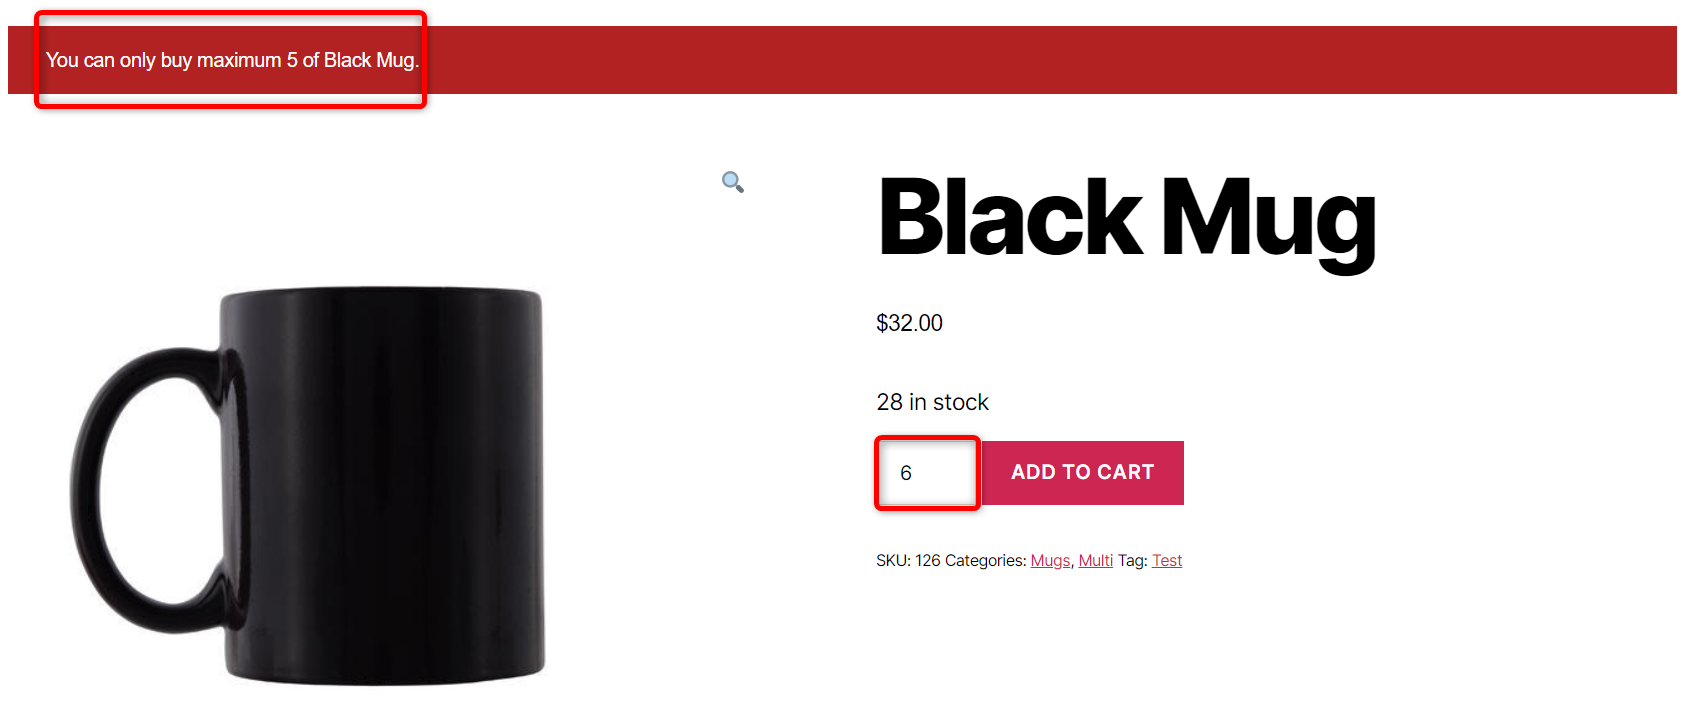
Now we can test how this looks like in the frontend. Here is how the notice would look like on the frontend. We are using the default WordPress theme here. The design of the notice will depend on your WordPress theme and you can easily change the location of the notice as well.
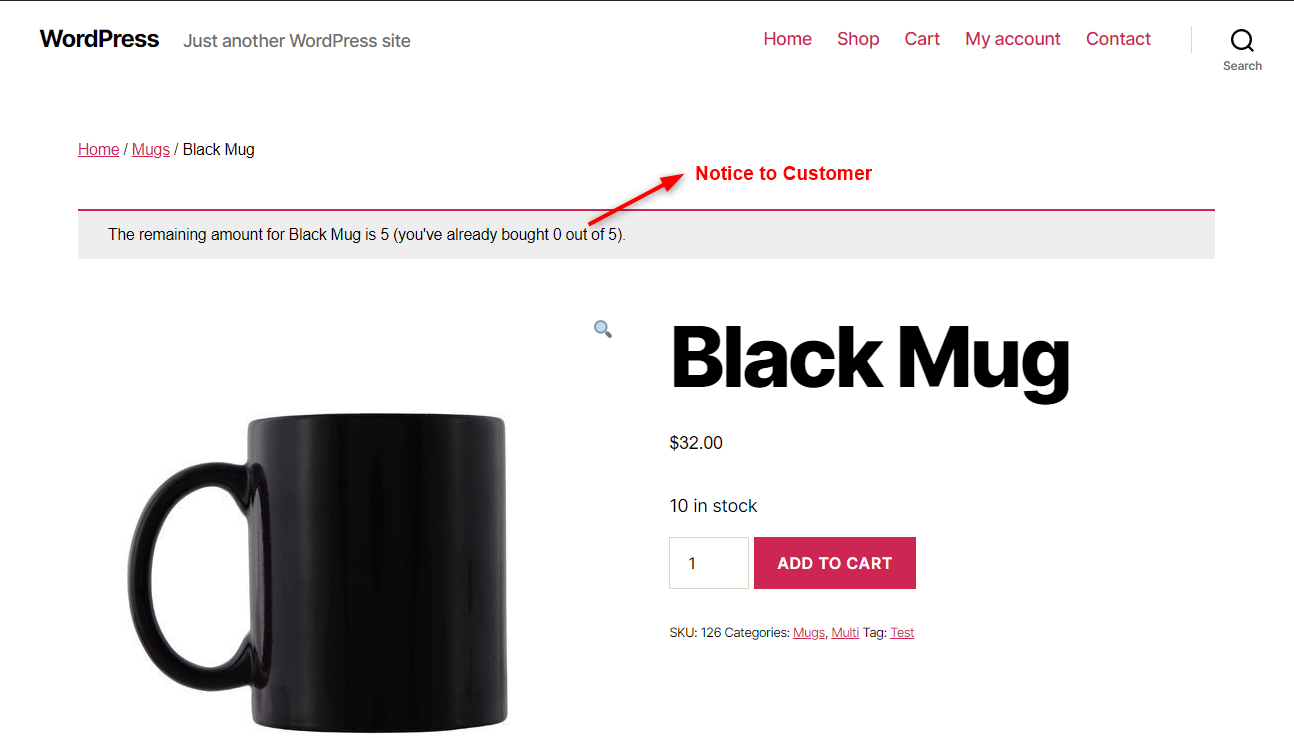
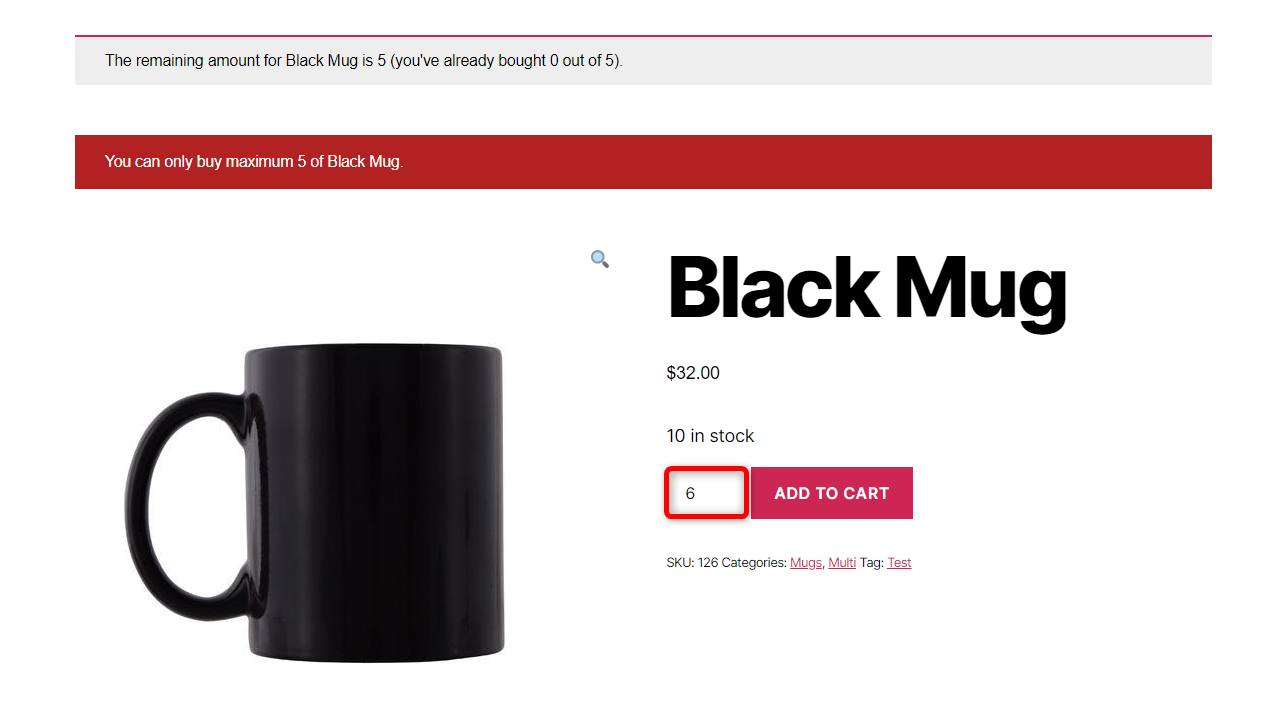
If the customer tries to purchase more than 5 he will be shown an error as shown below.
This was a very basic example of how you can set up the maximum products per user. The plugin has many more robust features to cover much more complex situation, in which you may want to restrict the maximum products per user.

Maximum Products per User Plugin Features
Now let’s have a look at the plugin’s settings in more detail.
-
-
- General Tab
- General option
- Block guests from buying products
- Multi-language options
- Limits Tab
- All Products
- Per Product Taxonomy
- Per product
- Formula
- Frontend
- Frontend option
- Product limit message
- My Account tab
- Admin Option
- Tools
- Tools
- Advanced
- Advanced Options
- General Tab
-
1a. General Options
The options here are Mode, Date Range, and Order Statuses.
Mode – Controls what the restrictions should be based on. They can be based on Product quantities, Product orders, Product prices, Product weights, and Product volumes.
Date Range – You can either select the default date ranges such as Lifetime, This hour, This day, This week, This month, This year, Last hour, Last 24 hours, Last 7 days, Last 30 days, Last 365 days or you can choose a custom date range.
If you select a custom date range, you will need to select the unit of time, for example, seconds, minutes, hours, days, or weeks, and then enter the custom date range unit.
For example, if you wanted to set up limits for 2 weeks, you would select weeks as the custom date range unit, and then in the custom date range units field, you would enter 2.
Order Statuses – Allows you to choose on which order status should the product data be updated. If multiple order statuses are selected, data is only updated once depending on whichever order status is applied first. The order statuses you add here are the ones to which the limits will be applied.
Order statuses: Delete – Allows you to choose when product data should be deleted. The order statuses you select here, if you set them for an order, the data for that order for maximum products per user will be deleted.
Payment gateways – Allows you to choose the payment gateways when the product data should be updated. For example, if you add here “Cash on Delivery” the maximum products per user data will only be updated when a customer checks out using cash on delivery payment gateway. If you leave this blank the data will be updated for all payment gateways.
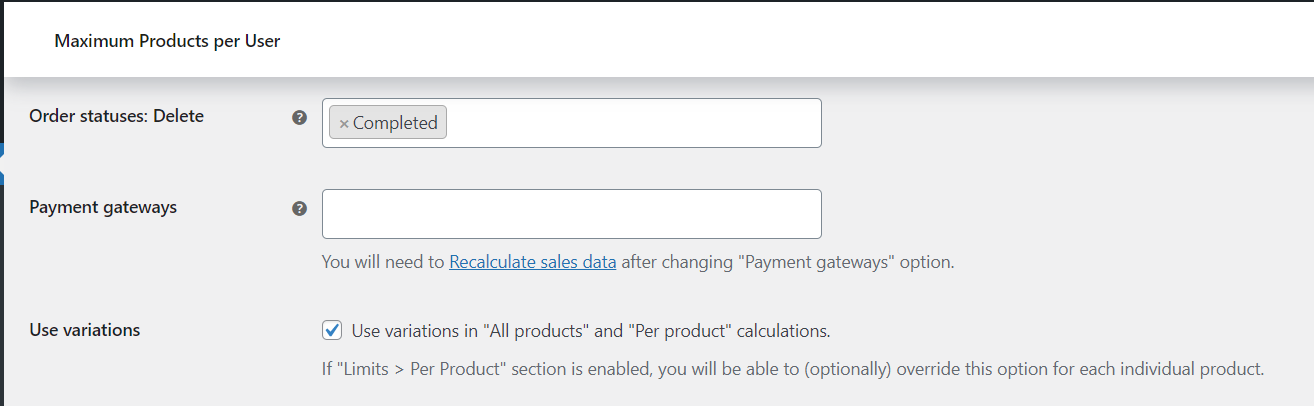
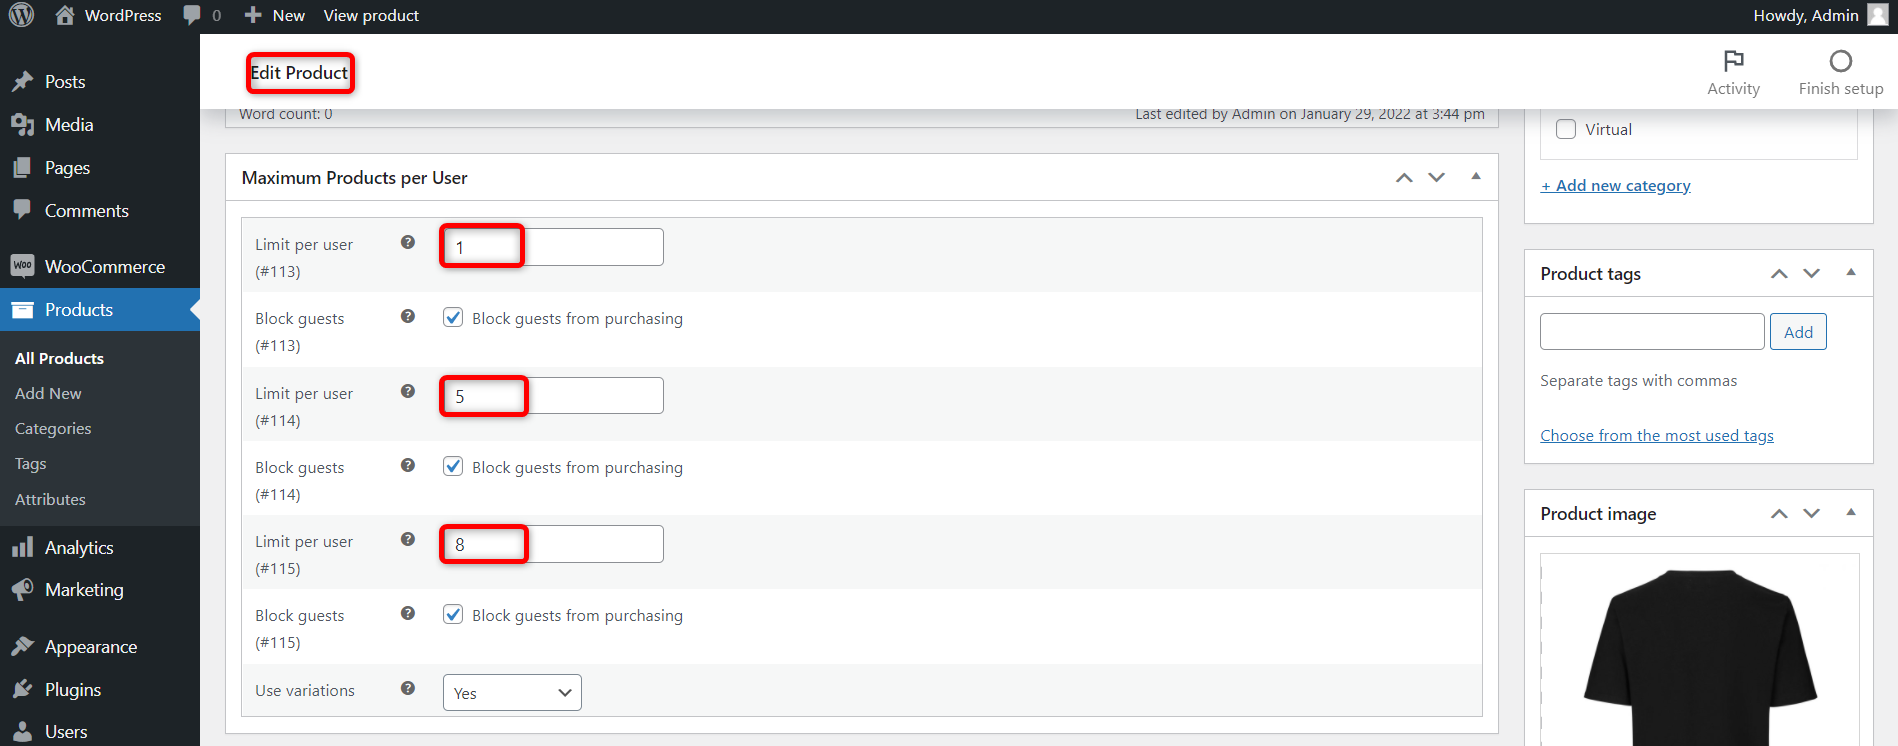
Use variations – If enabled you will be able to set different limits for different variations on the product edit page i.e is if you are using the Limits > All products or Per product option. In the example below the product has 3 variations, and by enabling this option, you can set a different maximum for each variation. You can see in the example below we have set the limits as 1, 5, and 8 for each of the variations.
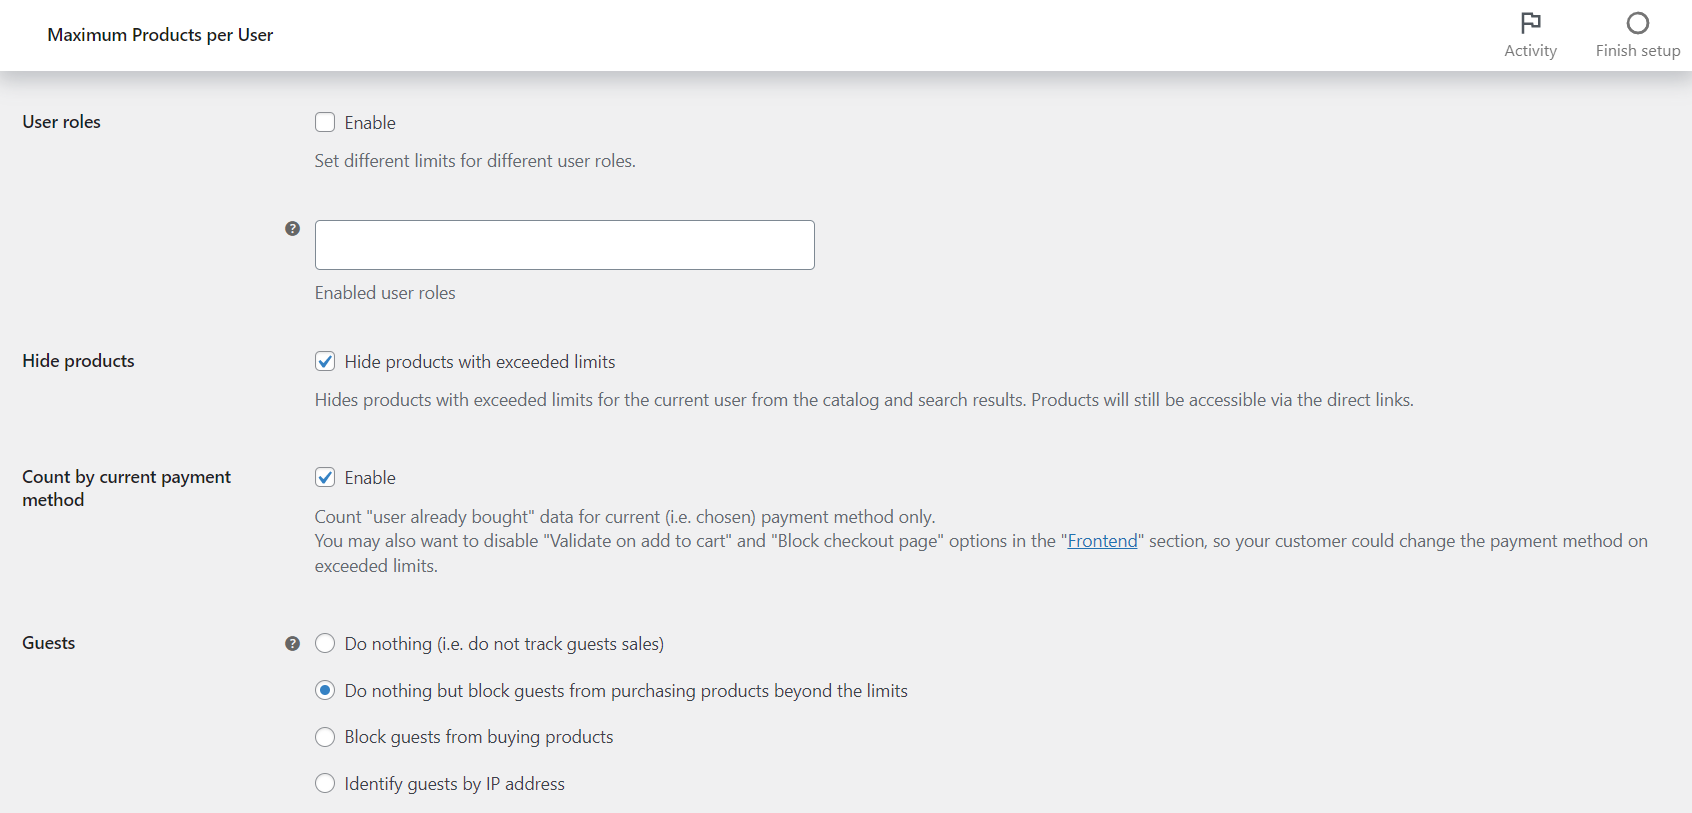
User roles – Allows you to set different limits for different user roles.
Hide products – If enabled this option will hide products from users who have exceeded the limits for certain products. This will result in a better user experience for the visitor, as they will only be shown products that they are able to purchase and not the ones on which they have exceeded the limits.
Count by current payment method – This option will allow you to set limits based on the payment method the customer has chosen. For example, if a customer already bought a maximum of 5 units for a certain products and paid “Cash on Delivery” he may not be able to buy again by using “Cash on Delivery” he can use a different payment method for example, “PayPal” and still be able to checkout.
Guests – There are 4 options here
-
-
- Do nothing – Ignores guest sales in the calculations
- Do nothing but block guests from purchasing products beyond the limits
- Block guests from buying products – Completely blocks guest purchases, users must register an account to purchase
- Identify guests by IP address – Tracks guests using IP addresses and applies restrictions to the IP addresses.
-
1b. Block Guests from Buying Products
Block Method – You can either block guests from buying all products or as per the limit options that you set.
Block Message – Here you can customize the message for guests when they get blocked
Add to cart text – For guests, you can change the add to cart text for both blocked products and variations. The default message is “Login to purchase”
Add to cart redirect – Useful to enable this option if you have enabled the change the Add to cart text in the above option for guests. You can redirect guests if they get the message “Login to purchase” instead of the Add to Cart button.
Hide products – If enabled this option will hide products from guests if their limits are exceeded. This only works if the Block Method is set to According to limit options.

1c. Multi-language Compatibility Options
These are compatibility options for users with Multi-language plugins WPML or Polylang installed.
Multi-language – Allows you to use the default product or term id instead of the translated one if you are using Polylang or WPML
Limit checking – If enabled it will use the product ID from the default language when checking the product limits.

2. Limits Tab
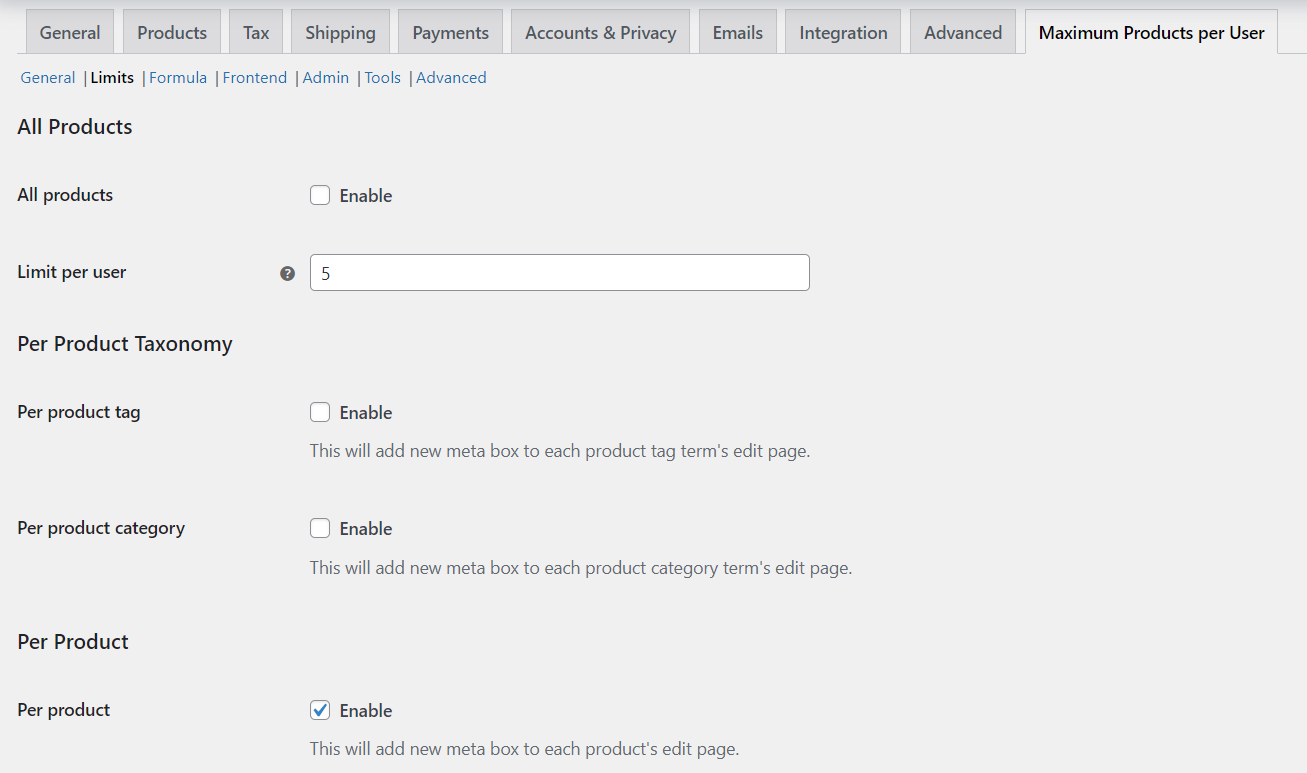
2a. All Products
All products – If enabled the limit you set will apply to all products in the store.
Limit per user – Allows you to set a limit for all products in the store. In the example above the limit set is 5. If the mode is Product Quantity under the General settings, then the limit here will be 5 units per user for all products. If the mode is Product Orders under General settings, and you set the limit per user here as 5, then the maximum number of orders a user can place is 5.
2b. Per Product Taxonomy
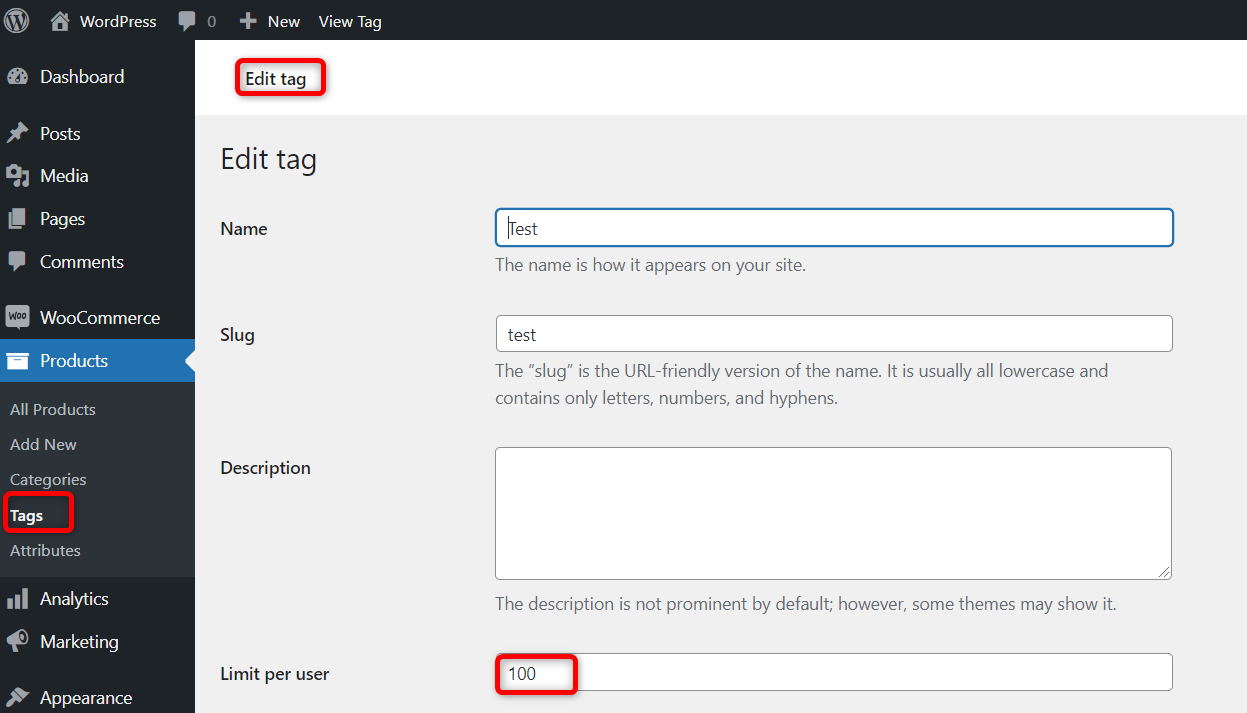
Per product tag – This will add a new meta box to the edit tag page. An example is shown below. Here the limit has been set as 100 for products with the tag “Test”
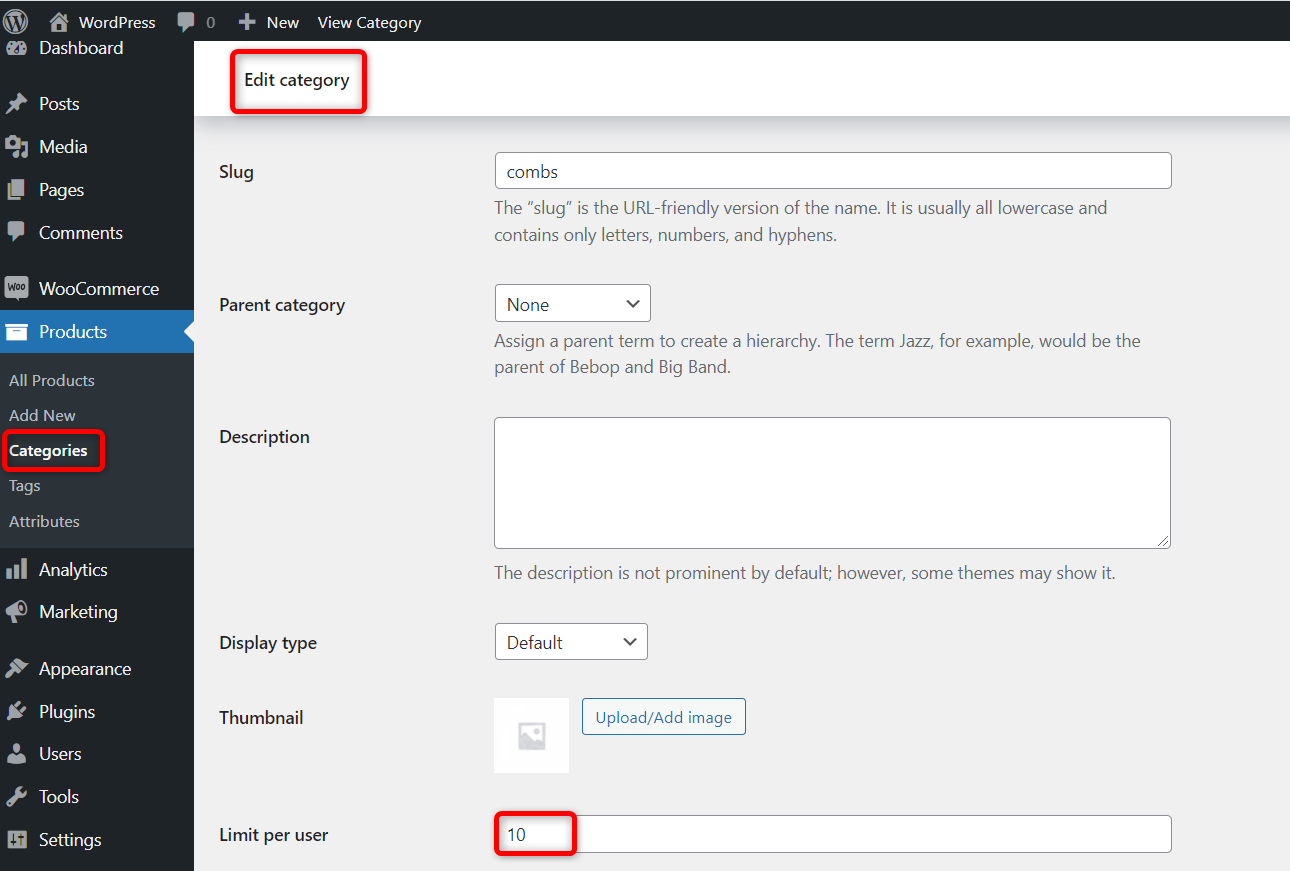
Per product category – Similar to the product tag option, this will add a new meta box to the category edit page. A similar example is shown below. The limit here for the “Combs” category has been set as 10. A user will only be able to purchase 10 products from the “Combs” category.
2c. Per product
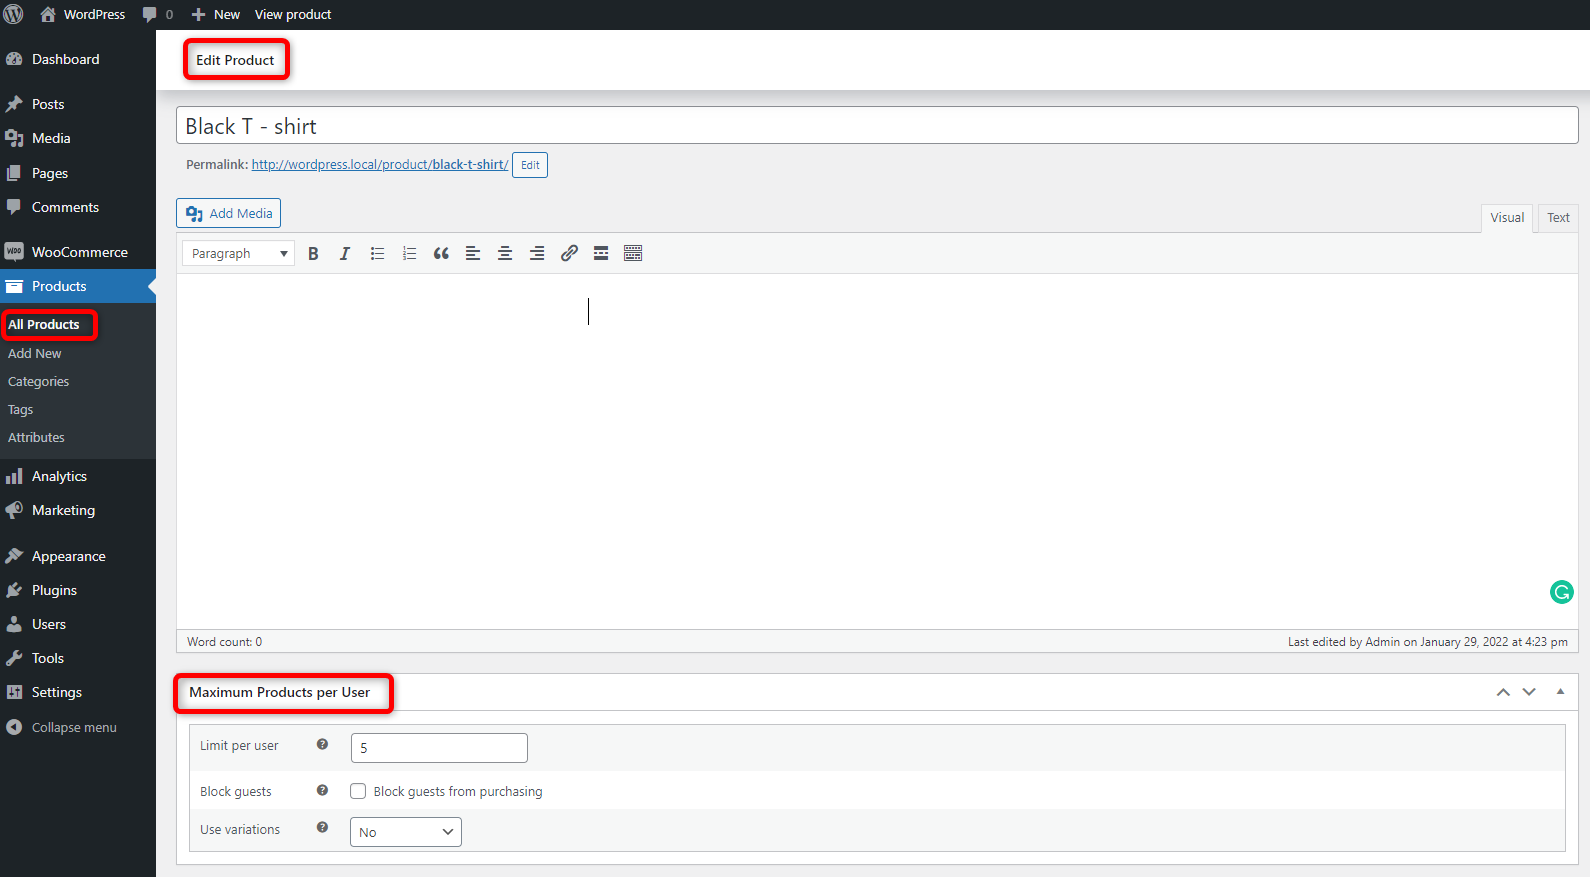
Per product – Enable this option if you want to set a different limit for each individual product. This will add a new meta box to the product edit page. An example is shown below.
3. Formula
This is probably the feature that makes this plugin stand out from the crowd of other limit plugins. This section allows you to set custom limits using a formula.

The shortcode that needs to be used here is
[alg_wc_mppu]
There are several attributes available for use with this shortcode.
user_id, user_role, membership_plan, payment_method, product_id, term_id, product_sku, is_downloadable, is_virtual, limit
There are several notes available in this tab to guide you to tailor a formula according to your requirements.
Notes
-
-
- You need to use [alg_wc_mppu] shortcode here.
- One shortcode per line.
- Algorithm stops when first matching shortcode is found (from top to bottom).
- Available shortcode attributes: user_id, user_role, membership_plan, payment_method, product_id, term_id, product_sku, is_downloadable, is_virtual, limit.
- Limit attribute is required.
- You need to enable “Per product” checkbox in “Limits” section to use product_id, product_sku, is_downloadable, is_virtual attributes.
- You need to enable “Per product category” and/or “Per product tag” checkbox in “Limits” section to use term_id attribute.
- You need to enable “Count by current payment method” checkbox in “General” section to use payment_method attribute. You may also want to disable “Validate on add to cart” and “Block checkout page” options in the “Frontend” section, so your customer could change the payment method on exceeded limits.
- You can not use product_id (or product_sku/is_downloadable/is_virtual) and term_id simultaneously in one shortcode.
- You can set shortcode effective date(s) with start_date, end_date (and not_date_limit) attributes.
-
Here are 2 examples of formulas and how they work.
[alg_wc_mppu limit=”18″ user_id=”2,5″] – Sets maximum limit to 18 for users 2 and 5.
[alg_wc_mppu limit=”18″ user_id=”2,5″ product_id=”100,110″] – Sets maximum limit to 18 for products 100 and 110 for users 2 and 5.
4. Frontend
This section allows you to modify the notification messages displayed to users in the front end about their limits. You can display the messages ion the cart page, the product page and the my-account page.
4a. Frontend Options
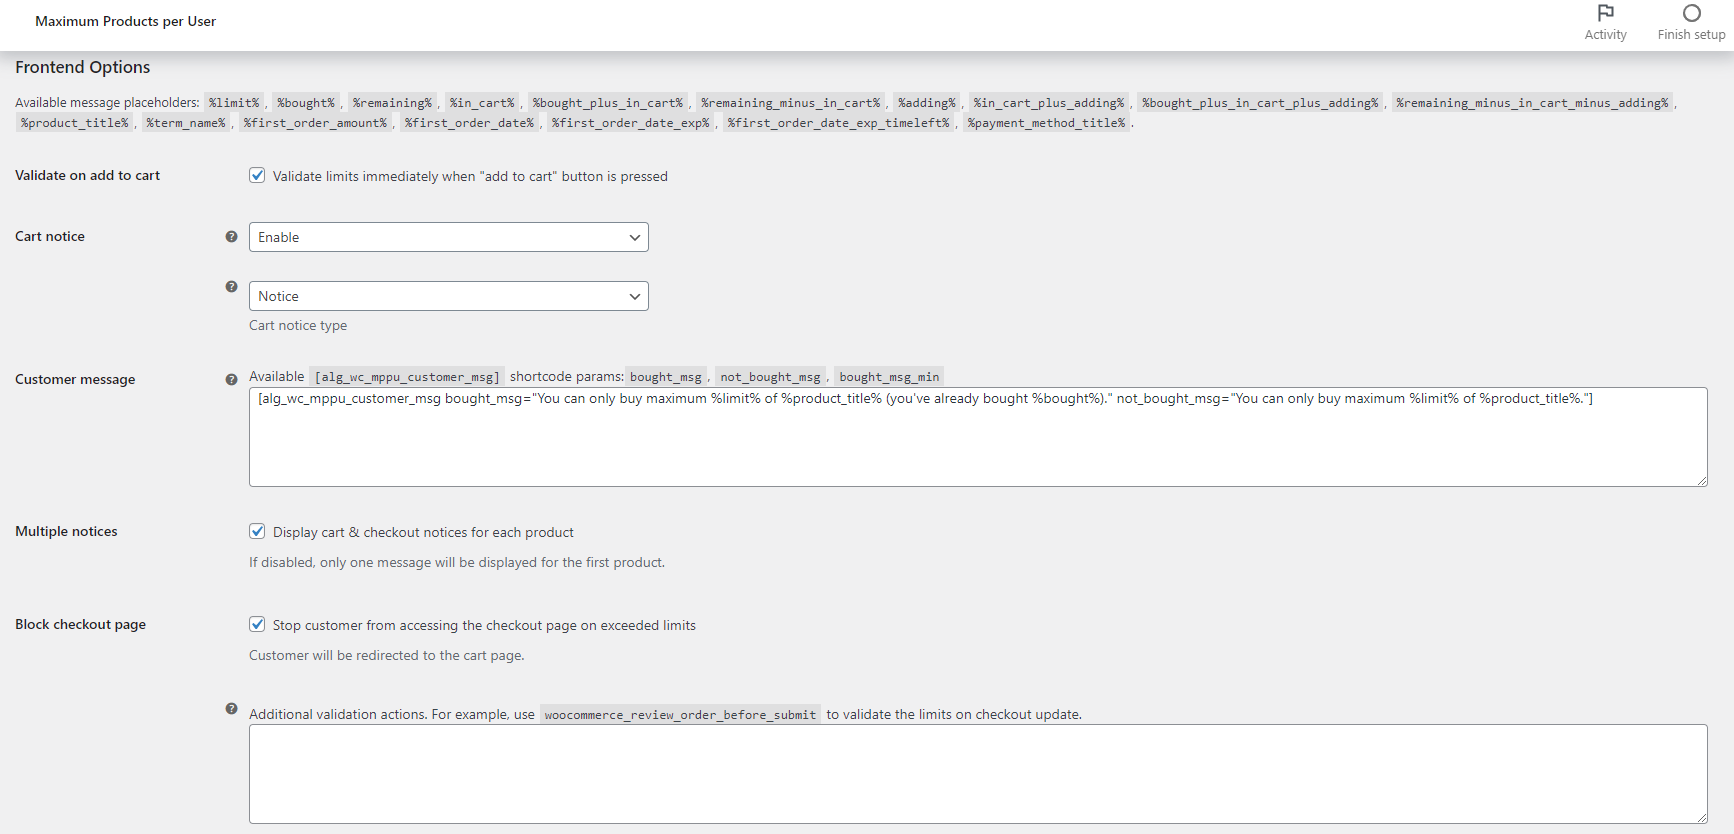
Validate on add to cart – If enabled the plugin will validate the limits immediately the add to cart button is pressed.
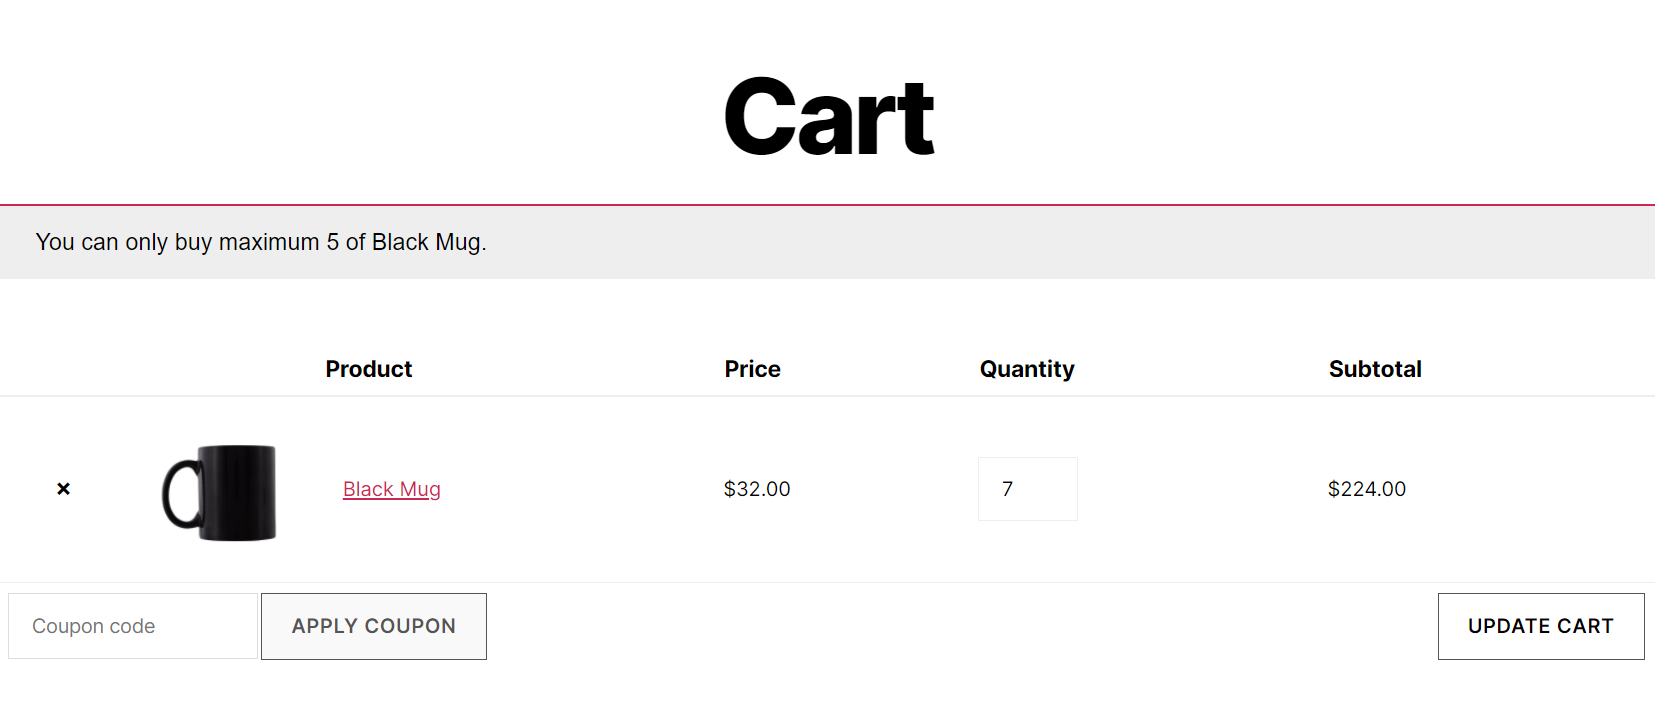
Cart notice – Allows you to enable a notice on the cart page about the limits and choose a notice type i.e either error, notice or success. The design of these notices will depend on your theme. An example of the cart page notice is shown below.
Customer message – Here you can customize the customer message. An example of the back-end message and how it’s displayed in the front end is shown below. There are 2 messages here that you can set, 1 is for customers who have already bought and the other for customers who have not bought.

Backend
Frontend – Design of the notice depends on your theme.
Multiple notices – If enabled both the cart and checkout notice will be displayed for each product.
Block checkout page – This will stop customers from accessing the checkout page if the limits have been exceeded. They will be redirected back to the cart page.
4b. Product Limit Message
This section controls if a limit message is shown on the product page and what message.

Product limit message – This can either be a notice, text in product summary or text in product description. An example of the product page notice is shown below.

The design of this notice will also depend on your theme.
Message content – You can use this section to customize the limit message for your users.
Variations – If enabled, the limit message will be shown to your visitors for each variation as well. For this option to work correctly, General > Use variations options should be enabled.
4c. My Account Tab
Another location where you can show users the limit message is the my-account page on your website. i.e. for logged in users only.
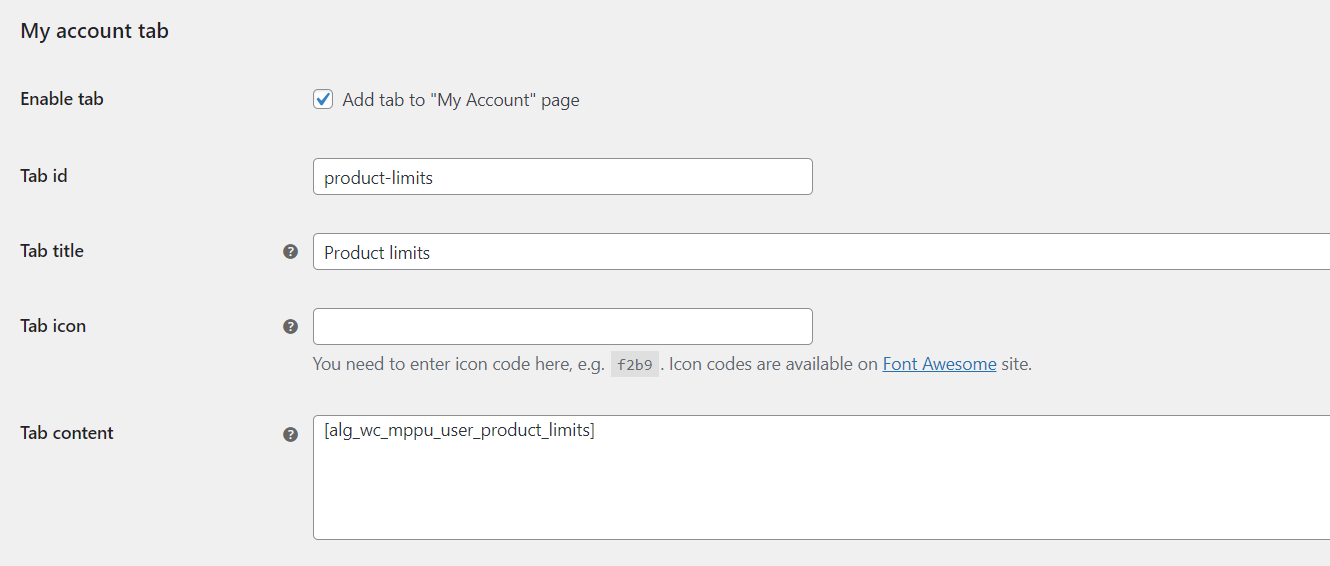
Tab id – Controls the link of your product limits tab on the my-account page. For example: http://www.yourwebsite.com/my-account/product-limits
Tab title – The title for the tab on the my-account page
Tab icon – You can use a font awesome icon for the tab
Tab content – You can use HTML or the shortcode [alg_wc_mppu_user_product_limits] here.
Here is an example of the frontend view of the my-account page and the product-limits tab.

5. Admin Option
This section has some settings for the site admin.
The first button here is the Export sales data for all users. As the name suggests, it allows you to download sales data for all users. It can be useful to analyze limits that you have set and adjust them according to user requirements.
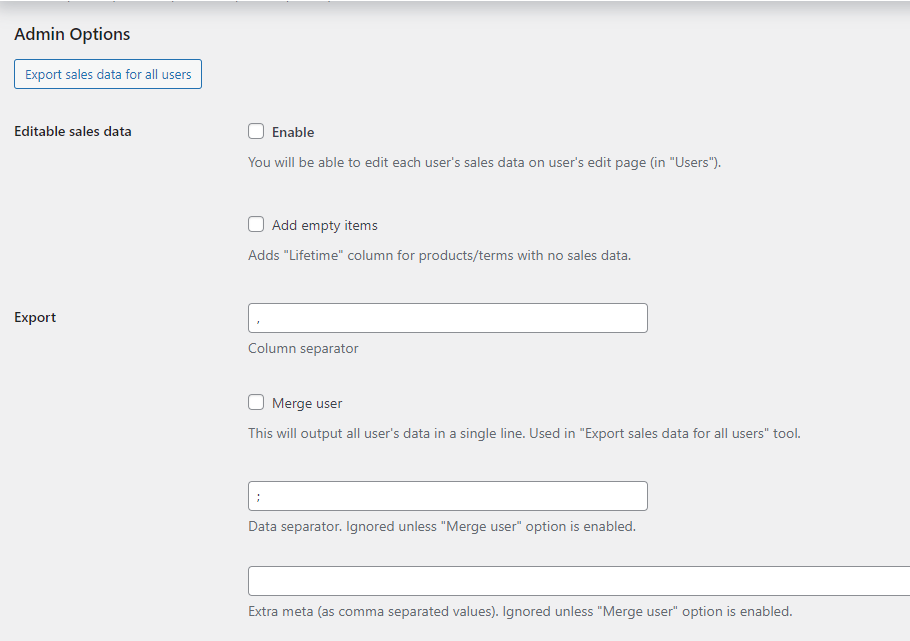
Editable sales data – If this option is enabled, you can edit the sales data from the edit users page. An example is shown below. This can be handy if you want to allow some users to purchase beyond the default limits.
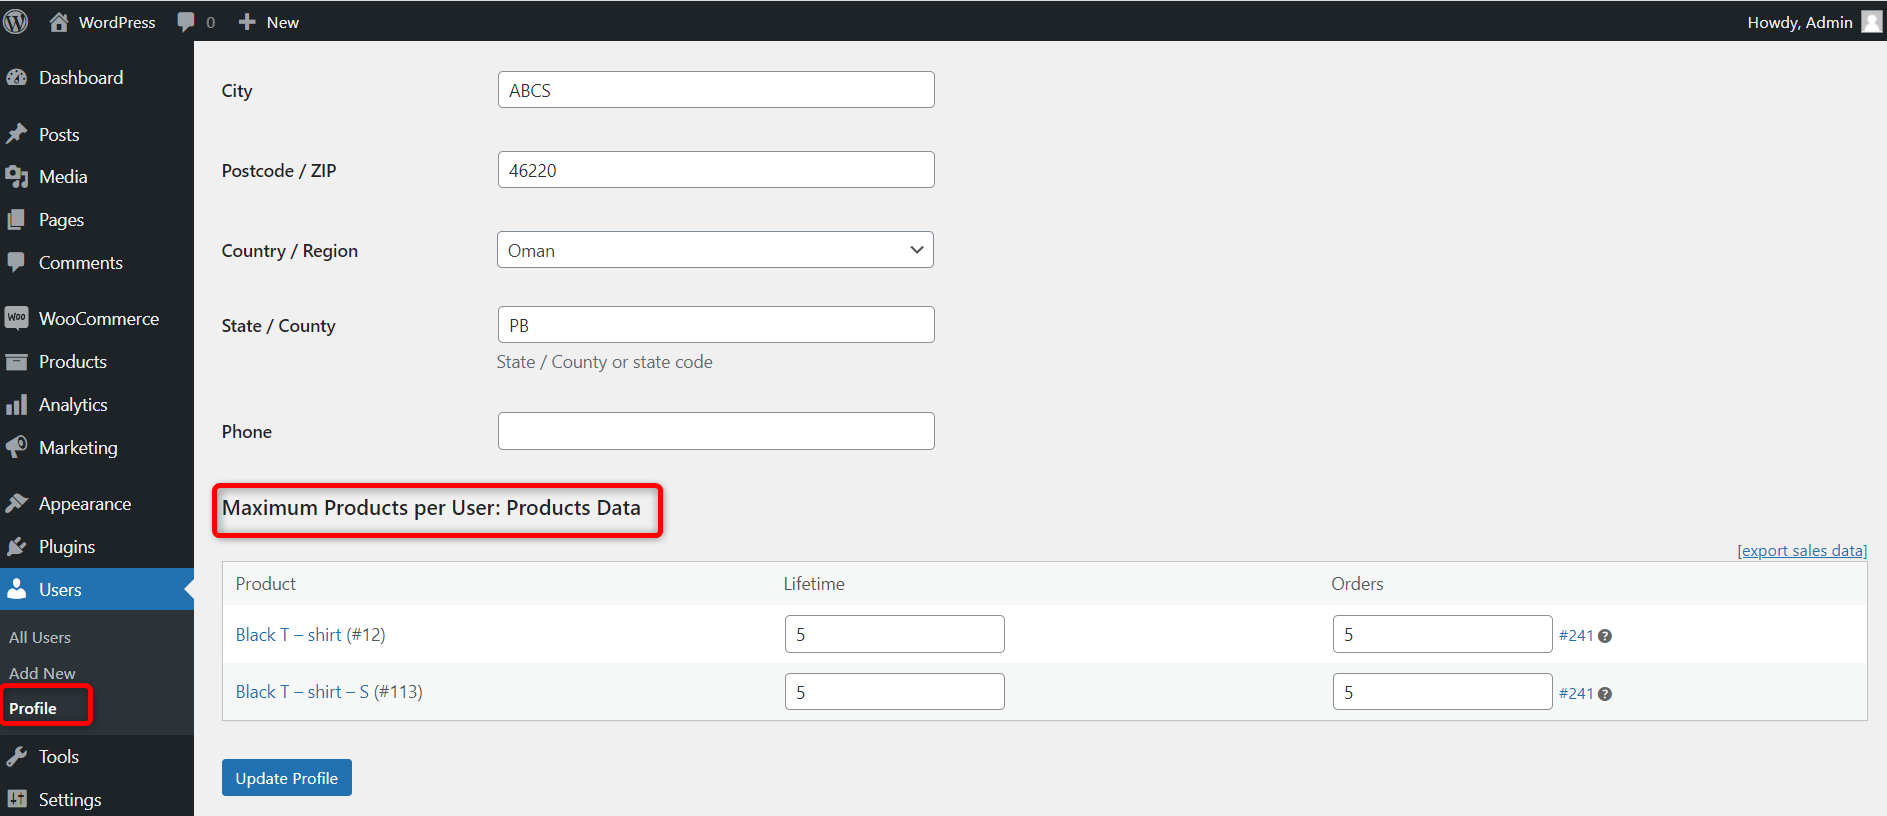
You can also download individual user’s limits data from here.
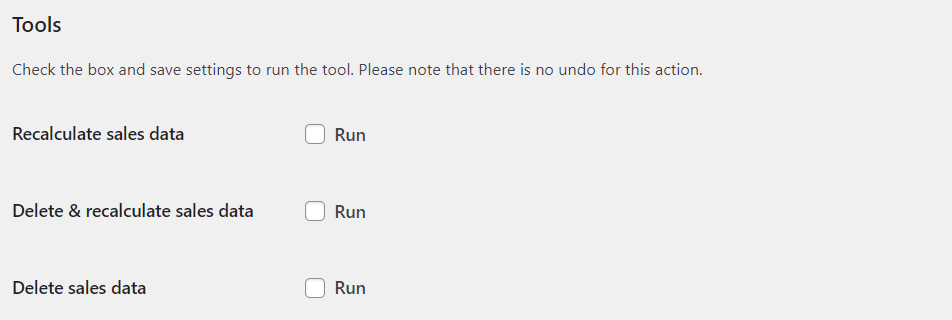
6. Tools
This section has some handy tools that you can use to recalculate sales data. It is useful, incase you change the Mode under general settings. It can also be used when you have just installed the plugin and you want limits to be recalculated for historical orders.
6a. Tools
To use any of the option here, you need to check the box and save the settings.
Recalculate sales data – Recalculates user limits when run.
Delete & recalculate sales data – Deletes user limits data first then recalculates user limits.
Delete sales data – Simply deletes the user limits data.
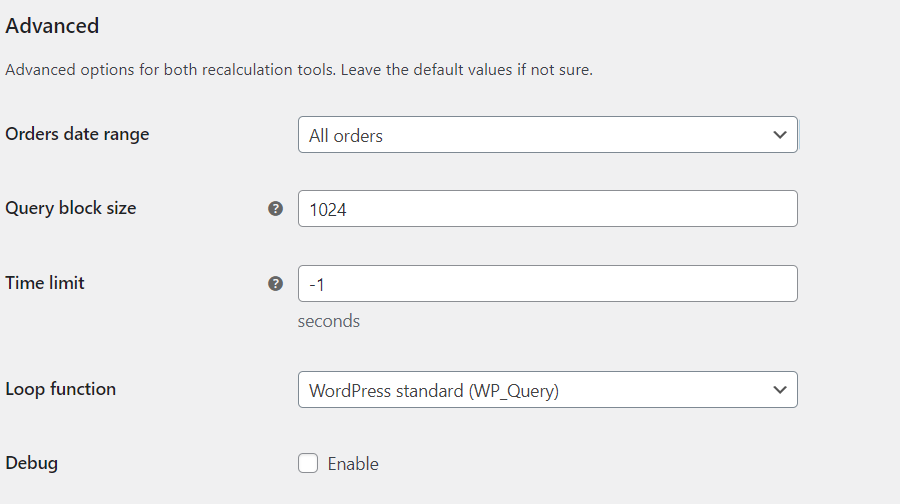
6b. Advanced
If you are having trouble recalculating sales data, it may be because your hosting resources are not sufficient. You can use the options here to change the query size, or enable the debug mode.
7. Advanced
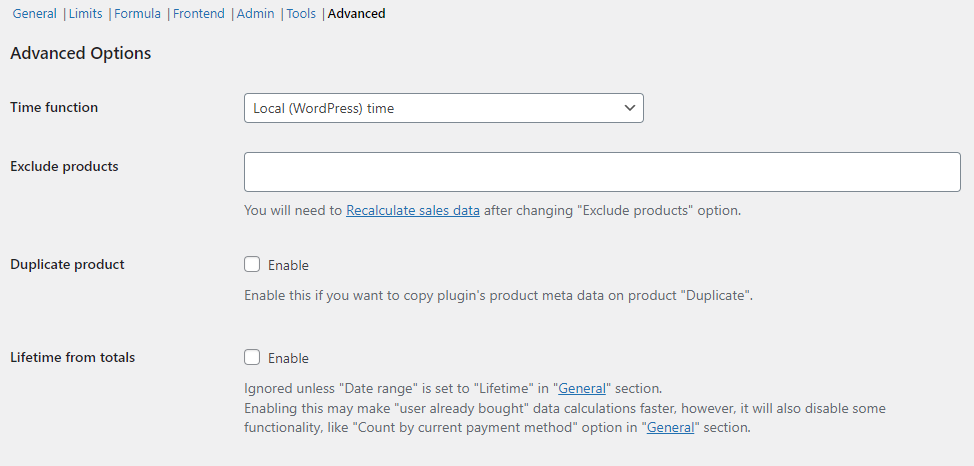
Time function – This is useful to set if you are using a date range in the general settings such as This day or 24 hours. At what time do you want the limits to reset? This can either be the local WordPress time or Coordinated universal time (UTC)
Exclude products – You can exclude some products here from the limit options. Especially handy, when you are using the All products option under the limits tab but still want to exclude say one or two products from the limits. It would be tedious to set the limit for the rest and leave out these one or two products manually.
Duplicate products – If you duplicate a product, do you want the metadata of the plugin to be copied to the new product? You can use this option if you do.
Lifetime from total – Enabling this may make “user already bought” data calculations faster, however, it will also disable some functionality, like “Count by current payment method” option in “General” section.
Conclusion
In conclusion, we explored many reasons why it might be advantageous to put a cap on the number of products a user can buy – from flash sales and exclusive editions, to custom items and shipping restrictions.
We’ve also saw how to implement this strategy in your WooCommerce store using the ‘Maximum Products per User’ plugin. This handy tool allows you to manage purchase limits effectively, which can be especially useful for businesses with limited production capacities or those running membership-based services.
Plus, it’s equipped with some pretty neat features to limit quantity per category or tag, and the ability to block guest purchases and support for multiple languages.
So whether you’re looking to avoid stock hoarding during flash sales, or just want to give all your customers a fair shot at snagging limited items, this plugin could be a game-changer for your store.
Happy selling!


Hi,
I am trying to set up my shop that user can buy any product but only once in a lifetime. I have 10 products on the website and user can buy all of them but only 1 quantity of each. I thought I did set up everything as I should (following your instructions in that post) but it doesn’t work. I can buy the same product with a new shopping session. Any help much appreciated.
Hi I am trying to write the short code to limit a membership to 2 free products per month while there membership is active please can you help as im struggling to understand it.
Hey,
I tried to use your shortcode in one of my product descriptions
I did exactly the same as the documentation, including the template. But the template that i specify is not shown in my website. The text / template is taken from the settings instead
Hey I am planning to use this alongside with Woocomemrce Subscription and WooCommerce Membership. Is it compatible?
The use case would be:
Customer purchasing Gold membership will be able to buy 10 products/month with the category of “resources”
Whereas Platinum members can purchase unlimited resources