Name Your Price WooCommerce: How to Solve Challenges?
Name Your Price WooCommerce is a pricing strategy that allows customers to decide how much they want to pay for a product.
In this article:
✔ You’ll learn about the common challenges that come with this model and how to overcome them effectively.
✔ We’ll discuss issues like managing low offers and helping customers understand the pricing system.
By the end:
You’ll have the tools and knowledge to implement this strategy successfully in your store, enhancing customer satisfaction and boosting sales.
Quick Overview of the Strategy and Its Appeal
Imagine walking into a store and being able to say, “I think this toy is worth $10,” 😅 instead of just seeing a set price.
This approach gives customers a sense of control and can attract more shoppers.
People love the idea of getting a good deal, and when they can name their own price, they’re more likely to feel satisfied with their purchase.
It can also help businesses sell products that might not be moving as quickly.
But:
In the business world, everything has its challenges, so let’s review together in the next section the most prominent challenge 👇
1. Lowball Offers: How to Manage Unrealistic Price Suggestions
One of the biggest challenges with the Name Your Price model is dealing with lowball offers.
This happens when customers suggest a price that’s way lower than what you think the product is worth.
For example:
If you’re selling a cool video game for $50, someone might offer just $5! That can be frustrating!
To manage this:
It’s important to set a minimum price that you’re comfortable with, this way, you make sure that no offer goes below what you need to cover your costs.
For instance:
If you decide that the lowest price you’ll accept is $20, you can set that as your minimum, if someone tries to offer $5, the system will automatically let them know that their offer isn’t acceptable.
You can also communicate clearly with your customers, let them know why there’s a minimum price and what they can expect when making an offer.
setting these boundaries, helps you keep the negotiation fair and ensure you’re not losing money while still giving customers a chance to participate in the pricing process.
2. Offer Management: Handling a Large Number of Offers
If a product gets a lot of attention, you might receive many different price suggestions from customers, this can become overwhelming!
Imagine you run an online store selling handmade jewelry, and you decide to let customers name their price.
As your promotion goes live, you start receiving offers from many shoppers, each person suggests different amounts for the same necklace, and soon your inbox is filled with price suggestions.
Keeping track of all these offers can get overwhelming! Just like in a busy chatroom, you might struggle to remember who offered what and when.

To make things easier:
It’s important to set up a system to manage these offers.
Most plugins, like the Name Your Price WooCommerce Plugin, provide an organized way to view all the offers in one place, you can quickly see the details of each offer, such as the price suggested and the customer’s information.
You can even set a minimum price that will be automatically accepted, allowing you to manage offers without needing to respond each time, saving you time and effort.
3. Customer Confusion: Clarifying How the Pricing Works
Another challenge with the Name Your Price model is that some customers might get confused about how it works.
When shoppers see that they can choose their own price, they might not understand the rules or how to make an offer, they could wonder if they can offer any amount, or if there are limits.
To help clear up any confusion, it’s important to provide clear information on your product pages.
You can include a short explanation, like:
“You can choose how much to pay for this item! Just type in your price, but remember, it has to be at least $20.”
Using visuals, like icons or simple graphics, can also help.
A graphic showing a slider with the minimum and maximum prices makes it easier for customers to understand their options.
Additionally:
Consider adding a FAQ section to your website where customers can find answers about this open pricing model. This way, customers will feel more confident making their offers!
You may be interested in:
WooCommerce Minimum Order Amount: Avoid These 5 Mistakes!
4. Inconsistent Revenue: Managing Unpredictable Sales
Yes, it is one of the challenges facing the “Pay What You Want” model!
This means that the amount of money you make from sales can vary a lot from month to month.
To clarify more:
One month, you might have several customers offering good prices, while the next month, you could get many lowball offers that leave you with less income than you expected.
This unpredictability can make it tricky to plan your budget and manage your inventory.
Imagine you’re selling cookies online, if one week you sell a lot and the next week only a few, it’s hard to know how much money you’ll have to buy more ingredients or supplies.
To help with this:
It’s important to keep track of sales trends over time, look at how customers respond to your pricing and adjust your strategies accordingly.
Again, setting minimum prices can also help create a more stable income, giving you a better idea of what to expect.
You just need some planning, so you can navigate these ups and downs while still enjoying the benefits of the Pay What You Want approach!
5. Inventory Management: Dealing with slow-moving products
These slow-moving items can take up space in your store and tie up your money. For example, if you have a new gadget that’s not getting much attention, you might feel stuck with it.
In this case, the “Name Your Price” will be a great solution 👌
When you let customers enter their own price, it opens the door for them to make offers on items that might not be moving quickly.
To make it even easier:
You can set up a special promotion for these products.
For instance:
You might say, “Name your price for this gadget! We really want to see it go to a good home.”
This way, customers are more likely to take a chance and make an offer, helping you clear out inventory and make room for new products.
So, this flexible dynamic pricing model gives you a fresh start on products that haven’t been sold and turn them into successful sales!
Leveraging Name Your Price WooCommerce Plugin
The Name Your Price Plugin comes with some handy features that make it easier to handle the challenges of the “Set Your Price” model.
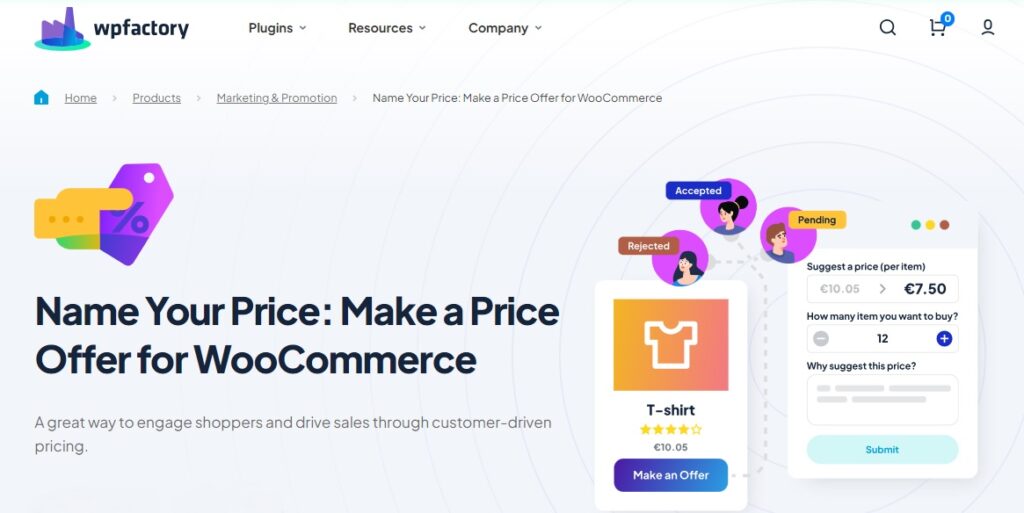
Here are a few that can really help:
-
Minimum Price Settings
For example:
If you sell a cool backpack, you can set the minimum price at $20.
This way, you make sure that every offer covers your costs and keeps your business healthy.
-
Offer Management Dashboard
The plugin provides a special dashboard where you can see all the offers customers make in one place.
This makes it super easy to keep track of who is offering what, so you can respond quickly.
Imagine having all your offers neatly organized, just like keeping your school supplies in a tidy backpack!😁
-
Accept, Reject, or Counter Offers
If a customer suggests a lower price, you can respond with a friendly message or propose a different amount.
This keeps the conversation going and helps find a price that works for both you and the customer.
-
Auto-Accept Options
You can set up auto-accept options to automatically approve offers that meet your minimum price, this saves you time and ensures that good offers are accepted without having to review each one.
For instance:
If you set a minimum price of $15, any offer at that price or higher will be accepted automatically, making the process smoother.
-
Select Specific Products or Categories
The plugin allows you to apply the “Name Your Price” feature to specific products or even entire categories.
So, you can choose which items will have this dynamic pricing model, making it flexible and targeted.
For example:
You might want to offer this option only on clearance items, helping you move older stock.
-
Automatic Notifications
You can set up email notifications to alert you whenever someone makes an offer, so you won’t miss out on any opportunities to respond, keeping your customers engaged.
-
Easy Integration with Your Store
The plugin works smoothly with your existing WooCommerce setup, making it easy to add the Name Your Price feature without any complicated steps.
You can customize how and where the price offer option appears, ensuring it fits perfectly with your store’s design.
These features help you tackle the challenges that come with the open pricing model, making the process smoother for you and more enjoyable for your customers.
You may be interested in:
WooCommerce Quantity Based Pricing: Do’s and Don’ts
Tips for Customizing the Plugin to Fit Your Store’s Needs
Along with the suggestions we’ve covered for tackling challenges, here are some tips to customize the plugin and make your customers smile while they shop:
-
Personalize the Button Label
Change the button label to something that matches your store’s vibe.
Instead of just saying “Name Your Price,” you could use something catchy like “Price It Your Way!” or “What’s Your Price, Buddy?”
This may make it more inviting and maybe fit your personality brand.
-
Adjust the Price Offer Settings
Take time to tweak the settings to fit your products.
If you have items that often go on sale, consider lowering the minimum price for those specific products, because this encourages more offers and can help clear out inventory.
-
Create Special Promotions
Use the plugin for special events or promotions.
For example:
During a holiday sale, you could allow customers to name their price for a limited time, to generate excitement and attract more shoppers to your store.
-
Monitor and Adjust
Keep an eye on how customers are responding to the pricing feature, if you notice a lot of low offers or confusion, be ready to adjust your settings.
You might need to change your minimum price or add more information to help customers feel comfortable making offers.
Conclusion
- Setting minimum prices and clearly communicating with customers helps create a smoother shopping experience.
- Finding the right balance is key.
- It’s also helpful to monitor how offers come in and adjust your approach based on what you see.
- Set up a system to manage these offers.
- it’s important to provide clear information on your product pages about how the pricing works
- Keep the lines of communication open and encourage customers to engage with the pricing feature.