How to Set Up Cost of Goods & Calculate Profits in WooCommerce
WooCommerce is one of the most popular platforms for building eCommerce stores. One essential feature however that is lacking in profitability reports. WooCommerce has excellent sales reports and can track orders, customers, and much more. However, profitability and cost of goods is an essential features that are lacking.
Thankfully, there is a solution though. One of the reasons for WooCommerce’s popularity is the sheer number of plugins available for the platform. Plugins allow you to easily add extra functionality to your WooCommerce store. If you are looking for profitability reports, there are many plugins available for this.
In this article, we will have a look at the Cost of Goods plugin for WooCommerce. It is an excellent solution for anyone who is looking to track the cost of goods for WooCommerce products and track profitability also. The plugin has extensive features, and we will go through each of them in detail.
The plugin has a free and paid version. The free version can be downloaded from here and the paid version is available here. The paid version has many more robust features such as bulk editing of cost field, recalculation of order profits, graphical reports, and multi-currency support.
Cost of Goods: Product Cost & Profit Calculator for WooCommerce
However, the free version is also sufficient for basic cost of goods tracking. The price of the pro version starts from only $49.99 for a single site annual license.
Setting up the plugin
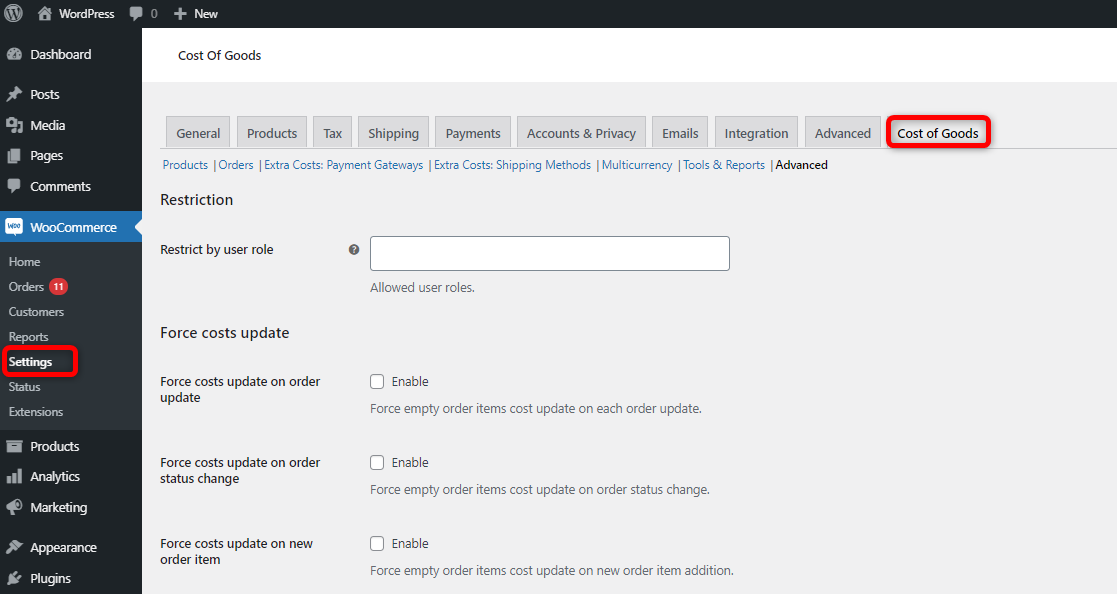
Once installed and activated you can access the plugin’s settings from your WordPress dashboard. Navigate to WooCommerce > Settings > Cost of Goods.
If you are unsure about installing a plugin you can see our tutorial on how to install a plugin in WordPress.
There are several tabs for settings under the plugin’s settings. We will go through a number of them and see what features are available for the plugin.
However, before that let us look at how you can add cost of goods now to your products.
Adding cost of goods to products
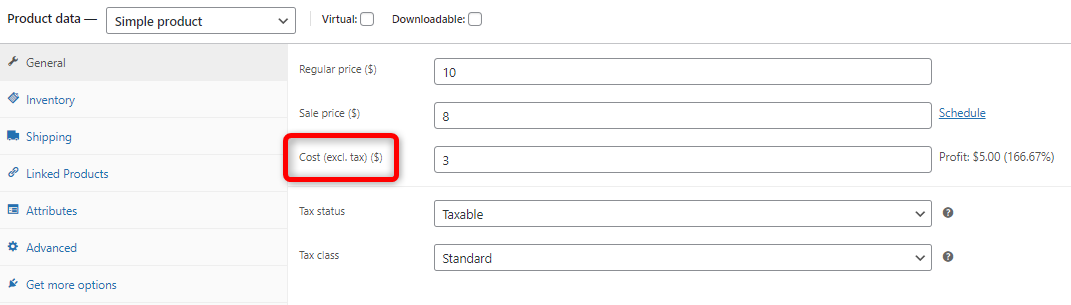
After activating the plugin when you edit an individual product you will find a new field for cost of goods.
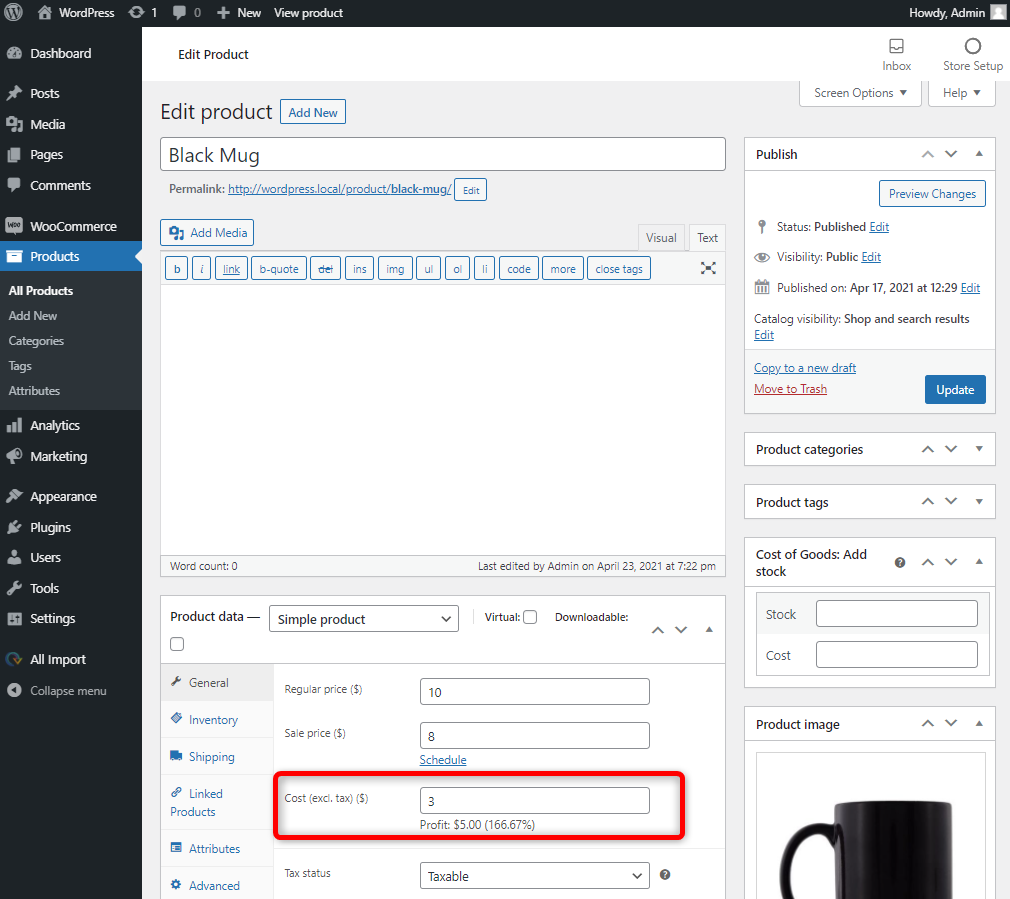
You can use this field to add your cost of your products and track its profitability. In the above example, you can see the sale price of the product is $10 and the cost is $5. The profit is also displayed, and it is $5 (100% profit)
Editing Bulk Costs
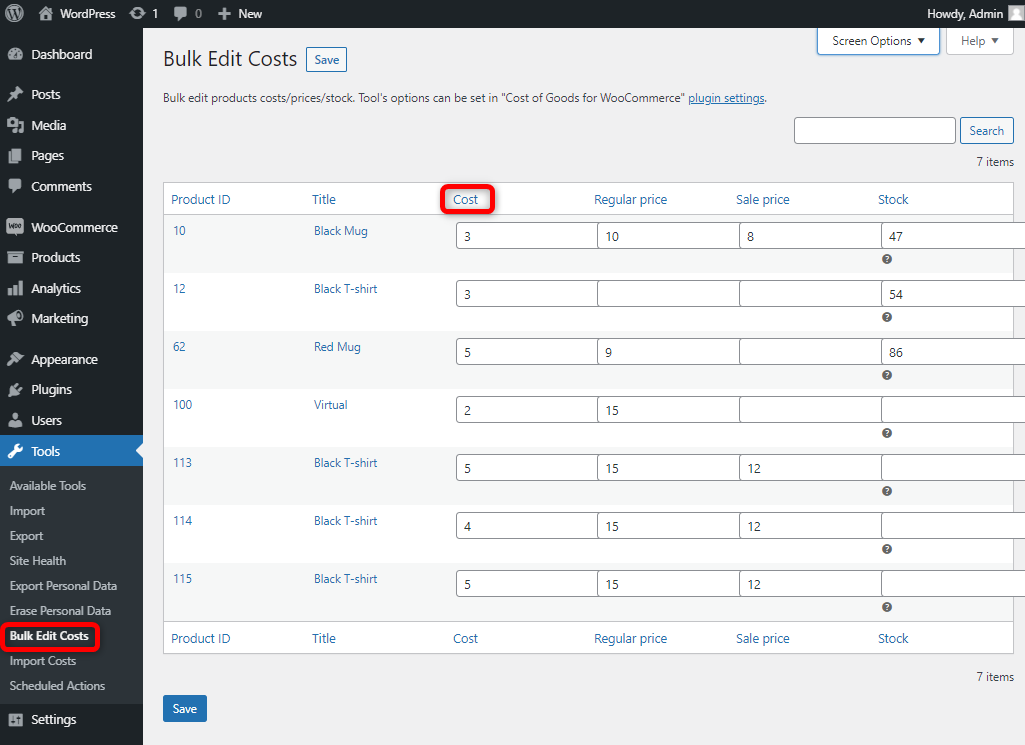
If you have a running eCommerce store and several products, editing each individual product and adding costs can be a tiresome process. Thankfully, the plugin comes with a number of options to edit costs in bulk.
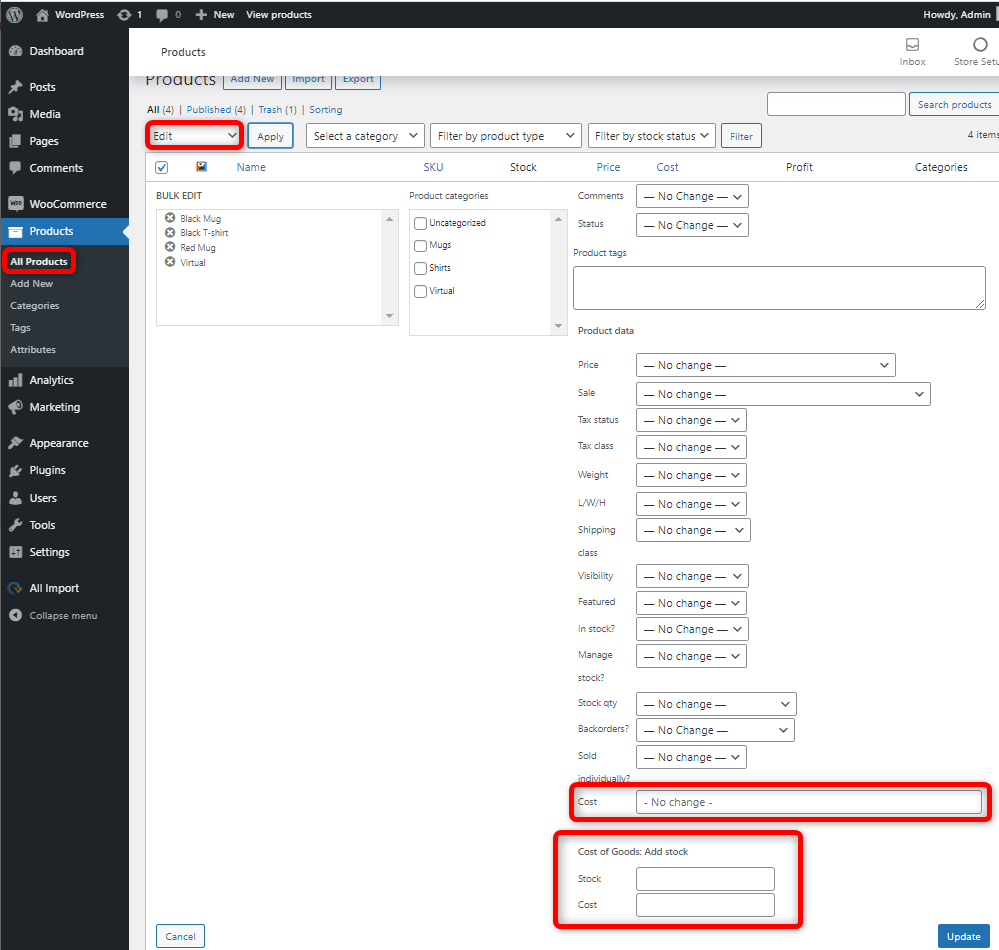
To bulk edit costs, in your WordPress dashboard navigate to Tools > Bulk Edit Costs.
Here you will find a list of all your products in your store, and you can easily edit the cost, regular price, sale price and stock.
This is a faster and more efficient way of editing your costs for existing products.
Creating Custom Profit Reports
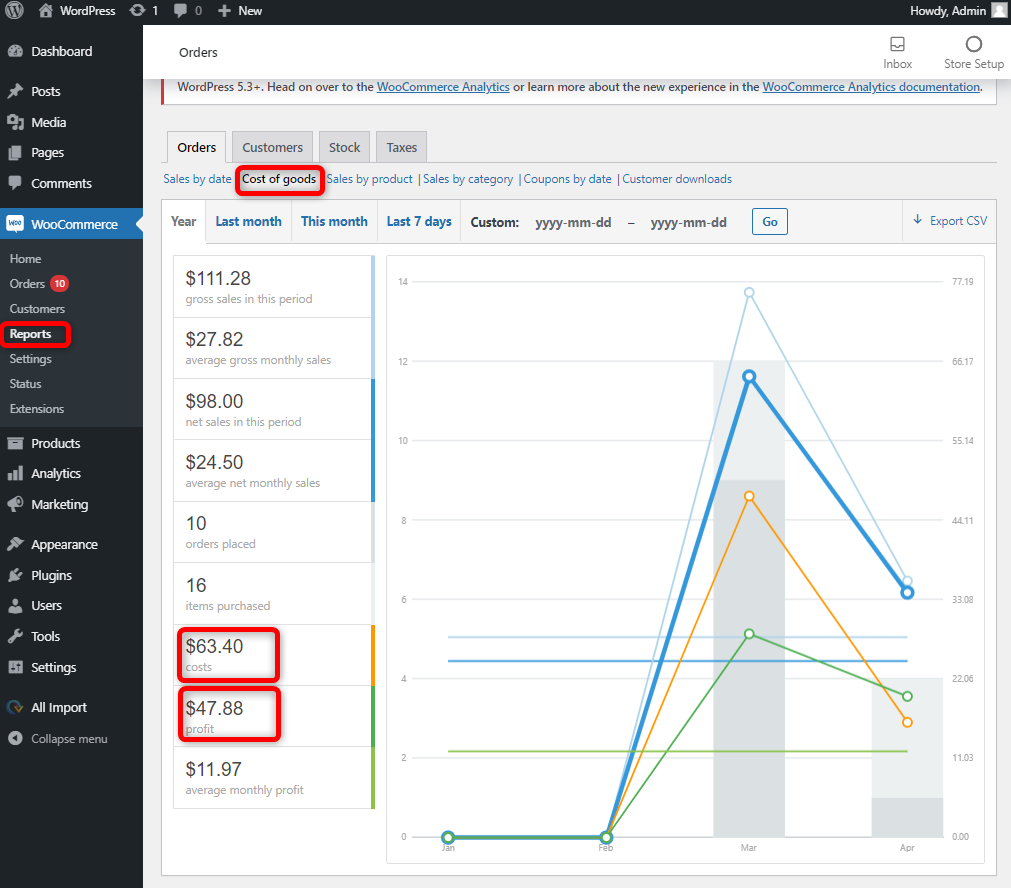
There are a number of reports that can be created when tracking cost of goods. First of course is the profit and cost of goods sold. To access it simply navigate to WooCommerce > Reports > Cost of goods. An example is shown below.
There are 2 new items that are tracked here, the cost of goods and the profit.
Secondly, the other report that you can create is the Stock report with the cost of goods. This gives you a quick overview of how much your stock is worth. To access it navigate to WooCommerce > Reports > Stock > Cost of Goods. An example is shown below.
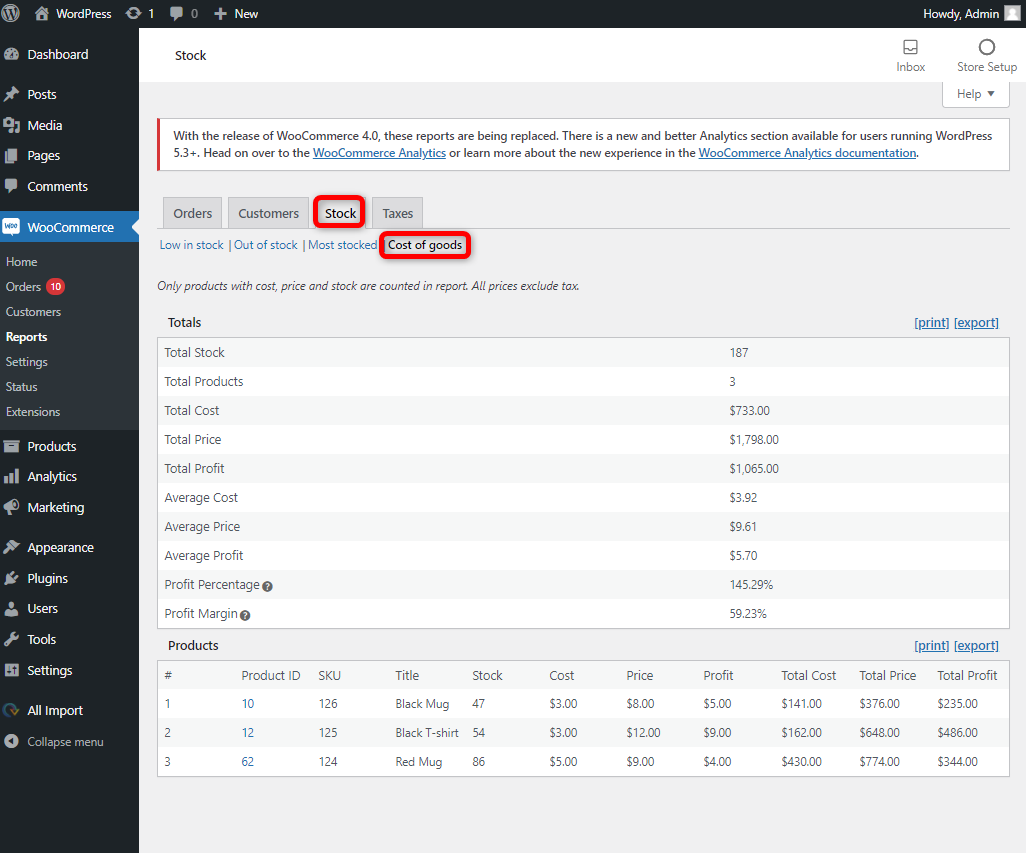
In this report, you can see the stock for each product in your store, the cost, the selling price, and the profit. You can also see the total cost, total selling price, and the expected total profit.
Importing Costs
In some situations, even the bulk edit costs options may be tedious if you have costs saved elsewhere already. It would be easier to import the costs. Another awesome feature of the plugin is the ability to allow you to import costs.
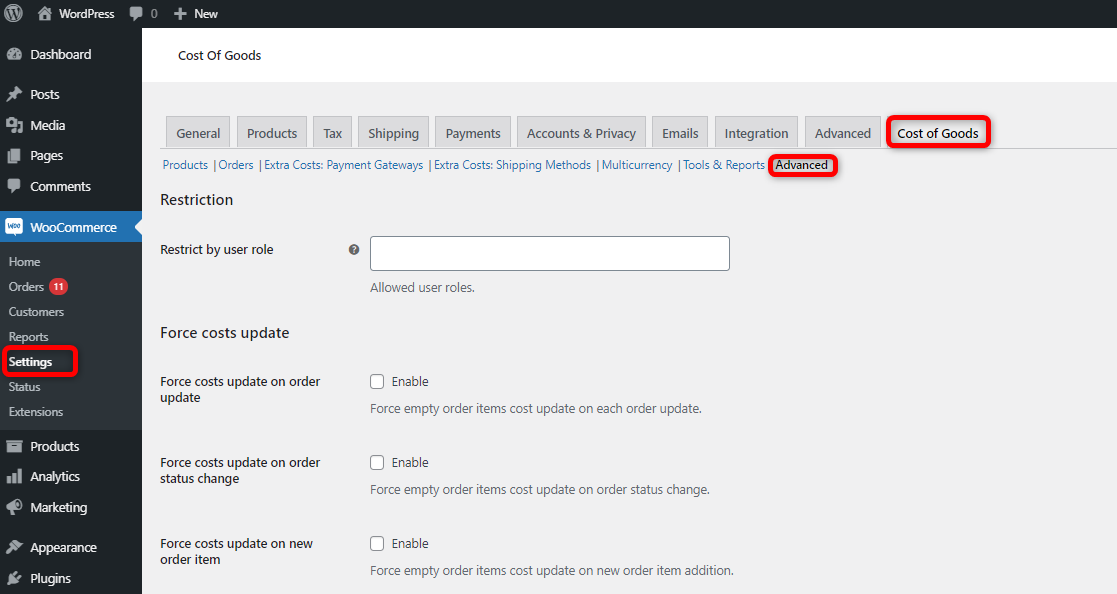
However, to import costs you will need to use the WP All Import plugin. Install and activate the plugin. Once done navigate to WooCommerce > Settings > Cost of Goods > Advanced and from here enable the compatibility option with WP All Import.
Once the compatibility has been enabled, in your dashboard navigate to All Import > New Import and click on Upload a file.
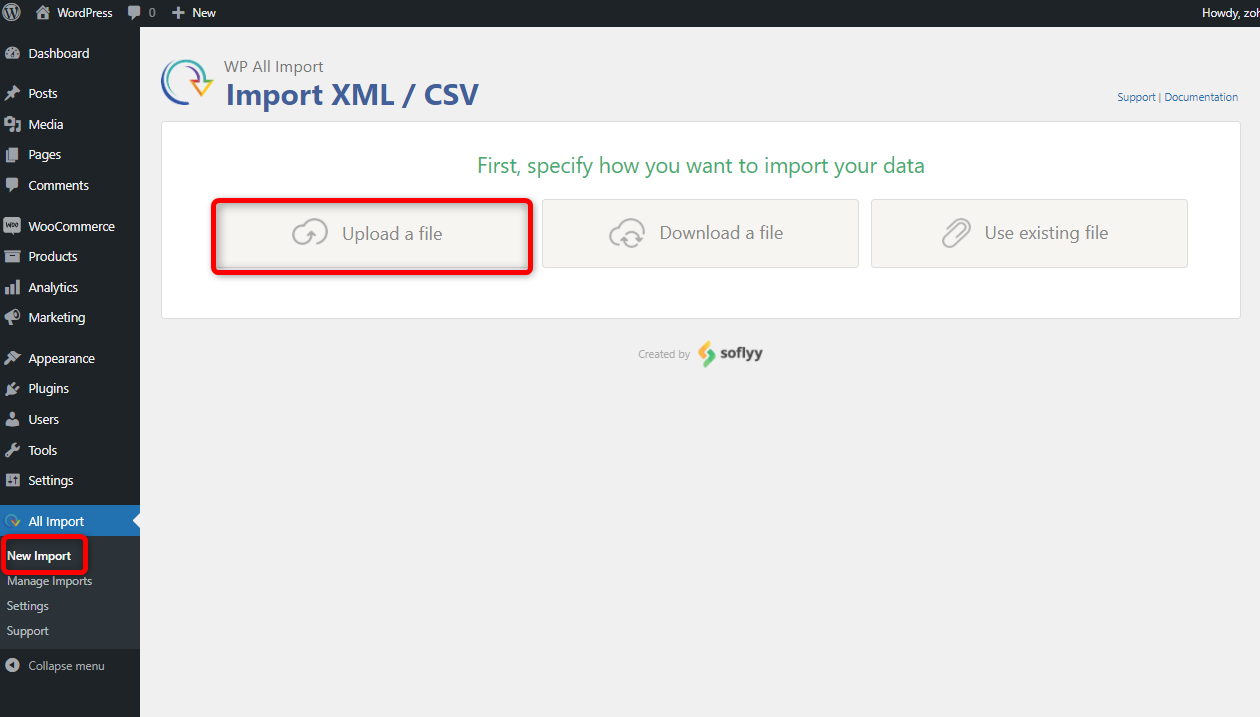
Select the file from your computer that has the costs. It will need to be in CSV or XML format. We want to import the costs into existing WooCommerce products. Therefore for “Import data from this file into..” option we have selected Existing items. For the option import to existing we have selected WooCommerce products.
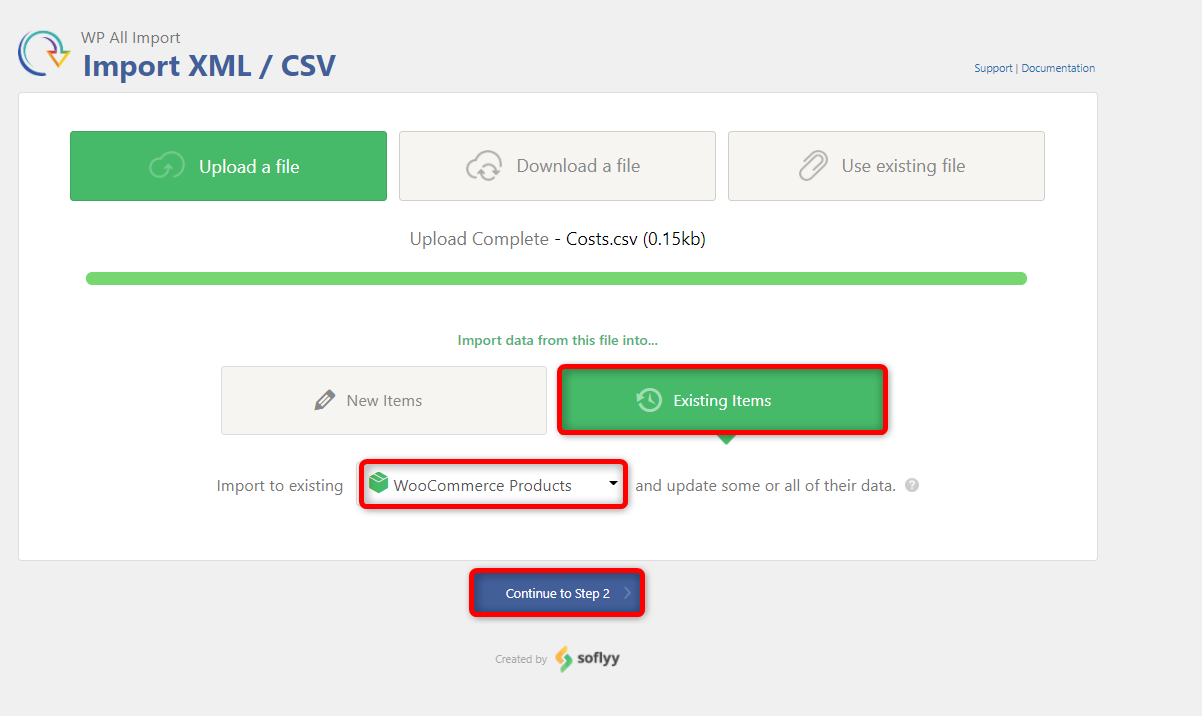
Click on Continue to Step 2. Here you can verify the data that is going to be imported. You need to use the _wc_cog_cost meta key in your uploaded file to replace the costs.
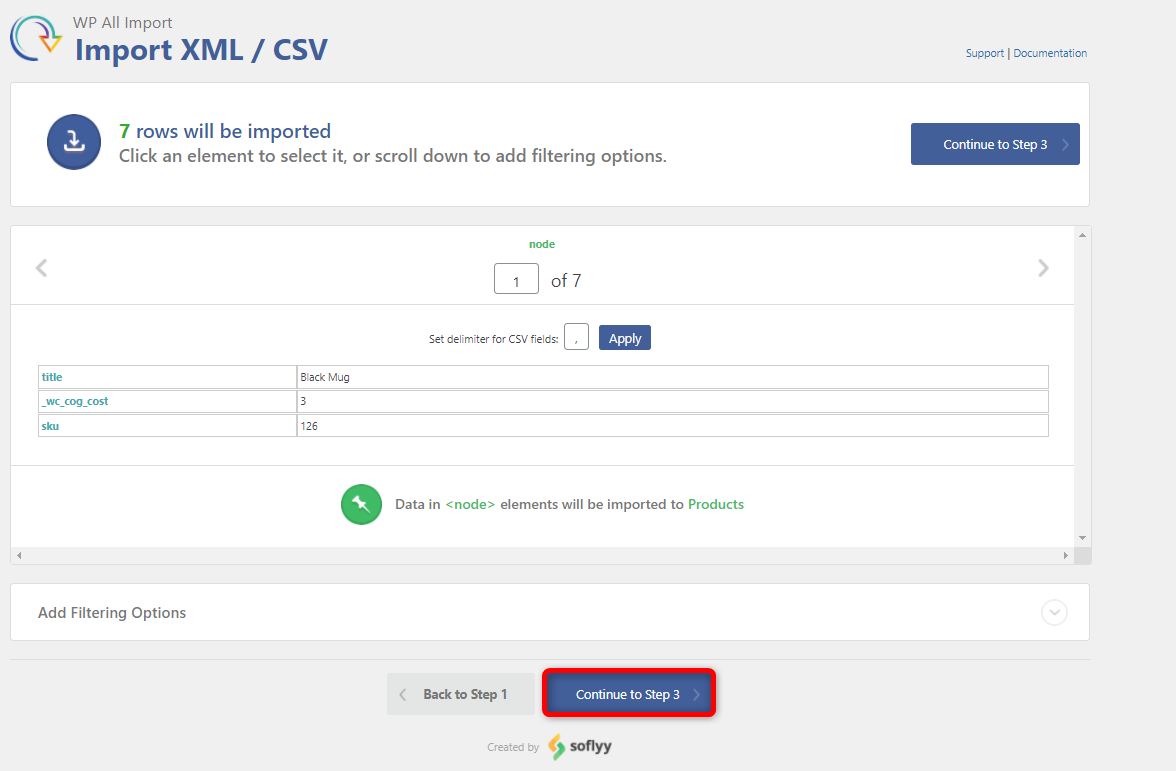
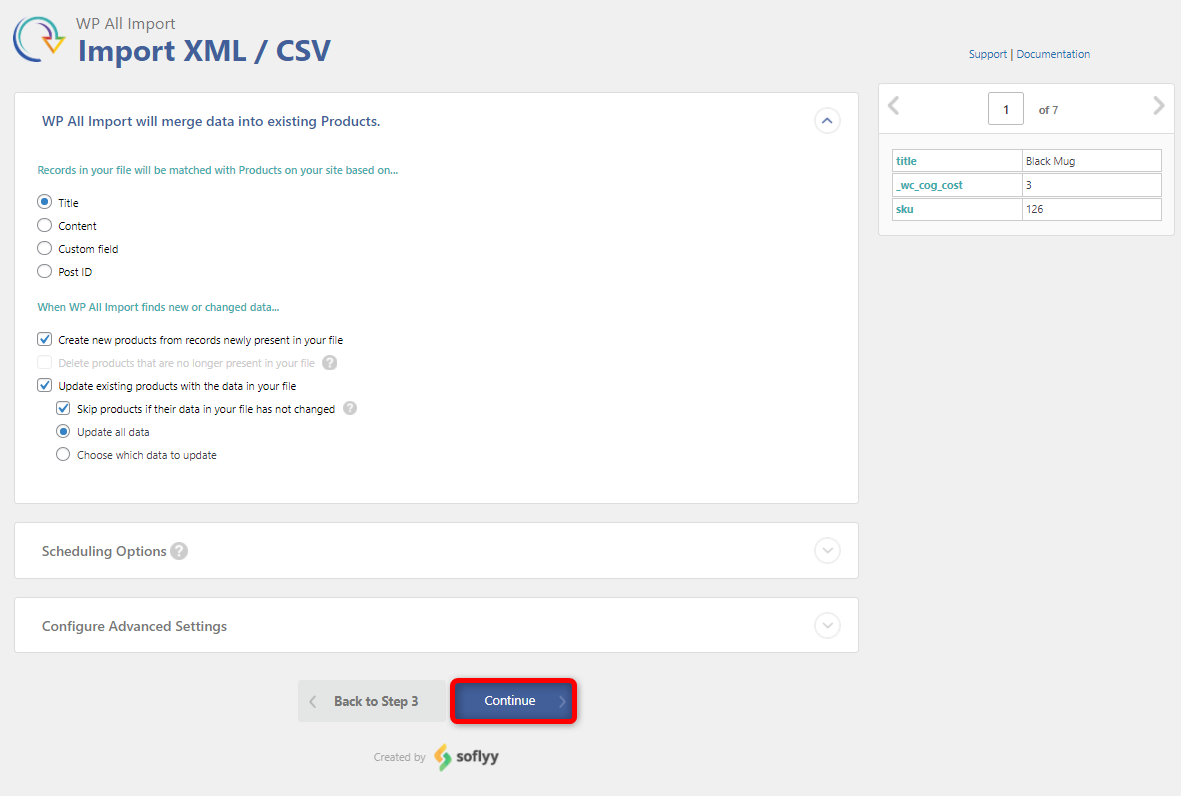
Once verified click on Continue to Step 3.
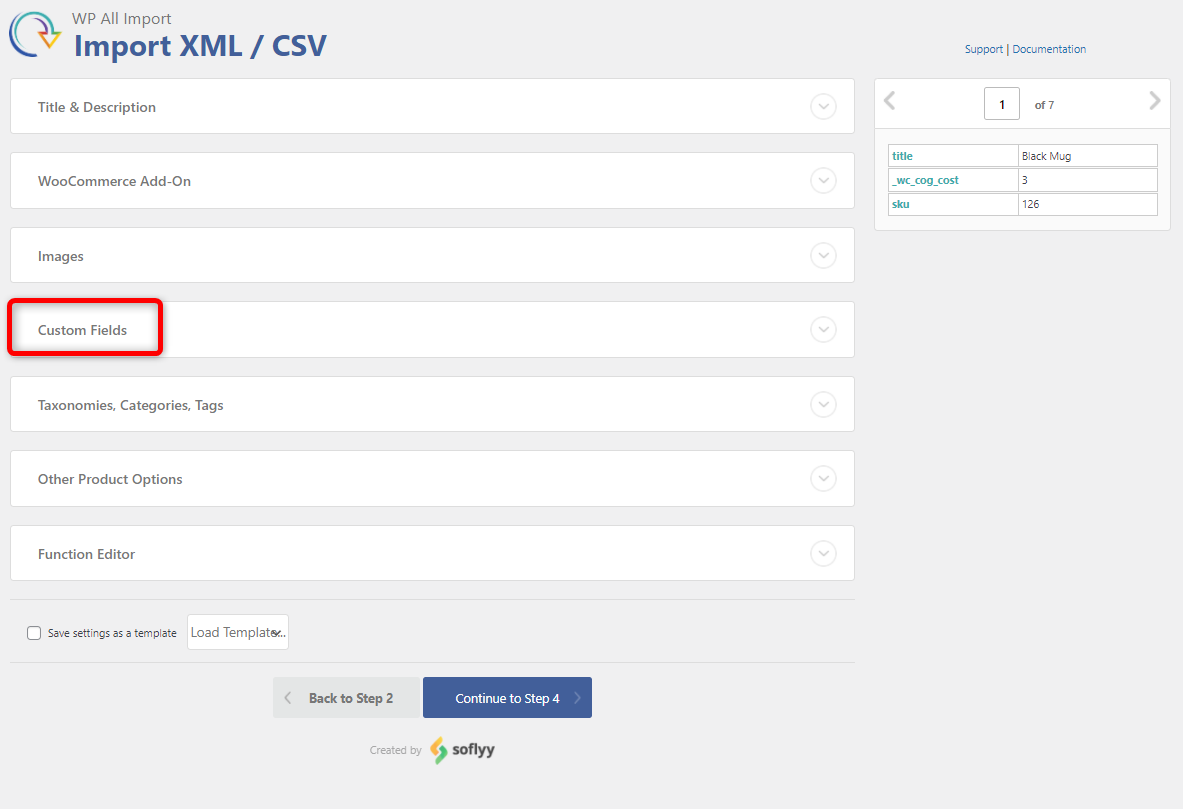
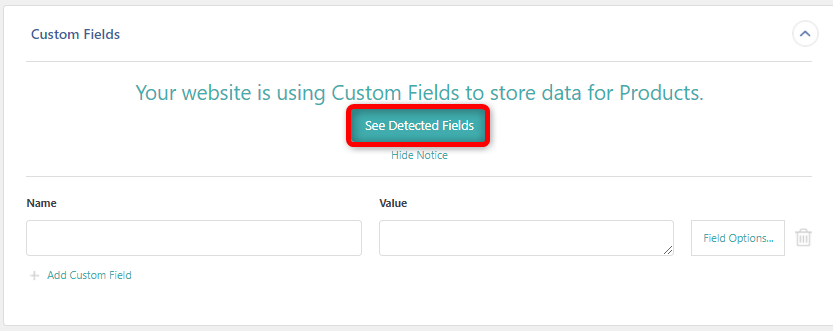
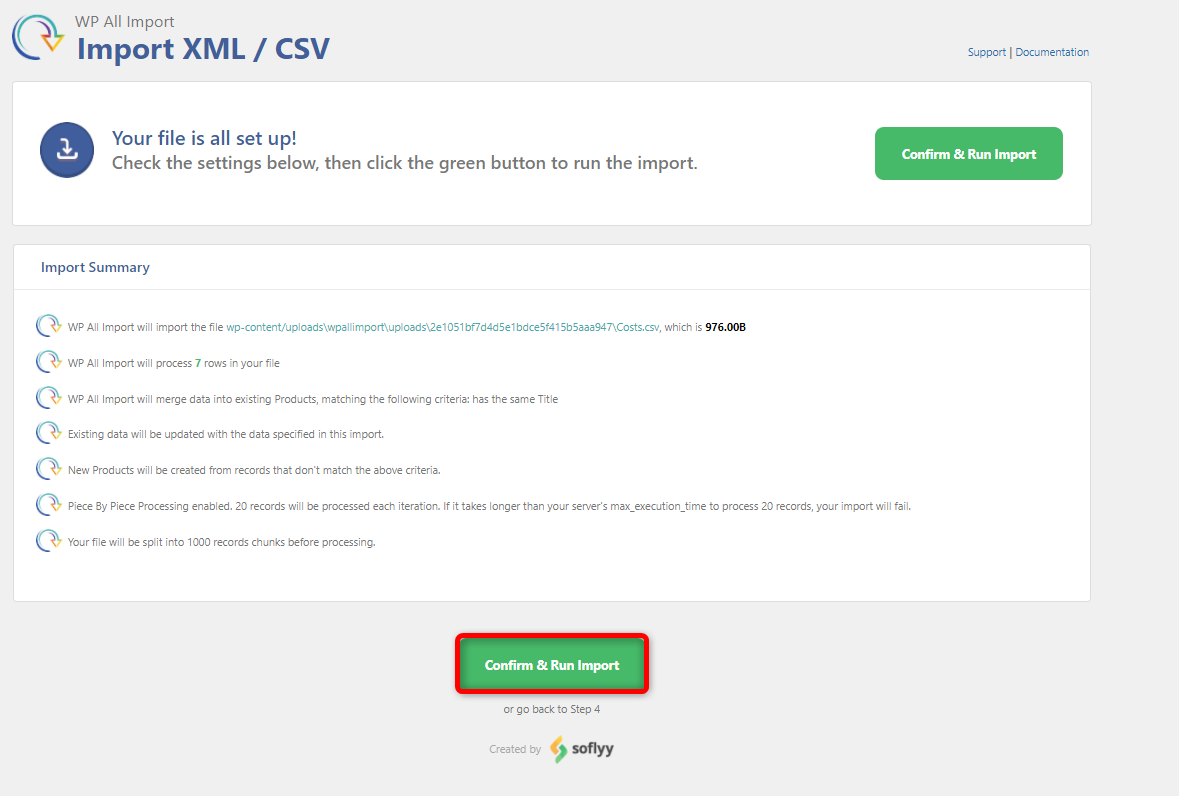
To import the costs, we want to update the custom field. Click on it to expand the options. Then click on See Detected Fields as shown below.
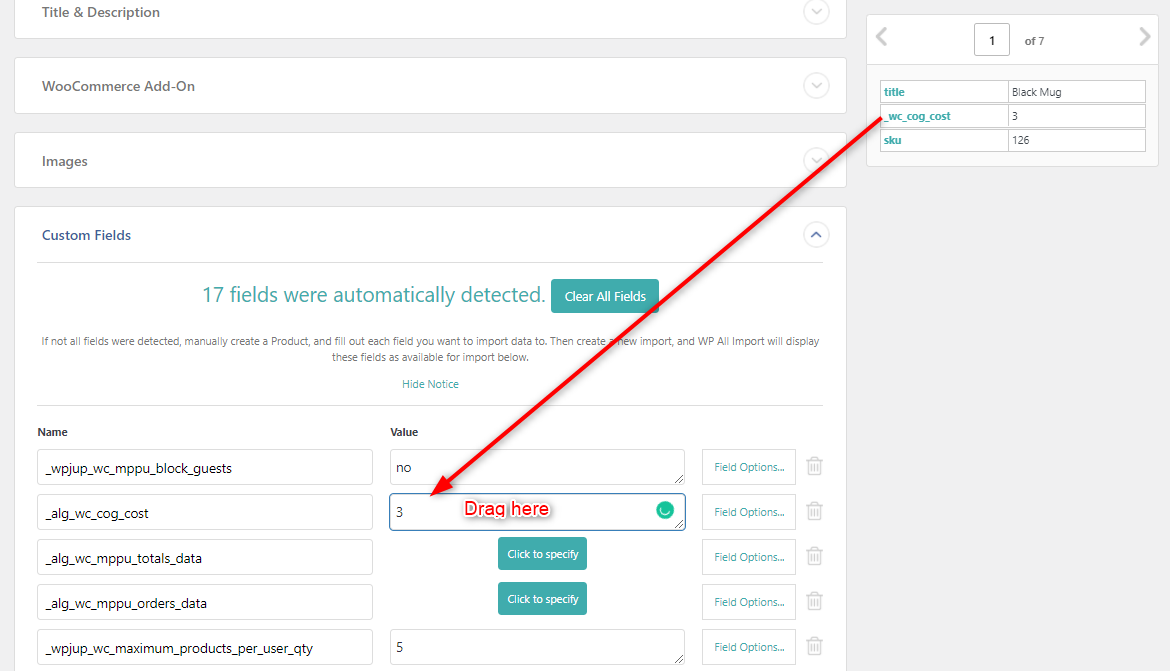
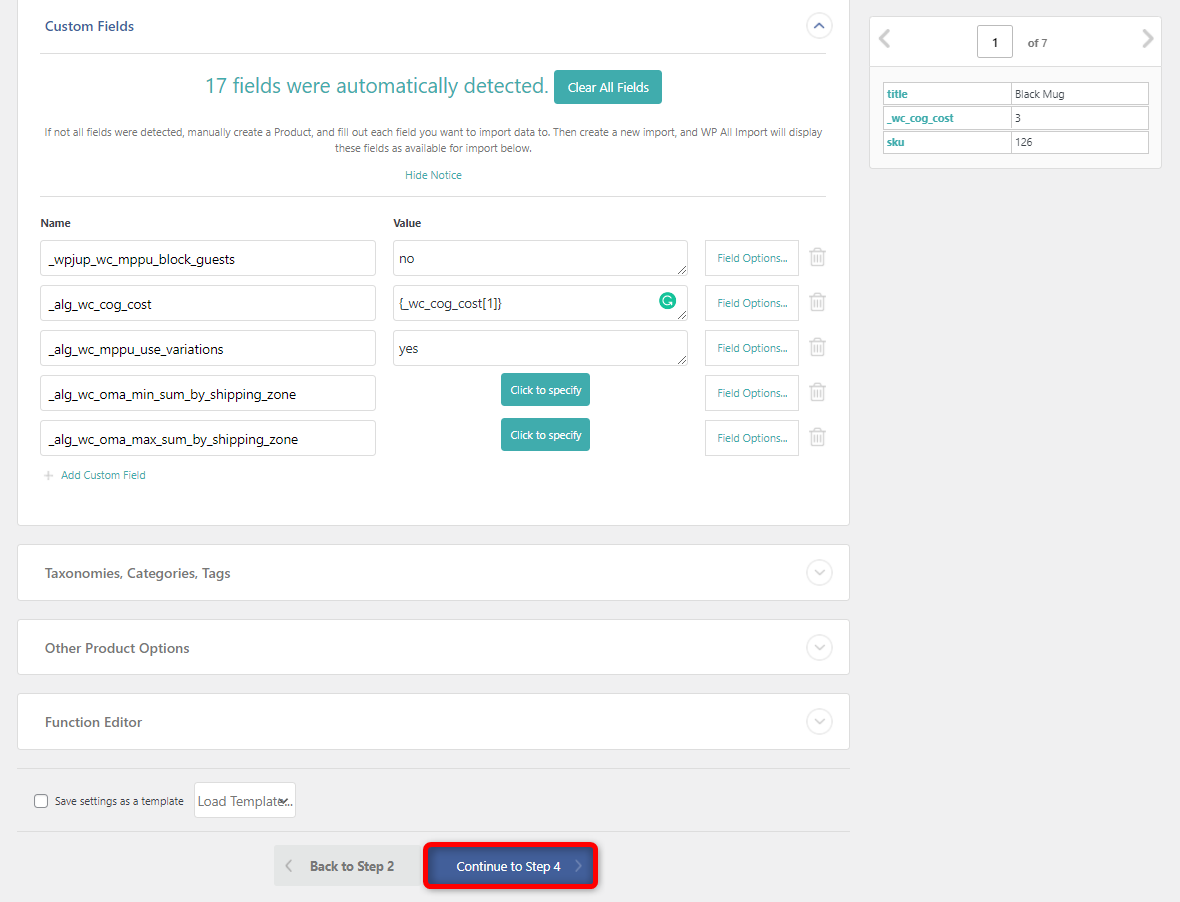
Once the fields have been detected, Drag the cost field from the right to the _alg_wc_cog_cost meta.
Then click on Continue to step 4.
Once done click on Confirm and Run Import.
The steps described above may vary slightly depending on the CSV template that you use. However, the general process is the same. The main catch in the process is to identify which fields you want to replace.
Plugin Settings / Features
There are several features of the plugin that are accessible from the plugin’s settings. We will go through the most important ones.
Product Settings
This section generally controls how the costs are displayed in the back end, in reports, in the order edit page, in the product edit page etc. There are 3 main sections under the product settings.
1. Admin Products List Columns – Here you can set up custom columns for the WooCommerce admin product list.
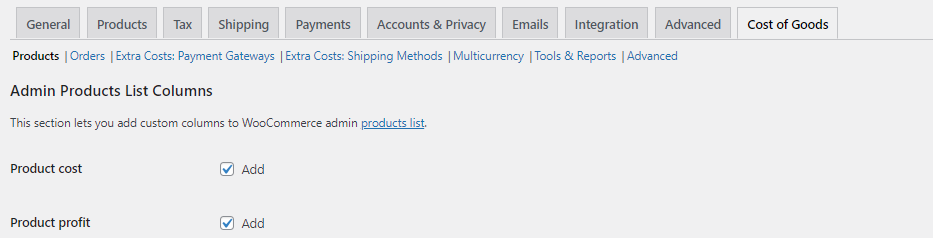
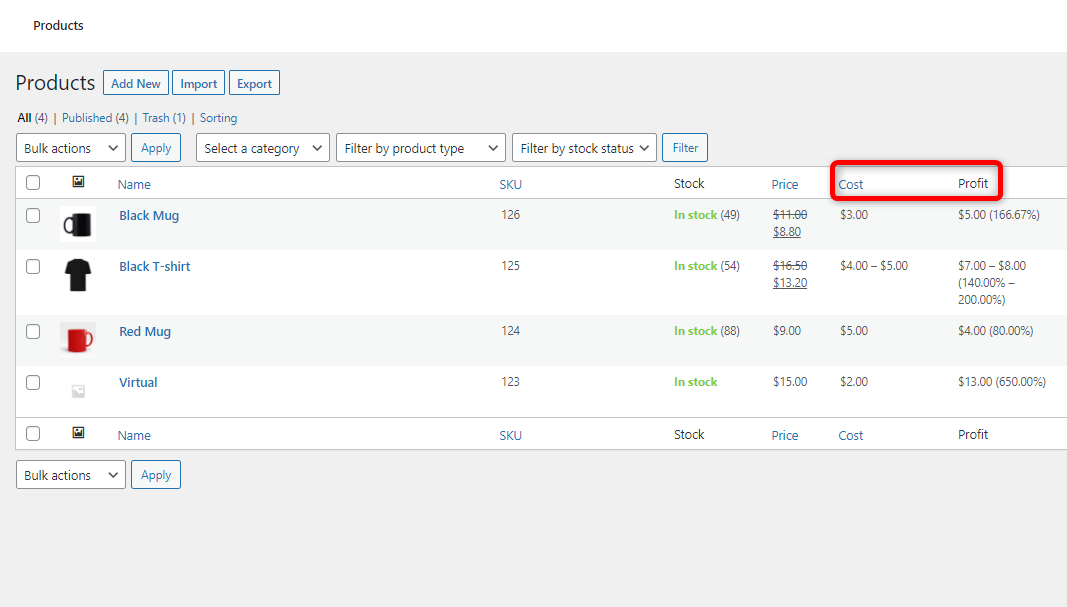
You can add a column for product cost and product profit on the product edit page. An example is shown below.
This is a great way to quickly have an overview of the costs and profits for each product. If you have an eagle eye you can easily tell which products are more profitable than others and you can focus on driving traffic to those to increase their sales and boost your profits.
2. General Options – From here you can set the cost field label. This is usually the “Cost Excluding Tax”
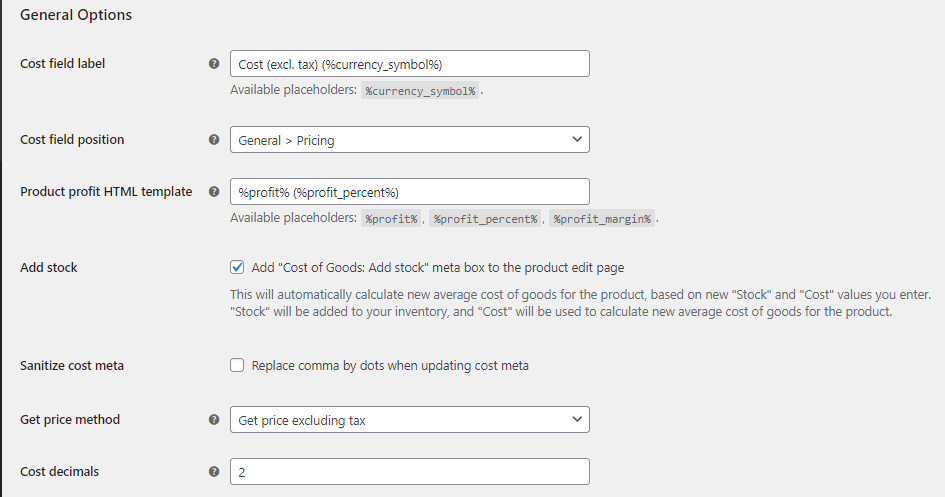
You can also set the cost field position, which allows you to choose the position of the cost field on the product edit page. In the above settings, we have set it to the pricing section. An example of the result is shown below.
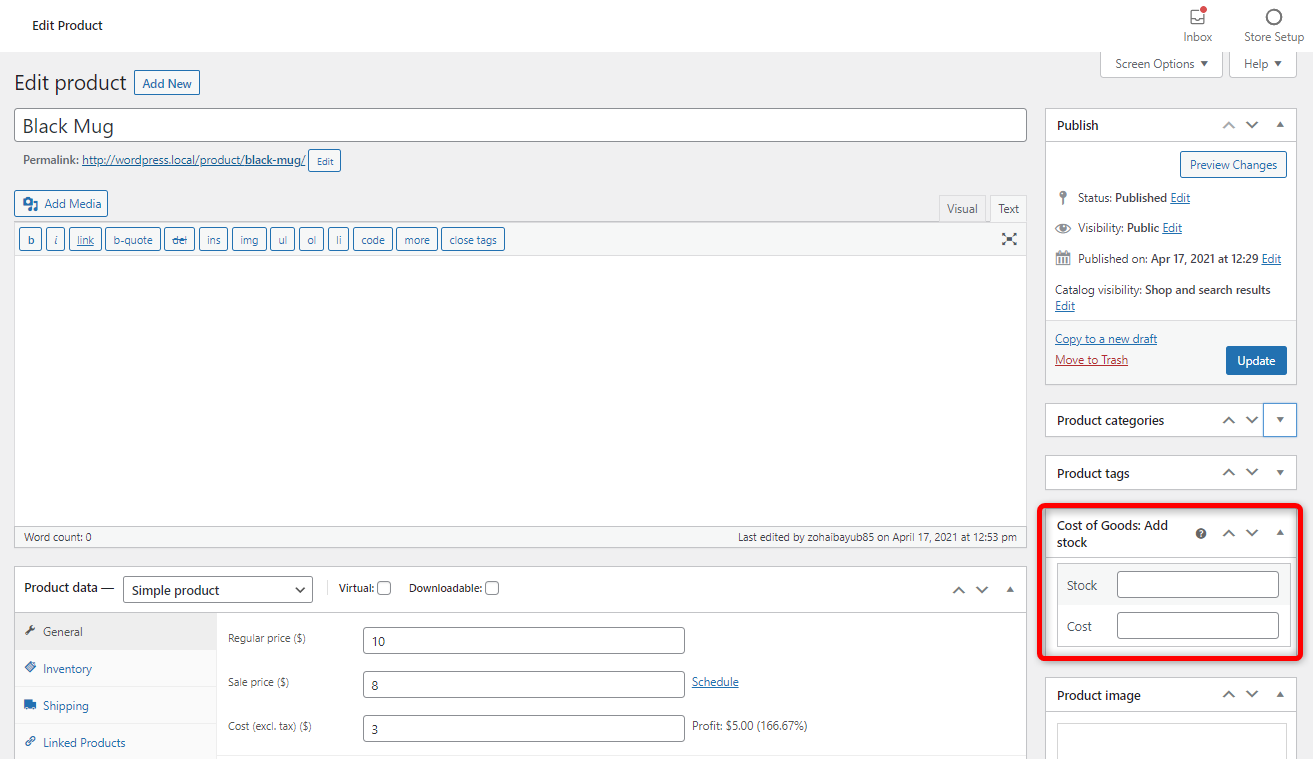
The Add stock option, if enabled will add a meta box to the product edit page. This will allow you to update the cost and the stock of the product. An example is shown below.
The other options under the General options include:
- Sanitize cost meta – Allows you to replace commas with dots when updating cost meta.
- Get price method – You can use this to get the price including or excluding tax for your profit calculations.
- Cost Decimals – Allows you to set the number of decimal places for product costs.
3. Quick and Bulk Edit – This section allows you to configure settings for the Quick and Bulk edit options.
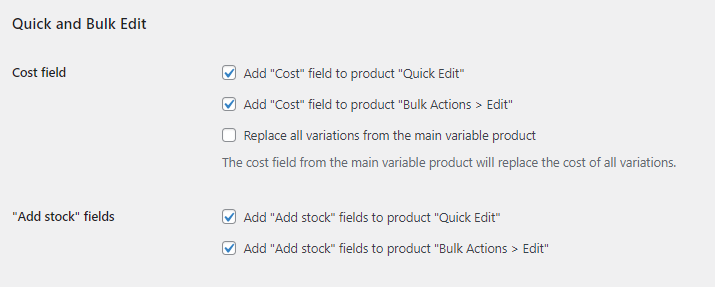
You can add the cost and stock fields to the product quick edit page. An example is shown below.

Order Settings
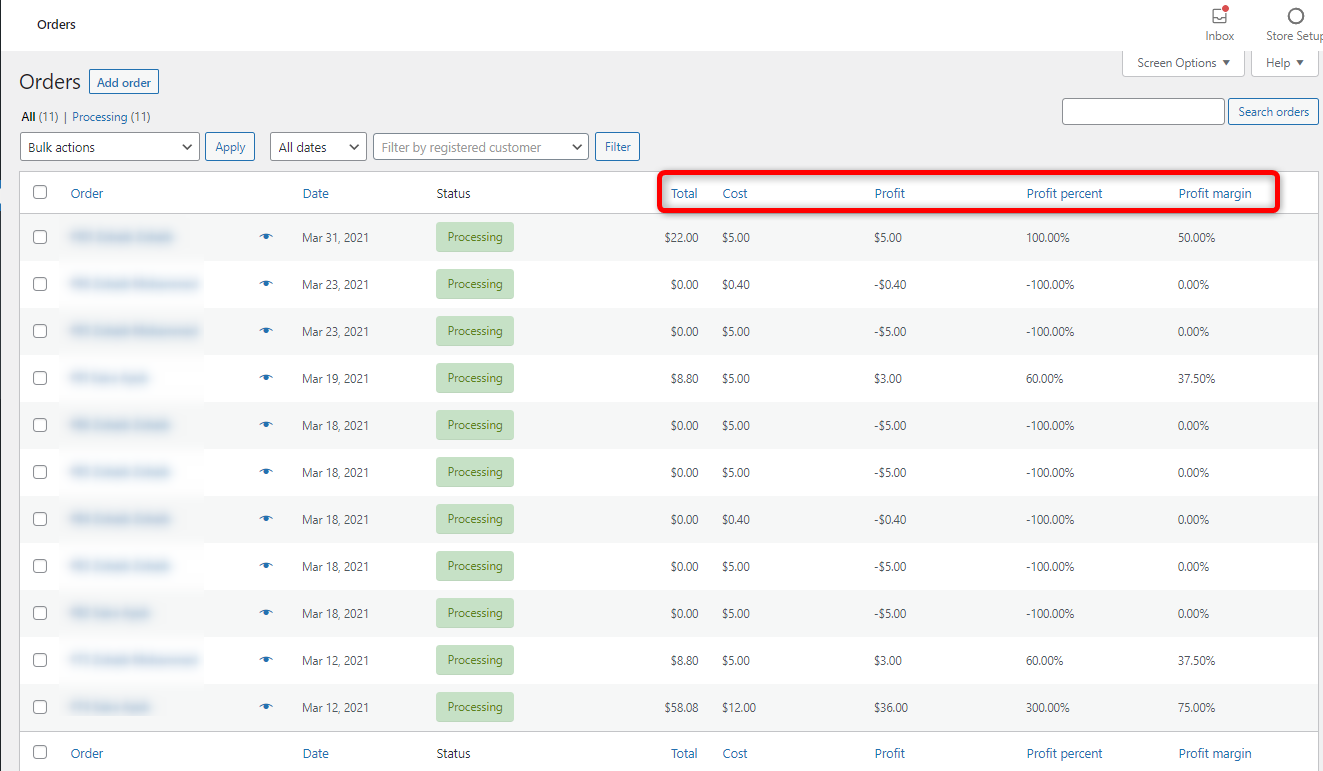
1. Admin Orders List Columns – Using these settings you can add order cost and order profit columns to the WooCommerce orders page.
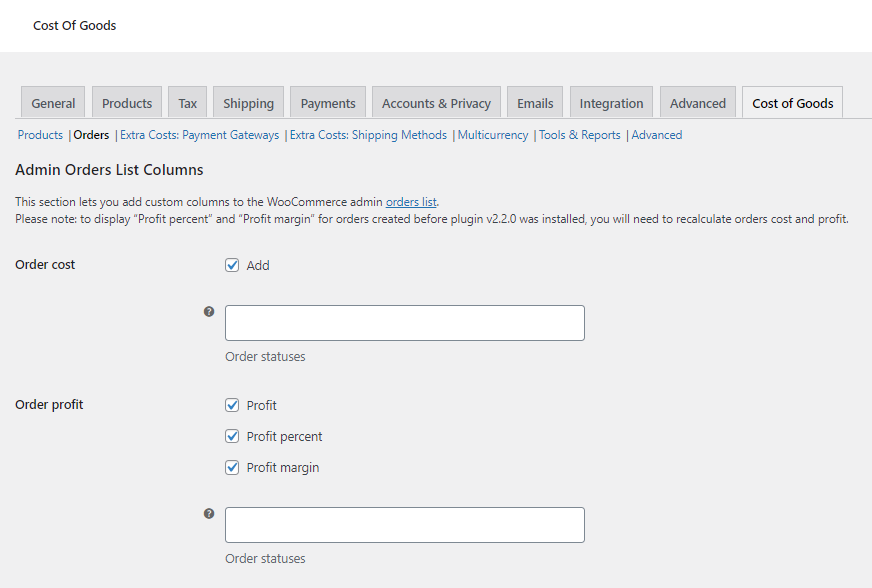
An example is shown below.
2. Admin Order Edit–These options will allow you to edit costs from the order edit page.
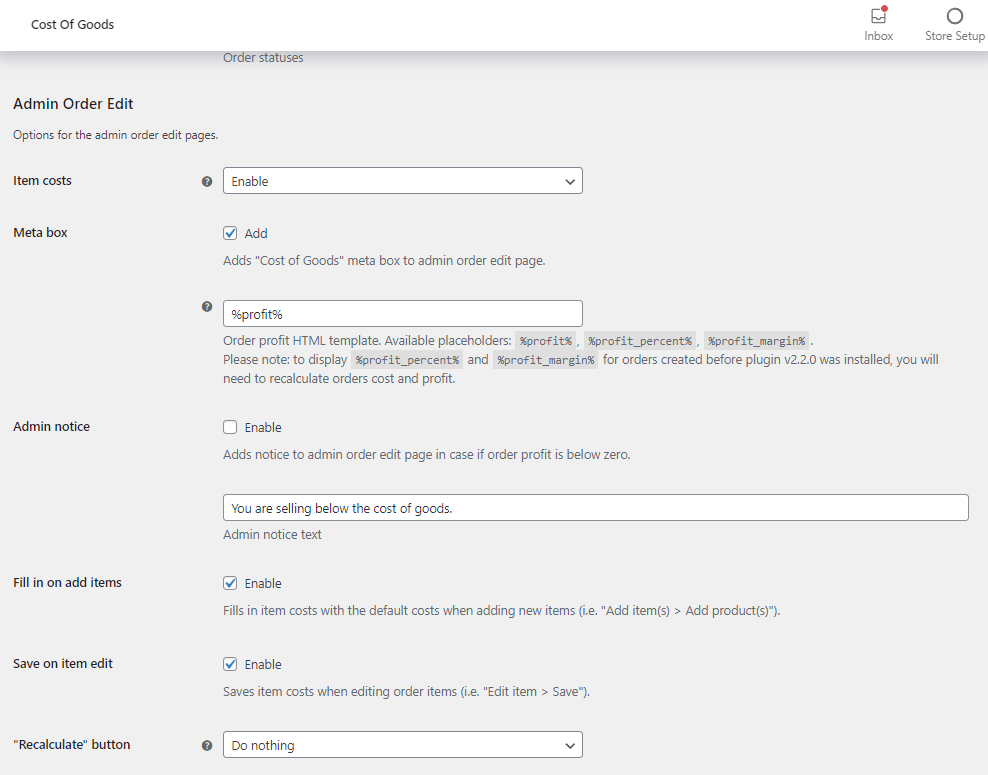
An example of the fields added to the order edit page is shown below.

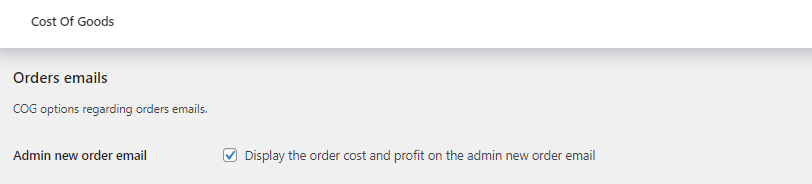
3. Orders emails – From here you can set the option to display order costs and profit on the admin new order email.
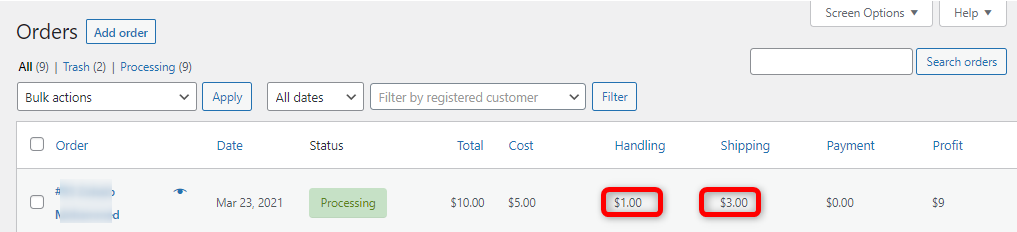
4. Calculations –If you change the settings here you will need to re-calculate order costs and profits. This section will allow you to add shipping fees, order fees, and taxes to your profits.
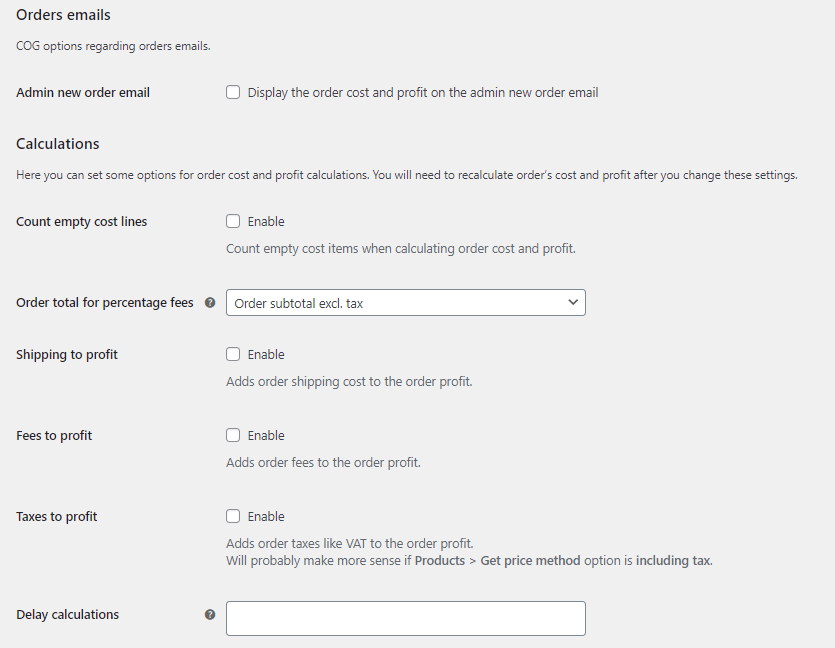
Here is an example of the shipping fees and taxes having been added to the profit. You can see the total of the order was $10 including shipping and handling of $4. With a cost of $5 this should have only resulted in a profit of $1. However, by adding the shipping and handling fees to the profit we have a profit of $9 instead of $1. This will generally depend on your store setup and you may or may not need to enable these options.
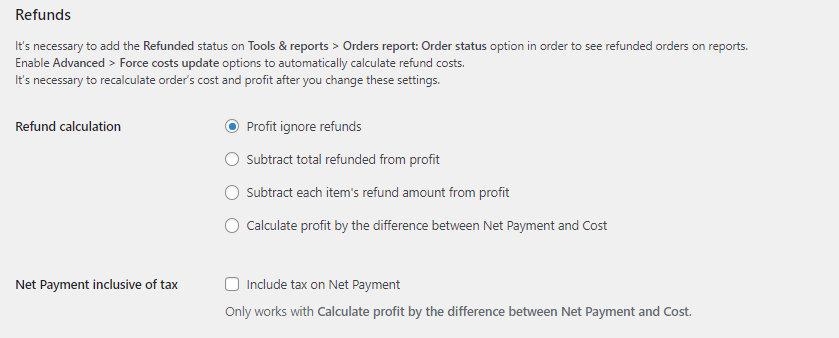
5. Refunds – There are a number of ways the cost of goods plugin can handle refunds. You can subtract total refunds or each items refunds from profits and you can also calculate profit by the difference between net payment and cost.
6. Extra Costs – Here you get a number of options for handling extra costs that you might be incurring.First, you can add a fixed cost or a percent cost to each order. This can be useful in a scenario where the cost of the product does not include an extra cost. For example, if you are offering Free shipping and have a fixed shipping cost, you can use the fixed cost section to add these costs to all your orders. Another example is when you have payment gateway costs. PayPal sometimes charges up to 3% per transaction. In such a case you can use the percent cost section to add the 3% as a cost to each order.
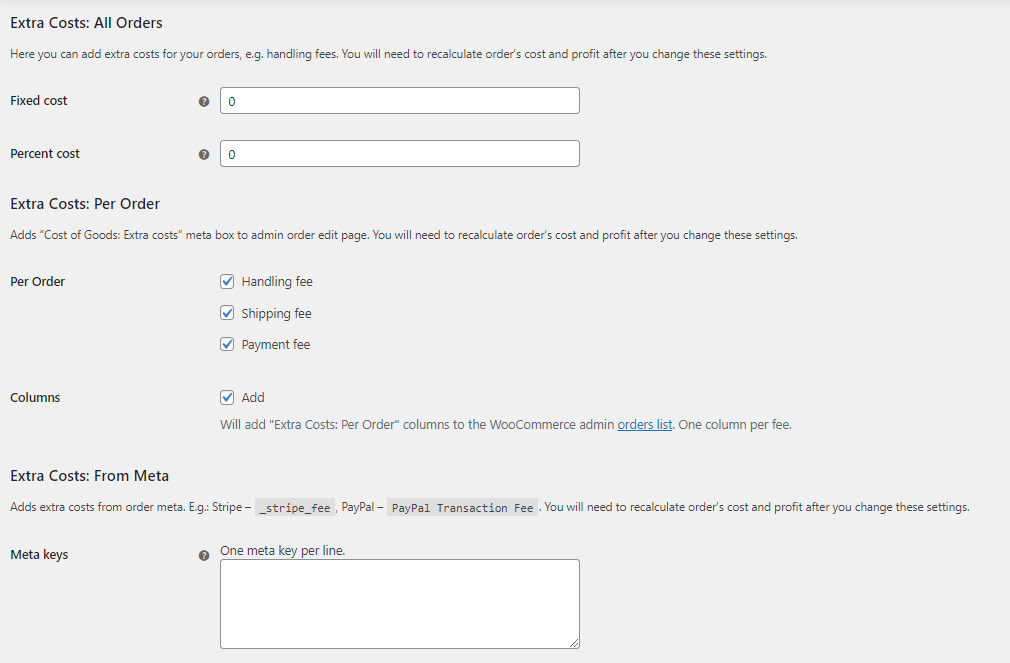
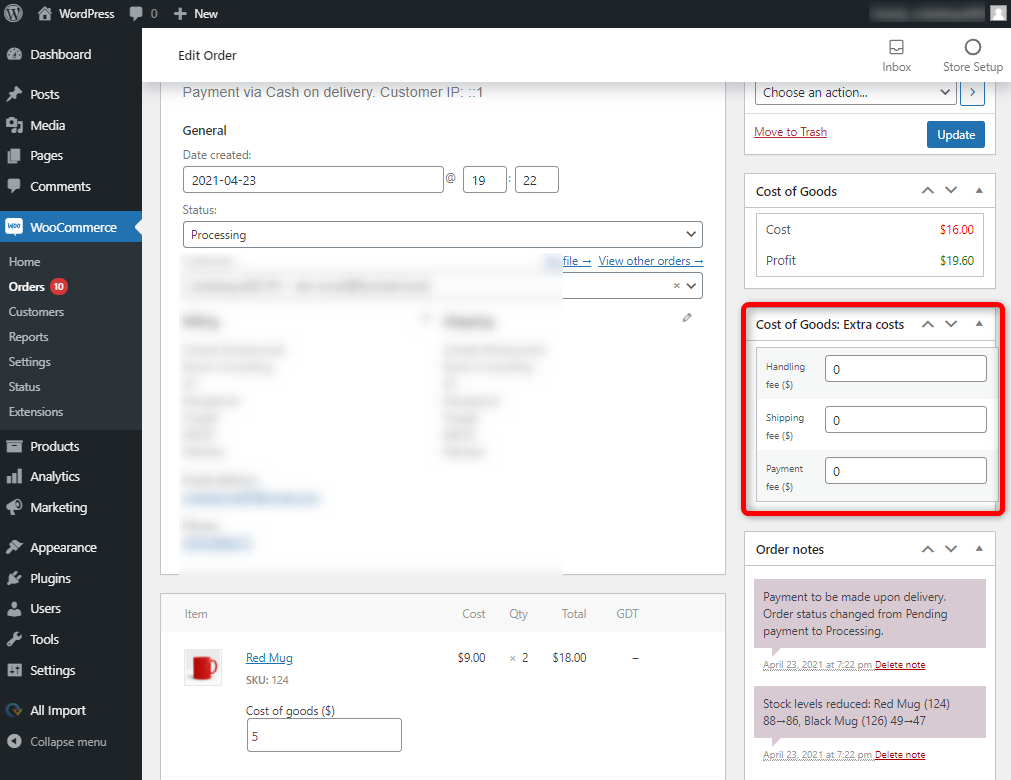
Secondly, you can add a shipping fee, handling fee, and payment fee to order costs. When you edit an order, you will find new columns for adding these. An example is shown below.
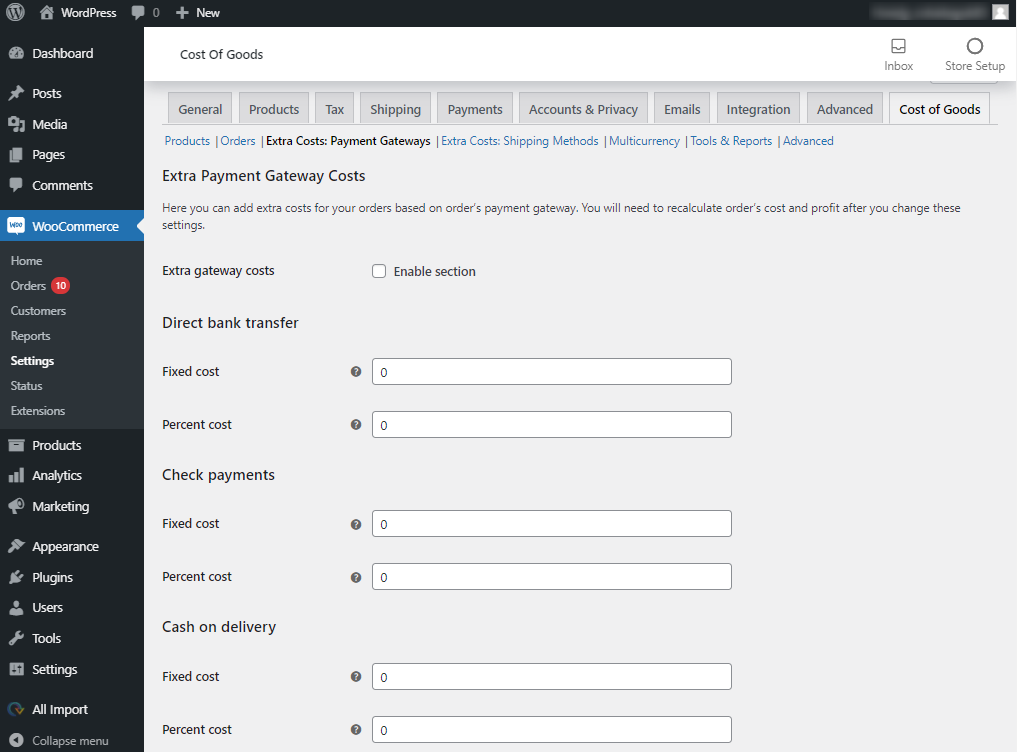
Extra Costs: Payment Gateways
The next tab in the plugin’s settings is the Extra Costs payment gateway tab. As mentioned above usually some payment gateways will have a fee that can be added as a cost to each order. An example can be cash on delivery, many logistic companies will charge a cash handling fee. Or a credit card processor such as Stripe can charge up to 4% per transaction. Such costs are usually ignored by WooCommerce store owners, however, over time they can start to add up. It is therefore a good idea to track these as well. The Cost of Goods plugins does an excellent job of providing an option to add extra costs for payment gateways.
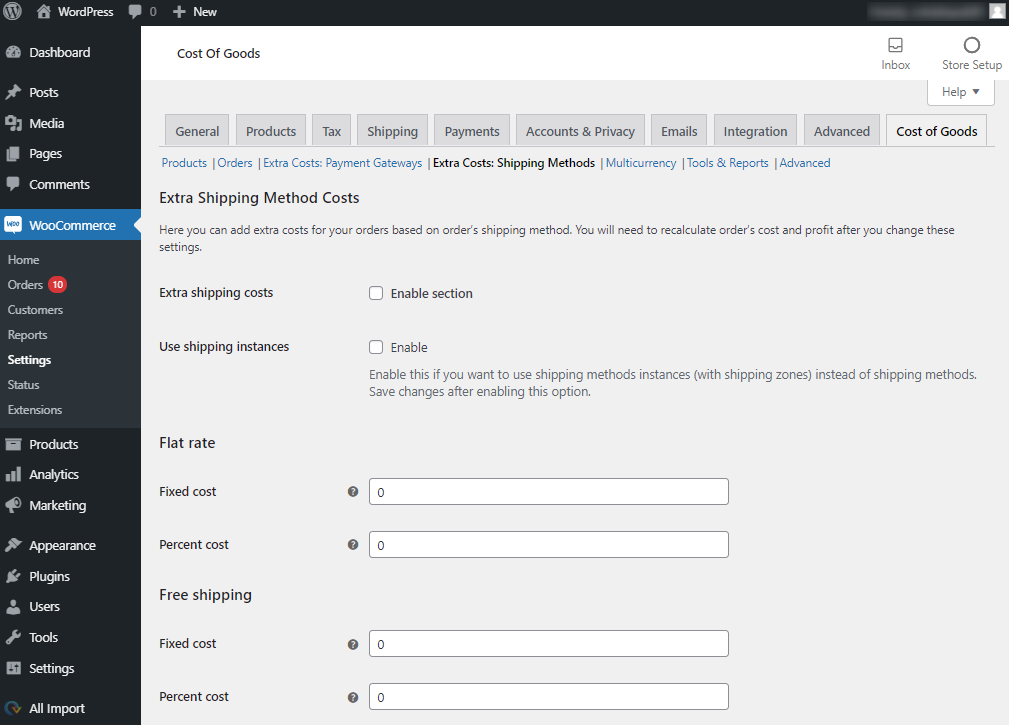
Extra Costs: Shipping Methods
Just the way you can incur extra costs for payment gateways, sometimes you can also incur extra costs for shipping methods. If there are any such costs that you would like to track for shipping methods, you can easily add them in this section. You can add both a fixed cost or a percent cost for each order.
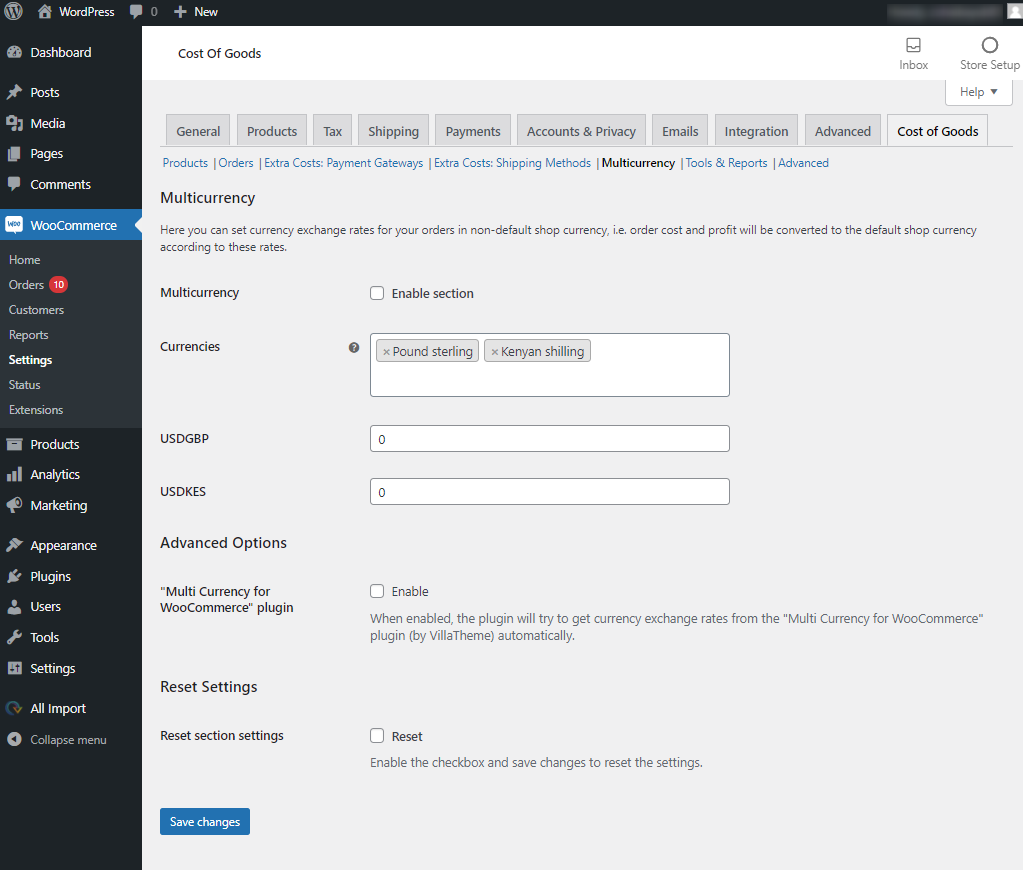
Multicurrency
Many store owners, especially those who are selling in various marketplaces and selling internationally will often use multiple currencies on their stores. If you have costs for your products in different currencies you can easily add the currencies in this section, add an exchange rate and then the plugin will track your multicurrency costs as well.
If you don’t want to do this manually, you can also use the Multi-Currency for WooCommerce plugin to do this automatically. https://wordpress.org/plugins/woo-multi-currency/
Tools & Reports
This section will generally control various tools and reports, for example, the product bulk edit page options, product import cost tools, reports, and analytics.
1. Product bulk edit cost tools – When editing products from using the bulk edit function you can update, prices, and stock. You need to enable the options here to be able to do that
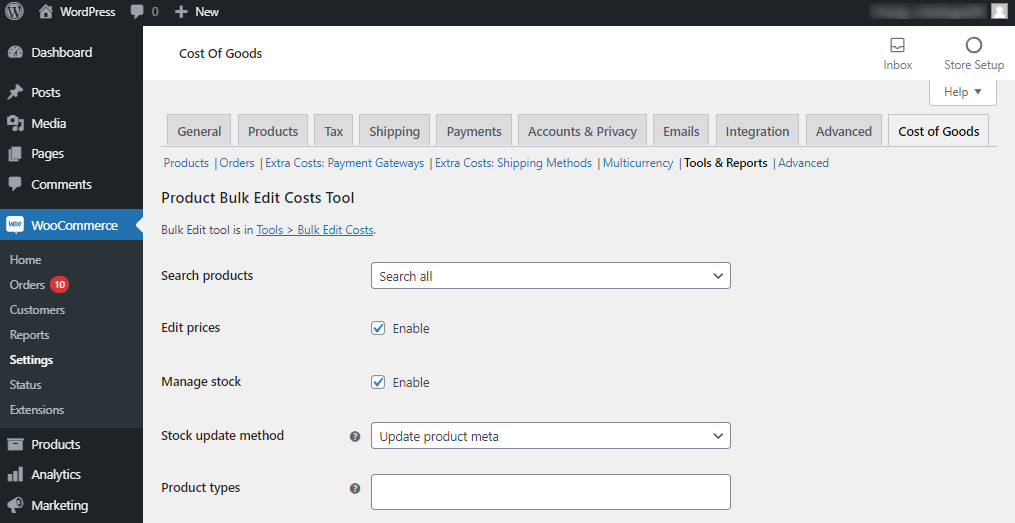
Here is an example of the product bulk edit tool. You will need to go to Products > All products and select the relevant products that you want to edit and click on Bulk Edit to access these options.
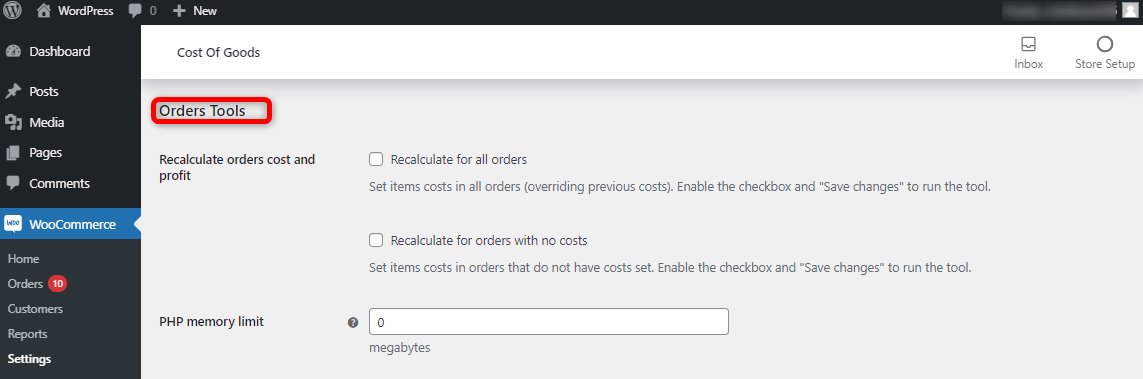
2. Order tools – Next we have the order tools. You can use this section to recalculate costs and profits for all orders. This is a useful option especially if you have many previous orders before installing the plugin. It can also be useful in a situation where the cost of the product changes and you want to recalculate the profits.
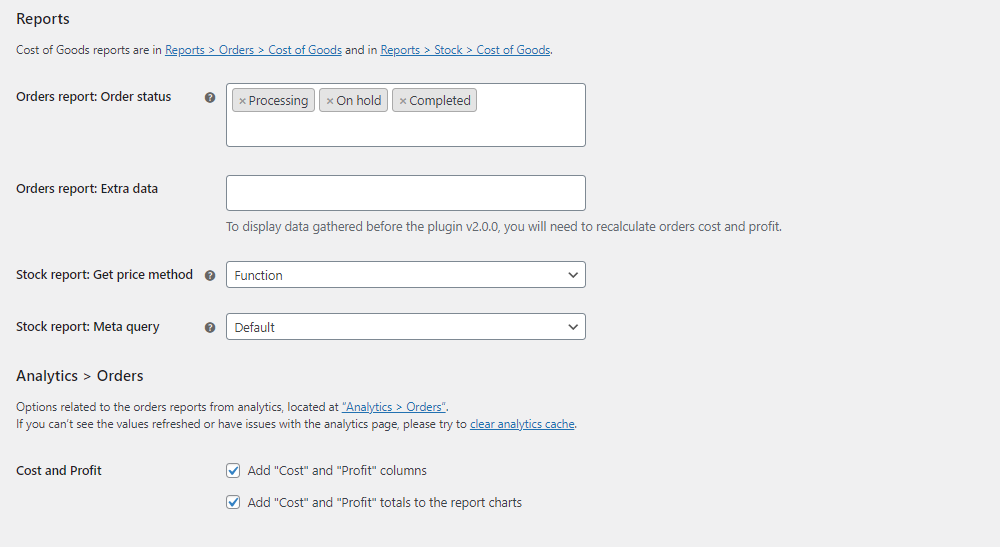
3. Reports – Here you can set options for reports and WooCommerce Analytics. For reports, you can select the order statuses to include in reports. In the example below we have selected Processing, On hold, and Completed. Orders with these statuses will be shown in the Cost of goods reports and profit reports. We have already shown how reports can be accessed earlier in this tutorial.
A newly added feature to the plugin is the integration with WooCommerce analytics. An example of WooCommerce analytic reports is shown below.
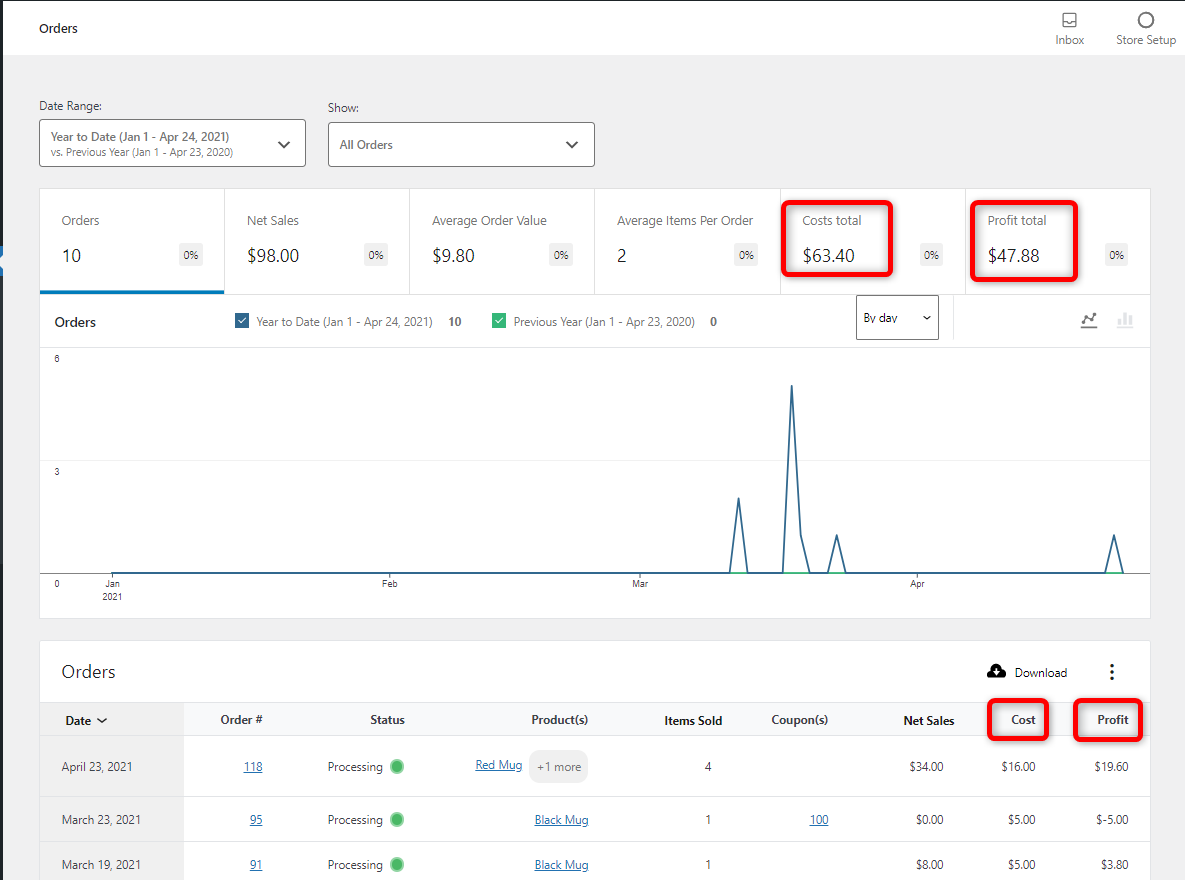
This is a useful insight for business owners. You can easily get your total revenue, costs, and profits. You can also get a breakdown of cost and profits per order.
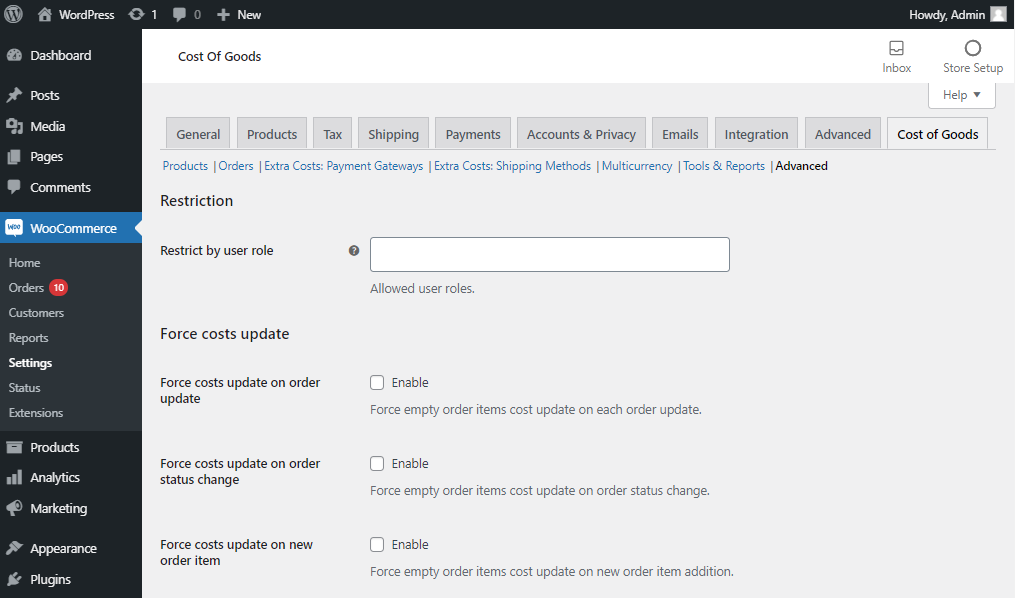
Advanced
There are a number of advanced plugin features that can be accessed from this section.
Firstly, you can restrict plugin access by user roles. If you have multiple users managing your WordPress dashboard this can be a handy option to use.
There are also some options for forcing cost updates. You can force cost updates when an order is updated, when an order status is changed, and when a new order item is added.
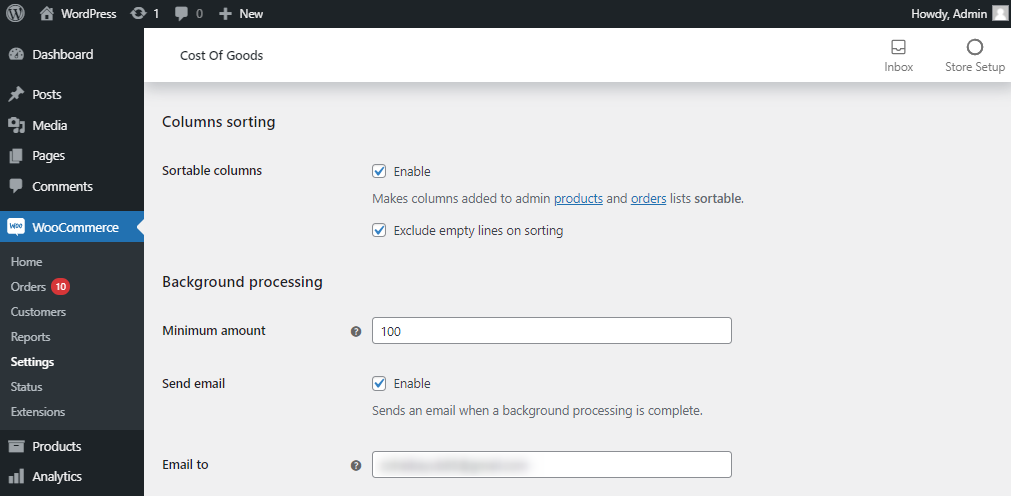
Under the column sorting options, you can enable sorting of columns.
Under the background processing options you can set the minimum amount of items that need to be updated for the plugin to run the update in the background. This can be useful if you have many orders whose costs and profits you want to update. You can continue working while background cost and profit updates run.
You can also receive an email when the background processing is complete.
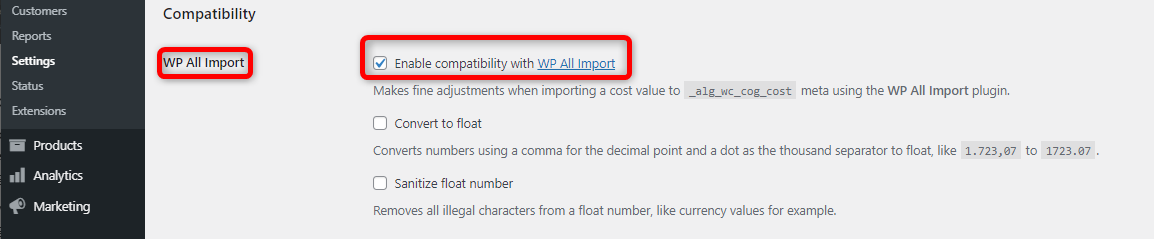
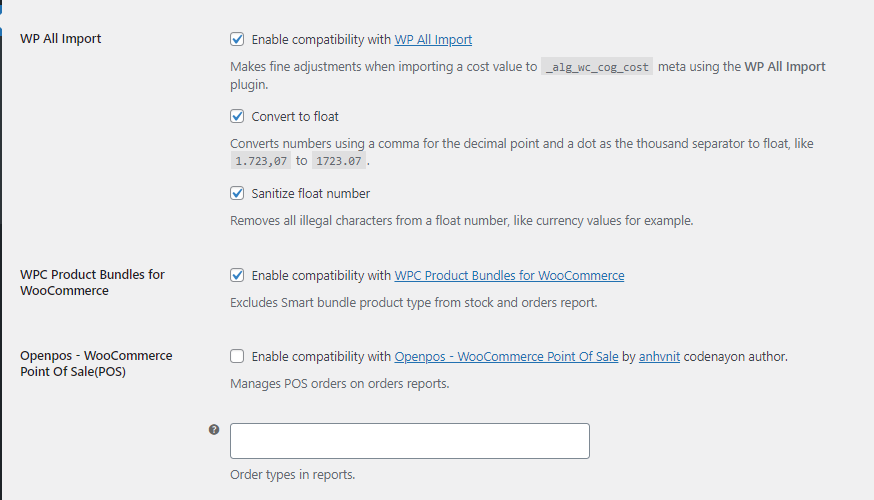
There 3 plugins with which the cost of goods plugin is compatible with. You can enable compatibility with these plugins using the options here. The plugins are; WP All Import, WPC product bundles for WooCommerce, and Openpos – WooComemrce Point of Sale.
Conclusion
The most successful eCommerce stores will always be on top of their numbers. They know metrics to keep an eye on and how to improve those metrics.
Gross profit margin is a vital number for any eCommerce store. It is simply your sales less direct product costs. If your gross profit margin is not healthy, there are very slim chances of your net profit being healthy. In other words, your business will struggle.
The cost of goods plugins are one of the most comprehensive solutions for WooCommerce to track costs with. As seen above, it has excellent features that have been put together after a lot of thought by the plugin’s developers.