WooCommerce Clean Contact Lists: Here is Why & How?
Email since it was introduced has become a vital part of how online businesses communicate. It is the primary means of communication for most WooCommerce stores.
With most WooCommerce stores, order notifications and updates are all done via email. Both for the client and store owners.
There may be other methods that you can use to communicate with your customers, but the way WooCommerce works, you are most likely to end up using emails for communication.
Your WooCommerce store most likely already sends out various emails such as order confirmations, order updates, payment confirmations, etc. Your emails will only work if the address the customer enters is right. Often customers can enter a wrong email address leading to a breakdown in communication. This can lead to a host of other problems such as failed deliveries.
Why We End With So Many Wrong Email Addresses?
In managing a contacts list, the occasional occurrence of incorrect emails is an inevitable reality. These missteps, stemming from either inadvertent errors or purposeful misinformation, can present as minor inconveniences or significant hurdles in maintaining effective communication channels.
- Sometimes it can be a silly typo mistake. When a person is in a hurry, they will usually end up making this mistake.
- Other times it might be due to forgetting their email address. This is usually common when people create a new email address. People create new email addresses all the time, for example, when they switch companies, or roles in the same company, they might also switch their email service provider, or their change domain names. When you sign up for a new email address with a popular provider say Gmail for example, and your name is John Doe, you might try to get the email johndoe(at)gmail.com however, this is likely to be already taken. Gmail might end up suggesting you take johndoe9864527(at)gmail.com If you have just signed up for such an email address you are highly likely to have a hard time remembering it.
- Sometimes customers will enter a wrong email address on purpose, it might be they are just testing something or to avoid a flood of marketing emails. Whatever the reason, it is possible for customers to enter the wrong email.
What Could Go Wrong with Wrong Email Addresses?
Consider a customer who has entered the wrong email address and placed an order on your WooCommerce store.
To start with they will not receive the order received notification. This may lead them to think the order was not successful. In some situations, this might even result in duplicate orders which then leads to lengthy refunds and returns.
They will miss order updates such as when it has been processed, shipped, or expected delivery dates. This might lead them to think your store has poor communication.
Failed order notifications can sometimes also lead to failed deliveries. There can sometimes be issues with payment processing as well. The customer may not get notified of charges on their payment methods making them loose trust in your store.
Another major problem with wrong email addresses can be failed marketing campaigns. Once customers have bought from you and are happy with their purchase, you will want to keep them coming back to your store.
Often WooCommerce store owners will use customer emails for email marketing campaigns. If your email list is full of wrong email addresses, it might mean failure for your marketing campaigns. As the email list you have might contain several non-existent emails this will lead to a high bounce rate.
A high bounce rate will lead to suspension with some email marketing service providers.
If you are not using an email service provider and using your hosting server to send out bulk emails, if your email list is not clean, your IP reputation is likely to go down the drain. This means other than your marketing campaigns, almost all your emails are likely to either bounce or end up in the recipient’s spam folder.
It is important to ensure your emails are delivered to the right people in a timely manner. One way to ensure you are maintaining a clean list of contacts and collecting the right emails of your customers is to use email verification.
What is Email Verification?
A common practice during the sign-up process on most websites or apps is to request email verification. The process typically involves sending a verification link to the provided email address, which needs to be clicked by the user to fully activate their account.
If the user doesn’t engage with this link, it often indicates that the email provided might be incorrect, preventing them from completing the verification process.
This form of email verification serves as a proactive approach to maintaining an accurate and clean contact list for marketing efforts. However, the benefits of a robust email verification system extend beyond this, ensuring a higher degree of accuracy in user data.
Why You Should Verify Customers Emails?
- First, you should not send to any email that you’re 100% sure they signed up on your website, otherwise, anyone can signup for anyone else.
- Helps ensure better communication with customers by confirming the email address is correct and emails can be delivered to it.
- With a clean email list, the emails you send out are less likely to be flagged as spam due to hard bounces. Hard bounces will occur when emails are immediately returned to the sender due to the email address being non-existent.
- Helps you easily build an email list that is error-free and accurate.
- A clean email list can be used to segment customers and target them according to where they are in the buying process. For example, people who have registered but not purchased can be given discounts on their first purchases, or people who have already purchased can be given repeat-purchase discounts.
As you can see email verification is an essential requirement for any WooCommerce store. Unfortunately, the feature is lacking by default in WooCommerce. However, you do not need to despair, as there are several solutions available in the form of plugins for WooCommerce email verification.

Our Email Verification for WooCommerce plugin is designed to help you maintain a clean list of contacts for your WooCommerce store. The plugin is an excellent solution for anyone looking to ensure their WooCommerce customers are verified.
There is a free version of the plugin also available. The prices of the Pro version start from $49.99 for a single site license. The free version of the plugin does the basic job of verifying customer emails. The pro version however has some awesome extra features such as the ability to block the checkout process, block guests from purchasing, compatibility with social login plugins, etc.
Setting up the Email Verification Pro for WooCommerce Plugin
After installing and activating the plugin, to access the plugin’s settings in your WordPress dashboard, navigate to WooCommerce > Settings > Email Verification.
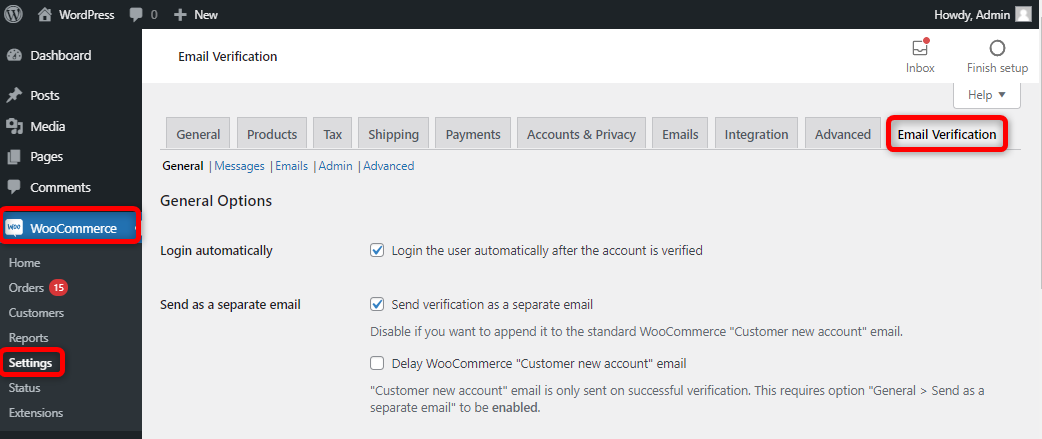
Here you will find 5 tabs in which you can set up different options of the plugin.
General Settings
Here there are 8 sections:
General Options
- Redirect on success
- Activation link
- Log out unverified users
- Block checkout
- Block adding products to cart
- Block non-paying users
- Block account verification by email
We will have a look at what each option does.
1. General Options
The login automatically option is self-explanatory. It will log in users automatically after their email is verified.
When customers sign up on your WooCommerce store, they will receive a standard WooCommerce “New Customer Account” email. If you want the verification link to be part of this email, you can disable the Send verification as a separate email and if you do not want it to be part of this email, you can enable the option. If you are using the send verification as a separate email, in some cases you might want to delay the standard WooCommerce “New Customer Account” email. You can use the option to delay this.
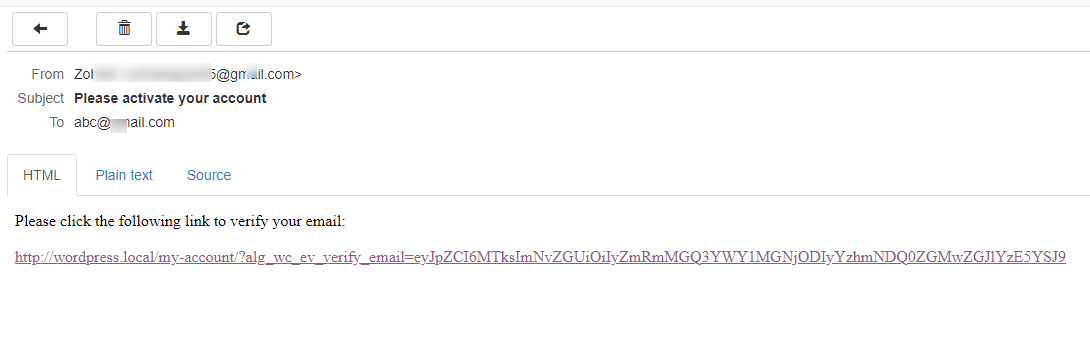
If you don’t send the email separately an example of the new account email is shown below, it contains the activation link.
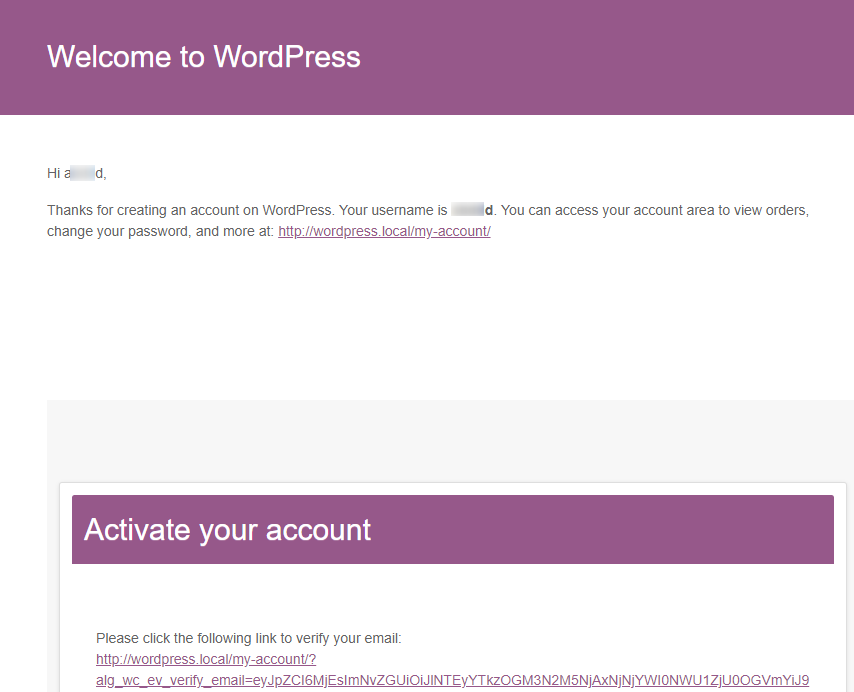
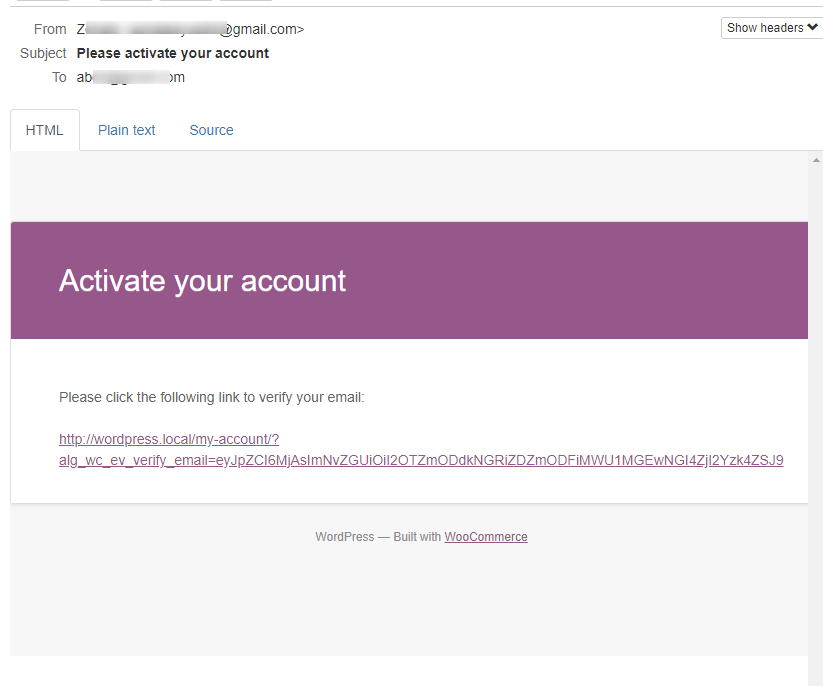
In most cases, it will be useful to send the activation email separately from the new account email. As shown below in that case the user will receive 2 emails, 1 for the new account and 1 for activating the email.

The next option allows you to skip email verification for various user roles. You add any user roles for whom you don’t want the emails to be verified for.
If you have just installed the plugin, you may already registered user. If you want to verify the existing user’s emails you can use the option for Enable email verification for already registered users.
The last option under this section allows you to re-verify the email of users who change their email addresses from the my-account page. The unverify email changing accounts option will unverify the email, log out the user, and resend the activation link for anyone who changes their email address. In most situations, you will want to have this enabled.
2. Redirect on Success
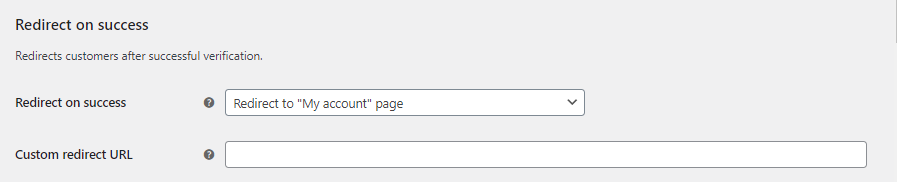
From this section, you can set up redirects for users who have successfully verified their emails. You can choose not to redirect them, or to redirect them to the My account page or any other URL. However, the custom redirect URL must be on the same domain as your website.
3. Activation link
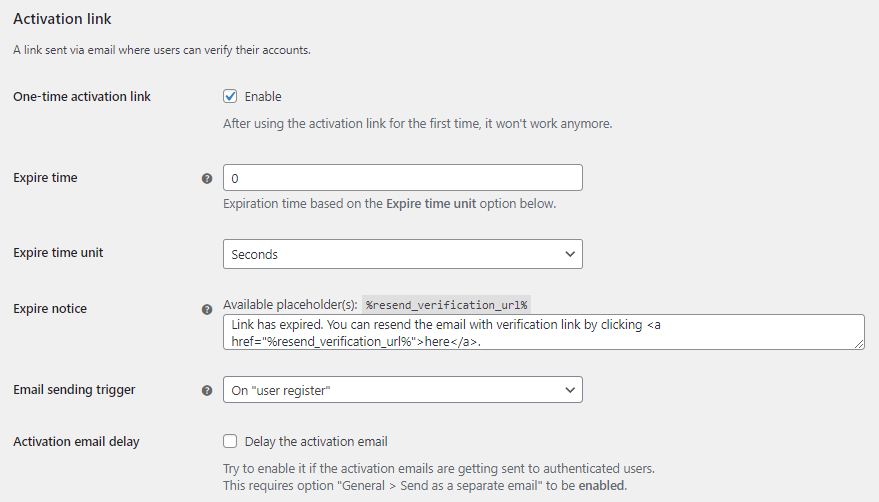
In this section first, you can set up if you want the activation link to be used once only. After a user has verified their email address the link will expire and not work. You can set the expiration time and the expiration notice as well. The expiration time feature is only available in the pro version of the plugin.
The email-sending trigger is an important option. It allows you to set when the verification email is sent. It can be either On “User register” i.e. when an account is registered from the My Account page or On “WooCommerce created customer” i.e. when the customer checks out and uses the option to create an account on the checkout page. If you are having trouble with emails not being sent to customers, you can try changing this option.
4. Logout unverified users
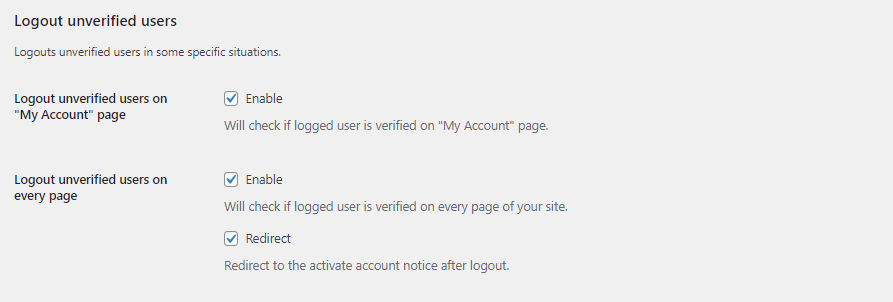
Here you can set options related to logging out unverified users. You can either log them out on the My Account page, or on every page of your website. You can also choose to redirect them to the activate account notice after being logged out.
5. Block checkout
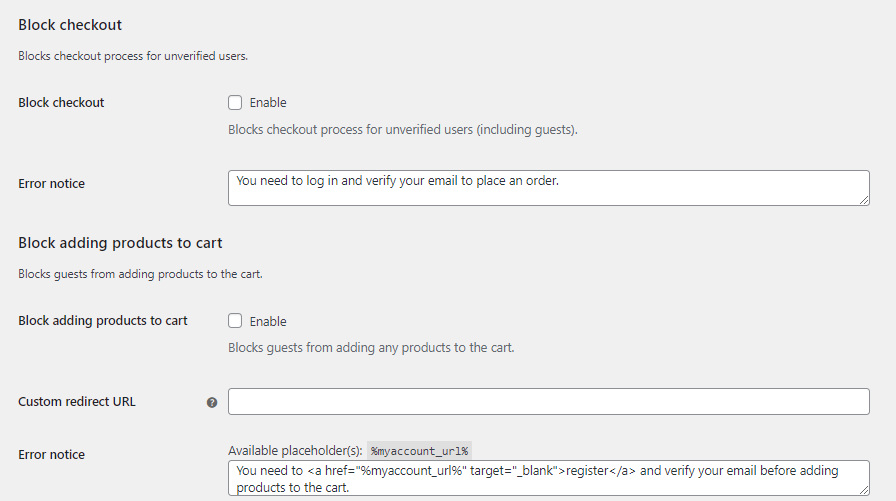
This is an excellent feature of the pro version of the plugin. It allows you to block the checkout process for customers who have not verified their emails. You can set an error message for them as well and ask them to verify their emails. You can also block customers from adding products to the cart until they have verified their email addresses.
The custom redirect URL option allows you to redirect customers who have been blocked from purchasing. Remember the URL for this custom redirect must also be on the same domain.
6. Block non-paying users
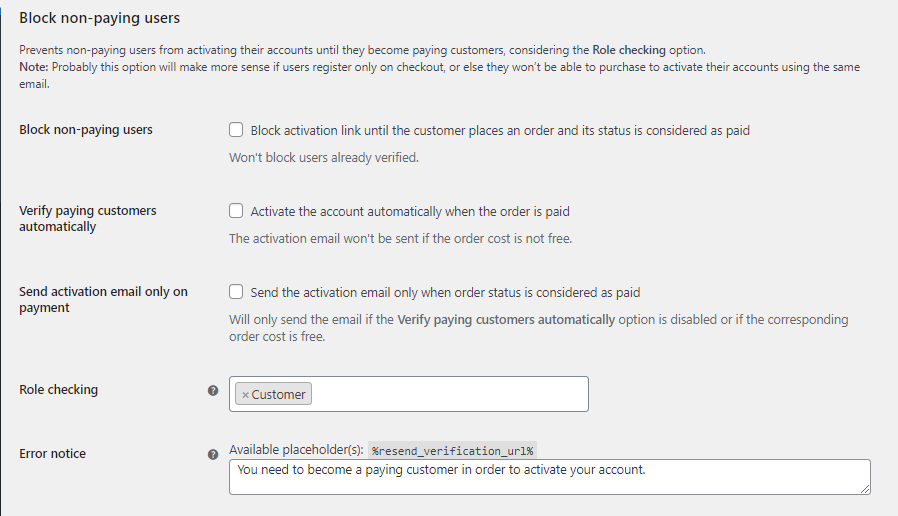
This is another feature that is only available in the pro version. This section prevents non-paying users from activating their accounts until they become paying customers, considering the Role checking option. You have the option to block the activation link until an order is placed and paid. You can also verify paid users automatically.
The role-checking option checks the role of the user before blocking them. In most cases, the customer role should be blocked. If you leave it empty, all users will be blocked.
7. Block account verification by email
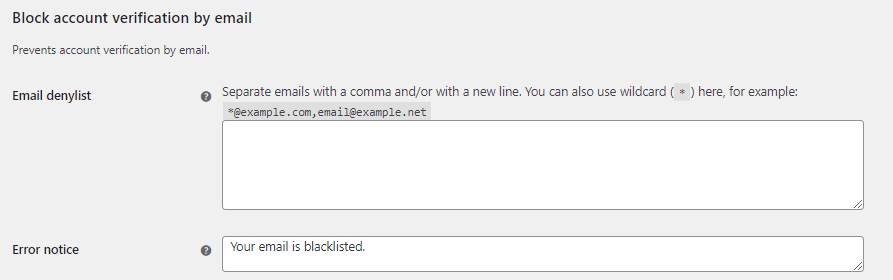
Here you can add the email addresses of users who you want to block on your website. Other than email addresses, you can also block domains using wildcards for example email(at)gmail.com. This feature is also only available in the pro version of the plugin.
Messages Settings
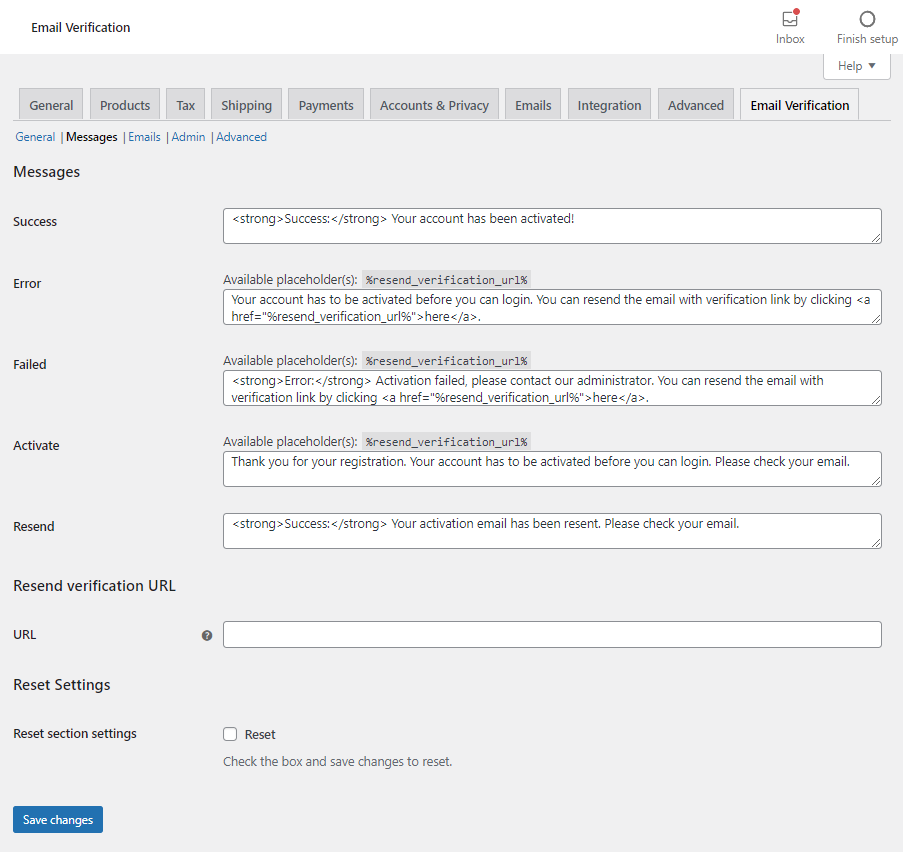
In this tab, you can set messages for various stages of the email verification process.
- The success message will be used when a user has successfully verified their email.
- The error message will be used if you have enabled the logout unverified users option under general settings. Once the user is logged out and tries to log in without verifying their email, they will receive this message.
- Failed message will be displayed if there are any errors in the verification process. Sometimes this can be when the user has already verified their email but still tries to use the activation link again.
- The activate message will be used after a user has registered on the my-account page or has completed a checkout.
- If a user uses the resend link option from one of the above messages they will be shown the Resend message.
You can use the %resend_verification_url% placeholder in some messages.
Emails Settings
There are 3 options here:
- Email Option (Available in the free version)
- Activation Email (Available in the pro version only)
- Admin Email (Available in the pro version only)
Email Option

If you are having trouble with activation emails not being sent out, you can try the various options here. This will usually depend on your hosting setup. If you are unsure you can leave it as the default which is WooCommerce “wc_mail” function.
Activation email
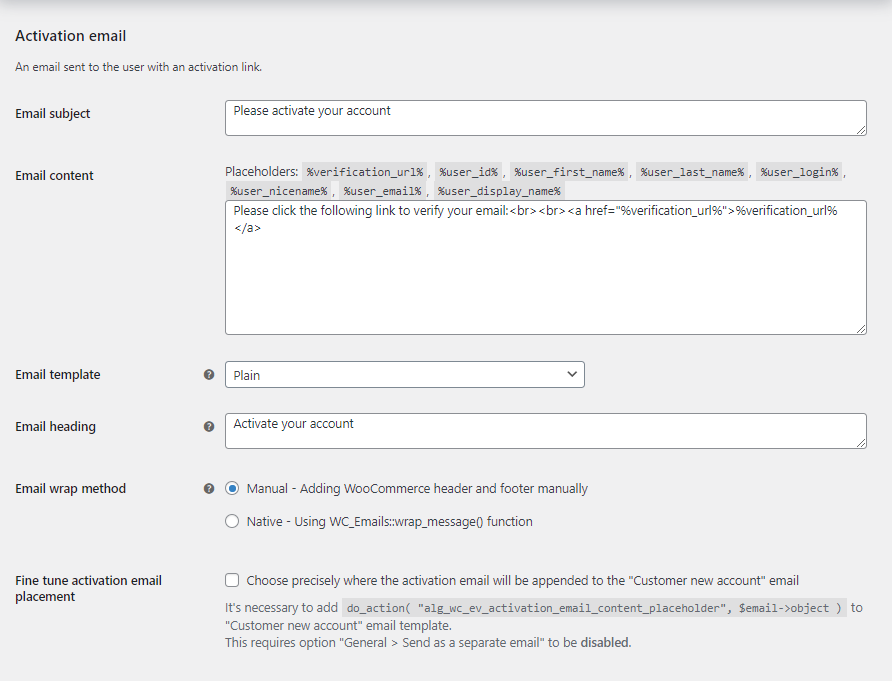
This section has settings related to the activation email. You can se the Email Subject, the content, and the email template. You can either use the plain template or the WooCommerce template. If you use the WooCommerce template, any customizations you make to the default WooCommerce email template will also apply here.
The Email Wrap method is only relevant if you are using the WooCommerce email template.
Here is an example of the plain email activation template.
Here is an example of the WooCommerce email template
 Admin Email
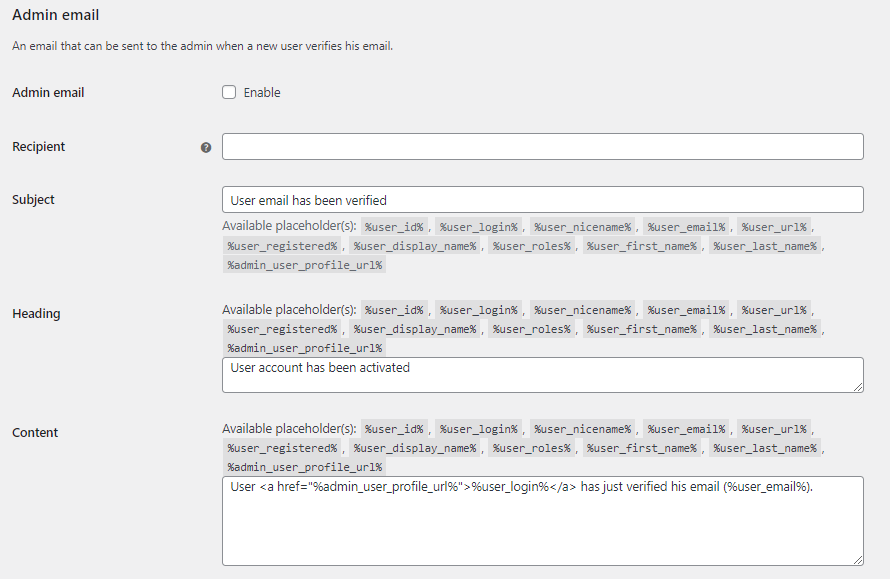
Here you can set up options for the admin to be notified each time a user verifies their email. You can define the recipient, subject, heading and content of the email. There are several placeholders available and you can use them in the relevant fields.
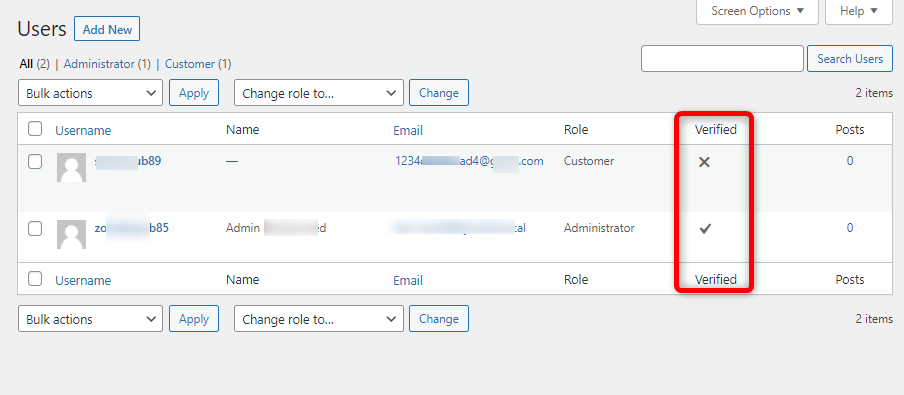
Admin Settings
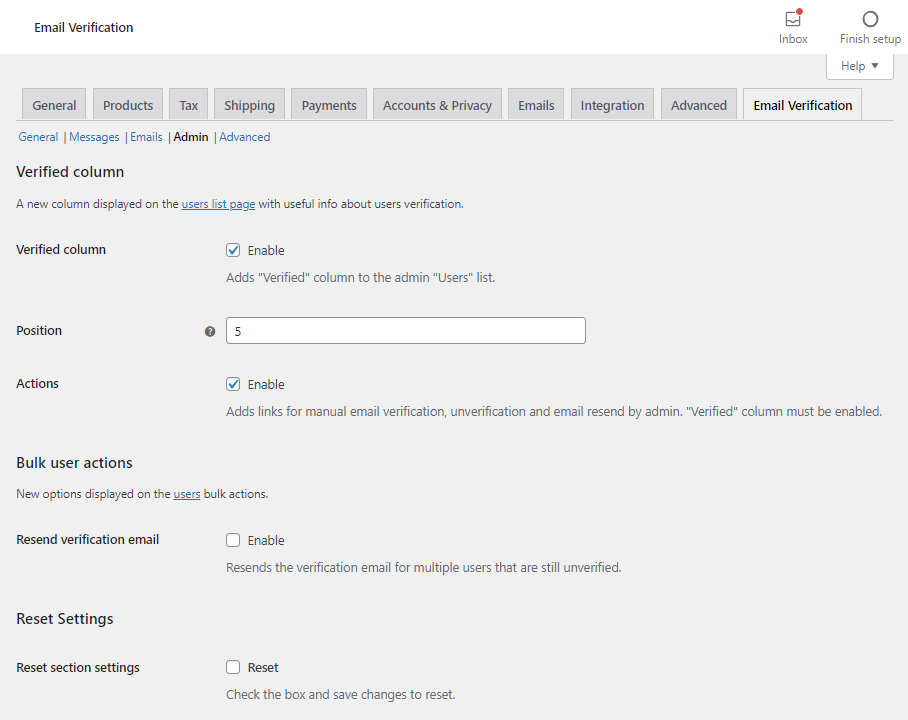
Here you can set options for the user list page. You can shoe a verified email column and you can also set the position of the column. You can also allow admins to manually verify users from the user list page. An example is shown below.
The other option on the Admin settings page is the Resend verification email. This allows you to resend the verification email to all users who have not yet verified their accounts.
Advanced Settings
Under the advanced settings page there are 7 options:
- Advanced options
- Prevent login after register
- Prevent login after checkout
- Block order emails
- Background processing
- Delete options
- Compatibility options
Advanced options

The first setting here is the authenticate filter. This is the WordPress filter used to check user authentication. You can leave it as default if you are unsure.
You can block cookies from being sent to unverified users. This is helpful if users are being able to log in even though you have blocked login before they verify their emails.
The custom logout function option is helpful if you are having trouble with users being logged in after registration or checkout. It is also useful if the Activate notice is not being displayed after user registration.
The replace HTML tags option is useful if you are having trouble saving the plugin’s settings.
Prevent Login After Register

If this option is enabled, you can prevent users from being logged in after registration. You can also redirect them to a page on the same domain.
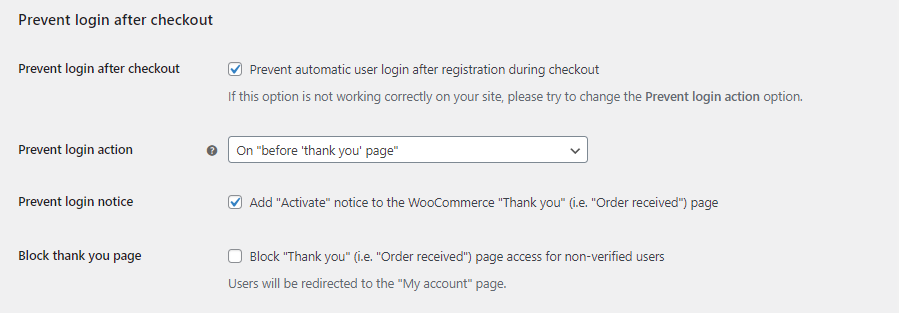
This section just like the above one, allows you to prevent login after checkout. You can set the notice and you can also block the thank you page.
Block order emails
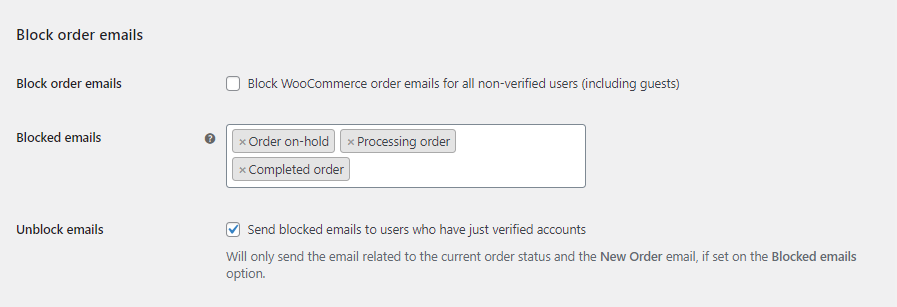
If this option is enabled, you can block order emails from being sent to customers until they verify their email accounts. Once verified you can allow the emails to be sent.
Background Processing
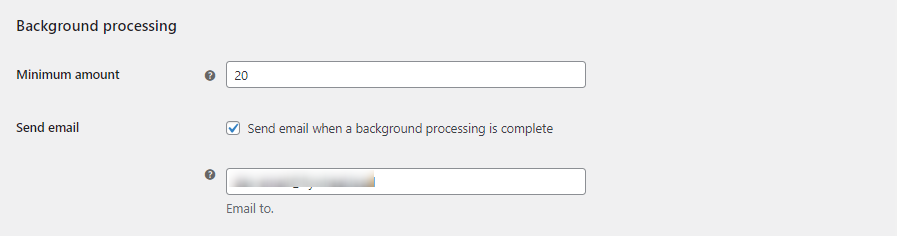
Some settings that you configure, for example, bulk user verification emails, can cause a strain on your hosting resources. You can therefore enable background processing after a certain minimum results from a query string to trigger background processing. You can also choose an email address that can be notified once the processing is complete.
Delete Options
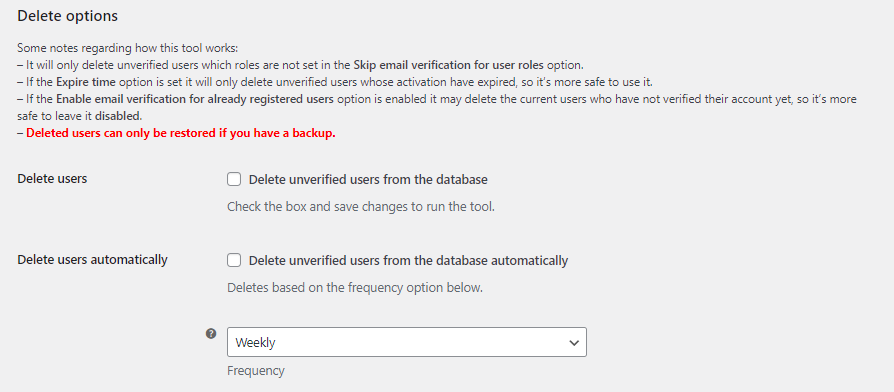
Enabling this option will automatically delete unverified users from the database. You should be careful with this, as deleted users cannot be restored. The only way to restore this will be to restore a WordPress backup.
You can either manually tun this tool at your convenience or set it up to run automatically after a certain period.
Compatibility
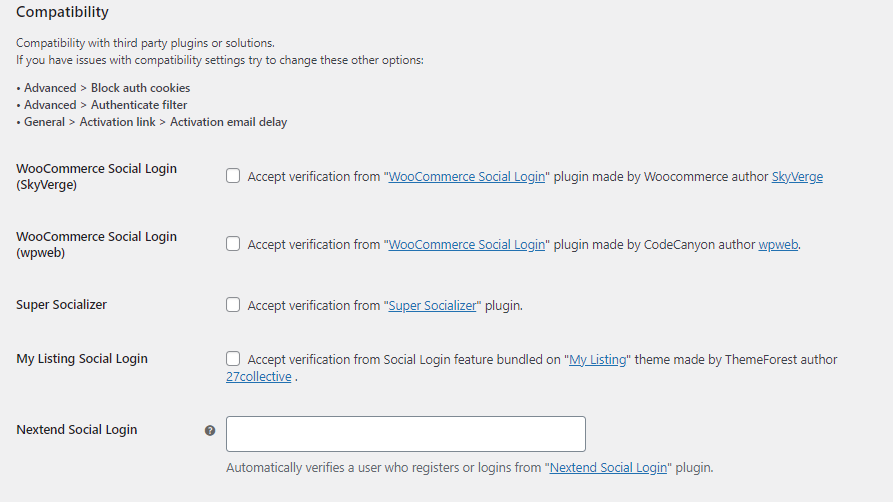
The last option under the advanced tab is the compatibility option. Many WordPress websites use social login plugins. The Email verification plugin is compatible with:
Social Share, Social Login and Social Comments Plugin – Super Socializer
You can automatically accept email verifications if your users register using their social media accounts and any of these plugins. The compatibility options are only available in the pro version of the plugin.
Conclusion
By now you understand, what email verification is and its importance. We have also shown you a comprehensive solution for email verification. Email verification for WooCommerce plugins is one of the best tools that you will come across for WooCommerce email verification purposes. The feature list is comprehensive and covers almost any situation where email verification is required. The paid version features such as blocking the checkout process are rare to find with other plugins.