

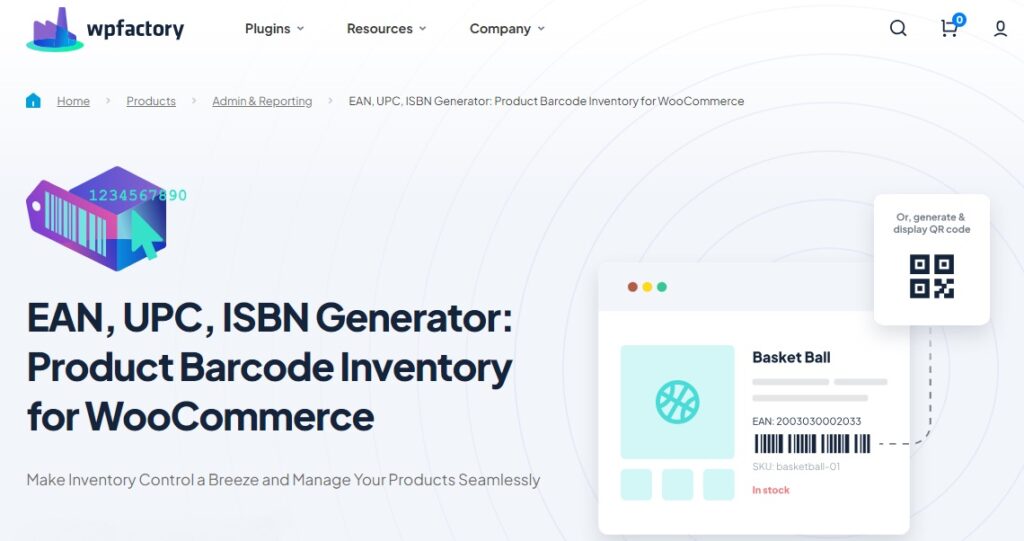
How to Add and Set Up a WooCommerce Barcode Generator?
Keeping track of products in a WooCommerce store can sometimes feel overwhelming, especially as your inventory grows, that’s where a WooCommerce barcode generator comes in handy, or also known as “GTIN WooCommerce“.
Creating unique barcodes for each item makes product identification, inventory management, and order processing much more efficient.
In this article:
We’ll walk you through how to generate a barcode in WooCommerce and explain the benefits it brings to your store.
By the end of this guide:
You’ll be able to create unique barcodes for all your WooCommerce products, helping you stay organized and keep track of inventory.
Why You Need a WooCommerce Barcode Generator
A WooCommerce barcode generator will completely change the way you handle your store’s products, here’s why:
-
Better Inventory Management
Imagine having hundreds of products in your store, without a proper system, it can be hard to keep track of everything:
◾ What’s in stock?
◾ What’s running low?
◾ Or what’s sold out?!
A barcode generator helps solve this problem by giving each product its own unique code.
This makes it easier to check your inventory and know exactly how many items you have at any given time.
-
Simplified Product Identification
Barcodes are like name tags for your products, instead of having to search for items by name, size, or color, each barcode tells you exactly which product it is.
So, barcodes help you and your customers find the right products quickly and accurately.
-
Faster Order Processing
With barcodes, scanning products during checkout or packing orders becomes much faster.
Instead of manually entering product names or numbers, you simply scan the barcode, and all the details pop up instantly, this speeds up the process and reduces mistakes.
How to Choose the Right Barcode Generator Plugin
When it comes to picking the best WooCommerce barcode generator plugin, there are a few key things to look for to make sure it simplifies your store’s workflow:
1. Easy Setup
You want a plugin that’s easy to install and start using right away, without needing technical skills, the plugin should guide you through setting up barcodes for your products in just a few simple steps.
2. Supports Multiple Barcode Formats
Look for a plugin that can generate different types of barcodes, like EAN, UPC, or ISBN.
This way, whether you’re selling books, electronics, or other items, the plugin can handle whatever barcode format you need.
3. Automatic Barcode Generation
A good plugin will automatically generate barcodes for all your products, saving you the time and hassle of creating them manually.
This feature is especially important if you have a lot of products or variations (like different sizes or colors).
You may be interested in:
Stock & Inventory Updates Triggers for WooCommerce
4. Customizable Display Options
The plugin should give you control over where the barcodes appear, on product pages, checkout, or even in order emails.
This flexibility ensures your customers and staff see the barcodes in the right places.
5. Bulk Barcode Management
If you have a large inventory, you’ll want a plugin that lets you generate barcodes for multiple products at once, this saves you time and keeps everything organized.
Unlock Easy Barcode Management With This Plugin
If you’re looking for everything we’ve mentioned in a barcode generator plugin, then the “Product Barcode Inventory for WooCommerce plugin” has you covered!
It’s designed to be easy to set up, supports multiple barcode formats like EAN and UPC, and automatically generates barcodes for your products.
Plus:
It lets you customize where the barcodes show up on your site, whether on product pages, at checkout or even in order emails.
If you have a lot of products, the plugin also handles bulk barcode generation, making it a perfect tool for managing larger inventories with ease.
You may be interested in:
How Do I Add a GTIN Field in WooCommerce? Step by Step
Setting Up a WooCommerce Barcode Generator
Setting up the “Product Barcode Inventory for WooCommerce plugin” is easy, and here’s a simple step-by-step guide to get you started:
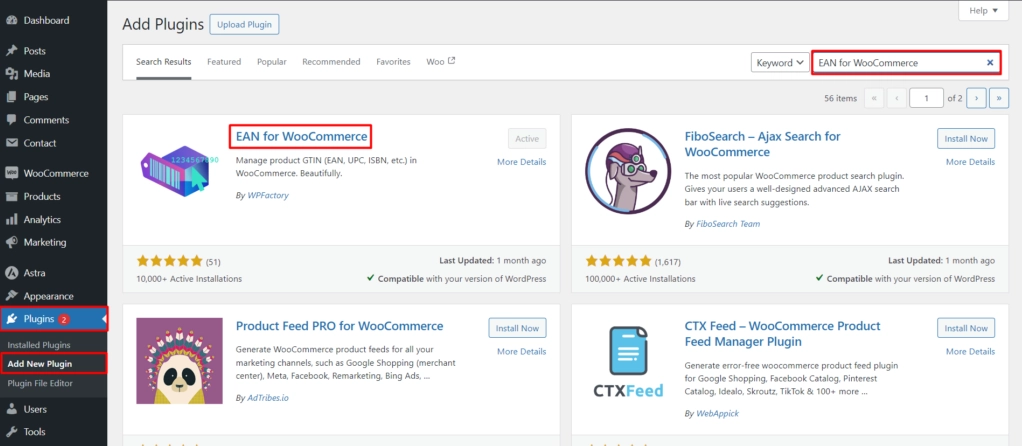
1. Go to the Plugins Menu
- Start by going to your WooCommerce dashboard.
- From there, navigate to Plugins > Add New.
2. Search for the Barcode Plugin
- In the search bar, type “Product Barcode Inventory”.
- You’ll see the plugin appear in the list, once you find it, click Install Now.
3. Activate the Plugin
- After the plugin is installed, click the Activate button.
- This will turn on the plugin so it’s ready to use on your site.
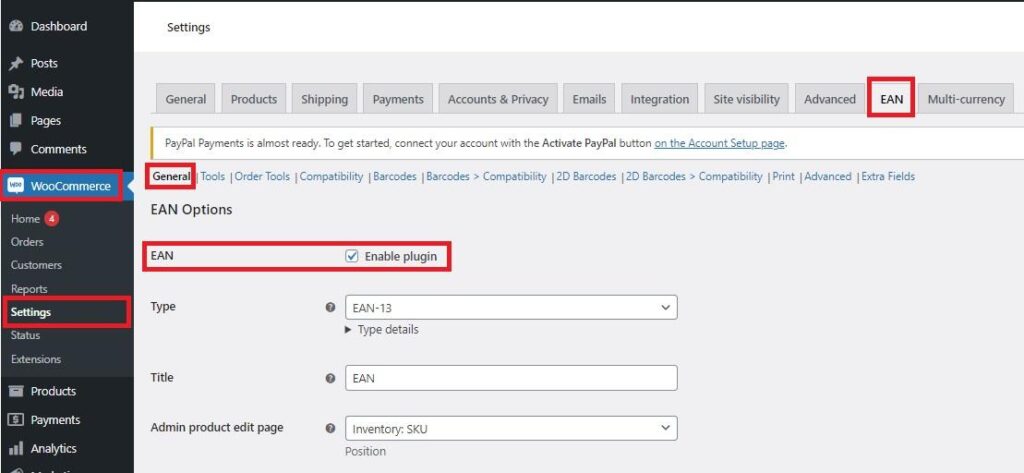
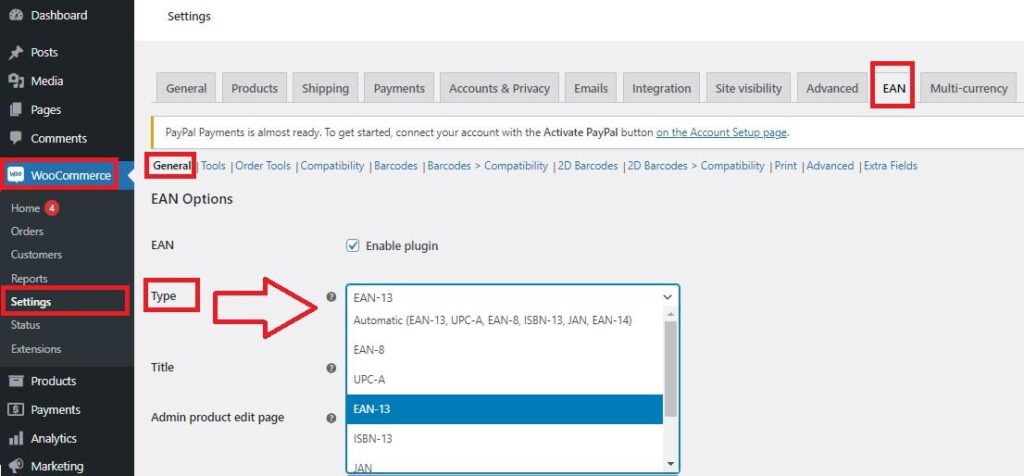
4. Configure the Plugin Settings
- Once activated, go to WooCommerce > Settings > EAN tab.
- Here, you can customize how the barcodes will be used on your products.
- Choose the type of barcode you want (EAN, UPC, ISBN), you can also choose “custom” if you want add MPN field for example.
- In the Title field, name it as the name of the type you chose (EAN, UPC, ISBN), let’s say EAN.
5. Save Your Changes
- After adjusting the settings to fit your store, make sure to click Save Changes at the bottom of the page.
Assigning Barcodes to WooCommerce Products
Once your WooCommerce barcode generator plugin is set up, it’s time to start assigning barcodes to your products.
Here’s how you can easily generate and assign them:
1. Generate Barcodes for All Products
- To automatically generate barcodes for all your products in your WooCommerce store at once, go to the EAN tab > Tools tab > Generate.
- Check the box labeled “Generate EAN for all products“, and the plugin will generate barcodes based on your settings.
- Save Your Changes

2. Go to the Product Edit Page
- In your WooCommerce dashboard, head over to Products and select All Products > edit.
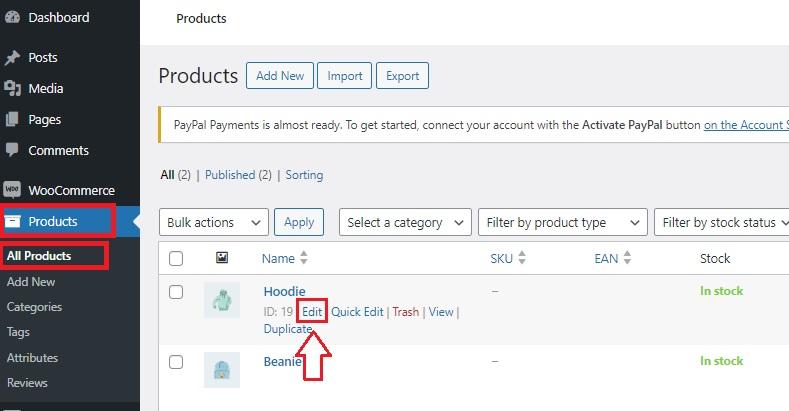
3. Locate the Barcode Field
- Once on the product edit page, scroll down to the Product data section.
- Under Inventory, you’ll see a new field labeled EAN (or UPC, depending on your settings).
- This is where your product’s barcode will be added.

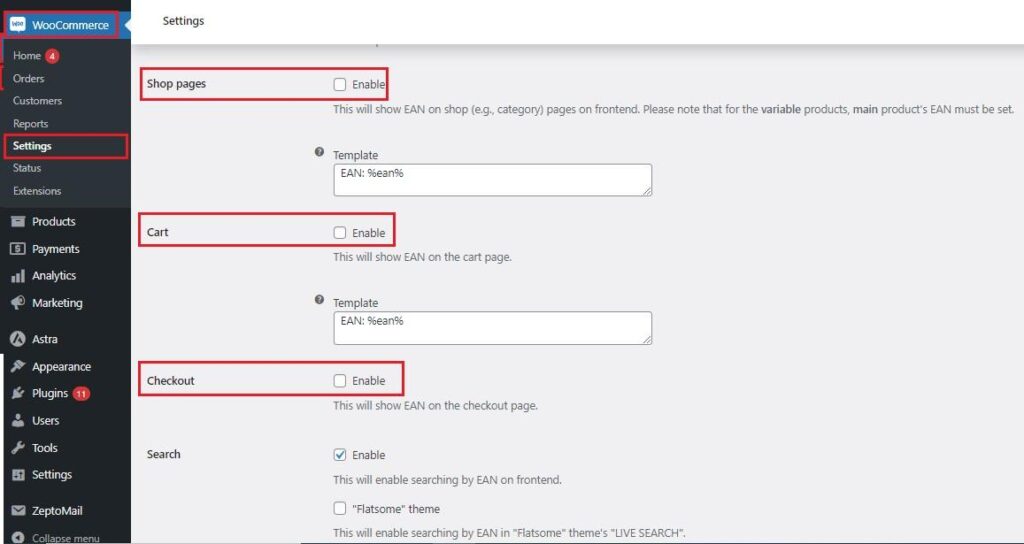
Customizing Barcode Display in Your WooCommerce Store
After setting up your barcodes, you can customize where they appear in your WooCommerce store.
Here are the options for displaying barcodes on product pages, in the cart, and at checkout:
1. Product Pages
You can show the barcode on each product page, making it visible to both you and your customers.
This is especially useful if your customers need to reference the barcode for reordering or if you want to easily track products in your store.
You can enable this by going to WooCommerce > Settings > EAN tab > General and selecting the option to display the barcode on the product page.
You may be interested in:
EU VAT Manager for WooCommerce
2. Cart Page
If you want barcodes to be visible in the shopping cart, that’s possible too! This can help customers double-check their items before checking out, it also helps you, the store owner, when processing orders.
Just go to WooCommerce > Settings > EAN tab > General and select the option to display the barcode on the Cart Page.
3. Checkout Page
Barcodes can also be displayed during the checkout process, making it easy to verify that the correct items are being processed.
This is especially helpful for stores that use barcodes for packing and shipping.
To enable this, also select the option in the EAN tab to show barcodes at checkout.
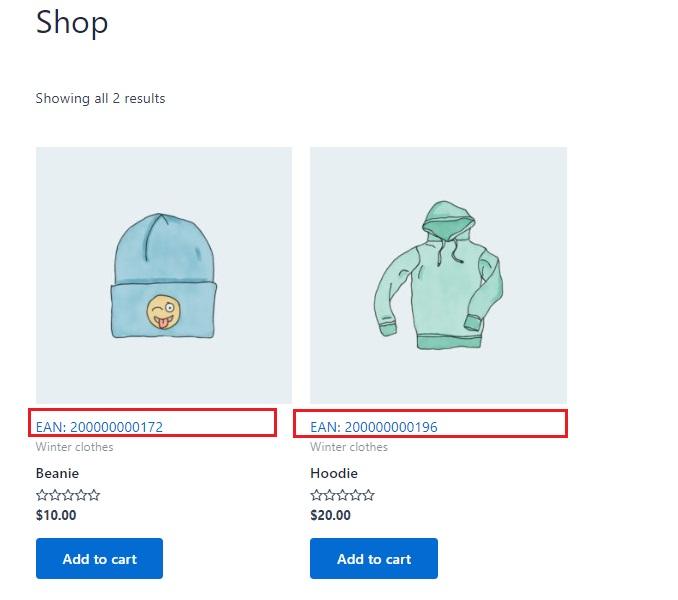
Here’s what it would look like 👇
That’s it! For more details about installation and other features, the plugin provides full documentation at: Doc of EAN and Barcodes for WooCommerce
Unlock Advanced Features with the Pro Version
The free version of the EAN for WooCommerce plugin already offers powerful barcode generation and management. However, upgrading to the Pro version opens up a range of advanced features designed to take your store to a strong level.
Here’s what you can expect:
-
Extra Fields for Custom Product Data
Want to add even more data to your products?
With the Pro version, you can create custom fields like EAN or MPN for each product.
This gives you the flexibility to store richer product information, making your store even more professional and organized.
-
2D Barcode Options
Go beyond standard barcodes with 2D barcode support for a more visually enhanced and scannable experience.
This feature elevates how your product data is presented, making it easier for both you and your customers to interact with barcodes.
-
Print Barcodes in Bulk
Save time by adding the “Print barcodes” option to your bulk actions menu in the admin products list.
This allows you to print barcodes for multiple products at once, streamlining inventory management.
-
Meta Key for Variations
Manage product variations like a pro!
The Meta Key for Variations feature lets you define unique identifiers for each variation, which is especially useful if your store sells products with multiple sizes or colors.
-
Force Remote Images (Barcodes)
Ensure your barcodes are always accurate by using the Force Remote Images option.
This feature retrieves barcode images directly from the source, improving the reliability and accuracy of your product data.
-
JavaScript Variation Options
For advanced users, the JavaScript Variation Options feature fine-tunes the code for managing product variations.
This helps you customize how variations are handled on the front end, giving you greater control.
Upgrading to the Pro version not only gives you access to these advanced features but also boosts the overall functionality of your store, helping you manage your products more efficiently!
You may be interested in:
Stock Report & History Manager for WooCommerce
Conclusion
Here’s a quick recap of why using a WooCommerce barcode generator is a smart move for your store:
-
Easier Inventory Management
Barcodes help you keep track of products effortlessly, so you always know what’s in stock.
-
Faster Product Identification
With unique barcodes for each item, finding and organizing products becomes much simpler.
-
Customizable Barcode Display
You can choose where barcodes appear, on product pages, in the cart, or even at checkout, making them visible where it matters most.
-
Automated Barcode Generation
The plugin saves time by automatically generating barcodes for all your products.
-
Advanced Features with the Pro Version
Upgrading to the Pro version unlocks powerful tools like 2D barcodes, bulk printing, custom fields, and more.


hi support,
how config add product URL, tags field , product name into barcode 2D ? when a customer scan label barcode . it will redirect to my website ? Please help me config it in tab 2D Barcodes Options setting.
Thanks