A Step-by-Step Guide for WooCommerce for Beginners: Setting Up Your Online Store
If you’re confused or worried about setting up your WooCommerce store the correct way don’t worry, we’ve got your back.
Many beginners feel intimidated when they’re trying to set up their first WooCommerce store, indeed, the WordPress and WooCommerce dashboards feel intimidating at first look.

In this tutorial, we will guide you step by step through the installation process of WooCommerce, so you can launch a professional-looking website in easy and simple steps.
Let’s go.
WooCommerce Installation Steps Overview:
Once you have an overview of the installation steps of your WooCommerce store it will be easy to follow through and resolve any issue that stands in your way. Treat this as your map for the WooCommerce installation process:
- Learning how to install WordPress Plugin
- Installing WooCommerce
- Customizing your store’s
- Location
- Industry
- Product types
- Theme
- Adding products
- Product Title
- Product Description
- Product Images
- Product Category
- Setting Up Payments
- Providing tax information
- Setting up shipping
- Choosing and customizing your theme
- Installing extensions and add-ons
- How to Grow Your WooCommerce Store
Once you know all this information you will be ready to launch and manage your online store successfully. And that’s what we will cover in this article.
How to Install WordPress Plugins in General
Step 1: Access the WordPress Dashboard
Log in to your WordPress admin dashboard. This is typically done by adding “/wp-admin” to your domain (e.g., yourdomain.com/wp-admin) and entering your login credentials.
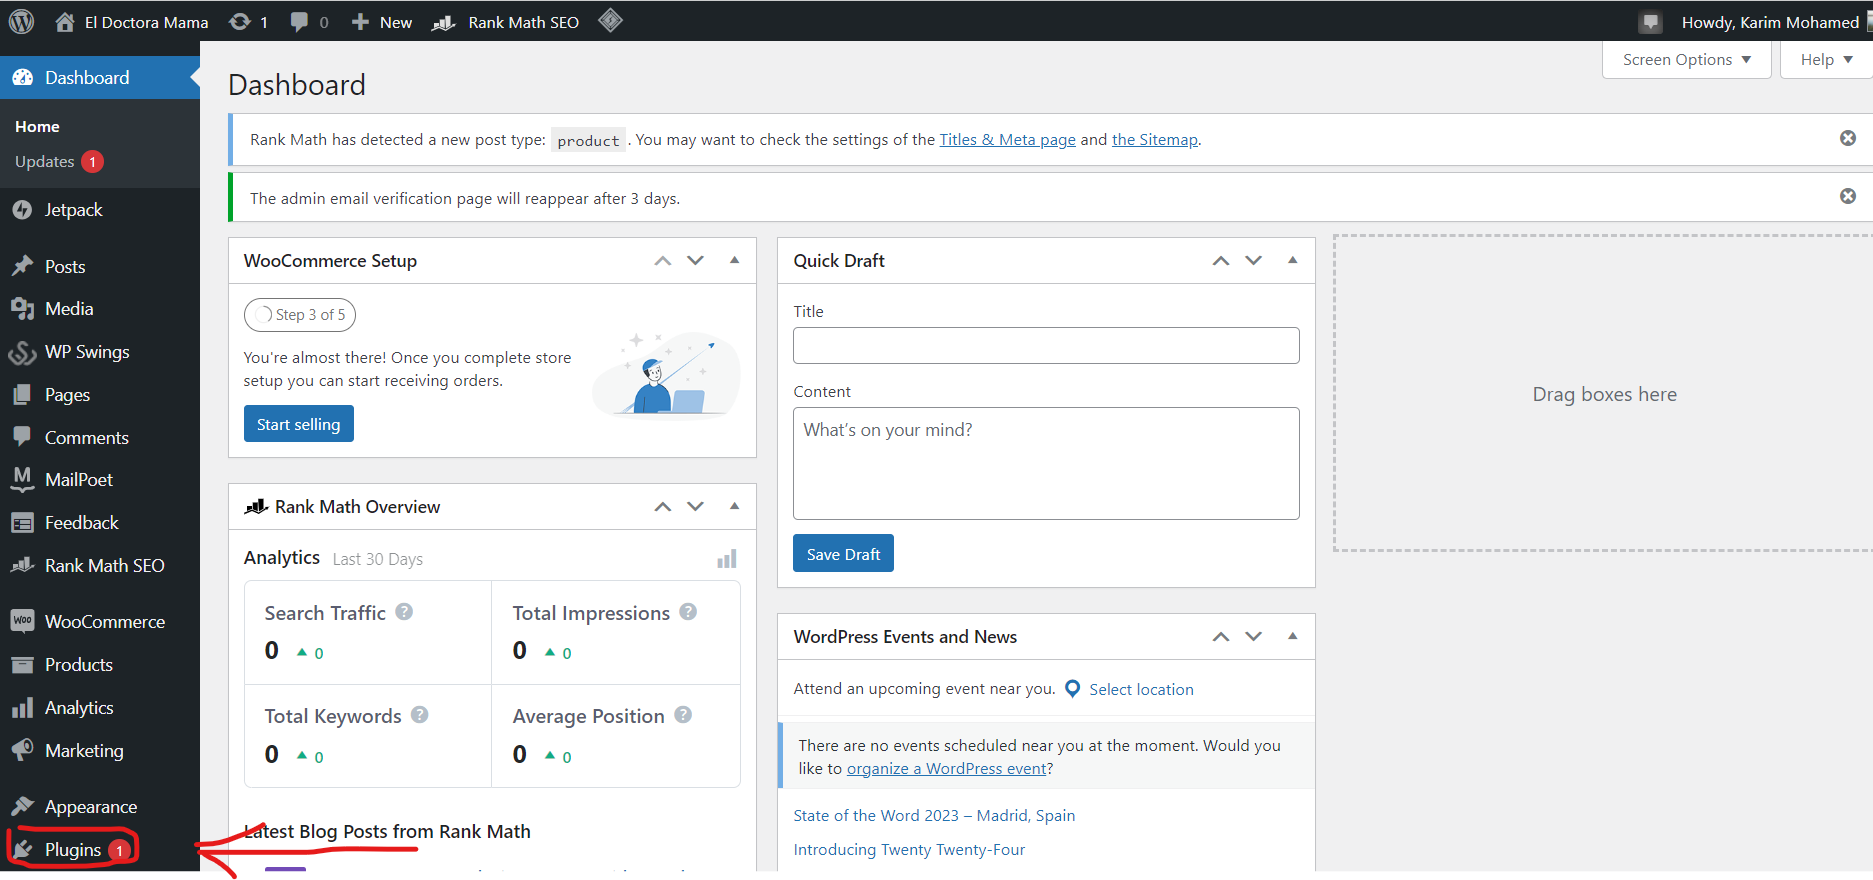
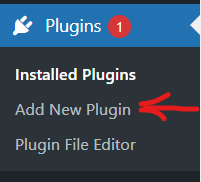
Step 2: Navigate to the Plugins Section
Once logged in, find the “Plugins” option on the left-hand menu. Click on it, and a dropdown menu will appear. Select “Add New.”
Step 3: Explore the WordPress Plugin Repository
You’ll be directed to the WordPress Plugin Repository. Here, you can browse through thousands of free plugins that cater to various functionalities. Use the search bar to find a specific plugin or explore featured popular, or recommended plugins.
Step 4: Install a WordPress Plugin
Once you’ve found a plugin that suits your needs, click the “Install Now” button next to it. WordPress will automatically download and install the plugin for you.
Step 5: Activate the Plugin
After installation, the “Install Now” button will change to an “Activate” button. Click on it to activate the plugin. Activating a plugin is necessary for it to start functioning on your website.
Step 6: Configure Plugin Settings
Some plugins may require additional configuration. Once activated, you may see a new menu item or settings option related to the installed plugin. Navigate to the plugin’s settings and configure them according to your preferences.
Step 7: Verify the Plugin
Visit the relevant section of your website to ensure that the plugin is working as expected. This might involve checking a new feature, widget, or settings panel, depending on the plugin’s purpose.
Step 8: Update Your Plugins Regularly
It’s crucial to keep your plugins up to date to ensure compatibility with the latest version of WordPress and maintain optimal security. Check the “Plugins” section regularly for updates and click the “Update Now” link for any plugins that have new versions available.
Tips for Choosing and Managing Plugins
- Choose Reliable Sources: Stick to reputable sources for plugins, such as the official WordPress Plugin Repository or trusted third-party developers. This helps ensure the plugins are well-coded, secure, and regularly updated.
- Avoid Overloading Your Site: While plugins can add powerful features, too many can slow down your website. Only install plugins that are necessary for your online store’s functionality.
- Back-Up Your Site: Before installing new plugins or updating existing ones, it’s wise to create a backup of your website. This provides a safety net in case anything goes wrong during the installation or update process.
By following these steps and tips, you will be well-equipped to install and manage WordPress plugins effectively, enhancing the functionality and performance of your online store.
Installing WooCommerce
Step 1: Search for WooCommerce
In the Plugins Repository, use the search bar on the top right to search for “WooCommerce.” Once it appears in the search results, click on the “Install Now” button.
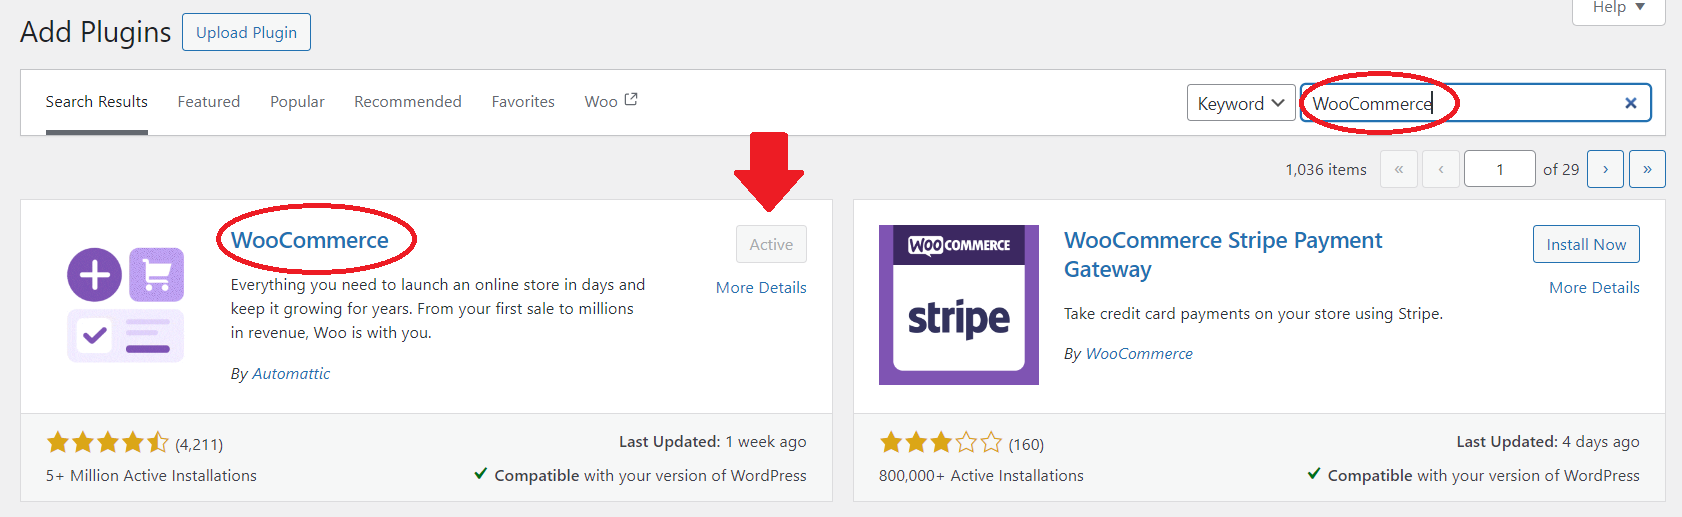
Step 2: Activate WooCommerce
After the installation is complete, the “Install Now” button will change to an “Activate” button. Click on it to activate WooCommerce.
Step 3: WooCommerce Setup Wizard
Upon activation, WooCommerce will launch its setup wizard. This wizard simplifies the initial configuration of your online store. It covers essential settings like store location, currency, product types, payment methods, and shipping options.
- Store Setup: Fill in your store’s location, currency, and the type of products you plan to sell.
- Shipping & Tax: Set up your shipping and tax preferences. WooCommerce provides options for flat-rate shipping, free shipping, and more.
- Payment: Choose the payment methods you want to offer. WooCommerce supports major payment gateways like PayPal, Stripe, and more.
- Extras: This section may include optional features like automated tax calculations and creating an account for the WooCommerce services.
Step 4: Install Recommended Pages
WooCommerce will prompt you to create essential pages like the Shop, Cart, Checkout, and My Account pages. Click on the “Continue” button, and WooCommerce will automatically generate and assign these pages for you.
Step 5: Choose a Theme
You can either use your existing WordPress theme or explore WooCommerce-specific themes. A WooCommerce theme is designed to optimize your store’s appearance and functionality. Navigate to “Appearance” > “Themes” to customize or switch your theme.
Step 6: Add Your First Product
With WooCommerce set up, it’s time to add your first product. Navigate to “Products” > “Add New” and fill in the details of your product, including title, description, price, and images.
Step 7: Customize Your Store
Explore the WooCommerce settings and customize your store further. This includes adjusting general settings, configuring product display options, and managing your inventory.
Step 8: Test Your Store
Before launching, thoroughly test your online store. Place test orders, check the checkout process, and ensure all features are functioning as expected.
Congratulations! Your WordPress online store powered by WooCommerce is now set up and ready for business. Regularly update both WordPress and WooCommerce to benefit from the latest features and security enhancements. Now we’ll dive deep into the details of managing your WooCommerce store.
Customizing Your Store
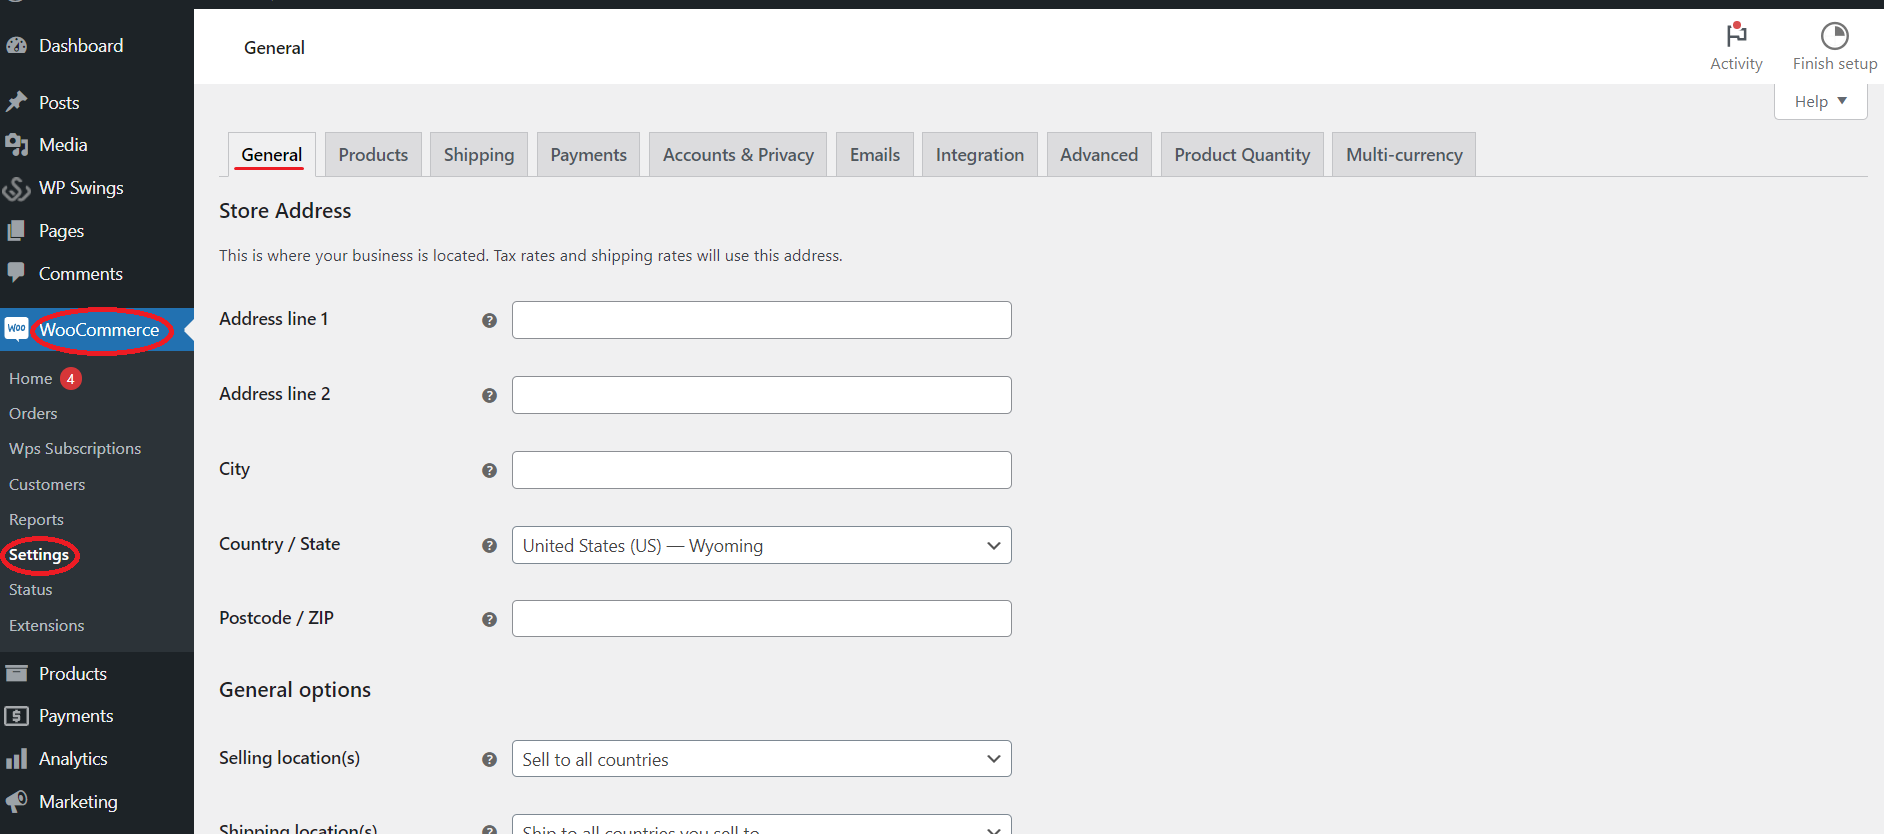
1. Location Settings:
- Navigate to your WordPress admin dashboard.
- Go to “WooCommerce” > “Settings.”
- Click on the “General” tab.
- Set your store’s address and location details under the “General Options” section.
- Adjust currency options, units of measurement, and other location-specific settings to match your business.
2. Industry-Specific Customization:
Customizing your online store to suit your industry ensures a tailored experience for your customers. Here’s how to make industry-specific adjustments:
- Fashion and Apparel:
- Choose a theme that highlights visual elements and provides a clean product showcase.
- Use high-quality images for your products.
- Implement filters for easy product categorization (e.g., by size, and color).
- Electronics and Gadgets:
- Focus on a theme with a modern and tech-savvy design.
- Utilize product specifications and features in product descriptions.
- Consider integrating product comparison features.
- Art and Handmade Products:
- Opt for a visually appealing and artistic theme.
- Highlight the craftsmanship and story behind each product in your descriptions.
- Enable customer reviews and testimonials to build trust.
3. Product Types:
- Simple Products:
- For basic products with no variations, create simple product listings.
- Add clear and concise product descriptions, including key features and benefits.
- Variable Products:
- If your products come in different variations (e.g., size, color), set up variable products.
- Include high-quality images for each product variation.
- Clearly communicate available options and pricing.
- Downloadable Products:
- If you’re selling digital products, ensure a seamless download process.
- Provide detailed instructions on accessing and using the digital files.
4. Theme Customization:
- Navigate to “Appearance” > “Customize.”
- Explore the theme customization options, which may vary depending on your chosen theme.
- Modify colors, fonts, and layout settings to align with your brand.
- Upload a custom logo and ensure it fits well with the overall design.
- Preview changes before saving to see how they will appear to your visitors.
5. Additional Tips for Theme Customization:
- Mobile Responsiveness: Ensure that your chosen theme is mobile-responsive to provide a seamless experience across devices.
- Loading Speed: Optimize images and minimize unnecessary elements to enhance page loading speed.
- Navigation: Create a user-friendly navigation menu to help customers easily find products and information.
- Call-to-Action (CTA): Place clear CTAs on product pages to encourage visitors to make a purchase.
- Security: Regularly update your theme to benefit from the latest security features and bug fixes.
Customizing your WordPress online store allows you to create a brand identity, enhance user experience, and differentiate yourself in the competitive e-commerce landscape. Regularly review and update your customization choices to stay current and meet the evolving needs of your customers.
Adding Products
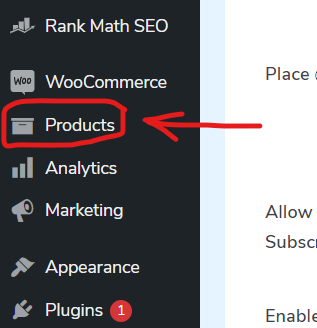
Step 1: Navigate to Products
In the WordPress dashboard, click on “Products” in the left-hand menu.
Step 2: Click on “Add New”
Once in the Products section, click on the “Add New” button to start creating a new product listing.
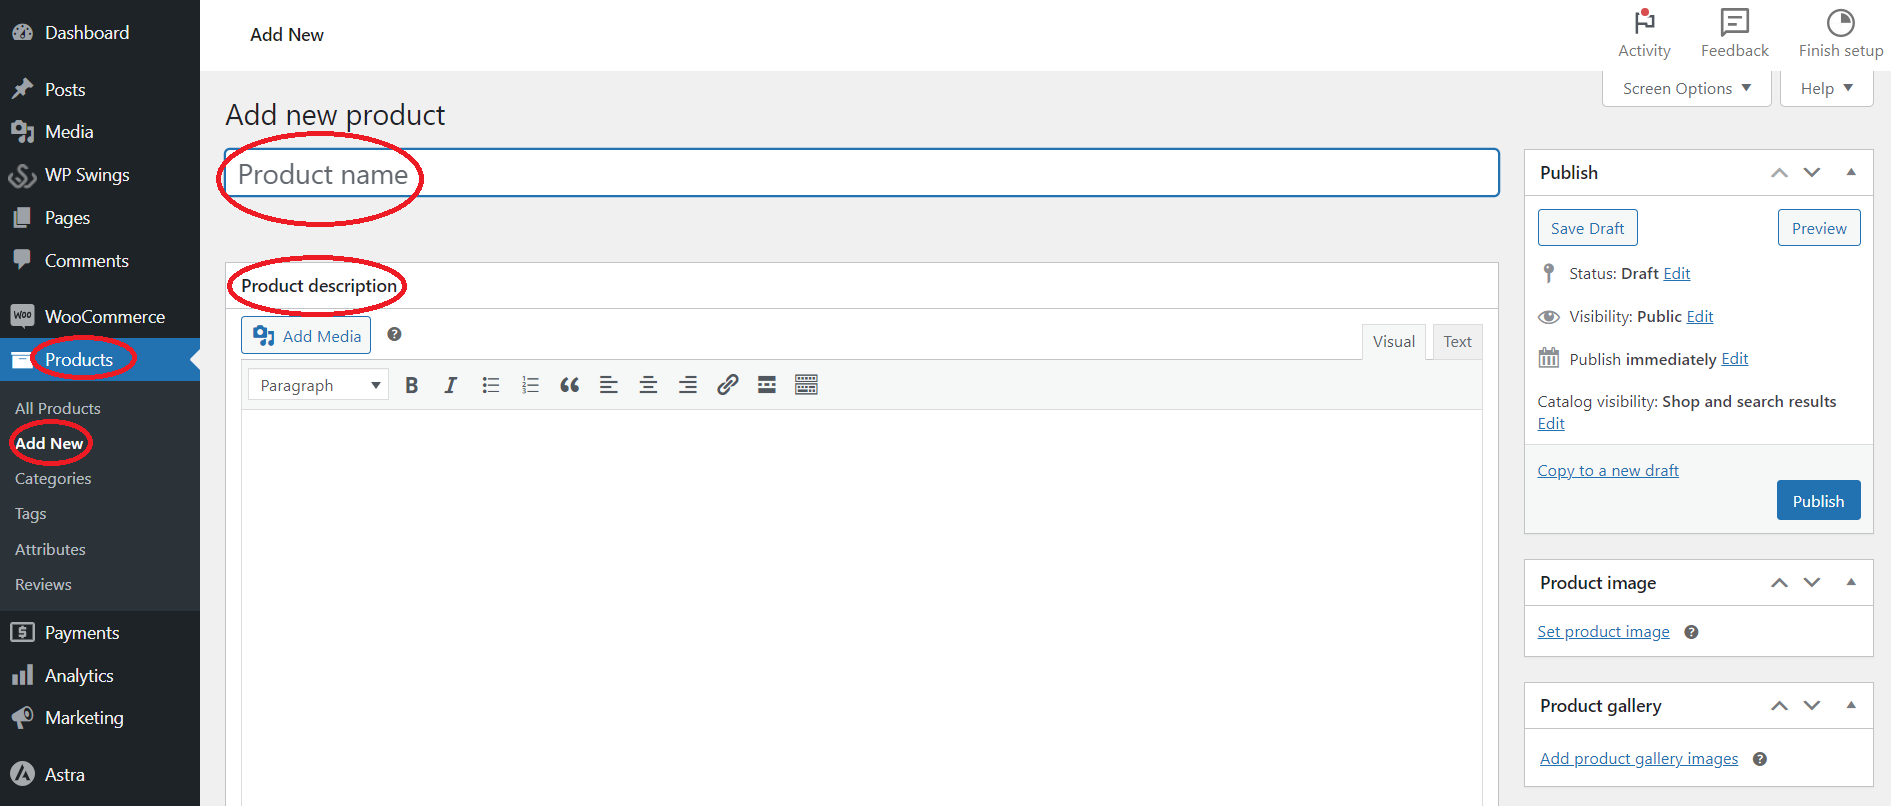
Step 3: Product Title
In the product editor, enter the title of your product in the designated field. Make sure your product title is clear, descriptive, and includes relevant keywords. This is essential for both user understanding and search engine optimization.
Step 4: Product Description
Below the product title, you’ll find a text editor where you can input a detailed description of your product. Use this section to highlight key features, benefits, and any other relevant information that helps customers make informed decisions.
- Formatting: Use formatting options (headings, bullet points, etc.) to make the description visually appealing and easy to read.
- SEO Optimization: Incorporate relevant keywords naturally in your product description for better search engine visibility.
Step 5: Product Images
Scroll down to the “Product Image” section. Click on the “Set product image” link to upload the main image that represents your product. This image will be displayed prominently on product pages and in search results.
- Image Quality: Use high-resolution images to showcase your product in the best light.
- Multiple Images: If applicable, upload additional images to the product gallery to provide customers with different perspectives.
Step 6: Product Categories
On the right-hand side of the product editor, you’ll find the “Product Categories” box.
- Create New Categories: If you haven’t set up product categories yet, you can create new ones directly from this section.
- Assign Categories: Assign relevant categories to your product to help organize your inventory. Categories make it easier for customers to browse and find products of interest.
Step 7: Product Tags (Optional)
Tags can be used to further classify and describe your products. You can add tags that represent specific features, attributes, or use cases.
Step 8: Product Data and Settings
Below the product editor, you’ll find additional sections for product data, including price, inventory, shipping, and more. Fill in these details according to your product’s specifications.
Step 9: Publish Your Product
Once you’ve added all the necessary information, click the “Publish” button to make your product live on your online store.
Congratulations! You’ve successfully added a product to your WordPress online store. Repeat these steps for each product you want to feature, and regularly update your product listings to keep your inventory current and appealing to customers.
Setting Up Payments
Step 1: Navigate to WooCommerce Settings
In the dashboard, go to “WooCommerce” and click on “Settings.”
Step 2: Choose the “Payments” Tab
Within the WooCommerce settings, select the “Payments” tab. This is where you’ll configure the payment gateways for your online store.
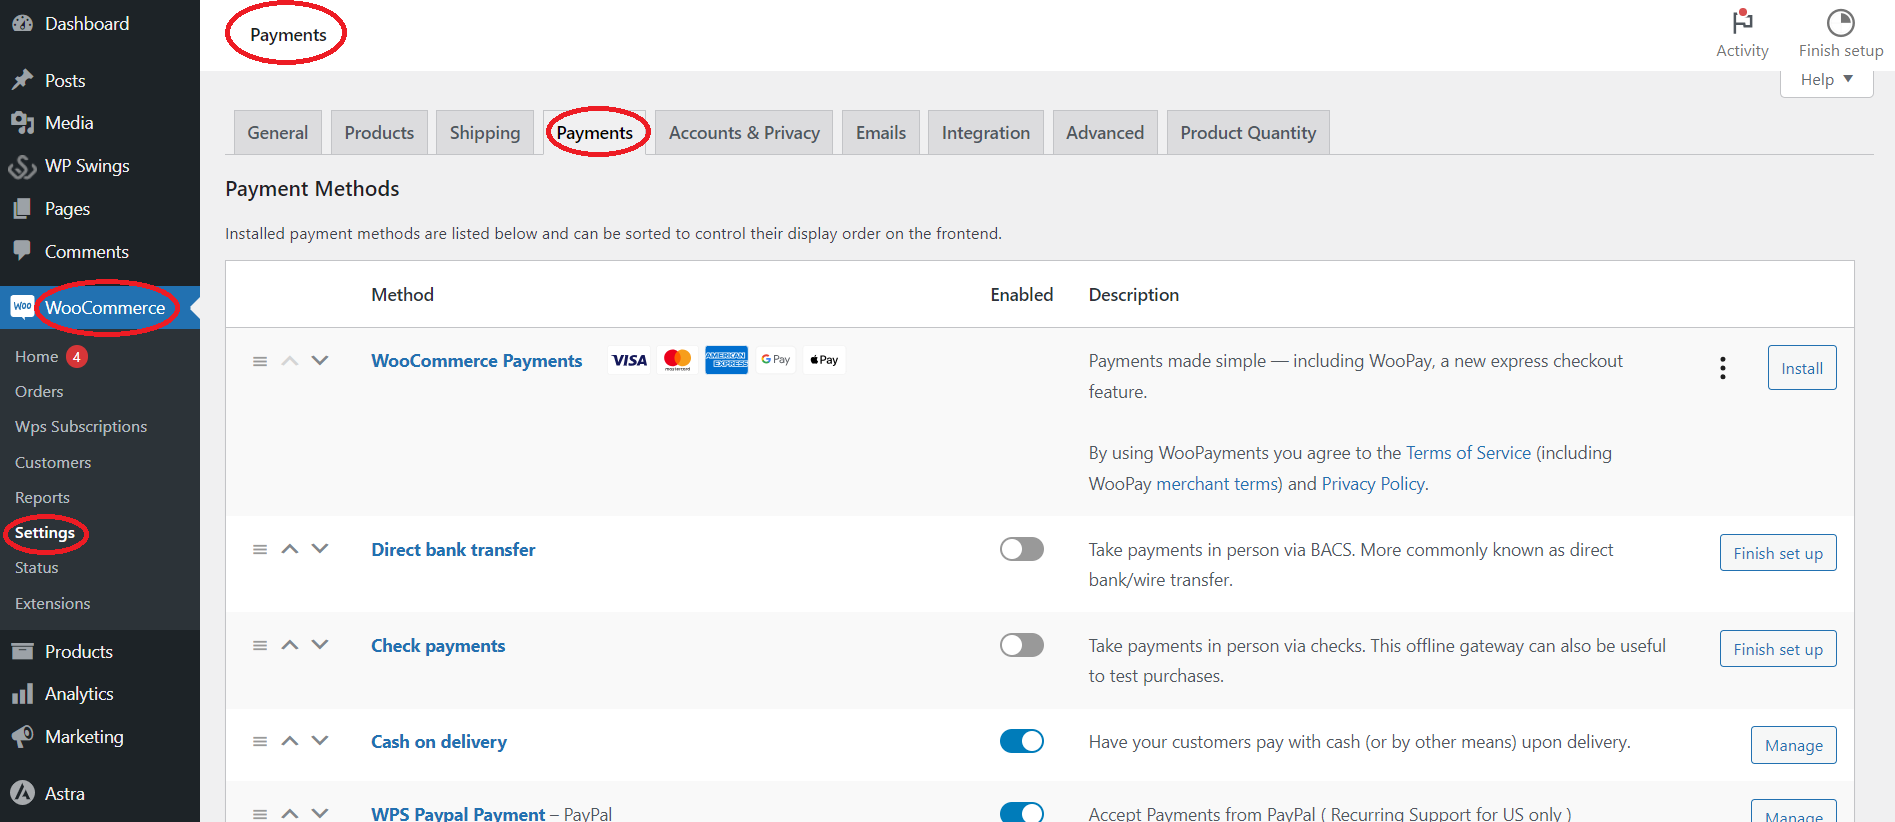
Step 3: Choose Payment Methods
WooCommerce offers a variety of payment methods that you can enable for your online store. Some common options include:
- PayPal: To enable PayPal, click on “PayPal” and check the box to enable it. Enter your PayPal email address and configure additional settings as needed.
- Stripe: For credit card payments, choose “Stripe” and click on the checkbox to enable it. Follow the prompts to connect your store with your Stripe account.
- Credit Card (WooCommerce Payments): WooCommerce Payments is another built-in option. Click on “WooCommerce Payments” and configure the necessary details.
- Other Payment Gateways: Depending on your location and business preferences, you may have additional options such as Square, Authorize.net, or others. Choose and configure the one that best suits your needs.
Step 4: Configure Payment Settings
For each enabled payment method, click on the respective tab to configure settings such as currency settings, checkout options, and additional options specific to that payment method.
- Currency Settings: Ensure that your currency settings match your business location and target audience.
- Checkout Options: Customize the appearance of the checkout page and determine whether customers should be redirected to the cart or directly to checkout.
- Security: Enable additional security features such as 3D Secure for credit card transactions if supported by your chosen payment gateway.
Step 5: Test Transactions
Before making your store live, perform test transactions using different payment methods to ensure everything is working smoothly. Most payment gateways provide sandbox or test modes for this purpose.
Step 6: Enable SSL Certificate
For secure transactions, it’s highly recommended to have an SSL certificate installed on your website. Some payment gateways may require this for processing payments securely.
Step 7: Stay Informed About Regulations
Be aware of any legal or regulatory requirements related to online transactions in your region. Ensure your store complies with necessary regulations to provide a secure and trustworthy shopping experience.
Step 8: Stay Updated
Regularly check for updates to both WooCommerce and your chosen payment plugins. This helps ensure compatibility with the latest versions and incorporates any security enhancements or new features.
By following these steps, you’ll successfully set up payment options for your WordPress online store, providing your customers with a secure and convenient shopping experience.
Providing Tax Information for Your WordPress Online Store
Step 1: Navigate to WooCommerce Settings
In the dashboard, go to “WooCommerce” and click on “Settings.”
Step 2: Choose the “General” Tab
Within the WooCommerce settings, select the “General” tab. This is where you’ll configure tax settings for your online store.
Step 3: Enable Taxes
Check the box labeled “Enable Taxes” to activate tax calculation on your online store.
Step 4: Configure Tax Options
- Tax Calculation: Choose whether taxes are based on the customer’s shipping address or billing address.
- Prices Entered With Tax: Indicate whether product prices you enter include or exclude taxes.
Step 5: Define Tax Rates
Click on the “Standard Rates” or “Reduced Rate” tabs to add tax rates based on your business location and applicable tax laws.
- Add a Tax Rate: Click the “Insert Row” button to add a new tax rate. Enter the country and state for the rate, along with the rate percentage.
- Compound Tax: If your tax structure involves multiple layers (e.g., state and local taxes), consider enabling compound tax to ensure accurate calculations.
Step 6: Tax Classes
Tax classes allow you to categorize products based on their taxability. For instance, some products might be exempt from certain taxes.
- Standard Classes: WooCommerce typically includes standard tax classes like “Standard,” “Reduced Rate,” and “Zero Rate.”
- Custom Classes: If needed, you can create custom tax classes for specific types of products.
Step 7: Additional Tax Options
Explore additional tax options based on your business needs:
- Display Prices During Cart and Checkout: Choose whether to display prices inclusive or exclusive of tax during the checkout process.
- Rounding: Set your rounding options to round taxes at the subtotal or per line item.
Step 8: Collecting EU VAT (if applicable)
If you’re selling to customers in the European Union, you may need to comply with EU VAT regulations. WooCommerce provides specific settings for this, including options for collecting VAT numbers from business customers.
Step 9: Save Changes
After configuring your tax settings, be sure to click the “Save Changes” button to apply the changes to your online store.
Step 10: Test the Checkout Process
Perform test transactions to ensure that tax calculations are accurate during the checkout process. This is especially important if you’re selling to customers in regions with complex tax structures.
Step 11: Stay Informed
Keep abreast of changes in tax regulations, especially if you operate in multiple regions. Periodically review and update your tax settings to stay compliant.
By following these steps, you’ll successfully provide accurate tax information for your WordPress online store, ensuring compliance with local regulations and fostering trust with your customers.
Setting Up Shipping
Step 1: Navigate to WooCommerce Settings
In the dashboard, go to “WooCommerce” and click on “Settings.”
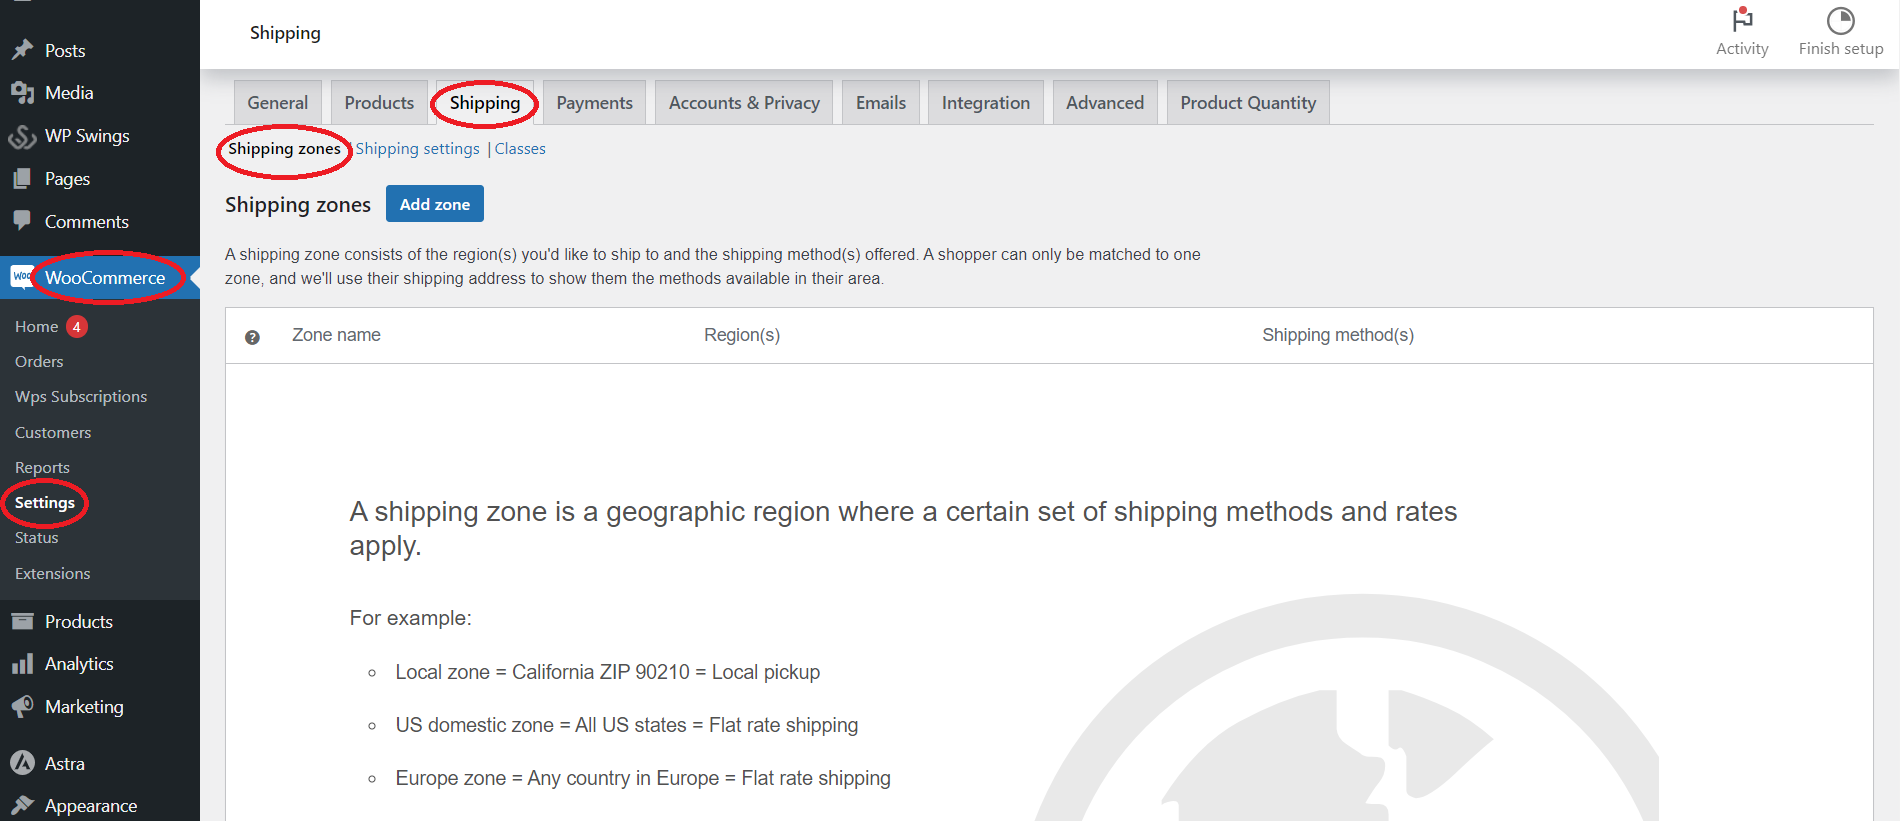
Step 2: Choose the “Shipping” Tab
Within the WooCommerce settings, select the “Shipping” tab. This is where you’ll configure shipping options for your online store.
Step 3: Enable Shipping
Check the box labeled “Enable shipping” to activate shipping calculation on your online store.
Step 4: Add Shipping Zones
Shipping zones allow you to set up different shipping methods and rates based on geographic regions.
- Click on “Add Shipping Zone”: Begin by creating a shipping zone. Enter a Zone Name (e.g., “Domestic” or “International”) and choose the region it applies to.
- Add Shipping Method: For each shipping zone, click on the “Add Shipping Method” button. Choose a method that suits your business, such as Flat Rate, Free Shipping, Local Pickup, or a third-party shipping service.
Step 5: Configure Shipping Methods
For each shipping method, you’ll need to configure specific settings:
- Flat Rate:
- Set a cost for shipping.
- Additional options may include setting a per-item cost or a percentage of the product cost.
- Free Shipping:
- Specify conditions for free shipping, such as a minimum order amount.
- Local Pickup:
- Set the location(s) where customers can pick up their orders.
- Third-Party Shipping Services:
- If using a third-party shipping service (e.g., UPS, FedEx), integrate it with WooCommerce and configure the settings accordingly.
Step 6: Shipping Classes
Shipping classes allow you to categorize products based on their shipping characteristics, enabling more precise control over shipping costs.
- Create Shipping Classes: Go to “WooCommerce” > “Settings” > “Shipping” > “Shipping Classes” to add classes like “Heavy,” “Fragile,” etc.
- Assign Shipping Classes to Products: Edit each product and assign the appropriate shipping class in the “Shipping” tab.
Step 7: Advanced Shipping Options
Explore additional shipping options based on your business needs:
- Shipping Calculations: Choose how shipping costs are calculated, such as based on the total order or per item.
- Shipping Destinations: Define where you’re willing to ship products. Options may include shipping worldwide or limiting to specific countries.
Step 8: Test the Shipping Process
Before making your store live, perform test transactions to ensure that shipping calculations are accurate and that all chosen shipping methods work as expected.
Step 9: Communicate Shipping Policies
Clearly communicate shipping policies on your website, including estimated delivery times, shipping costs, and any restrictions on certain products.
Step 10: Stay Informed
Keep track of shipping-related updates, especially if you’re using third-party shipping services. Regularly review and update your shipping settings to stay current.
By following these steps, you’ll successfully set up shipping for your WordPress online store, providing your customers with transparent and reliable shipping options.
Choosing and Customizing Your WooCommerce Theme
Step 1: Navigate to Appearance and Themes
In the dashboard, go to “Appearance” and click on “Themes.”
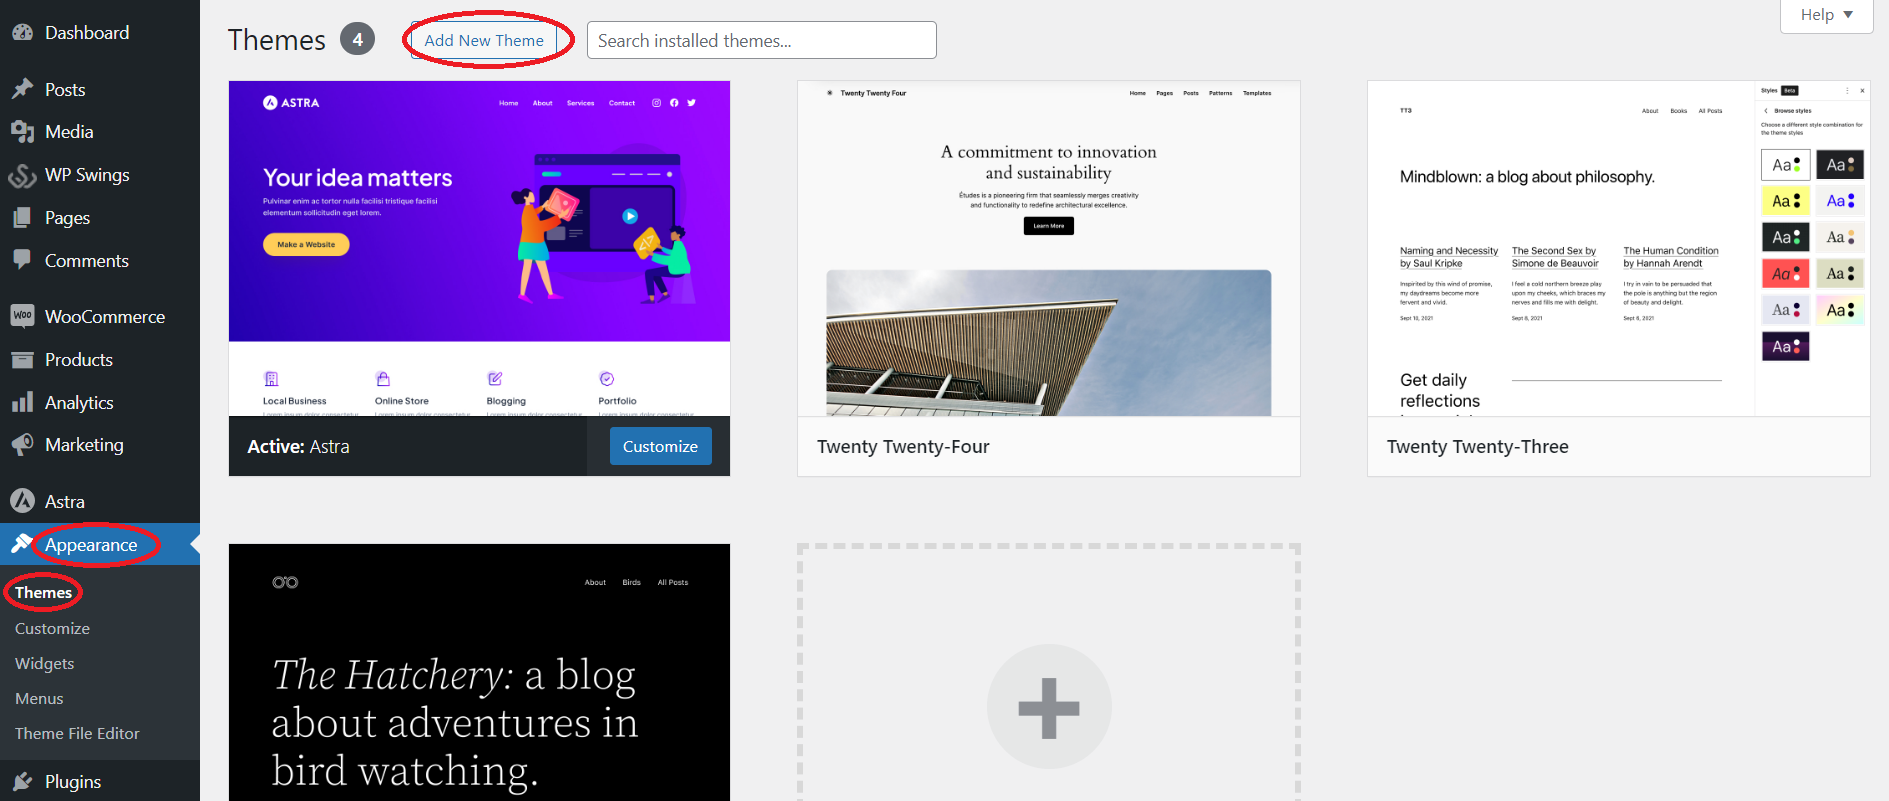
Step 2: Explore WooCommerce-Compatible Themes
For a seamless integration with WooCommerce, look for themes explicitly labeled as “WooCommerce-compatible” or those designed specifically for e-commerce. Click on the “Add New” button to explore available themes.
Step 3: Filter and Search
Use filters and the search bar to find themes that match your online store’s aesthetic and functional requirements.
- E-commerce Features: Look for themes that highlight e-commerce features such as product galleries, shopping carts, and easy navigation.
- Mobile Responsiveness: Ensure the theme is mobile-responsive for a seamless experience on various devices.
- Customization Options: Check for themes that offer a good balance between customization options and ease of use.
Step 4: Install and Activate Your Chosen Theme
Once you’ve found a WooCommerce-compatible theme, click on the “Install” button, and after installation, click on the “Activate” button to make it the active theme for your site.
Step 5: Customizing Your WooCommerce Theme
- Navigate to “Appearance” > “Customize.”
Step 6: General Theme Settings
Explore the general theme settings, which may include options for:
- Site Identity: Set your site title and tagline.
- Colors: Customize the primary and secondary colors of your theme.
- Typography: Adjust the font styles for different elements on your site.
Step 7: Homepage and Product Page Customization
- Homepage Settings:
- Set up your homepage layout, choosing between a static page or a dynamic blog-style layout.
- Product Page Settings:
- Customize how product pages are displayed, including the layout, number of products per page, and the display of product images.
Step 8: Header and Footer Customization
- Header Settings:
- Customize the appearance of the header, including the logo, navigation menu, and header layout.
- Footer Settings:
- Modify the footer area, which may include copyright information, widgets, and other elements.
Step 9: Shop and Category Pages
- Shop Page Settings:
- Customize the shop page layout, including the display of featured products and sorting options.
- Category Pages:
- Customize how product categories are displayed, including the layout, sorting options, and the number of products per page.
Step 10: Widget Areas
Explore and customize widget areas such as the sidebar or footer. Many themes have specific widget areas designed for e-commerce elements like product filters, recent products, or promotional banners.
Step 11: Additional Customization Options
Explore additional customization options that may vary depending on the theme you’ve chosen:
- Theme-Specific Options: Some themes come with additional customization panels for unique features.
- Background Image: Set a background image for your site.
- Featured Images: Configure how featured images are displayed in different parts of your site.
Step 12: Preview and Publish
Before finalizing your customization, use the “Preview” button to see how your changes will look on your site. Once satisfied, click “Publish” to make your customizations live.
Step 13: Consider Premium Themes
If you’re looking for advanced features and a more unique design, consider investing in a premium WooCommerce theme. Premium themes often come with dedicated support and additional customization options.
Step 14: Regular Updates
Keep your theme updated to benefit from the latest features, security patches, and improvements.
By following these steps, you’ll successfully choose and customize a WooCommerce theme for your online store, creating a visually appealing and cohesive brand identity.
Installing WooCommerce Extensions and Add-ons for Your WordPress Online Store
Step 1: Navigate to WooCommerce Settings
In the dashboard, go to “WooCommerce” and click on “Extensions.”
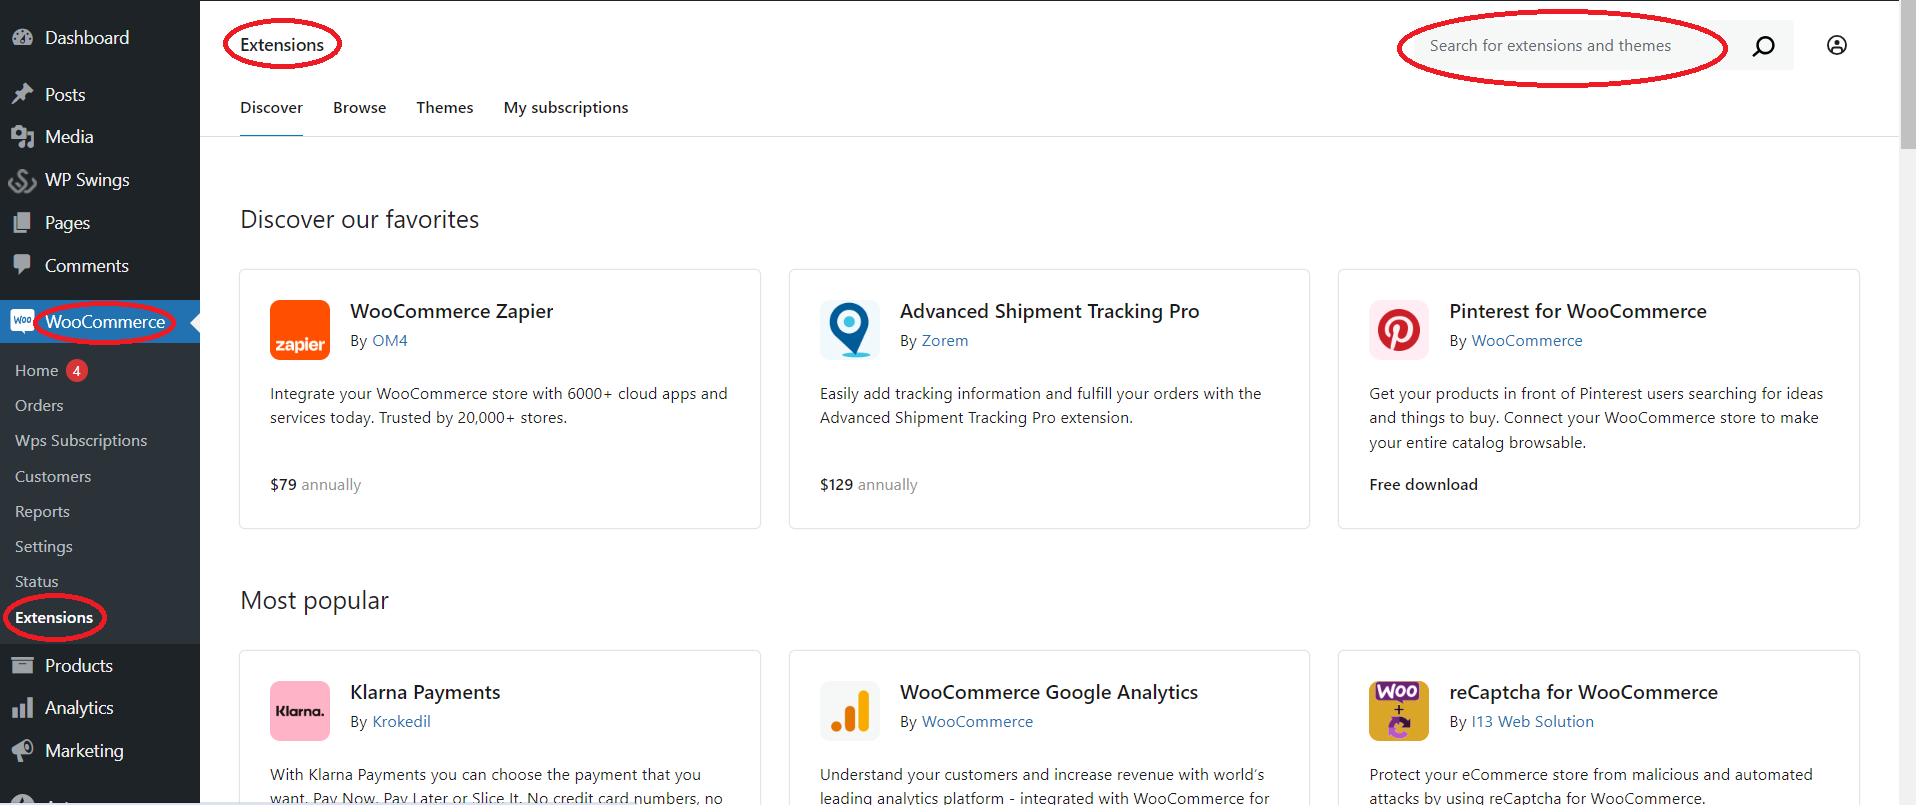
Step 2: Choose the “Extensions” Tab
Within the WooCommerce, select the “Extensions” tab. This is where you’ll find a list of available extensions.
Step 3: Explore WooCommerce Extension Marketplace
WooCommerce has an official extension marketplace where you can find a wide range of extensions and add-ons. Click on the “Visit the Marketplace” button or visit the WooCommerce Extensions page to browse available options.
Step 4: Choose and Purchase an Extension
Browse through the available extensions and choose the one that fits your specific needs. Some extensions are free, while others may require a purchase. Click on the extension you want and follow the steps to purchase and download it.
Step 5: Download the Extension ZIP File
After purchasing the extension, download the ZIP file containing the extension files to your computer.
Step 6: Upload the Extension to Your WordPress Site
- In your WordPress dashboard, go to “WooCommerce” > “Extensions.”
- Click on the “Upload Extension” button.
- Choose the ZIP file you downloaded and click “Install Now.”
Step 7: Activate the Extension
- Once the extension is installed, click the “Activate Now” button to make it active on your site.
Step 8: Configure Extension Settings
After activation, some extensions may add new settings panels to your WordPress dashboard. Navigate to the plugin’s settings to configure it according to your preferences.
Step 9: Test the Extension
Before making your store live, perform tests to ensure that the extension works as expected. This may involve making sample transactions, checking settings, and verifying that the new features are functioning correctly.
Step 10: Explore Additional Extensions
Repeat the process for any additional extensions or add-ons you want to install on your WooCommerce site. Remember to choose extensions that align with your business goals and customer needs.
Step 11: Update Regularly
Keep your WooCommerce plugin and extensions updated. Developers often release updates to improve functionality, address security issues, and ensure compatibility with the latest version of WooCommerce.
Step 12: Troubleshooting
If you encounter any issues during installation or usage, consult the documentation provided by the extension developer. Many developers offer dedicated support or community forums where you can seek assistance.
Step 13: Consider Subscriptions or Membership Plans
Some WooCommerce extensions, especially those providing ongoing services, may offer subscription or membership plans. Consider subscribing to receive updates, support, and access to new features.
By following these steps, you’ll successfully install and configure WooCommerce extensions and add-ons for your WordPress online store, enhancing its functionality and providing a better experience for both you and your customers.
How to Grow Your WooCommerce Store
1. Optimize Your Product Pages for Conversions:
- High-Quality Images: Use clear and high-quality images that showcase your products from multiple angles.
- Compelling Product Descriptions: Write detailed and persuasive product descriptions that highlight features and benefits.
- Clear Calls-to-Action (CTAs): Place prominent and persuasive CTAs to encourage visitors to make a purchase.
2. Implement Effective SEO Strategies:
- Keyword Research: Identify relevant keywords for your products and optimize your product pages accordingly.
- Meta Titles and Descriptions: Craft compelling meta titles and descriptions to improve click-through rates from search engine results.
- User-Friendly URLs: Ensure that your product URLs are clean and descriptive.
3. Utilize Social Media Marketing:
- Share Product Highlights: Regularly share your products on social media platforms with engaging visuals and captions.
- Run Contests and Giveaways: Encourage user engagement by running contests or giveaways on social media to increase brand visibility.
- Leverage Social Commerce: Utilize features on social platforms that enable direct shopping from posts.
4. Email Marketing:
- Build an Email List: Encourage visitors to subscribe to your newsletter for updates, promotions, and exclusive offers.
- Segmentation: Segment your email list based on customer behavior and preferences to send targeted and relevant content.
- Automated Campaigns: Implement automated email campaigns for abandoned carts, product recommendations, and follow-ups.
5. Content Marketing:
- Blog Posts: Create informative blog posts related to your products, industry trends, and customer interests.
- Video Content: Utilize video content to showcase products, provide tutorials, and engage your audience.
- Guest Blogging: Collaborate with influencers or industry experts for guest blog posts to tap into their audience.
6. Loyalty Programs and Discounts:
- Reward Repeat Customers: Implement a loyalty program that rewards customers for repeat purchases.
- Limited-Time Discounts: Create a sense of urgency by offering limited-time discounts or promotions.
- Referral Programs: Encourage customers to refer friends and family by offering incentives.
7. Optimize the Checkout Process:
- Streamlined Checkout: Simplify the checkout process to minimize cart abandonment.
- Multiple Payment Options: Offer a variety of payment options to cater to diverse customer preferences.
- Guest Checkout: Allow customers to check out as guests for a quicker experience.
8. Responsive Customer Support:
- Live Chat: Implement live chat to provide real-time assistance to potential buyers.
- FAQs and Knowledge Base: Create a comprehensive FAQs section and knowledge base to address common queries.
- Prompt Responses: Respond promptly to customer inquiries and provide excellent post-purchase support.
9. Run Paid Advertising Campaigns:
- Google Ads: Utilize Google Ads to target potential customers actively searching for products.
- Social Media Ads: Run targeted ads on platforms like Facebook and Instagram based on demographics and interests.
- Retargeting Campaigns: Implement retargeting ads to re-engage visitors who have previously interacted with your site.
10. Monitor Analytics and Iterate:
- Use Analytics Tools: Utilize tools like Google Analytics to track website traffic, user behavior, and sales.
- A/B Testing: Conduct A/B testing on product pages, CTAs, and marketing campaigns to identify what works best.
- Iterative Improvement: Continuously analyze data and make iterative improvements to your website, marketing strategies, and customer experience.
11. Expand Product Range and Diversify:
- Research Market Trends: Stay informed about industry trends and expand your product range accordingly.
- Diversify Categories: Introduce new product categories to cater to a broader audience.
- Limited Edition Releases: Create a sense of exclusivity by offering limited-edition or seasonal products.
12. Collaborate with Influencers and Affiliates:
- Influencer Marketing: Partner with influencers in your niche to promote your products to their followers.
- Affiliate Programs: Implement an affiliate marketing program where affiliates earn a commission for driving sales.
13. Mobile Optimization:
- Mobile-Friendly Design: Ensure your website is optimized for mobile devices to accommodate the growing number of mobile shoppers.
- Mobile App: Consider developing a mobile app for your store to enhance the mobile shopping experience.
14. Community Building:
- Social Groups and Forums: Create or participate in social groups and forums related to your niche.
- User-Generated Content: Encourage customers to share their experiences with your products through reviews, testimonials, and social media.
15. Monitor Competitors:
- Competitor Analysis: Keep an eye on your competitors to identify new strategies, products, and market trends.
- Differentiation: Differentiate your store by offering unique products, better customer service, or innovative features.
Remember that the growth of your WooCommerce store is a dynamic process that requires continuous effort, adaptation, and a customer-centric approach. Regularly evaluate your strategies, listen to customer feedback, and stay ahead of industry trends to ensure sustained growth.