
Step-by-Step Guide to Add Payment Gateway in WooCommerce
Payment Gateway in WooCommerce is key to making your online store run smoothly. In this guide, we’ll dive into everything you need to know about setting up and optimizing payment gateways in WooCommerce.
Whether you’re just starting or looking to improve your current setup, we have the insights you need.
We’ll walk you through the whole process, you’ll learn how to install and configure popular gateways like WooCommerce payments. Plus, we’ll share tips on reducing transaction fees and ensuring secure transactions.
But there’s more. We’ll show you how to tailor payment methods for different products and countries, imagine offering local payment options to customers in Germany while showing different methods to those in France. Pretty cool, right?
By the end of this article, you’ll be equipped with all the knowledge and tools to make your WooCommerce store’s payment process seamless and efficient, so let’s dive in and boost your e-commerce success!
Why Payment Gateways Matter in E-commerce?
Simply put, they’re the bridge between your customers’ money and your business, a solid payment gateway makes the whole checkout process smooth and secure, which is crucial for keeping customers happy and coming back.
Imagine this:
a customer finds exactly what they want on your site, adds it to their cart, and heads to checkout, but then, they run into problems with payment options or security concerns! Frustrating, right? A good payment gateway prevents that scenario, ensuring transactions are quick, easy, and safe.
Plus:
offering multiple payment methods is very important, why?
Some folks prefer using credit cards, while others might lean towards PayPal or even local payment methods, giving them options means fewer abandoned carts and more completed purchases.
Security is another huge factor🛡️
Payment gateways help protect sensitive information, like credit card details, from fraud and breaches, when customers know their data is safe, they trust your store more and are more likely to shop with you again.
In short:
a reliable payment gateway keeps the checkout process smooth, offers payment flexibility, and boosts security.
All these factors combined significantly enhance your customers’ shopping experience and your store’s success. So, getting your payment gateway setup right is definitely worth the effort!
Setting Up a Payment Gateway in WooCommerce
-
Prerequisites for Adding a Payment Gateway
Before diving into setting up a payment gateway in WooCommerce, there are a few things you need to have in place, these prerequisites will ensure that everything goes smoothly and you don’t run into any unexpected issues.
First off:
make sure your WooCommerce store is fully set up and functional. This means having your products listed, your theme customized, and all the basic settings configured. If your store isn’t ready, adding a payment gateway won’t be much use.
Next:
you’ll need an SSL certificate for your website. This is crucial for securing transactions and protecting your customers’ sensitive information. Most hosting providers offer SSL certificates, and some even include them for free, if you don’t have one yet, get it sorted before moving forward.
Another important step:
Is to set up your business bank account. This is where your payments will be deposited, make sure it’s ready to handle online transactions and linked to your payment gateway of choice.
You should also:
Decide which payment gateways you want to offer, popular options include PayPal, Stripe, and Authorize.Net. Research their features, fees, and compatibility with your target market to make an informed decision.
Finally:
Ensure you have administrative access to your WooCommerce site, You’ll need this to install and configure the payment gateway plugins, If you’re not the admin, coordinate with the person who is to get the necessary permissions.
Once you have these prerequisites sorted, you’re ready to start adding payment gateways to your WooCommerce store. Let’s get to it!
-
Accessing Payment Gateway Settings in WooCommerce
Alright, now that you’ve got the prerequisites sorted, it’s time to dive into the WooCommerce settings and get those payment gateways up and running.
First, log in to your WordPress dashboard, this is your main control center where all the magic happens.
Once you’re in, look to the left-hand menu and find WooCommerce. Hover over it, and a drop-down menu will appear, Click on Settings, this will take you to the main settings page for WooCommerce.
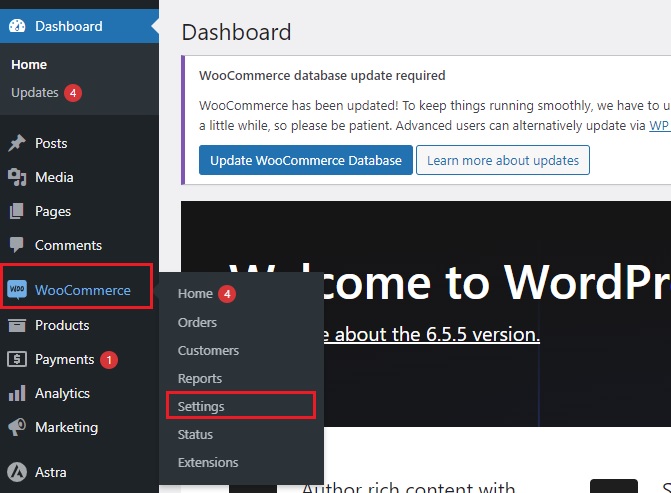
Now, you’re looking for the Payments tab at the top of the page, Click on it, and you’ll be taken to the payment settings area, this is where you’ll manage all your payment gateways.
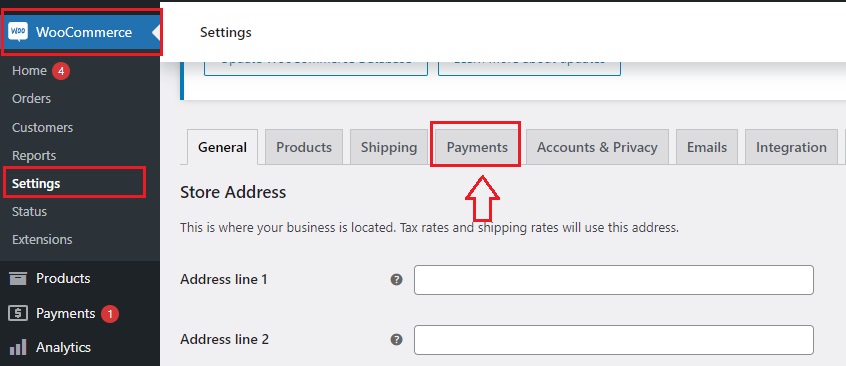
In the Payments section, you’ll see a list of all available payment methods, some of the popular ones like PayPal and Stripe might already be listed, if your preferred gateway isn’t there yet, don’t worry; you can add it manually by installing the relevant plugin.
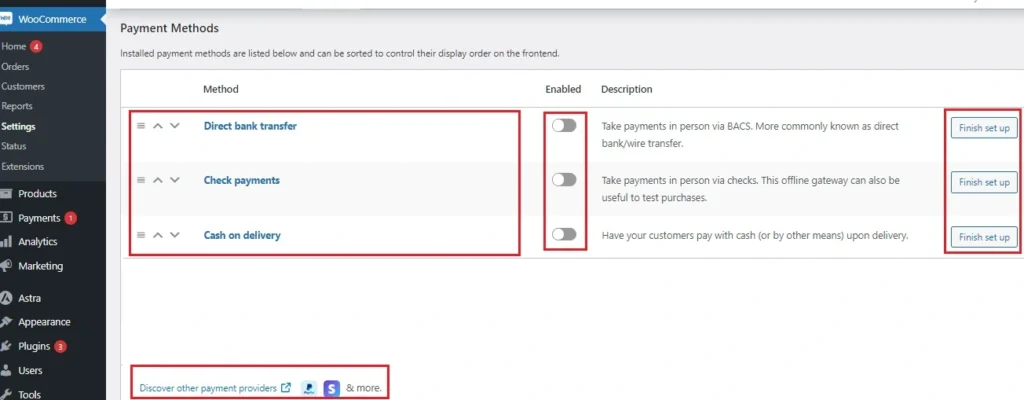
To configure a payment method:
✅ Direct bank transfer
✅ Check payments
✅ Cash on delivery
Simply click on the Set up button next to the payment gateway you want to use, this will open the settings page for that specific gateway.
Here, you’ll enter all the necessary details, such as your account information, Instructions, and any other required settings, make sure to fill out everything accurately to ensure smooth transactions.
Don’t forget to enable the payment gateway by toggling the switch next to its name. Once you’re done, click Save Changes at the bottom of the page to lock in your settings.
And that’s it! You’ve successfully accessed and configured your payment gateway settings in WooCommerce.
Next up, we’ll dive into installing and setting up specific payment gateways like PayPal and Stripe.
Popular Payment Gateways for WooCommerce
Let’s take a look at some of the most popular options you might consider for your store.
1. PayPal
With PayPal, you can accept payments from credit cards, debit cards, and PayPal accounts. Plus, it offers robust security features to protect both you and your customers.
2. Stripe
Stripe is another top contender, especially if you want a flexible and developer-friendly payment solution, it supports a wide range of payment methods, including credit and debit cards, and even newer options like Apple Pay and Google Pay.
Stripe is known for its seamless integration and detailed reporting, making it a favorite among tech-savvy store owners.
3. Square
Square is perfect for those who have both online and offline sales channels, it allows you to accept payments in-store and online with ease.
Square’s integration with WooCommerce is straightforward, and it offers competitive transaction fees. Plus, you get access to powerful sales analytics to help you understand your business better.
4. Authorize.Net
It’s been around for a long time and offers extensive features for fraud prevention, recurring billing, and more, Authorize.Net supports a wide range of payment methods and is known for its excellent customer support.
5. Amazon Pay
Amazon Pay leverages the trust and convenience of Amazon, allowing customers to use their Amazon account to make purchases on your WooCommerce store, this can help boost conversion rates, as many customers appreciate the speed and security of using a familiar payment method.
6. WooPayments
Last but not least, WooCommerce Payments is a native solution built specifically for WooCommerce.
it’s designed to offer a seamless experience, with features like integrated payments, simple setup, and in-dashboard management.
Also, it supports multiple currencies, which is great for international stores.
These are just a few of the popular payment gateways you can integrate with WooCommerce, each has its own strengths, so consider your store’s specific needs and customer preferences when making your choice.
You may be interested in:
How to Choose The Right Payment Gateway for Your WooCommerce Business
Up next, we’ll dive into the step-by-step process of adding and configuring WooCommerce Payment Gateway.
Add a WooCommerce Payment Gateway
-
Installing WooCommerce Payments plugin
Alright, let’s get down to business and install a payment gateway plugin for your WooCommerce store, this process is super straightforward, so don’t worry if you’re not a tech wizard.
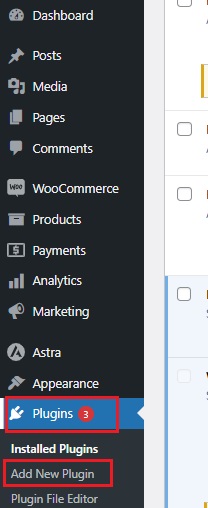
First things first, log in to your WordPress dashboard, this is where you’ll manage all the behind-the-scenes action for your store.
Once you’re in, look to the left-hand menu and find Plugins. Hover over it and click on Add New, this will take you to the plugin installation page where all the magic happens.
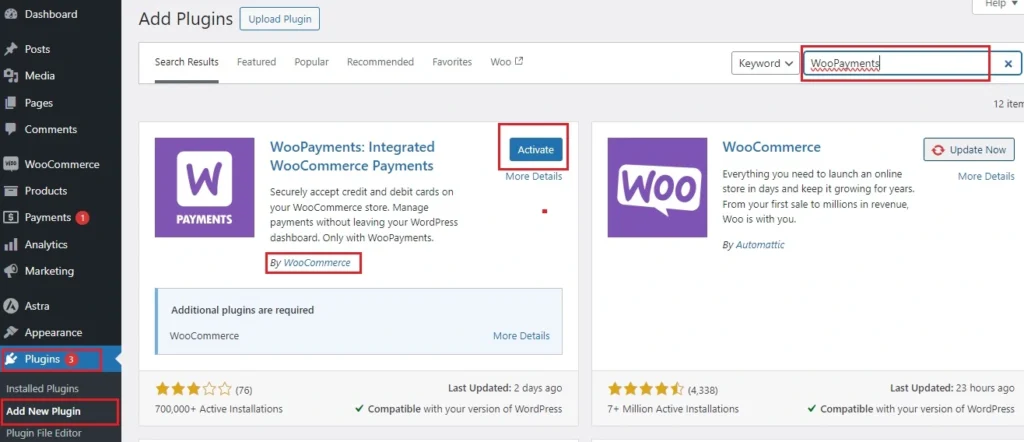
In the search bar on the right, type in the name of the payment gateway you want to install. For example, if you’re looking to add WooPayments, just type “WooPayments” and hit enter, you’ll see a list of related plugins pop up.
Find the official plugin for WooPayments, make sure it’s from a trusted developer, and check the ratings and reviews if you’re unsure. Once you’ve found the right one, click the Install Now button.
After a few moments, the button will change to Activate, click on it to activate the plugin. This step is crucial because it makes the plugin ready for use on your site.
The next step is to configure the settings and get it up and running. For now, give yourself a pat on the back – you’re doing great!
-
Configuring WooCommerce Payments Settings
Now that you’ve installed the WooPayments plugin, it’s time to get it configured and ready for action, this part is where we make sure everything works smoothly for your customers.
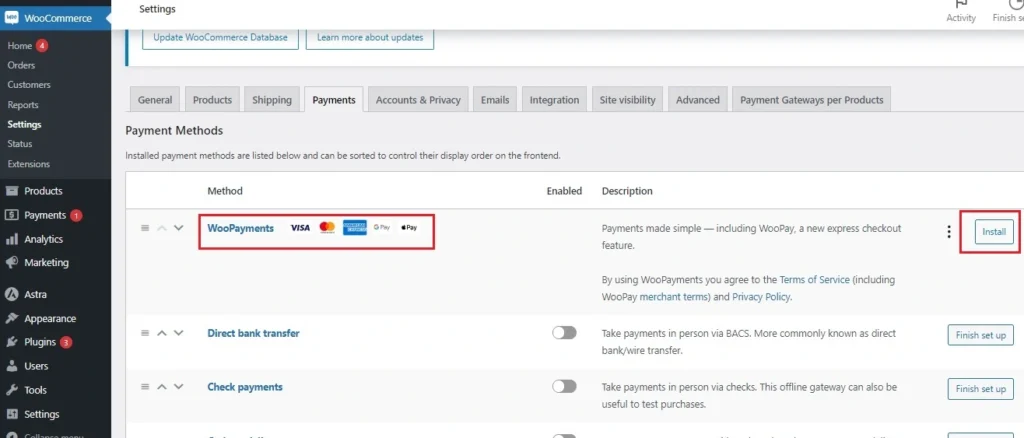
- First, head back to your WordPress dashboard. In the left-hand menu, find WooCommerce and hover over it, Click on Settings to open up the main settings page.
- Once you’re in the settings area, click on the Payments tab at the top, you’ll see a list of all the available payment methods, including WooPayments, click on the Finish set up button next to it.
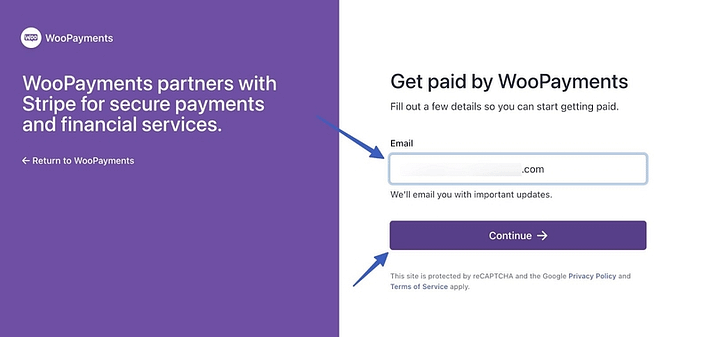
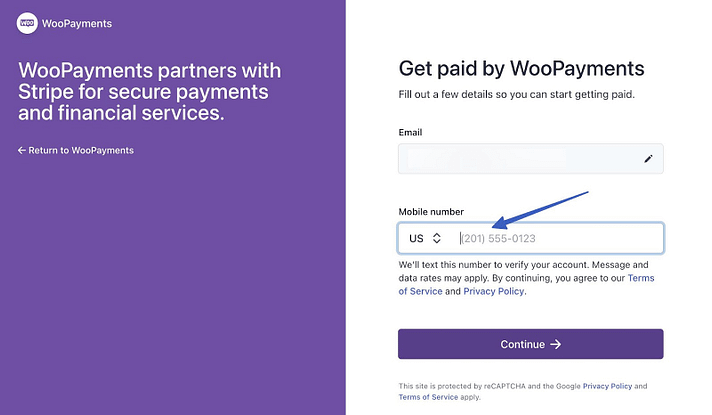
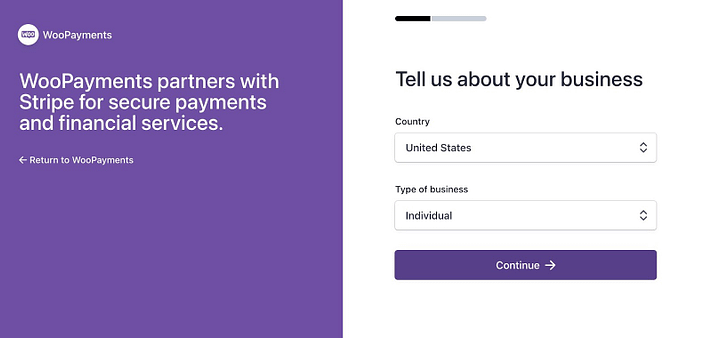
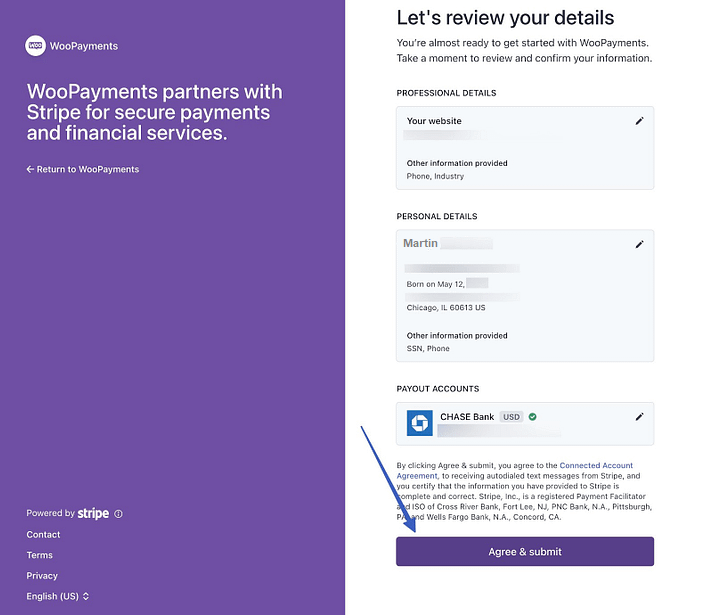
- This will take you to the login to your WooPayments dashboard, if you don’t account, you have to create one, it’s simple, you will enter some basic information and some information about your business, and make sure you fill in all the details correctly.
👉 Here’s what you’ll need to provide:
- Your country and business type
- Legal name
- Email address
- Birth date
- Home address
- Phone number
- Last 4 digits of social security number (or full social security if further verification is needed)
- Industry
- Website
-
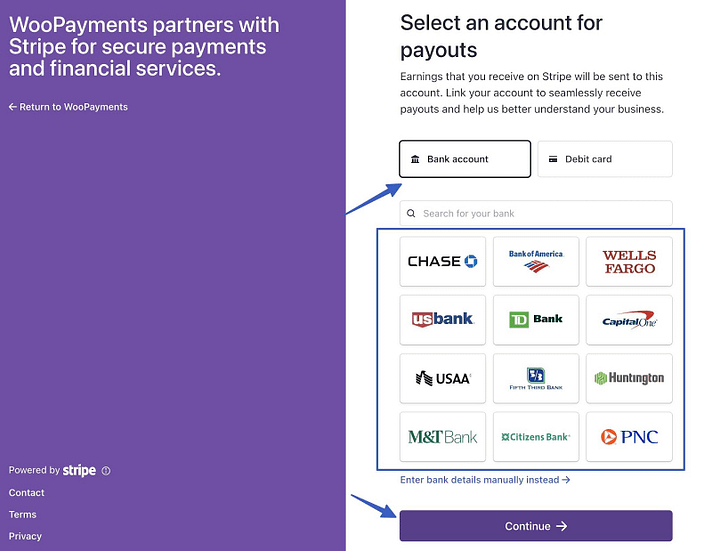
Connect a Bank Account for Payouts
An essential part of setting up WooCommerce Payments is linking a bank account or debit card to the plugin. This ensures you receive direct payments whenever a customer makes a purchase on your ecommerce store.
👉 You have two options:
✔ Bank account
✔ Debit card

Return to the main Payments page on WordPress. Here, you’ll find a welcome page displaying a summary of your payments, including available and pending funds. You’ll also see details on enabled features like Payments and Automatic Deposits.

-
Configure Payment Methods in WooCommerce Payments 💳
Next, decide which payment methods you want to accept in your ecommerce store. For example, you might enable credit card processing, as well as options like Apple Pay or regional solutions like EPS (popular in Austria).
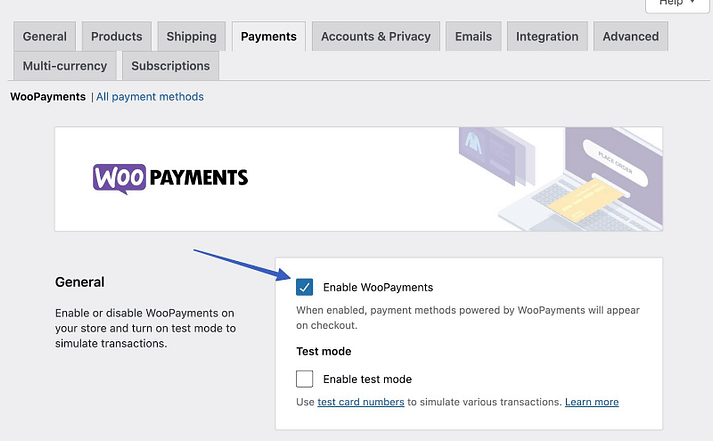
Navigate to WooCommerce → Settings → Payments. This will take you to the Payments tab within the WooCommerce module.
You’ll see a checkbox to Enable WooPayments. If you completed the previous setup wizard, it should already be checked. If not, go ahead and check it now.
Scroll to the section labeled Payments Accepted on Checkout. Select the payment methods you want to use and display them in your checkout area.
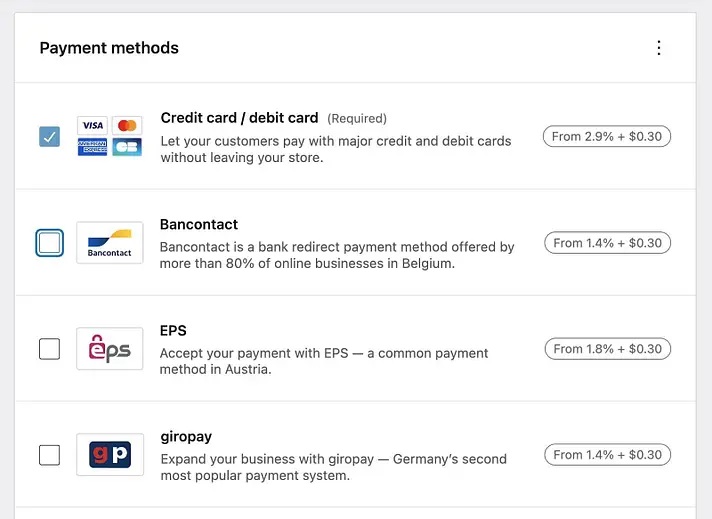
There are numerous country-specific payment gateways available. For those managing a global business, it’s possible to enable multiple gateways.
Take a moment to check the fees associated with each payment method on this page to make sure you’re getting the most cost-effective option.
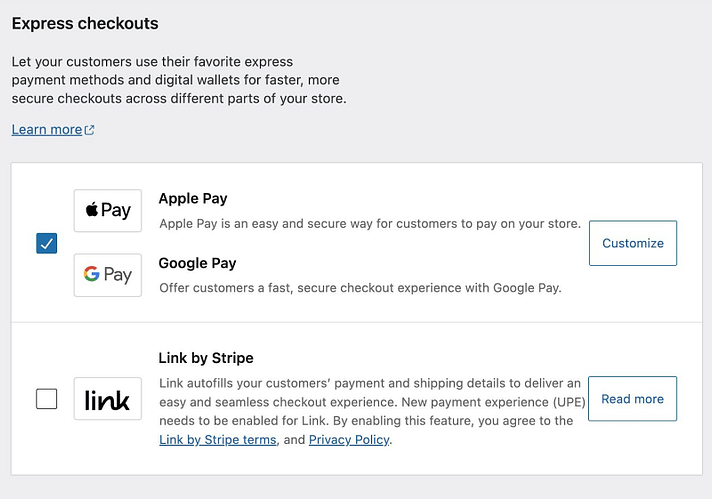
Now, scroll down to find the Express Checkouts section. These methods provide a fast and secure checkout experience by automatically populating customer details. They will only be visible in your store if the customer has enabled the service on their device.
👉 Choices include:
Apple Pay
Google Pay
Link by Stripe
And there you go!🕺 Your Payment Methods in WooCommerce is now configured and ready to accept payments.
Testing the Payment Gateway
Alright, you’ve got your payment gateway installed and configured. Now it’s time to test it out and make sure everything works smoothly.
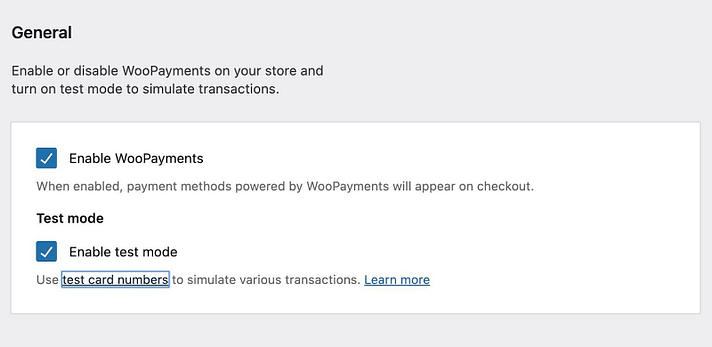
First:
switch your payment gateway to test mode. This lets you run transactions without using real money, you’ll find this option in the settings of your specific payment gateway, like WooPayments.
Here you go:
Payments → Settings on WordPress, under General, check off Enable Test Mode. Click Save Changes.
Next:
✔ Go to your store and add a product to your cart. Proceed to checkout and select the payment method you want to test. Fill in the required details using the test credentials provided by your payment gateway. These are usually found in the documentation or settings page.
✔ Complete the checkout process as if you were a real customer! After you finish, head back to your WordPress dashboard and check the order details, you should see the test transaction listed there, this confirms that the payment gateway is working correctly.
✔ If the test transaction goes through without any issues, you’re almost set, switch the payment gateway back to live mode to start accepting real payments, make sure all the live credentials are correctly entered, and double-check all settings.
✔ It’s also a good idea to place a real order with a low-cost item to ensure everything functions perfectly in a live environment. Once confirmed, you’re ready to roll!
Remember:
Take your time to ensure everything’s spot on.
So far, we’ve covered the basics of setting up and configuring payment gateways in WooCommerce. But what if you could take it a step further and increase the effectiveness of your payment methods? 💥
Imagine offering tailored payment options that not only enhance your customer’s experience but also boost your sales and reduce fees! Intrigued? This is what we will review now!👇
Smart Payment Solutions by Product & Country
One size doesn’t fit all! Yes, especially when it comes to payment options. Tailoring payment methods for different products and countries is a smart move that can really enhance your customers’ experience.
1. Let’s start with products.
Some items have thin profit margins, so using a payment gateway with high fees, like PayPal, might eat into your earnings. For these low-margin products, it’s better to enable credit card payments, which usually have lower transaction fees.
On the flip side, for high-ticket items, you might want to offer wire transfers or checks to avoid hefty percentage-based fees.
2. Now, think about country-specific options.
Customers love seeing familiar payment methods at checkout, if someone in Germany is shopping on your site, offering them local payment options like EPS or SOFORT increases their comfort level and likelihood of completing the purchase. Meanwhile, shoppers in the US might prefer credit cards or Apple Pay.
To set this up, you’ll need a plugin like “Payment Methods by Product & Country for WooCommerce“
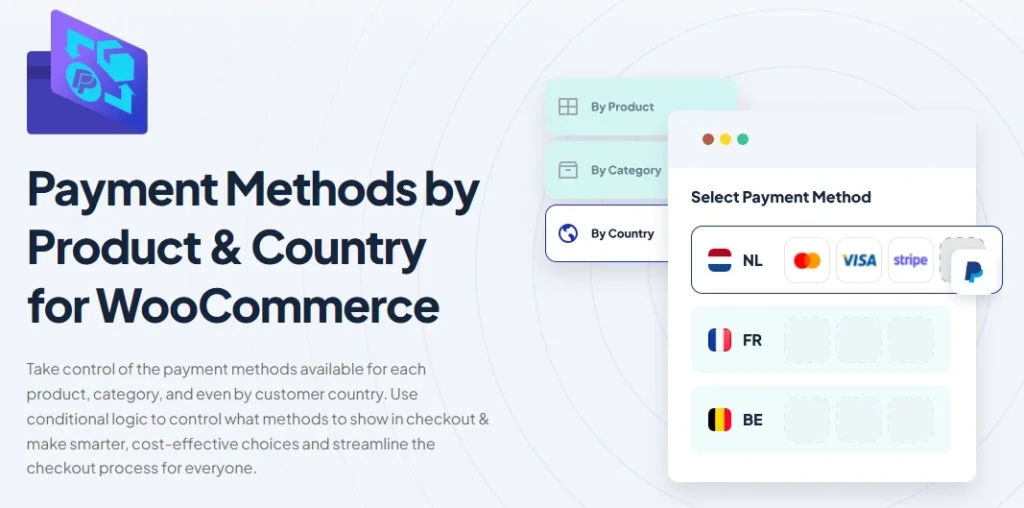
it lets you show or hide payment methods based on the product, product category, or the customer’s location, this flexibility ensures that each customer sees the payment options that make the most sense for them.
For instance:
If you’re selling a $1,000 gadget, you might disable PayPal to save on fees and instead offer a wire transfer or check.
Or, if you’re selling a popular product in France, make sure to offer local payment methods that French customers trust and use regularly.
Customizing payment options this way not only makes your checkout process more efficient but also helps build trust with your customers by offering them familiar and convenient payment choices, it’s a win-win for both your business and your shoppers.
So, take a moment to review your payment settings and adjust them to better suit different products and regions, your customers will appreciate the personalized touch, and you’ll see the benefits in your bottom line.
You may be interested in:
Top 5 multi-currency Control for WooCommerce Plugins
Conclusion
You’ve made it to the end of our guide on setting up and optimizing payment gateways in WooCommerce. Congrats!
By now, you should have a solid understanding of how to get started with payment gateways, configure them, and even tailor them for different products and regions.
Remember:
The right payment gateway setup is crucial for providing a seamless checkout experience for your customers, it’s all about making the process as smooth and secure as possible, which in turn helps build trust and encourages repeat business.
We’ve also explored how customizing payment methods can make a big difference, by offering the right payment options to the right customers, you’re not just improving their experience—you’re also optimizing your operations and potentially increasing your sales.
Don’t forget to keep testing and tweaking your setup, E-commerce is always evolving, and staying on top of your payment gateway performance ensures you’re providing the best experience for your customers.
Thanks for sticking with us through this guide. Now, go ahead and put these tips into action. Happy selling 💵 and here’s to a more efficient and profitable WooCommerce store!
