Managing orders efficiently in WooCommerce involves more than just tracking their progress. The ideal system provides options to take specific actions directly from the order list or preview page. This guide explores the settings for configuring order status options, allowing you to empower your workflow with tailored action buttons.
Accessing Order Status Settings
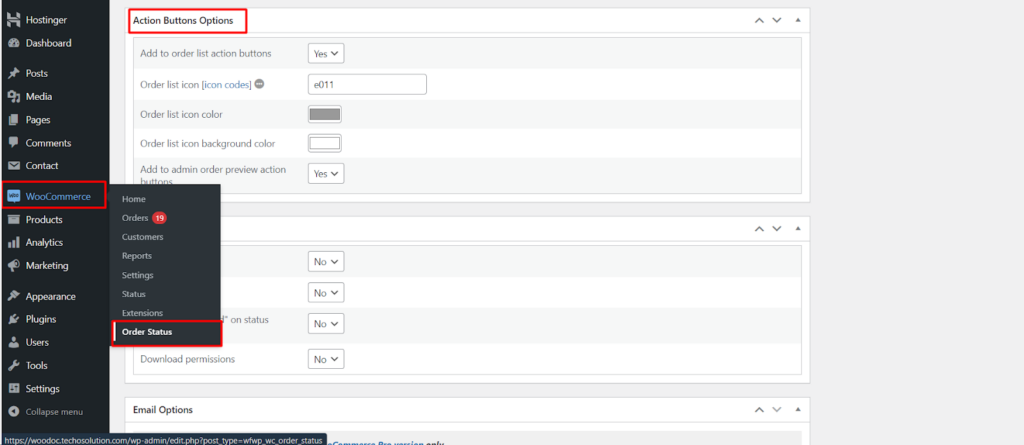
To customize these options, navigate to the Order Status settings in WooCommerce.
- Locate WooCommerce: Within your WordPress dashboard, find the WooCommerce menu and click on it.
- Access Order Statuses: Click on Settings and then look for a tab labeled Order Status (or similar wording depending on your WooCommerce version). This section manages all your order statuses, both default and custom.
Configuring Order Status Options
The Order Status settings typically display a list of all your statuses. Each status usually has associated configuration options, often presented in a table format.
Here’s what you might find
- Status Name: Displays the name of the order status.
- Slug: This is the unique identifier used internally by WooCommerce.
Action Button Settings (Plugin Dependent)
Some WooCommerce plugins offer additional configuration options related to action buttons.
- Add to order list action buttons: This setting allows you to choose whether to display custom action buttons next to the order status within the order list. These buttons can be used to trigger specific actions, such as “Mark as Shipped” or “Send Invoice.” The availability of this option and the specific actions offered might vary depending on your plugin.
- Order list icon [icon codes]: If your plugin supports order list icons, you can define the icon code to visually represent your custom status within the order list. This adds another layer of visual distinction for easier identification.
- Order list icon color: (if applicable) Choose a specific color for the order list icon, further enhancing the visual distinctiveness of your custom status.
- Order list icon background color: (if applicable) Define the background color for the order list icon, providing a clear visual cue for the status.
Additional Considerations
- Add to admin order preview action buttons: This option, offered by some plugins, allows you to configure custom action buttons that appear on the individual order preview page within your admin dashboard. These buttons can be used to perform specific actions directly on the order, potentially streamlining your workflow.
Benefits of Configured Order Status Options
By configuring these options, you can achieve several benefits.
- Enhanced Workflow Efficiency: Action buttons placed strategically allow for quick actions directly from the order list, reducing the need to navigate to separate pages.
- Improved Order Management: Visually distinct order statuses with icons and action buttons provide a clear overview of order stages and enable efficient processing.
- Reduced Errors: Streamlined workflows with readily accessible actions can minimize the risk of errors by guiding users through the correct steps.
Choosing Your Plugin
The specific options available for order status customization will depend on the particular WooCommerce plugin you’re using. Consider exploring different plugin options to find one that aligns with your specific needs and provides the features you desire, such as custom action buttons and order list icons.
Conclusion
By utilizing the Order Status settings and the functionalities offered by your chosen plugin, you can create a tailored order management system in WooCommerce. Configuring action buttons, order list icons, and background colors empowers you to streamline your workflow, improve efficiency, and ultimately optimize your order processing experience.
