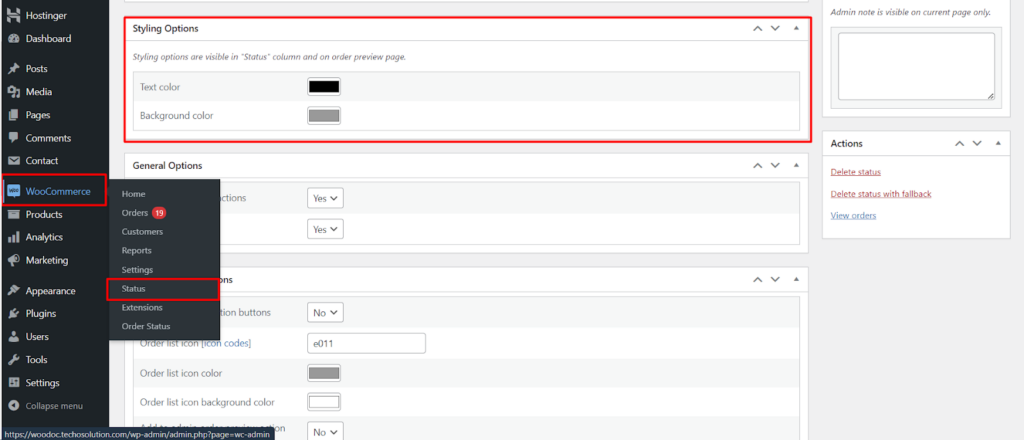
Efficient order management in WooCommerce relies not only on clear communication but also on visual cues. This is where styling options for custom order statuses come in. They allow you to visually differentiate statuses in the “Status” column and on the order preview page, enhancing clarity and streamlining your workflow.
Accessing Order Status Settings
To access the styling options for your order statuses, follow these steps.
- Navigate to WooCommerce: Within your WordPress dashboard, locate the WooCommerce menu and click on it.
- Access Order Statuses: Click on Settings and then look for a tab labeled Order Status (or similar wording depending on your WooCommerce version). This section manages all your order statuses, both default and custom.
Exploring Styling Options
The Order Status settings typically display a list of all your statuses. Look for options associated with each individual status, often presented in a table format. Here’s what you might find:
- Status Name: This displays the name of the order status.
- Slug: This is the unique identifier used internally by WooCommerce.
- Styling Options: This section, usually containing two options, allows you to define visual styles for your custom order status.
- Text Color: Choose a specific color for the text of the order status within the “Status” column and on the order preview page. This helps the status text stand out and be easily readable against the background.
- Background Color: Assign a unique background color to your custom order status. This visual differentiation makes it instantly recognizable within the order list, promoting quicker identification of order stages.
Benefits of Visually Distinct Statuses
By leveraging styling options for custom order statuses, you can achieve several benefits.
- Enhanced Workflow Overview: Visually distinct statuses provide a quick visual reference in the order list, allowing for faster scanning and identification of order stages.
- Improved Order Management: Clear visual cues help streamline order processing by readily highlighting the current status of each order.
- Prioritized Attention: Assigning specific colors to critical statuses (e.g., red for “Awaiting Payment”) can grab attention and ensure these orders receive prompt action.
Choosing Effective Colors
When selecting colors for your statuses, consider these aspects.
- Color Meaning: Utilize color psychology to your advantage. For example, red often denotes urgency, while green might signify completion.
- Clarity and Readability: Ensure the chosen text color contrasts well with the background color for optimal readability.
- Brand Consistency (Optional): If you have an established brand color palette, consider incorporating those colors into your status styles for a cohesive visual identity.
Conclusion
WooCommerce’s styling options for custom order statuses empower you to create a visually organized and efficient order management system. By assigning distinct colors, you can enhance clarity, improve workflow, and prioritize attention on critical orders, ultimately leading to a smoother and more streamlined fulfillment process.
