WooCommerce Shipping Setup Guide 2026: Zones, Methods, Rates & Free Shipping
WooCommerce Shipping can be a game-changer for your online store, transforming the way you handle deliveries and customer satisfaction!
Whether you’re just starting out or looking to refine your shipping processes, in this guide, we’ll walk you through everything you need to know to set up and optimize WooCommerce Shipping, from basic setups to advanced strategies, we’ve got you covered.
By the end, you’ll be well-equipped to handle all your shipping needs and boost your store’s efficiency and customer satisfaction.
Dive in and discover how to make shipping a seamless and efficient part of your WooCommerce store.
Why WooCommerce Shipping Matters?
What exactly is WooCommerce Shipping, and why is it so important?
At its core, WooCommerce Shipping is all about managing how products get from your store to your customers, It involves setting up shipping zones, choosing the right shipping methods, and configuring shipping classes to handle different types of products.
Getting these elements right can make a huge difference in your customers’ shopping experience.
Imagine a customer finds exactly what they need in your store, adds it to their cart, and heads to checkout, only to be hit with confusing shipping options or high costs! That’s a quick way to lose a sale.
With WooCommerce Shipping, you can offer clear, reliable, and cost-effective shipping options that keep customers coming back.
Plus, WooCommerce offers a range of built-in shipping methods like flat rate, free shipping, and local pickup.
These methods are just the starting point, you can expand your capabilities with advanced configurations and plugins to suit your store’s unique needs.
Let’s dive in and make your shipping strategy work for you!
Getting Started with WooCommerce Shipping Setup
-
Setting Up WooCommerce Shipping Zones
Alright, let’s kick things off with setting up WooCommerce Shipping Zones, this is your first step in creating a smooth shipping experience for your customers.
Knowing how to set up shipping in WooCommerce is essential for offering the right shipping options based on customer location.
Shipping zones are essentially geographic regions where you offer specific shipping options, think of it as defining where and how you’ll ship your products. Here’s how to get started:
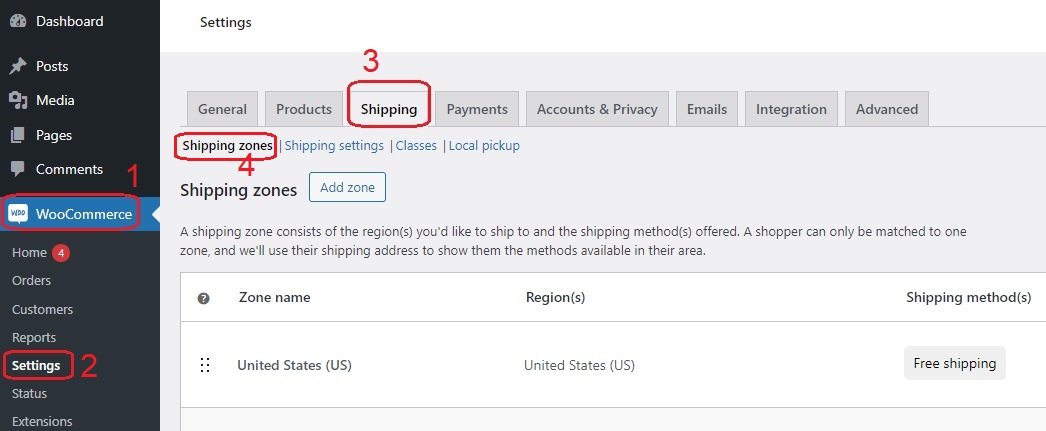
1. Navigate to Shipping Zones:
-
- In your WooCommerce dashboard, go to WooCommerce > Settings > Shipping.
- Click on the Shipping Zones tab, this is where you’ll create your zones.
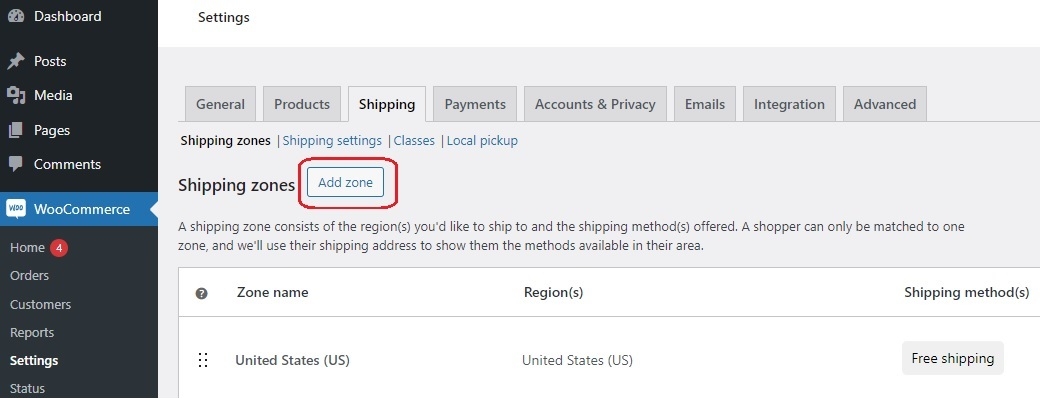
2. Add a New Shipping Zone:
-
- Click the Add Shipping Zone button.
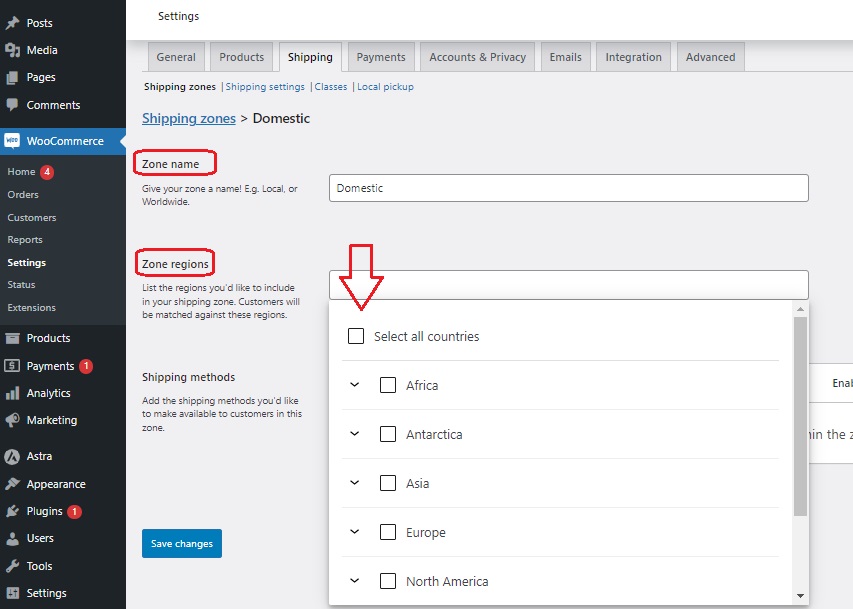
-
- Give your zone a name, like “Local,” “Domestic,” or “International.”
- Select the regions or countries that this zone will cover, you can be as broad or specific as you need.
3. Set Up Shipping Methods:
-
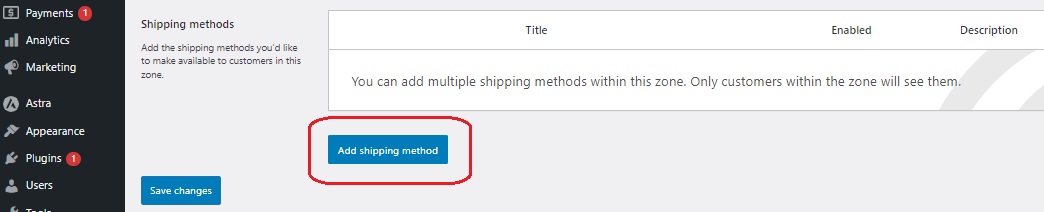
- Once you’ve defined your zone, it’s time to add shipping methods.
-
- Click the Add Shipping Method button and choose from options like Flat Rate, Free Shipping, or Local Pickup.
-
- Configure the details for each method, for instance, set a flat rate price or define the conditions for free shipping.
4. Arrange Your Zones:
-
- Order your shipping zones based on priority. WooCommerce will apply the first matching zone it finds, so make sure your most specific zones are at the top.
- For example, if you have a “Local” zone and a broader “Domestic” zone, put “Local” first.
5. Save Your Changes:
-
- Don’t forget to save your settings! Click the Save Changes button to lock in your shipping zones and methods.
Setting up shipping zones ensures that your customers see the right shipping options based on their location. It’s a simple step that makes a big difference in their shopping experience.
Next, we’ll dive into adding and configuring shipping methods within these zones. But for now, pat yourself on the back – you’re well on your way to mastering WooCommerce Shipping!😄
-
Adding Shipping Methods
You may wonder what are shipping methods?🤔
Well, adding and configuring shipping methods ensures your customers have clear, reliable options at checkout, it’s a key part of making your WooCommerce store user-friendly and efficient.
This step is all about defining how you’ll deliver products to your customers within each zone, let’s get started:
1. Access Your Shipping Zones:
(As in the pictures above)
- Head back to your WooCommerce dashboard and go to WooCommerce > Settings > Shipping.
- Click on the Shipping Zones tab to see the zones you’ve created.
2. Select a Zone:
- Choose the zone you want to add shipping methods to by clicking the Edit button next to it.
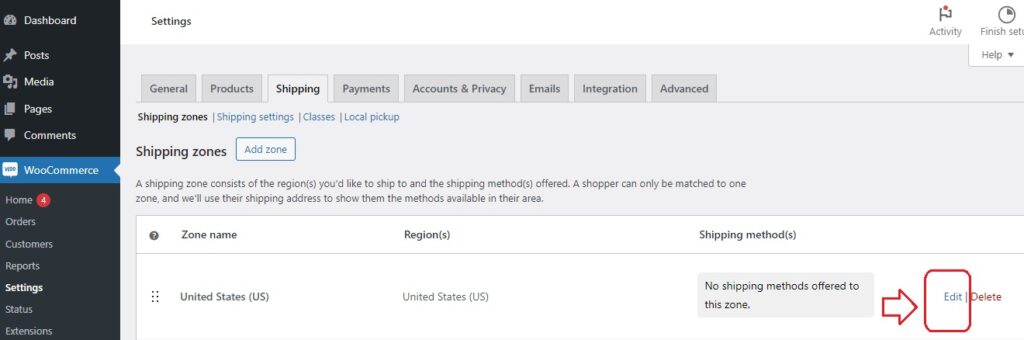
- You’ll see the option to add shipping methods for that specific zone.
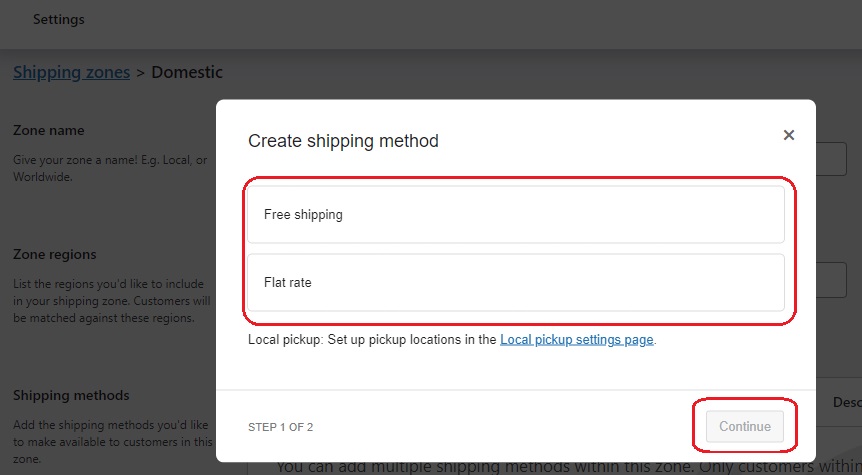
3. Add a Shipping Method:
(As in the pictures above)
- Click the Add Shipping Method button.
- A popup will appear with a few options: Flat Rate, Free Shipping, and Local Pickup, choose the one that fits your needs and click Add Shipping Method.
4. Configure Your Shipping Method:
- Once added, you’ll see the shipping method listed under your zone. Click on the Edit button to configure the details.
- For Flat Rate, you can set a standard shipping cost, if you want to offer free shipping for orders over a certain amount, configure the Free Shipping method accordingly.
- If you’re offering Local Pickup, make sure to provide clear instructions for your customers on how and where to pick up their orders.
We’ll go over this in detail – read on
5. Set Conditions (Optional):
- Some shipping methods allow you to set additional conditions, for instance, with Free Shipping, you can require a minimum order amount or a valid free shipping coupon.
- Configure these conditions to suit your store’s needs and enhance the customer experience.
6. Save Your Settings:
- Don’t forget to click the Save Changes button to ensure your shipping methods are properly configured and active.
That’s it👌 about adding and configuring shipping methods!
-
Configuring WooCommerce Shipping Classes
Great job on setting up your shipping zones and methods! 👏 Now, let’s talk about Configuring Shipping Classes.
So, what are shipping classes in WooCommerce?
Using shipping classes allows you to offer more accurate shipping rates based on product type, this helps manage costs better and provides a clearer breakdown of shipping fees for your customers.
In other words, shipping classes help you manage different types of products with varying shipping costs, here’s how to set them up:
1. Navigate to Shipping Classes:
- In your WooCommerce dashboard, go to WooCommerce > Settings > Shipping.
- Click on the Shipping Classes tab, this is where you’ll create and manage your shipping classes.
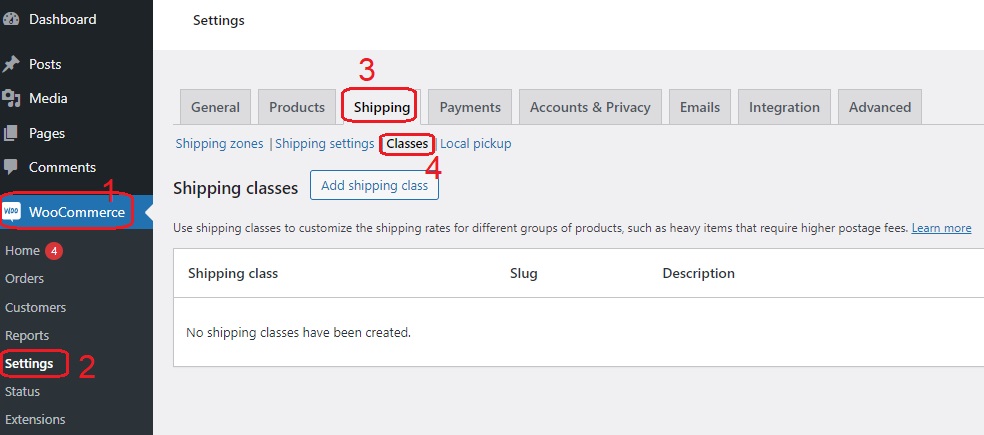
2. Add a New Shipping Class:
- Click the Add Shipping Class button.
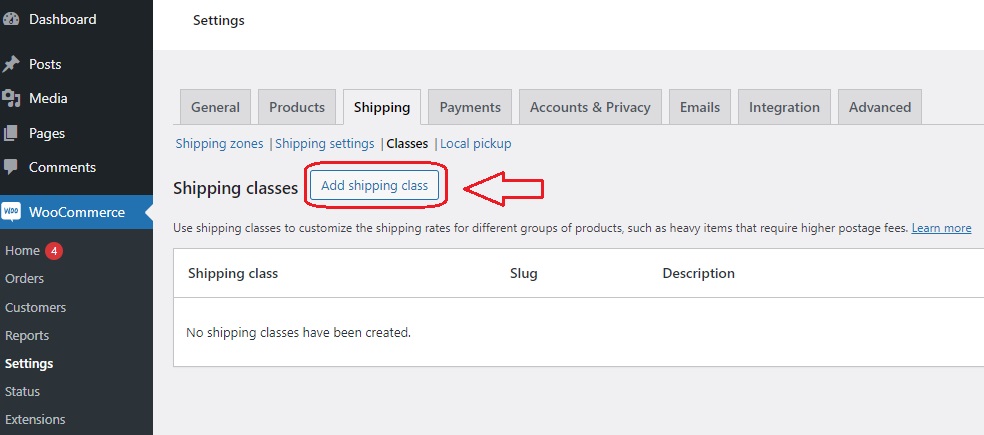
- Give your class a name, like “Heavy Items,” “Fragile Products,” or “Small Packages.”
- Add a description to help you remember the purpose of the class, this is especially useful if you have multiple shipping classes.
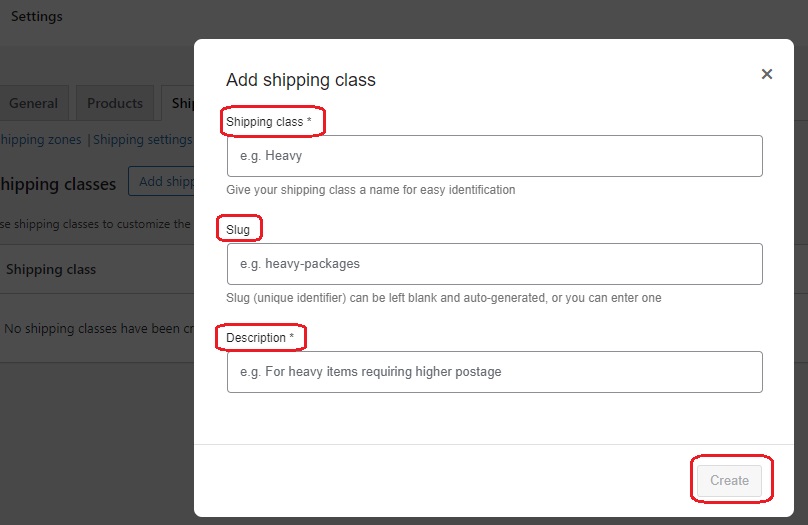
3. Save Your Shipping Class:
- After naming and describing your class, click the Save Shipping Classes button.
- Repeat these steps to create as many shipping classes as needed for your store’s products.
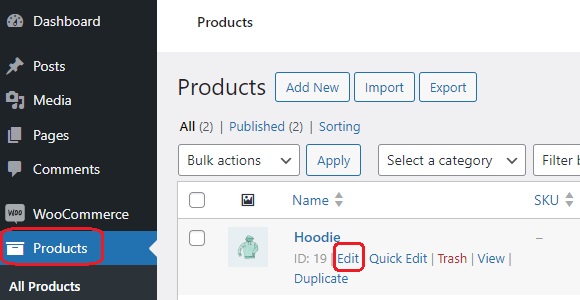
4. Assign Products to Shipping Classes:
- Go to your Products section in the WooCommerce dashboard.
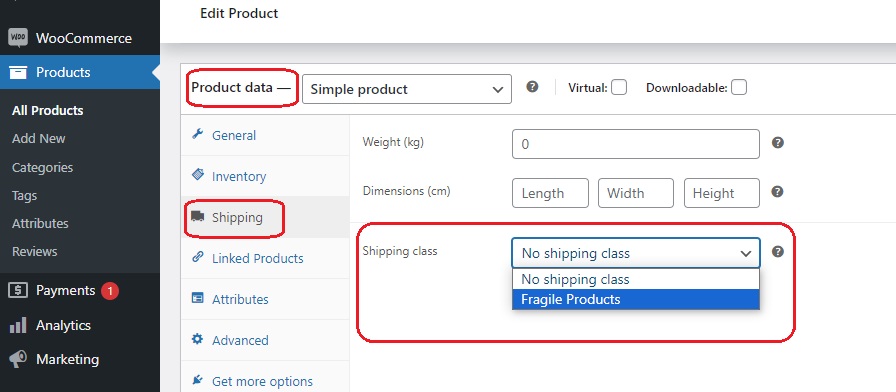
- Edit a product you want to assign to a shipping class.
- In the Product Data section, click on the Shipping tab.
- Select the appropriate shipping class from the dropdown menu.
- Save your product changes.
5. Configure Shipping Methods for Classes:
- Head back to WooCommerce > Settings > Shipping and select the Shipping Zones tab.
- Edit the zone where you want to apply the shipping class rates.
- Click on the Edit button next to the shipping method you want to configure (e.g., Flat Rate).
- In the method settings, you’ll see an option to add costs for different shipping classes.
- Enter the additional cost for each class, for example, you might charge extra for heavy items or fragile products.
6. Save Your Changes:
- Click the Save Changes button to ensure your shipping class rates are applied.
Now, take a moment to appreciate the flexibility and efficiency you’ve added to your store’s shipping process! 😎
You may also like:
4 Best Plugins to Restrict Payment Methods by Products & Locations for WooCommerce
Woocommerce Shipping Options
-
Flat Rate Shipping
Let’s talk about one of the simplest and most popular shipping methods: Flat Rate Shipping!
Flat rate shipping means you charge a fixed fee for shipping, no matter the order size or weight, it’s straightforward and easy to manage, making it a favorite for many online store owners.
Knowing how to set up flat rate shipping in WooCommerce is key to providing a predictable and user-friendly shipping experience.
Flat rate shipping keeps things predictable for both you and your customers, it’s especially handy if you want a simple, no-fuss approach to shipping costs.
Plus, customers appreciate knowing exactly what they’ll pay for shipping from the get-go.
Here’s how to set it up:
1. Access Your Shipping Zones:
(As in the pictures above)
- Navigate to WooCommerce > Settings > Shipping and click on your existing shipping zone.
2. Add Flat Rate:
(As in the pictures above)
- Click Add Shipping Method within your chosen zone and select Flat Rate.
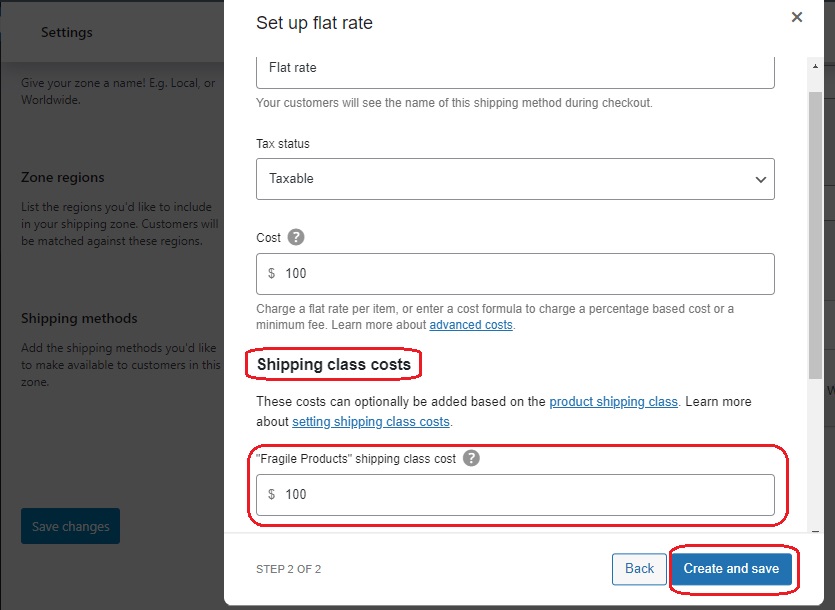
3. Configure the Flat Rate:
(As in the pictures above)
- Set a fixed cost for your flat rate shipping. This fee remains the same regardless of the number of items or their weight.
- If you need to add a handling fee to cover additional costs, you can do so here.
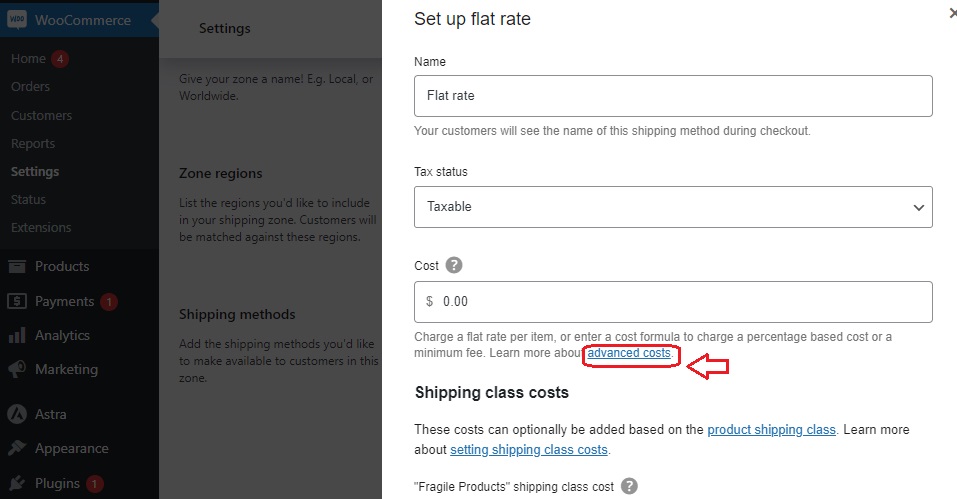
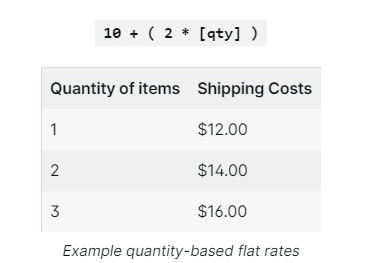
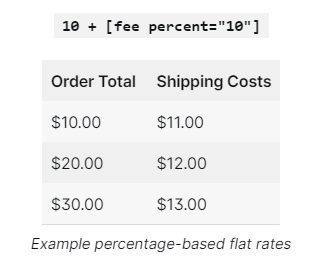
4. Advanced Options:
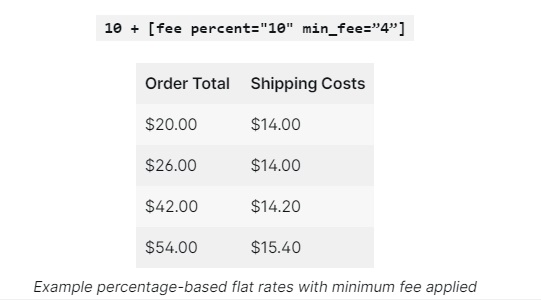
- For more control, you can add extra charges per item or shipping class. For instance, you might charge a base fee of $5 plus $1 per item. Enter it like this: 5 + (1 * [qty]).
5. Save Your Settings:
- Make sure to save your changes to apply the flat rate shipping.
Next, we’ll take a look at how free shipping can benefit your store and make your customers happy!
-
Free Shipping
This is one of the most enticing shipping options for customers. Yes!
Offering free shipping is a powerful tool to increase your average order value and reduce cart abandonment.
Customers love the idea of not paying extra for shipping, and it often encourages them to add more items to their cart to meet the minimum requirement.
Let’s go over how to set up free shipping in WooCommerce to make the most of this strategy.
Here’s how to set it up:
1. Access Your Shipping Zones:
(As in the pictures above)
- Head over to WooCommerce > Settings > Shipping and select the shipping zone where you want to offer free shipping.
2. Add Free Shipping:
(As in the pictures above)
- Click Add Shipping Method and choose Free Shipping from the list.
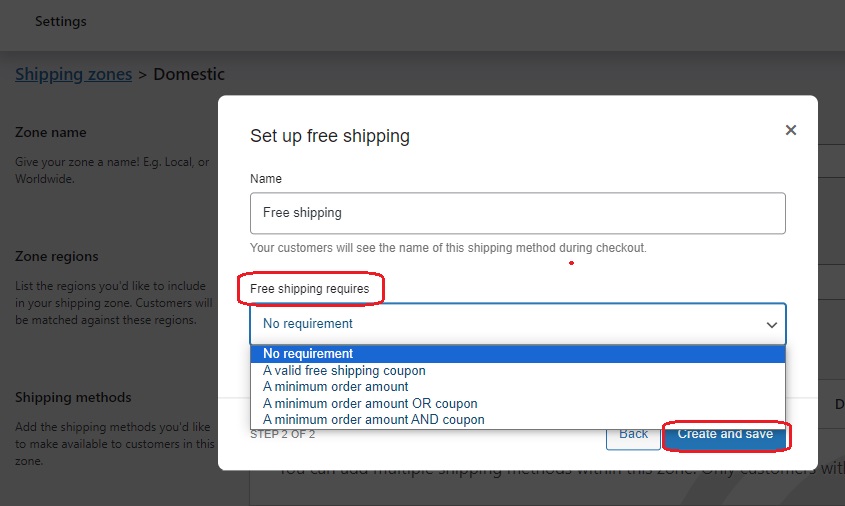
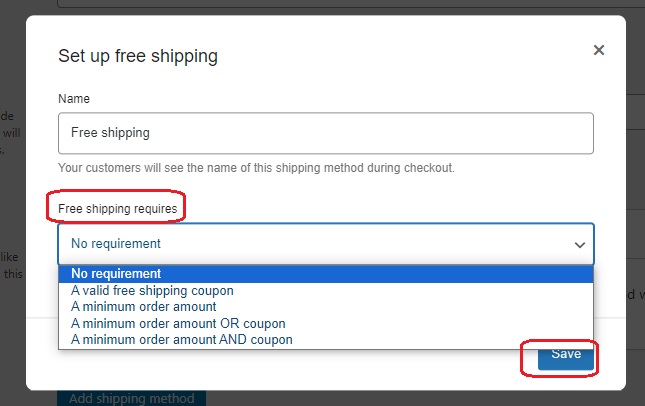
3. Configure Free Shipping:
- Once added, click Edit next to Free Shipping to set the conditions.

- You can offer free shipping under specific conditions, like a minimum order amount, a valid free shipping coupon, or a combination of both.
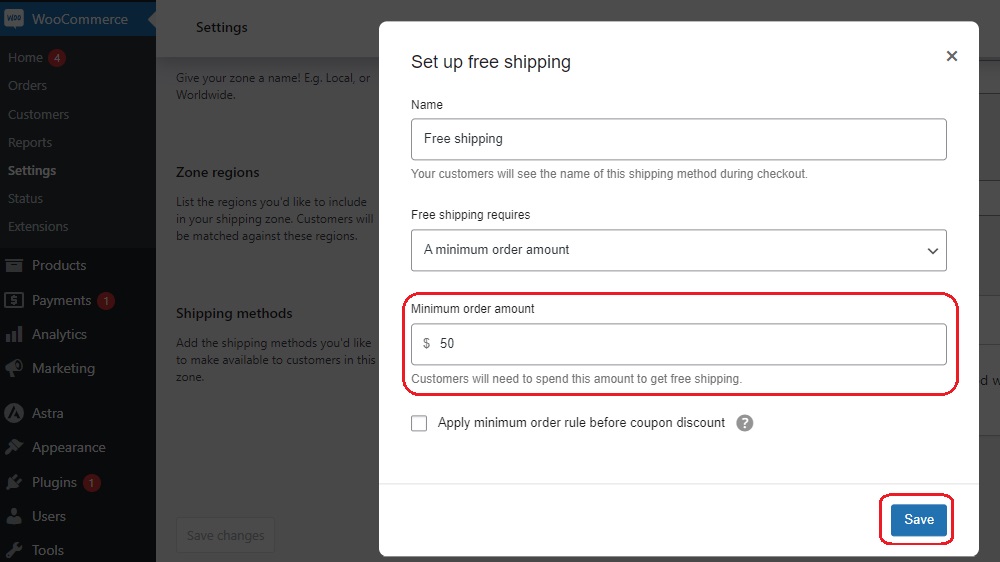
4. Set a Minimum Order Amount:
- If you want to encourage larger orders, set a minimum order amount that customers need to qualify for free shipping, for example: “Free shipping on orders over $50.”
5. Use Coupons:
- You can also offer free shipping through a coupon code, this is great for promotions and special events, customers can enter the coupon at checkout to receive free shipping.

6. Save Your Settings:
- Save your changes to activate, and enjoy the benefits of making your customers happy with free shipping!
-
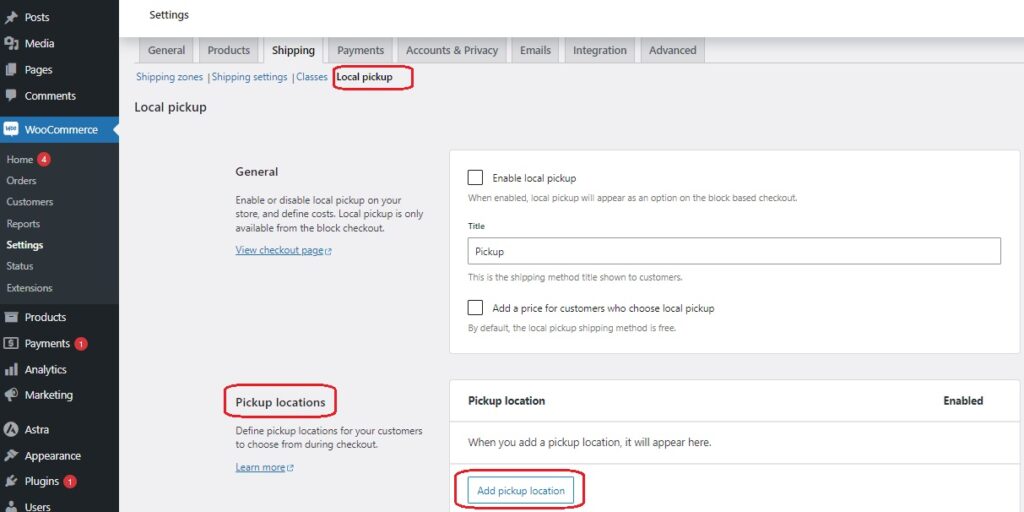
Local Pickup
This option is perfect if you have a physical store or a local warehouse and want to give customers the choice to pick up their orders in person.
It’s a win-win because customers save on shipping costs, and you save on shipping logistics.
Offering local pickup is a great way to connect with your community and provide convenience for your customers, it’s also a fantastic option for customers who need their items quickly and prefer not to wait for shipping.
Here’s how to set it up:
1. Access Your Shipping Zones:
(As in the pictures above)
- Go to WooCommerce > Settings > Shipping and choose the shipping zone where you want to offer local pickup.
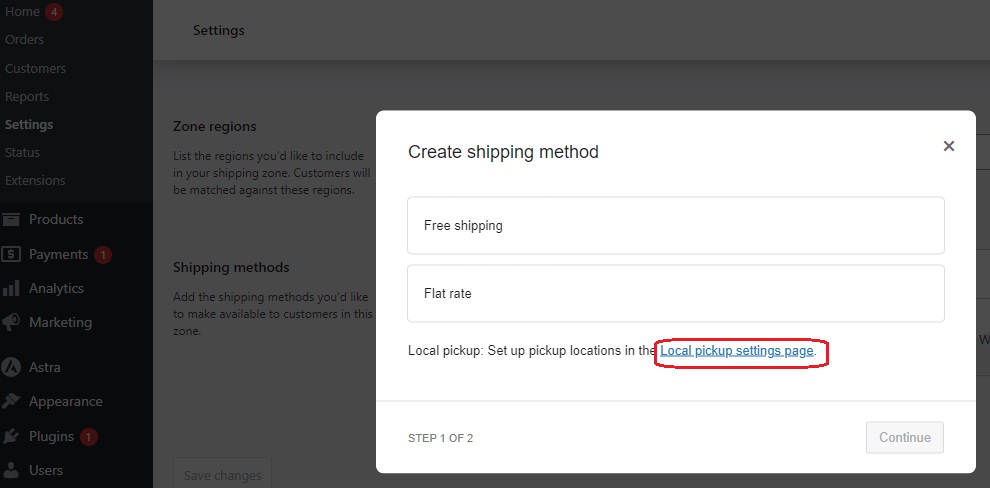
2. Add Local Pickup:
- Click Add Shipping Method then click Local pickup settings page.
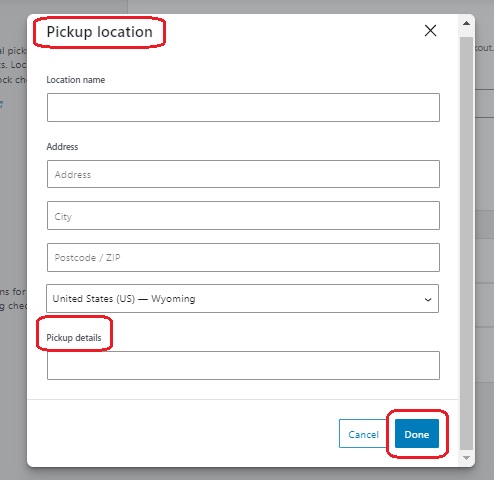
3. Configure Local Pickup:
- In the Pickup Locations section, click the Add Pickup Location button.
- You can set a cost for local pickup if needed. While it’s often free, some stores might charge a small fee for this service.
4. Provide Pickup Instructions:
- Clearly specify where and when customers can pick up their orders, you can add this information in the Pickup details field.
- Include details like the address, pickup times, and any necessary instructions (e.g., bring a confirmation email or ID).
5. Save Your Settings:
- Remember to save your changes to enable local pickup for your customers.
This way, you have the option of local pickup, which enhances customer satisfaction and saves on shipping costs!
-
International Shipping
Let’s take your WooCommerce store global with International Shipping!
Offering international shipping can open up your store to a world of new customers, but it also comes with its own set of challenges. Here’s how to get started:
1. Access Your Shipping Zones:
(As in the pictures above)
- WooCommerce > Settings > Shipping and click on the Shipping Zones tab.
- Add a new shipping zone specifically for international destinations, you can name it something like “International” or specify regions like “Europe” or “Asia.”
2. Add Shipping Methods:
(As in the pictures above)
- Within your new international zone, click Add Shipping Method.
- You can choose methods like Flat Rate, Free Shipping, or integrate with a shipping carrier plugin for real-time rates (e.g., DHL, UPS, FedEx) – We’ll get to that later, read on.
3. Configure Your Methods:
(As in the pictures above)
- Click Edit next to your chosen shipping method to configure the details.
- For flat rate, set a base rate that makes sense for international orders. Consider additional charges for heavier or bulkier items.
4. Consider Real-Time Rates:
- Using a plugin for real-time shipping rates can be a game-changer, these plugins pull current rates from carriers, ensuring you and your customers get accurate shipping costs.
- Install and configure your chosen plugin according to the instructions provided.
5. Set Up Customs and Duties:
- Inform your international customers about potential customs fees and duties, this information can be added to your shipping policy or directly on the checkout page.
- Some shipping plugins also offer options to calculate and include these fees during checkout.
6. Save Your Settings:
- Save your changes to apply your international shipping methods.
Don’t forget that the most important point in international shipping is to make sure you clearly inform your customers about shipping costs and potential fees to avoid surprises and ensure a smooth purchasing experience.
Next, we’ll explore advanced shipping configurations to take your WooCommerce store to the next level. For now, celebrate the fact that your store is ready to reach customers all around the globe! 🎊🎉
Advanced Shipping Configurations
-
Table Rate Shipping
Let’s step up our shipping game with Table Rate Shipping.
This method lets you set shipping costs based on various factors like weight, number of items, or total order value. It’s super flexible and can really help you fine-tune your shipping strategy.
Here’s how to get started:
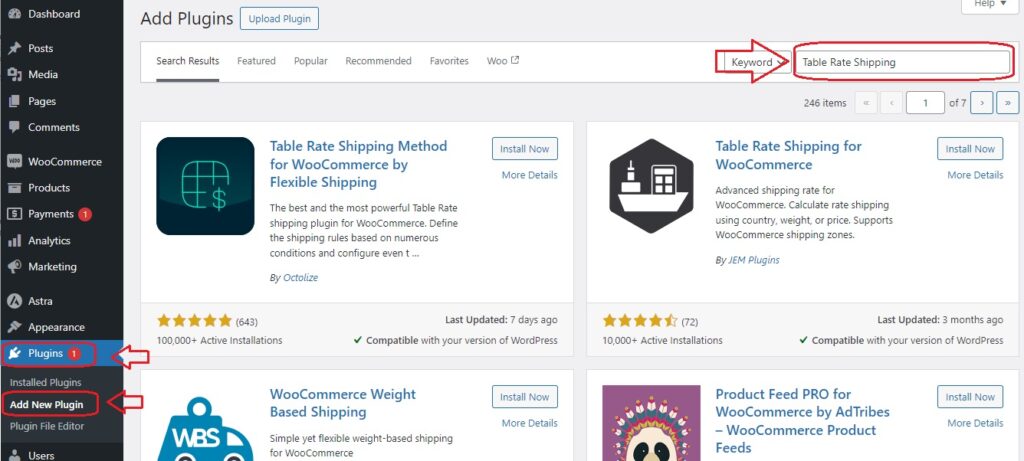
1. Install a Table Rate Shipping Plugin:
- To use table rate shipping, you’ll need a plugin, head over to the WooCommerce marketplace and find a reliable table rate shipping plugin, install and activate it.
2. Access the Plugin Settings:
- Once the plugin is activated, navigate to WooCommerce > Settings > Shipping.
- You’ll see a new tab for Table Rate Shipping, click on it to access the settings.
3. Create a New Table Rate:
- Click Add Shipping Method and select Table Rate.
- Name your table rate method and start adding your rules, for example, you can set different rates based on weight ranges, item counts, or order totals.
4. Set Up Shipping Rules:
- Define the conditions and corresponding rates, for instance, you can charge $5 for orders up to 5 pounds, $10 for 5-10 pounds, and so on.
- You can also set rules for the number of items, for example, $3 for 1-3 items, $6 for 4-6 items.
5. Add Additional Costs:
- If needed, you can add extra costs based on specific criteria, for instance, you might want to add a handling fee or charge more for certain product categories.
6. Test Your Settings:
- Before going live, make sure to test your table rate shipping settings.
- Place test orders with different weights, quantities, and order values to ensure everything works as expected.
7. Save and Apply:
- Once you’re happy with your setup, save your changes👌
- Your new table rate shipping options will now be available to your customers at checkout.
-
Conditional Shipping Methods
These methods allow you to offer different shipping options based on specific conditions, like customer location, order value, or product type, it’s all about providing the right shipping options at the right time.
Here’s how to set it up:
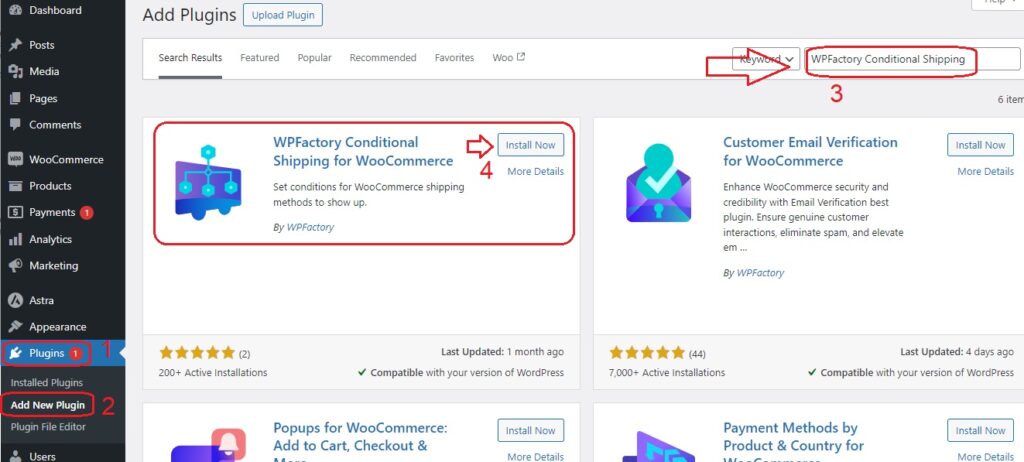
1. Install a Conditional Shipping Plugin:
Start by finding WPFactory Conditional Shipping plugin in the WooCommerce marketplace, and install and activate it to get started.
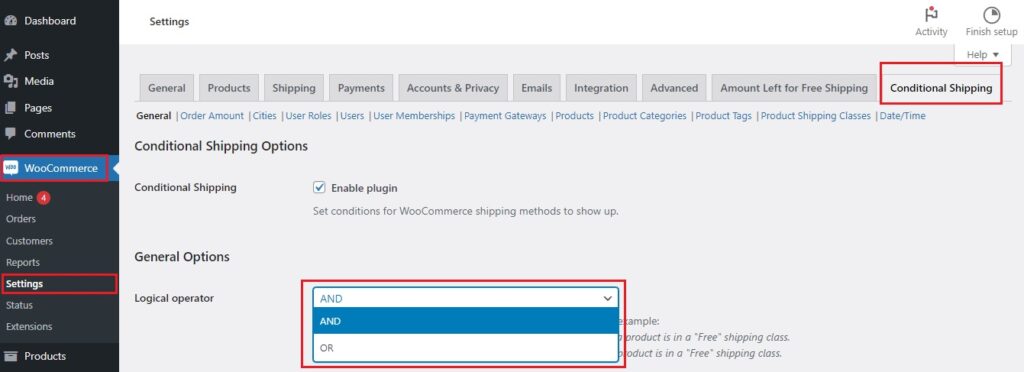
2. Access the Plugin Settings:
- Go to WooCommerce > Settings > and click on the new tab for Conditional Shipping.
- This is where you’ll configure your rules and conditions.
- Choose (and) if you want two conditions to be mandatory.
- Choose (or) if you want one of the two conditions to be met by the customer but not both.
For example:
Enable free shipping if an order is over a certain amount AND if a product is in a “Free” shipping class.
Enable free shipping if an order is over a certain amount OR if a product is in a “Free” shipping class.
- Below you will find the criteria for available conditions
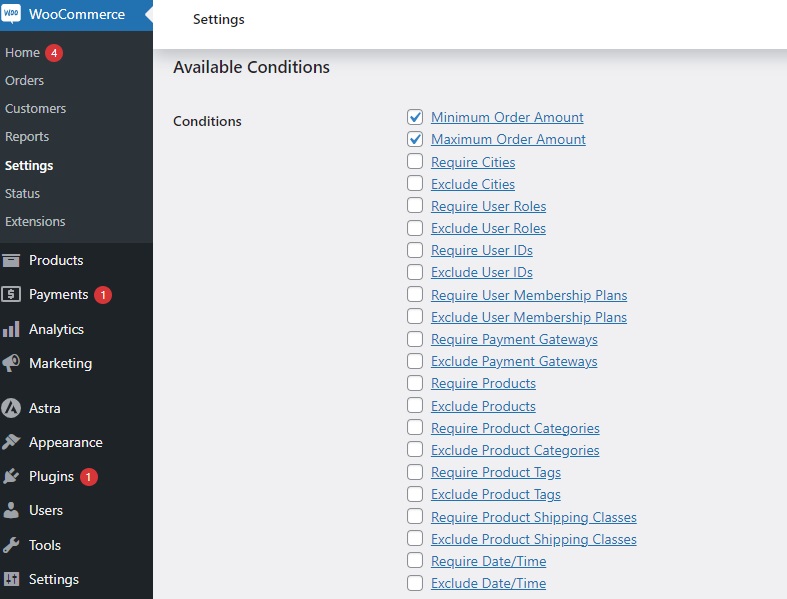
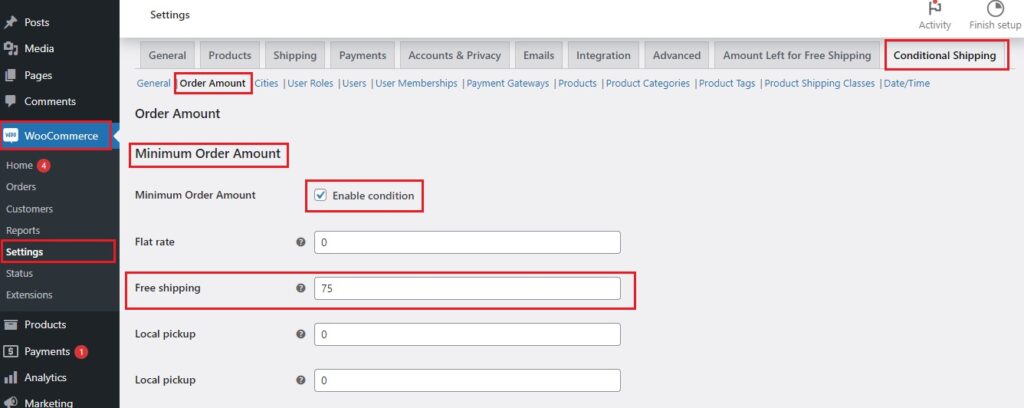
3. Create a New Shipping Condition:
- Now suppose you would like to set conditions for Minimum Order Amount.
- Fill in the information according to the shipping method you desire.
- In the same menu, you will find many other options for setting conditions, such as user roles, product, etc.
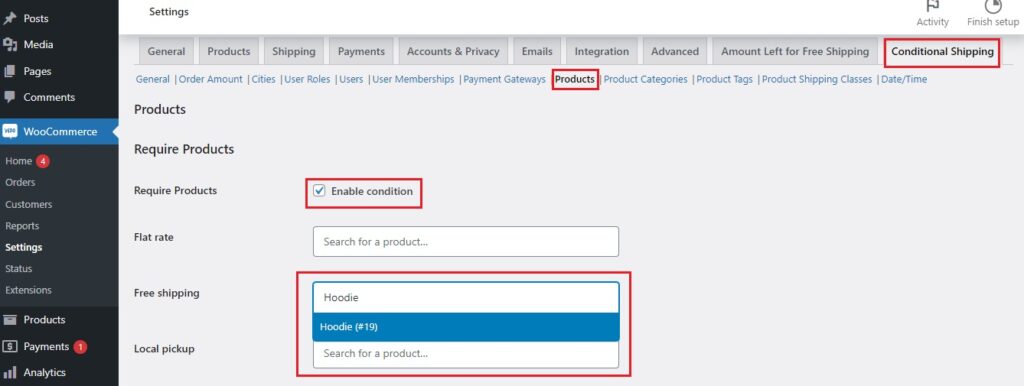
4. Add Multiple Conditions:
- You can stack multiple conditions to create complex rules. For example, offer a discounted shipping rate for orders over $75 that also includes at least one item from a specific category.
- Make sure your conditions are clear and logical to avoid confusion at checkout.
5. Test Your Conditional Shipping Methods:
- Place a few test orders to ensure your conditions are working correctly, check different scenarios to make sure the right shipping options appear based on the set conditions.
6. Save and Implement:
- Once you’re satisfied with your settings, save the changes.
- Your conditional shipping methods will now be available to customers, making their checkout experience smoother and more tailored.
Next, we’ll explore integrating third-party shipping services for even more options, let’s continue this journey!
-
Integrating Third-Party Shipping Services
These services provide real-time shipping rates, label printing, and tracking options, making your life easier and your customers happier.
Here’s how to get started:
1. Choose a Third-Party Shipping Service:
Some popular options include UPS, FedEx, DHL, and USPS. Each offers different features and benefits, so choose the one that best fits your needs.
Also, each company has different instructions for installation and running, but you will definitely need to create an account and enter your account details, such as API keys, account numbers, and any other required information.
But more importantly now, let’s know what are the excellent things that third-party services offer? Here you are:
-
Configure Shipping Rates:
Setting up the shipping rates that will be pulled directly from your third-party service, these rates will update in real-time based on the customer’s location and the weight of their order.
You can also add handling fees or offer discounts based on certain conditions.
-
Print Shipping Labels:
One of the best features of integrating third-party services is the ability to print shipping labels directly from your WooCommerce dashboard.
Configure your label printing settings, including label size and format, this will save you time and streamline your shipping process.
-
Enable Tracking:
Provide your customers with real-time tracking information, once an order is shipped, they can track their package’s journey from your store to their doorstep.
Set up automated emails or SMS notifications to keep customers informed about their shipping status.
2. Test Your Integration:
Place a few test orders to ensure everything is working smoothly, check that rates are calculated correctly, labels print without issues, and tracking information is accurate.
3. Save and Go Live:
Once you’re satisfied with the setup, save your changes and start using your integrated third-party shipping service.
Start reaping the rewards of a smoother shipping process with third-party integrations in your WooCommerce store!
Using WooCommerce Shipping Plugins to Extend Functionality
-
Enhancing Free Shipping
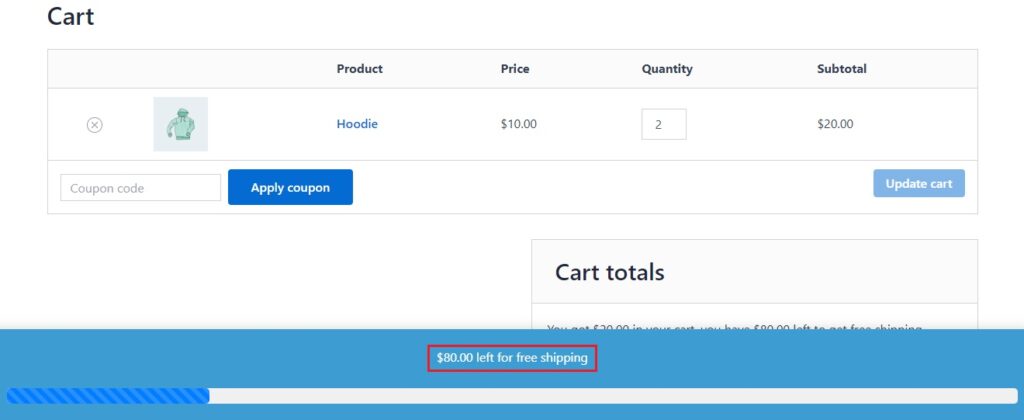
Let’s talk about taking your free shipping game to the next level with the “Amount Left Tracker for WooCommerce” Plugin.
![]()
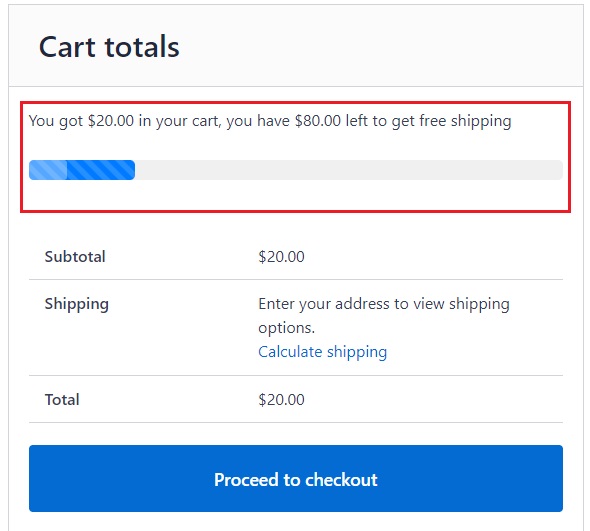
This handy plugin shows customers how much more they need to spend to qualify for free shipping, turning the shopping process into a fun and engaging experience.
The “Amount Left Tracker for WooCommerce” Plugin not only boosts your average order value but also enhances the shopping experience by adding a bit of motivation for your customers.
Here’s how to set it up and make the most of it:
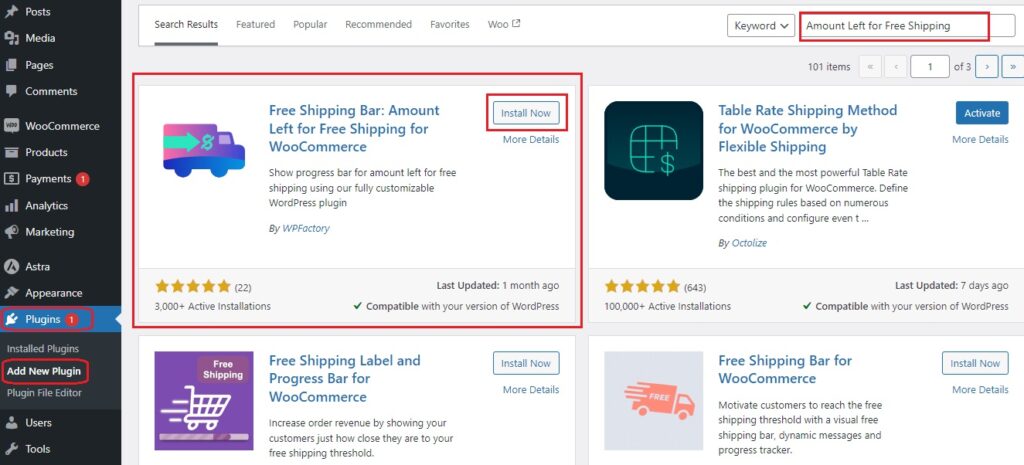
1. Install the Plugin:
- Head over to your WooCommerce dashboard and go to Plugins > Add New.
- Search for “Amount Left for Free Shipping“, install, and activate it.
2. Configure the Plugin Settings:
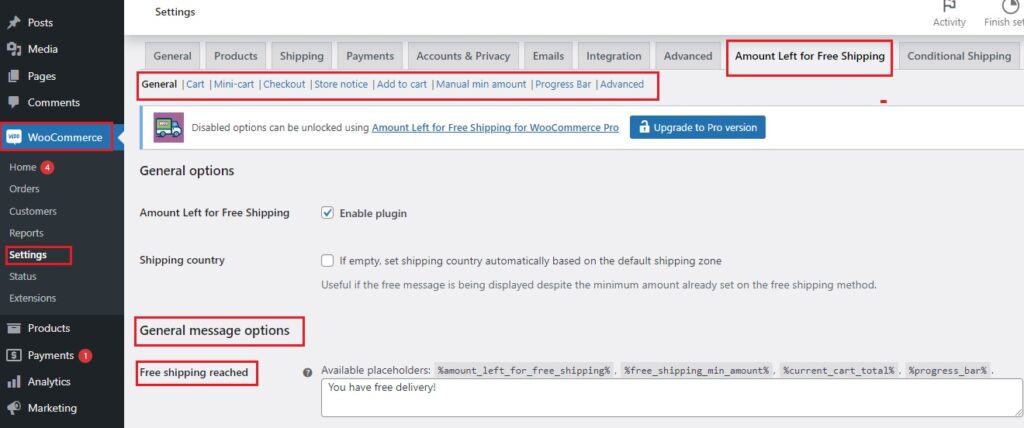
- Once activated, navigate to WooCommerce > Settings > Amount Left Tracker.
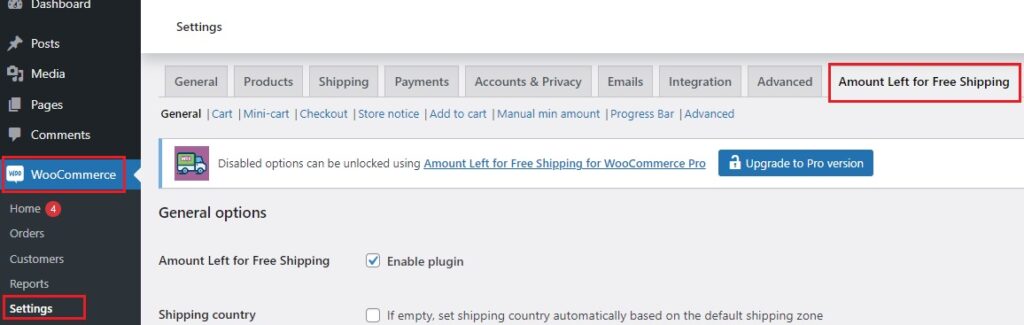
- Here, you can customize the message that appears to customers, for example, “You have free delivery!”
- Or you can browse the rest of the menu and put different messages such as “You have $20 left to qualify for free shipping!”
3. Set Up Free Shipping Conditions:
- Ensure you have free shipping set up in your WooCommerce shipping zones.
- Define the minimum order amount needed for free shipping, this amount will be used by the plugin to calculate how much more customers need to add to their cart.
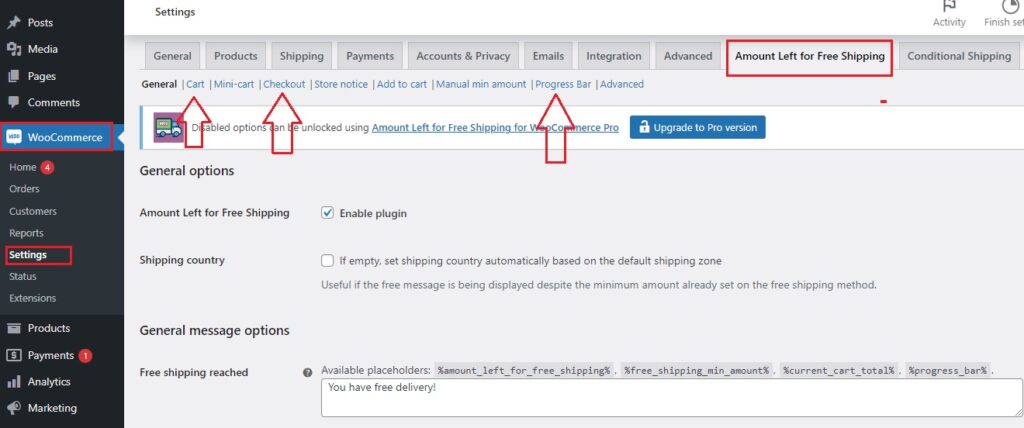
4. Customize the Display:
- Choose where and how the amount left message will be displayed, you can show it on the cart page, mini cart, or during checkout.
- You can also add a progress bar to visually show customers their progress towards free shipping, this adds a gamification element that encourages higher spending.
5. Test the Plugin:
Place a few test orders to ensure the tracker works correctly.
Check that the message updates dynamically as items are added to or removed from the cart.
Here’s how it looks👇 it’s too encouraging!
Also:
You may also like:
Best 5 free shipping plugins for WooCommerce on bulk purchases
Now, let’s dive into why showing the amount left for free shipping is such a game-changer and how it taps into psychological triggers and gamification to boost your order value.
Benefits of Showing Amount Left for Free Shipping
-
Encourages Larger Orders
When customers see they only need to spend a little more to get free shipping, they’re likely to add extra items to their cart, this can significantly increase your average order value.
-
Improves Customer Experience
Transparent messaging about how much more they need to qualify for free shipping helps customers feel informed and in control, this positive experience can lead to repeat business.
-
Reduces Cart Abandonment
Unexpected shipping costs are a major reason for cart abandonment, So, by clearly showing the path to free shipping, you reduce the chances of customers leaving their carts behind.
Psychological Triggers and Gamification
-
Scarcity and Urgency
Highlighting the amount left for free shipping creates a sense of scarcity and urgency, customers feel like they’re missing out on a deal if they don’t reach the threshold.
-
Goal Setting
People love achieving goals! Showing the amount left for free shipping sets a clear, attainable goal for customers, this small challenge can make shopping more engaging.
-
Progress Indicators
Using a progress bar to show how close customers are to free shipping taps into the “Zeigarnik effect” which is the psychological tendency to want to complete unfinished tasks.
A visual representation of progress can motivate customers to complete their purchase.
-
Reward Systems
Free shipping acts as a reward for spending a certain amount, this taps into the reward system in the brain, making customers feel good about their purchase and the savings they’re getting.
By leveraging these psychological triggers and gamification elements, you can create a more engaging shopping experience that encourages customers to spend more.
The “Amount Left Tracker for WooCommerce Plugin” is a powerful tool to implement these strategies seamlessly.
Get ready to see an increase in order value and happier customers thanks to the amount left tracker for free shipping!
-
Conclusion
Let’s wrap things up with a quick recap of the key strategies we’ve covered to enhance your WooCommerce shipping and some tips on keeping things optimized for better customer satisfaction and sales.
-
Key Strategies Recap:
- WooCommerce Shipping Zones: Tailor shipping options by defining specific regions.
- WooCommerce Shipping Methods: Offer a mix of flat rate, free shipping, local pickup, and international shipping.
- WooCommerce Shipping Classes: Ensure accurate rates by managing different product types.
- Table Rate Shipping: Set flexible rates based on weight, item count, or order total.
- Conditional Shipping: Provide options based on order value or location.
- Third-Party Services: Integrate UPS, FedEx, or DHL for real-time rates and tracking.
- Free WooCommerce Shipping Plugins: Use the “Amount Left Tracker for WooCommerce” to encourage larger orders.
-
Ongoing Optimization Tips:
- Monitor Feedback: Listen to customer feedback to improve your shipping process.
- Analyze Data: Track shipping costs and delivery times to find optimization opportunities.
- Update Plugins: Keep plugins updated for new features and security.
- Test Strategies: Experiment with new shipping methods and promotions to boost sales.
Finally, happy shipping, and here’s to growing your WooCommerce store!