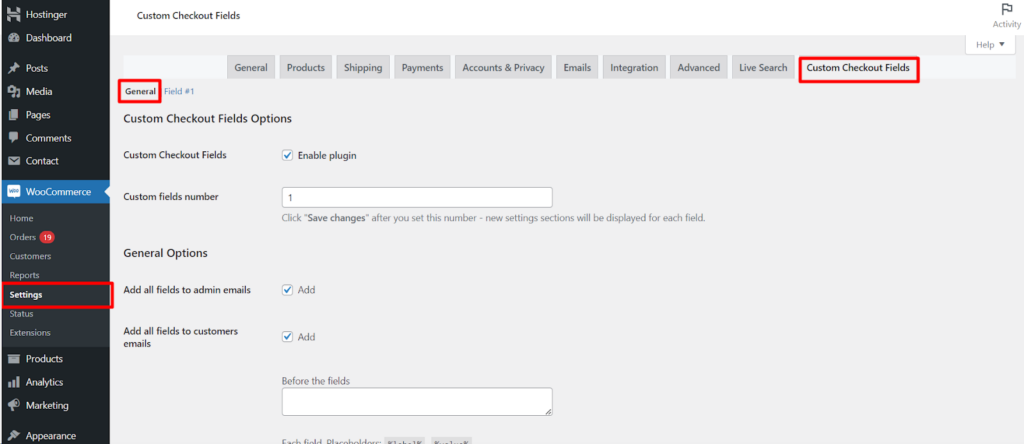
Building a comprehensive checkout experience goes beyond just collecting basic information. The Custom Checkout Fields for WooCommerce plugin empowers you to gather valuable customer data and tailor the checkout process by allowing you to add custom fields. This guide walks you through the process of enabling and configuring these fields, ultimately creating a more informative and user-friendly checkout for your customers.
Enabling Custom Fields
With the plugin activated, follow these steps to enable custom fields on your checkout page.
- Navigate to WooCommerce: Within your WordPress dashboard, locate the WooCommerce menu and click on it.
- Access Settings: Click on Settings within the WooCommerce menu.
- Find Custom Checkout Fields: Look for a section labeled Custom Checkout Fields . Click on it to access the plugin’s settings.
- General Tab: Locate the General tab within the Custom Checkout Fields settings.
Setting the Number of Custom Fields
Within the General tab, you’ll find an option to define the number of custom fields you want to add to your checkout page. This number typically corresponds to the number of separate field configuration sections that will appear below.
- Choose the Number: Enter the desired number of custom fields you wish to create.
- Save Changes: Click on the Save changes button located at the bottom of the page.
Configuring Individual Custom Fields
Once you’ve saved your changes, new settings sections will appear with the General tab, corresponding to the number of custom fields you defined. Each section allows you to configure a specific field.
Here’s what you can typically define for each field
- Field Label: This is the text that appears next to the field on the checkout page, guiding the customer on what information to enter.
- Field Type: Choose the type of field that best suits the information you want to collect. Common options include text fields, checkboxes, radio buttons, dropdowns, date pickers, and more.
- Field Placement: Select where you want the field to appear on the checkout form. You can typically choose between placing it before the billing address section, after the billing address section, or during registration (if applicable).
- Required Field (Optional): Mark the checkbox if you want to make the field mandatory for users to complete the checkout process.
- Default Value (Optional): Set a default value that will pre-populate the field, potentially guiding customers or providing a starting point.
- Field Options (Optional): For specific field types like dropdowns or radio buttons, you can define the individual options that will be displayed to the customer.
Benefits of Custom Checkout Fields
By adding custom fields to your checkout page, you can achieve several advantages.
- Gather Valuable Customer Data: Collect specific information that helps you understand your customer base and tailor your marketing strategies.
- Improved Order Fulfillment: Gather essential details like preferred delivery instructions or specific product requirements to ensure accurate order fulfillment.
- Enhanced Customer Experience: Requesting relevant information upfront can streamline the checkout process and minimize the need for additional communication after purchase.
