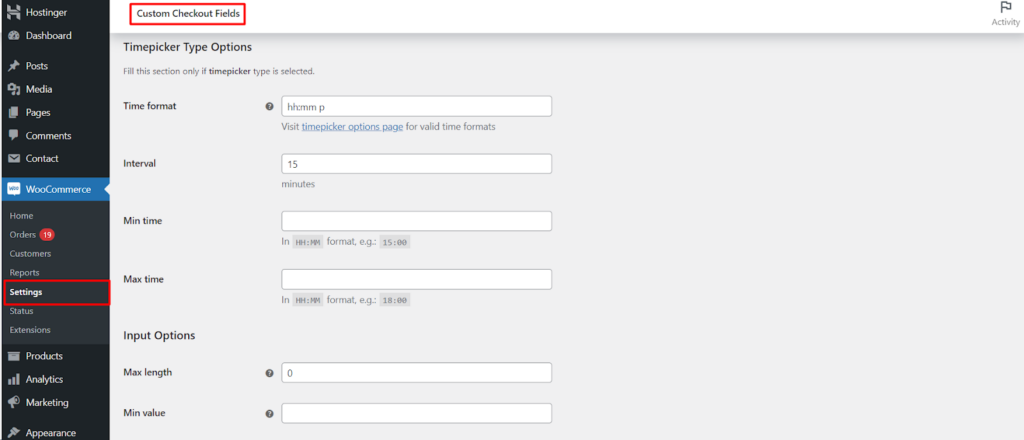
The Custom Checkout Fields for WooCommerce plugin provides a “Timepicker” field type that allows customers to select specific times during checkout. This guide delves into the configuration options available for Timepicker fields, empowering you to refine how time selection works within your WooCommerce store.
Accessing Field Configuration
- Navigate to WooCommerce: Within your WordPress dashboard, locate the WooCommerce menu and click on it.
- Access Settings: Click on Settings within the WooCommerce menu.
- Find Custom Checkout Fields: Look for a section labeled Custom Checkout Fields (or similar wording based on your plugin version). Click on it to access the plugin’s settings.
- Individual Field Tabs: Locate the tab for the specific custom field you want to configure (e.g., Field #1, Field #2). Click on the relevant tab.
Timepicker Type Options
If you’ve chosen the “Timepicker” field type, you’ll find a dedicated section for configuring time selection.
- Time format: Select a valid time format from the provided options (e.g., 24-hour format or 12-hour format with AM/PM). Refer to the plugin’s documentation or timepicker options page for specific format details.
- Interval (minutes): Define the increment at which users can select times. For example, setting an interval of 15 minutes allows users to choose 9:00 AM, 9:15 AM, 9:30 AM, and so on.
Time Restrictions
You can set boundaries for time selection using these options.
- Min time (HH:MM format): Define the earliest selectable time (e.g., “09:00” for 9 AM).
- Max time (HH:MM format): Define the latest selectable time (e.g., “17:00” for 5 PM).
Input Options (Optional)
Some plugins might offer additional options for controlling user input within the timepicker field.
- Max length: Set a maximum number of characters allowed for the time input.
- Min value: (Not applicable for timepickers)
- Max value: (Not applicable for timepickers)
- Step: (Not applicable for timepickers) – These options are typically used for numeric field types.
Advanced User Interaction
You might also find options for enhancing user interaction with the timepicker.
- Autofocus (Enable/Disable): Enable this option to automatically focus on the timepicker field when the customer reaches it on the checkout page.
- Autocomplete: Disable autocomplete functionality if it interferes with the timepicker’s behavior.
Benefits of Configured Timepickers
By strategically configuring these Timepicker options, you can achieve several benefits.
- Streamlined Scheduling: Providing a timepicker allows customers to easily choose preferred delivery or appointment times.
- Improved Order Accuracy: Clear time selection reduces ambiguity and ensures accurate scheduling for your operations.
- Enhanced User Experience: Offering time selection empowers customers and provides a more convenient checkout process.
Conclusion
The Custom Checkout Fields for WooCommerce plugin empowers you to create a user-friendly time selection experience with Timepicker fields. By leveraging these configuration options and exploring your plugin’s specific features, you can streamline scheduling, improve order accuracy, and ultimately enhance customer satisfaction.
