

How Do I Add a GTIN Field in WooCommerce? Step by Step
If you’re running an online store, you may need to add GTIN field in WooCommerce to keep track of your products better.
GTIN stands for Global Trade Item Number, and it’s a special code that helps identify products all over the world, like the barcodes you see on items at the store.
In a previous article entitled “What is GTIN WooCommerce?“ We explained this matter in detail.
In this article:
You’ll learn why adding a GTIN field is important for organizing your products, how it helps with inventory management, and how to add GTIN fields to your WooCommerce store.
Whether you’re managing a few items or a large inventory, this guide will show you how to make things easier and more efficient with GTINs.
Let’s get started! 🚀
Why Add GTIN Field in WooCommerce Products?
Adding a GTIN field to your WooCommerce products has a lot of benefits that make running your store much easier.
First:
GTINs help with inventory management.
Think of a GTIN like a product’s unique ID card! With this special number, you can easily track how many of each product you have in stock, this way, you don’t accidentally sell more than what’s available or run out without knowing.
Next:
GTINs improve product identification.
Since every product has its own GTIN, there’s no confusion between similar items.
For example:
If you’re selling two different types of headphones, each one will have its own GTIN so you won’t mix them up.
Lastly:
Having a GTIN field helps with customer searchability.
Customers can use the product’s GTIN to search for exactly what they want.
It’s especially helpful for wholesale or large stores where customers might search by the product’s barcode or GTIN to find what they need quickly, this makes shopping easier and faster for everyone!
In short:
Adding a GTIN field helps you stay organized, avoid product mix-ups, and give your customers a better shopping experience.
How Do You Add a GTIN Field in WooCommerce?
WooCommerce, by default, doesn’t let you add a GTIN or other unique identifiers to your products directly.
To do that, you would typically need to add custom fields using either a plugin or by writing some custom code to store details like GTIN and MPN for each item.
Luckily, there are plugins available that can handle this for you, removing the need for manual coding or extra work.
One such plugin not only adds these fields automatically but also helps prepare your WooCommerce store for listing your products on major online marketplaces without any hassle.
Read on to see how you can do it!
Overview of a GTIN-Compatible WooCommerce Plugin
Luckily, there’s a plugin that makes this whole process a lot easier.
Welcome to “EAN, UPC, ISBN Barcodes Generator for WooCommerce” plugin!
This plugin, designed specifically for WooCommerce, lets you quickly add GTIN fields to your products without any technical hassle.
Whether you’re selling books, electronics, or clothing, the plugin takes care of creating and managing those unique identifiers, so you don’t have to do it manually.
What makes this plugin really helpful is that supports important product codes like EAN, UPC, and ISBN, it works behind the scenes to make sure each product gets the right code, keeping your inventory organized and searchable.
Plus:
It even handles product variations, so if you’re selling different sizes or colors, everything gets the correct identifier.
With this plugin, adding GTINs to your WooCommerce store becomes a simple, smooth process, freeing up your time to focus on running your business!
You may be interested in:
Stock & Inventory Updates Triggers for WooCommerce
Step-by-Step Guide: Adding a GTIN Field with a Plugin
Adding a GTIN field to your WooCommerce products is easy with the “EAN, UPC, ISBN Barcodes Generator for WooCommerce” plugin.
Here’s a simple guide to get you started, even if you’re new to WooCommerce:
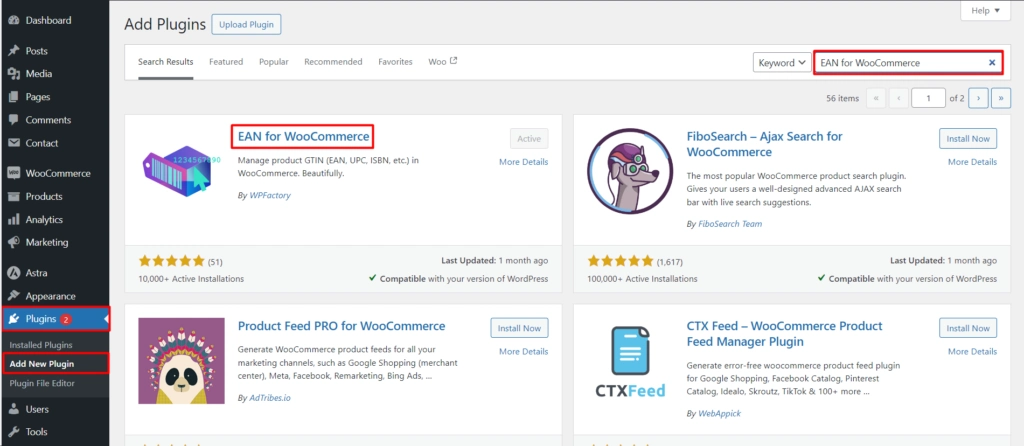
1. Install and Activate the Plugin
- First, head over to your WooCommerce dashboard.
- Go to Plugins > Add New, then type “EAN for WooCommerce” into the search bar.
- Once you find the plugin, click Install and then Activate.
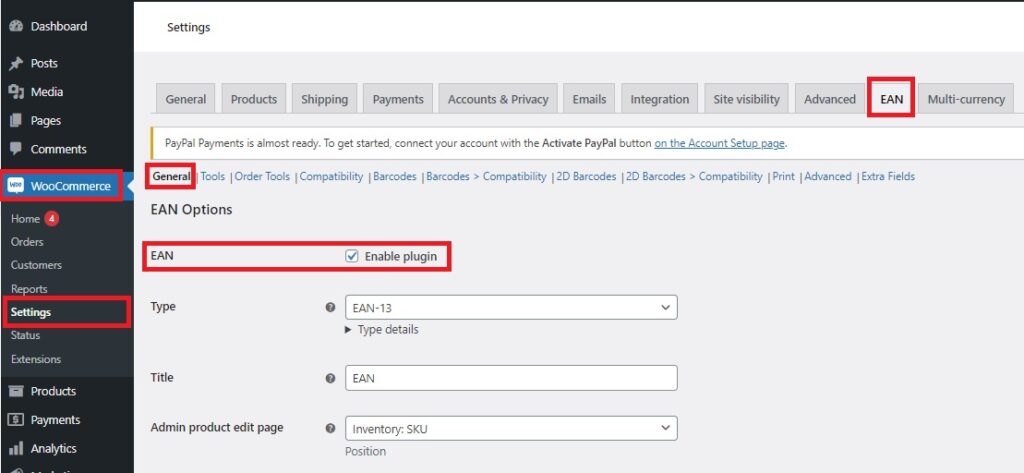
2. Enable the Plugin
- After activation, go to WooCommerce > Settings > EAN tab.
- Under the General tab, you’ll see an option labeled Enable plugin.
- Make sure to check this box, so the plugin starts working.
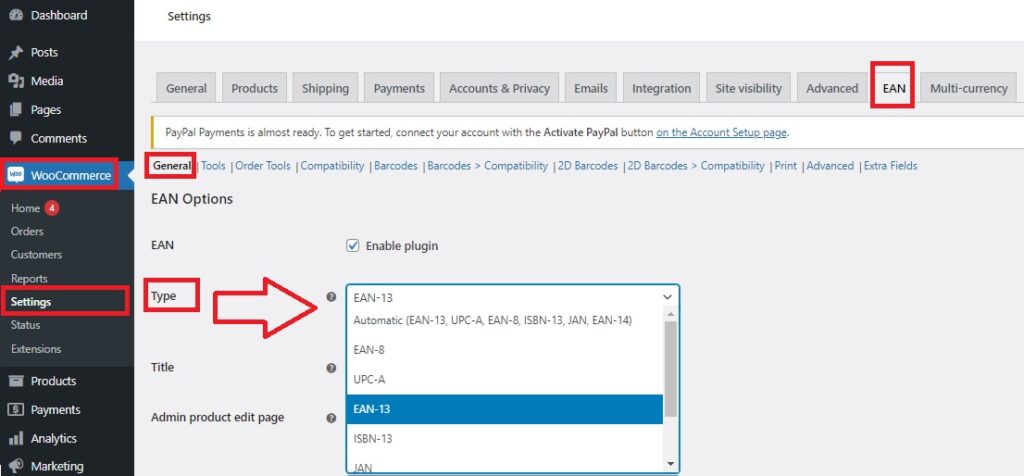
3. Adjust the Settings
- In the same EAN tab, under the General tab, you’ll find an option called Type.
- This lets you decide what kind of GTIN or barcode format to use (EAN-8, UPC, etc.).
- If you’re not sure, you can select the automatic option, or you can choose a specific type if you already have a format in mind.
- Don’t forget to hit Save Changes when you’re done!
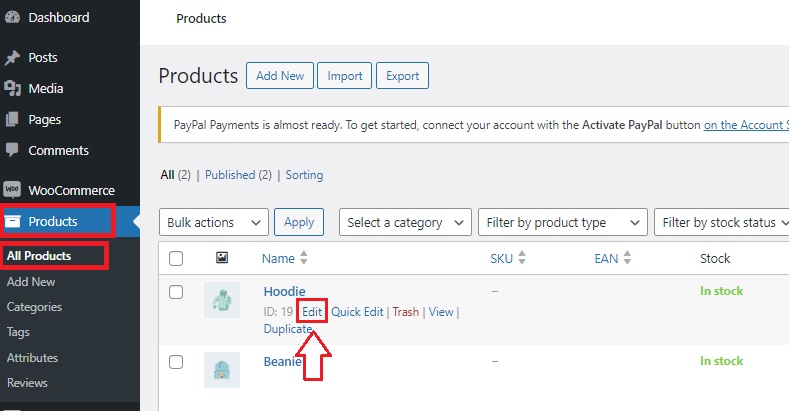
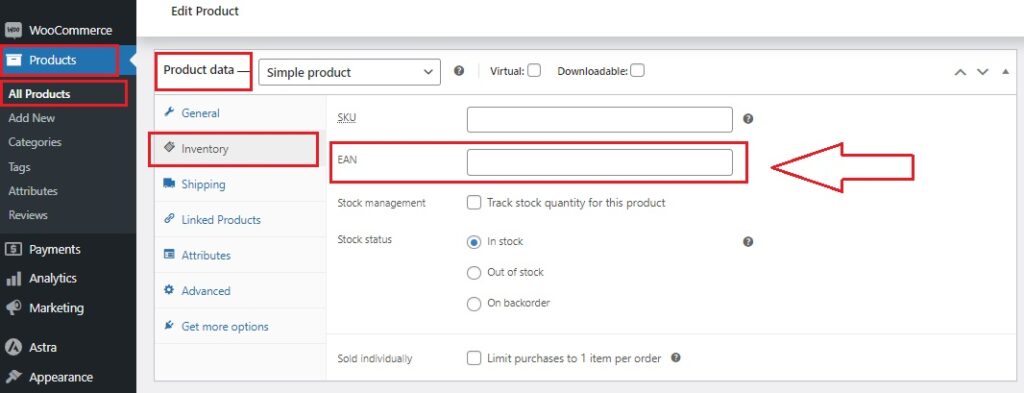
4. Assign GTINs to Products
- Now, go to the product edit page by selecting one of your products.
- Under Product data > Inventory, you’ll see a field for EAN.
- You can either type in your own GTIN or let the plugin handle it automatically (You will see how in step 6).
- Once you’ve entered or checked the EAN, click Update to save your changes.
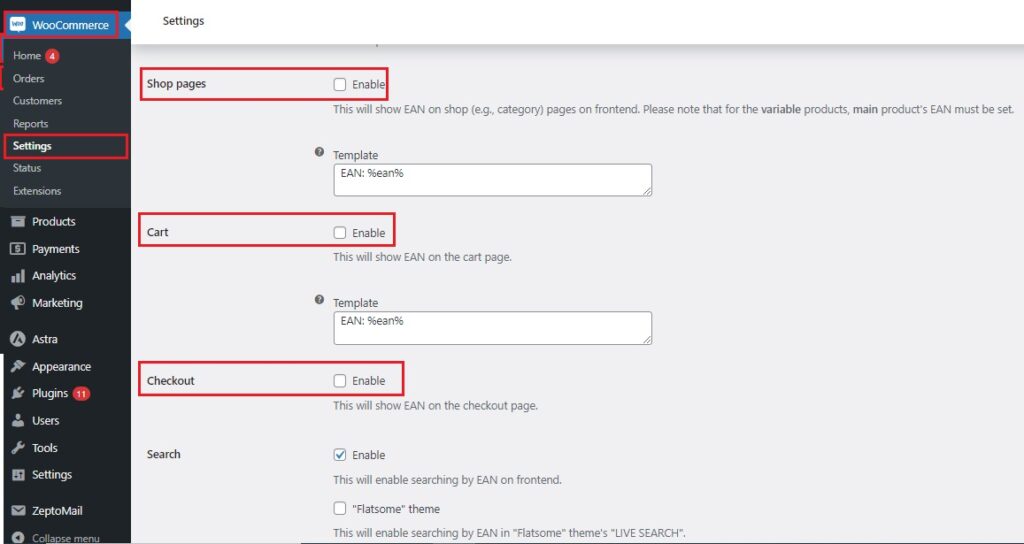
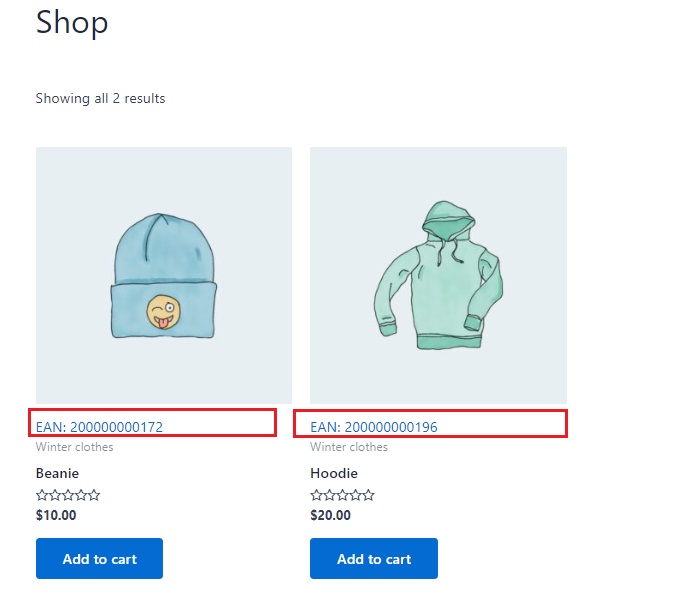
5. Customize Where GTINs Appear
- The plugin also lets you decide where the GTIN will show up, like on product pages, shop pages, or in the cart.
- Go back to the EAN tab and check the boxes for where you want the GTIN to be visible.
- You can display it in all the places that matter to you, then hit Save Changes again.
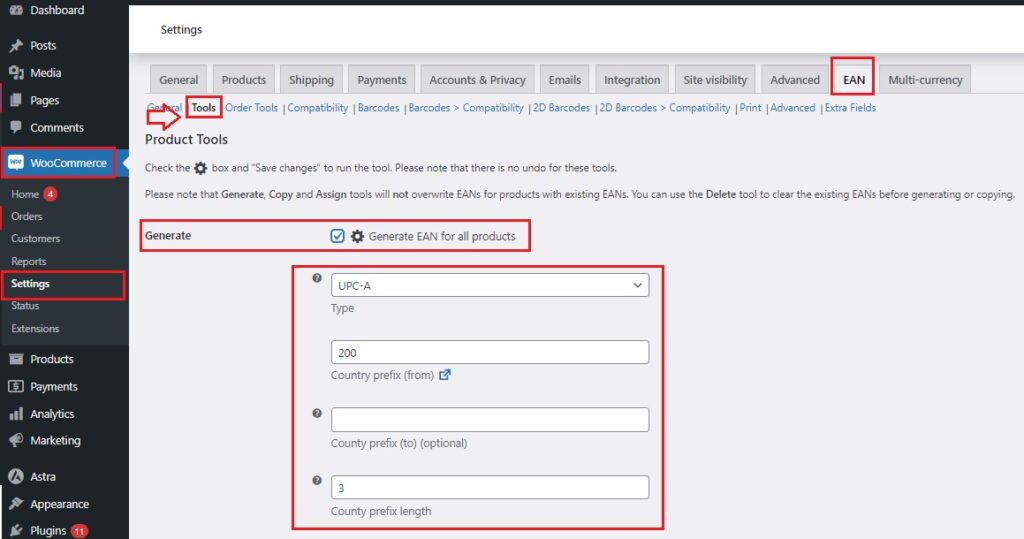
6. Automatically Generate GTINs for All Products
- If you don’t want to manually enter GTINs for each product, the plugin can generate them for you.
- Head over to the EAN tab > Tools tab and find the Generate section.
- Check the box that says Generate EAN for all products, and the plugin will create GTINs based on your settings.
- You can also customize the format by choosing the type of EAN (like EAN-8 or EAN-13) and set specific country prefixes if needed.
- Once you’re ready, click Save Changes.
7. Review the GTINs on Product Pages
- After you’ve set everything up, go back to the product edit page under Product data > Inventory.
- You should now see the GTIN field populated with the right code, based on your settings.
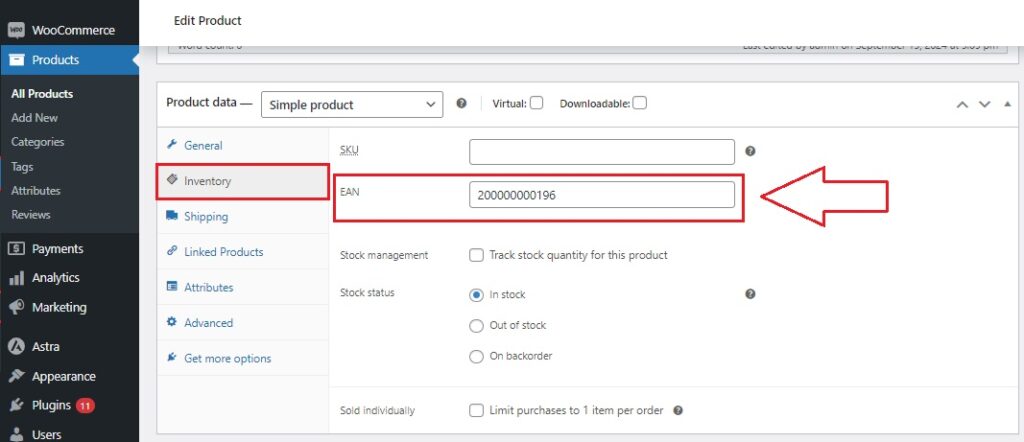
Here’s what it would look like 👇
You may be interested in:
Stock Report & History Manager for WooCommerce
That’s it! 🥳 You’ve successfully added GTIN fields to your WooCommerce products and even set up automatic GTIN generation to make things easier for managing your store.
For more details about installation and other features, the plugin provides full documentation at:
Doc of EAN and Barcodes for WooCommerce
Conclusion
Here’s a quick recap of why adding GTINs with the “EAN, UPC, ISBN Generator” plugin is great for your store:
1. Better Product Tracking
Each product gets its own unique code, making it easy to track and organize everything in your store.
2. Faster Inventory Management
With GTINs, you can quickly check what’s in stock and what needs restocking, helping you stay on top of your inventory.
3. Improved Customer Search
Customers can search for products using the GTIN, making it easier for them to find exactly what they need.
4. Automated GTIN Generation
A plugin lets you create GTINs automatically for all your products, saving you time and effort, especially if you have a large inventory or manage bulk orders.
5. Easy Management for Variations
Even if your products come in different sizes or colors, the plugin ensures each variation gets its own unique code, so there’s no mix-up.
6. Professional and Organized Store
Using GTINs makes your store look more professional, giving you better control over your product management and boosting customer confidence.
You may be interested in:
EU VAT Manager for WooCommerce
FAQs
-
Is GTIN the Same as Barcode?
No, GTIN and barcode aren’t exactly the same thing, but they’re related! GTIN (Global Trade Item Number) is the special number that identifies a product, while a barcode is the picture or pattern of lines that you see on products.
Think of it like this:
The GTIN is the actual number or code that tells you what the product is, and the barcode is just a way to show that number so machines, like scanners at stores, can read it.
The barcode helps make sure the product’s GTIN is scanned quickly and correctly. So, while they work together, the GTIN is the code, and the barcode is the way it’s shown!
-
Is a GTIN the Same as a UPC Code?
A GTIN and a UPC code are not exactly the same, but a UPC code is a type of GTIN.
Think of GTIN as the big family of product identification numbers, and UPC is just one member of that family.
The UPC code is used mostly in the U.S. and Canada and is usually 12 digits long.
Meanwhile, the GTIN can be longer and used in different places around the world.
So, while all UPC codes are GTINs, not all GTINs are UPC codes. It’s like how a square is a type of rectangle, but not all rectangles are squares! 😅
-
Can I Use an SKU Number as a GTIN Number?
No, you can’t use an SKU number as a GTIN number because they’re not the same thing.
An SKU (Stock Keeping Unit) is a code that you create to keep track of your products in your own store.
It’s like a personal code that only you and your store use to organize your products, every store might have a different SKU for the same product.
A GTIN, on the other hand, is a global code that’s used all around the world.
It’s a unique number given to products by international organizations, and it’s the same no matter where the product is sold.
So, while an SKU helps you manage your store’s inventory, a GTIN helps products get identified anywhere in the world.
So, you can’t swap them, but both are useful for keeping your products organized!
-
How Do I Add Barcodes to WooCommerce Products?
Adding barcodes to your WooCommerce products is super easy with the help of a plugin! WooCommerce doesn’t let you add barcodes by itself, so here’s what you can do:
1. Install a Barcode Plugin
First, you’ll need to install a plugin that lets you create and manage barcodes, like the EAN, UPC, ISBN Generator.
Go to the Plugins section of your WooCommerce dashboard, search for the plugin, and click Install and then Activate.
2. Set Up the Plugin
After activating the plugin, go to the plugin’s settings to enable barcodes, you can even choose the type of barcode you want, like EAN or UPC.
3. Assign Barcodes to Products
Now, when you edit your products, you’ll see a new field where you can add a barcode for each product.
The plugin can even generate the barcodes for you automatically if you don’t want to do it manually.
4. Display Barcodes
You can decide where the barcode shows up, like on the product page or in the order details, this is helpful for keeping track of inventory and making it easier for customers to find products.


Since the September 2024 update there is a native GTIN field in WooCommerce.