View Categories

Intro: How to Use the Plugin

Are you planning a flash sale at the end of this weekend? or need to quickly change your prices to stay competitive, or simply stay updated with supplier changes effortlessly!? 

But as we know, manually updating prices one by one will take a lot of time and effort!

Okay, imagine with me that you can handle all these scenarios with just ONE CLICK!

In this article, I will introduce you to one of the most powerful tools that will save you a lot of time and will make your work much easier for editing your products prices in bulk effortlessly. 

You will learn how to install, set up, and use this tool to always stay up to date with any price changes.

keep reading to find the ultimate solution at your hand!

What is WooCommerce Bulk Price Editor? #

Instead of editing prices one by one, this amazing tool helps you quickly adjust all your products’ prices in just a few clicks!

I want to tell you quickly, in less than a minute, what you will gain from this plugin:

One-Click Bulk Price Updates
Flexible Pricing Calculation Made Easy
Targeted Bulk Price Edits for Full Control
Preview & Confirm Price Changes

And now let’s dive into how to install and set up the plugin!

Price Update_ Bulk Pricing Editor for WooCommerce

Step1: #

  • Download The Plugin #

To get started you will need to download the WooCommerce Bulk Price Editor plugin that allows you to display or hide specific payment gateways.

 After downloading the plugin, from your WPFactory account, upload it to your WordPress site.

How to Edit Your Prices in Bulk in WooCommerce - Step1

Step2: #

  • Access The Plugin #

Once the plugin is installed and activated, you can tailor it to fit your business needs as desired.

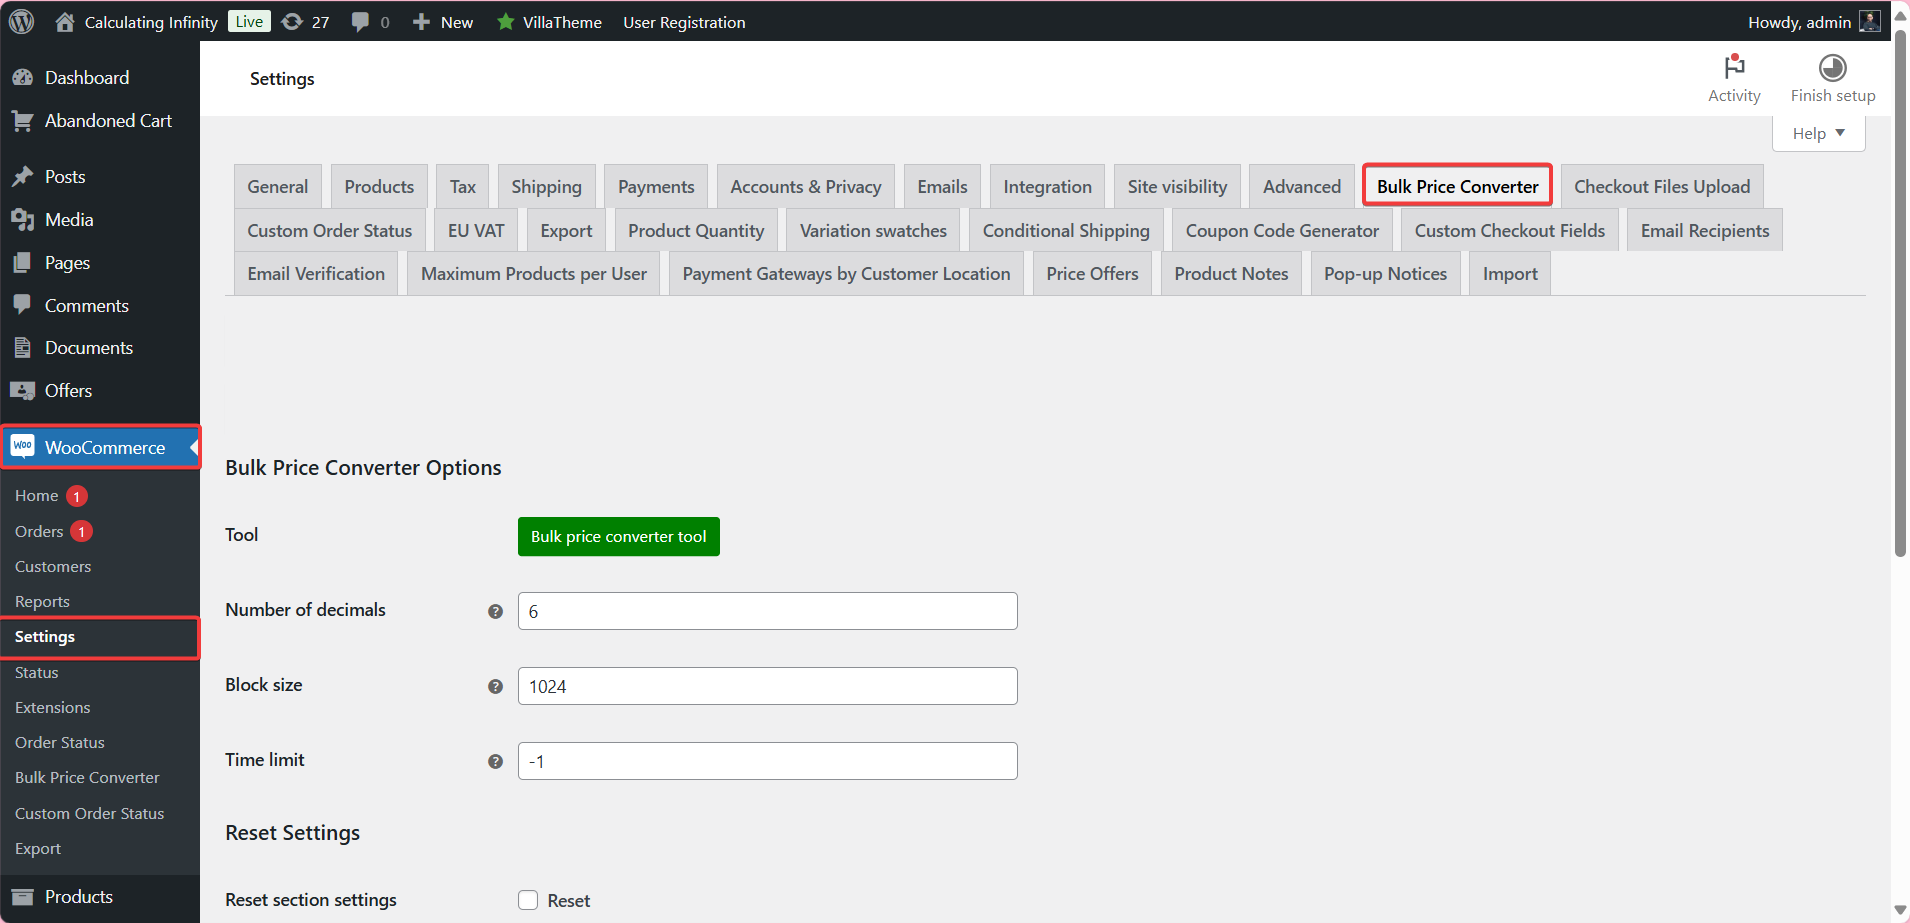
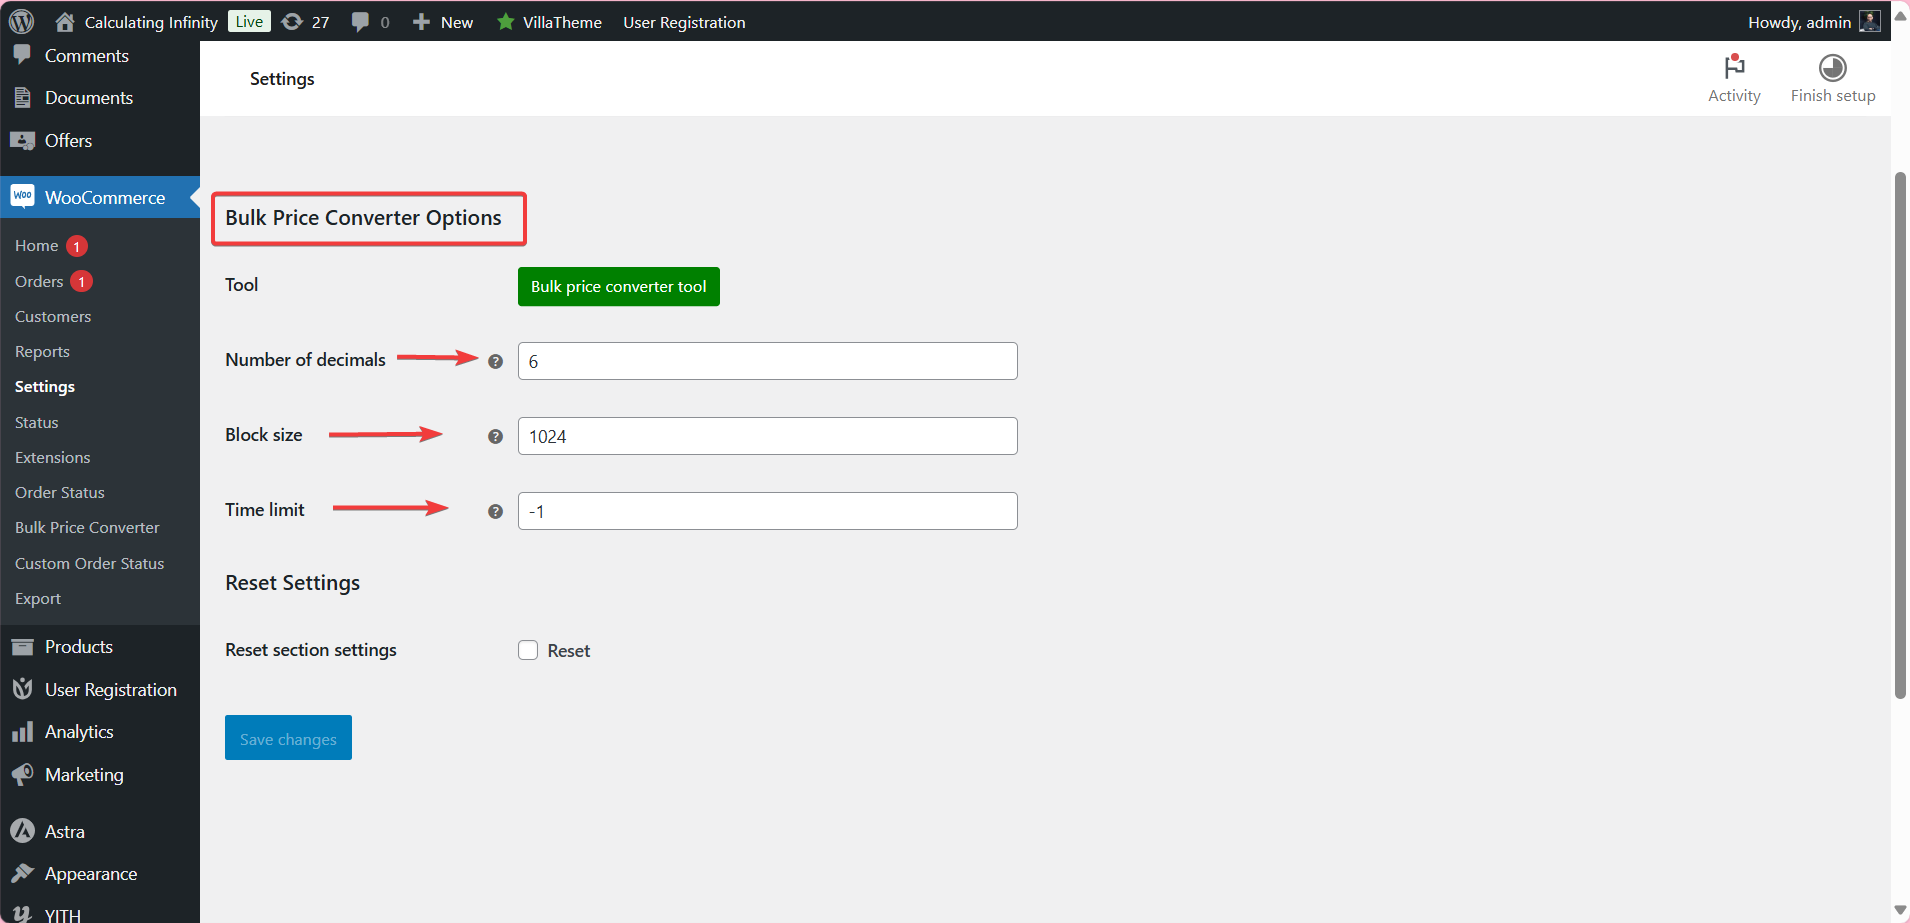
To access the plugin: Go to your WordPress dashboard > Tools tab > Bulk price converter.

How to Edit Your Prices in Bulk in WooCommerce - step2

Step3: #

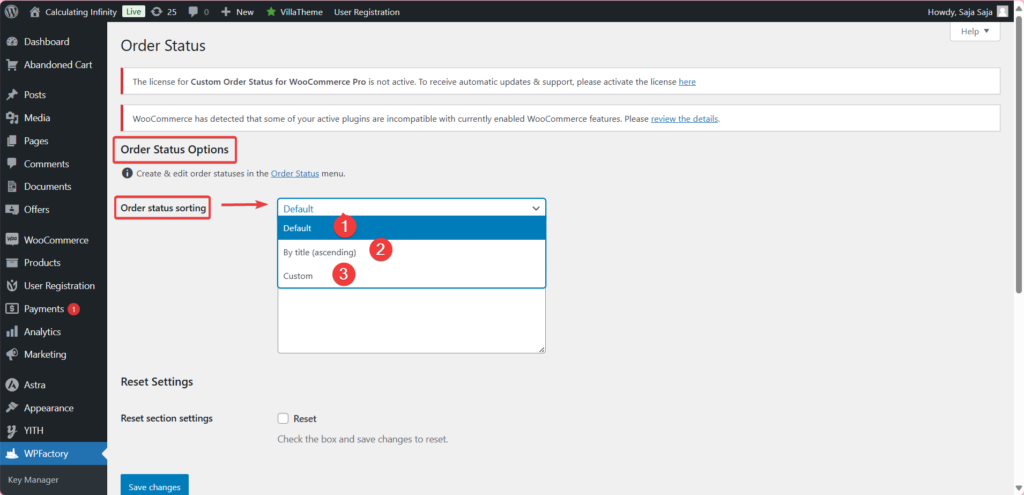
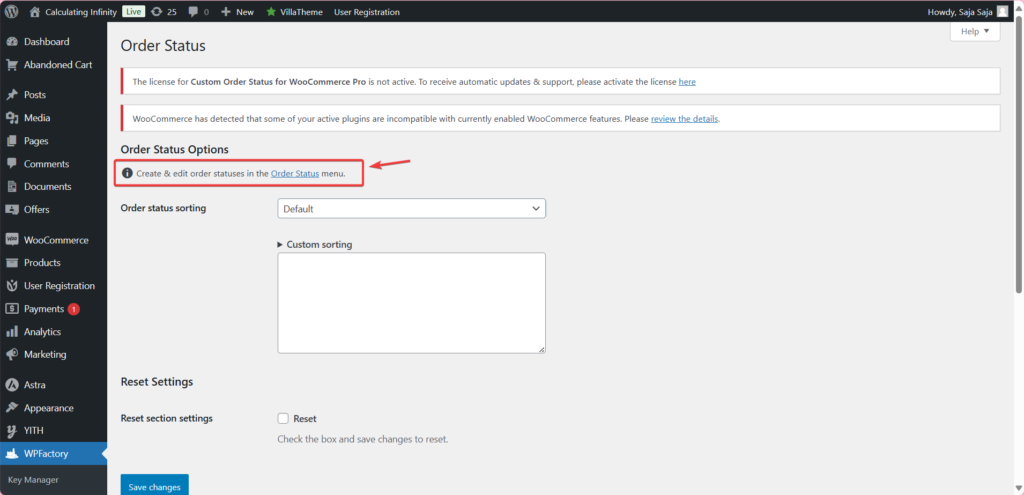
  • Bulk Price Converter Options #

From here you can customize some general settings to modify prices in bulk.

Number of decimals: If you have prices that require high accuracy, this option allows you to specify the number of decimal places that will appear in the prices after the decimal point.

Block size: This option allows you to specify the number of products that will be processed each time you modify prices.

Time limit: From here, you can specify the maximum time period allowed to execute the price adjustment process. If you set the value -1, the price adjustment will be executed without any time limit.

How to Edit Your Prices in Bulk in WooCommerce - step3

Step4: #

  • Bulk price converter tool #

Go to Bulk price converter tool for more customization.

How to Edit Your Prices in Bulk in WooCommerce - step4

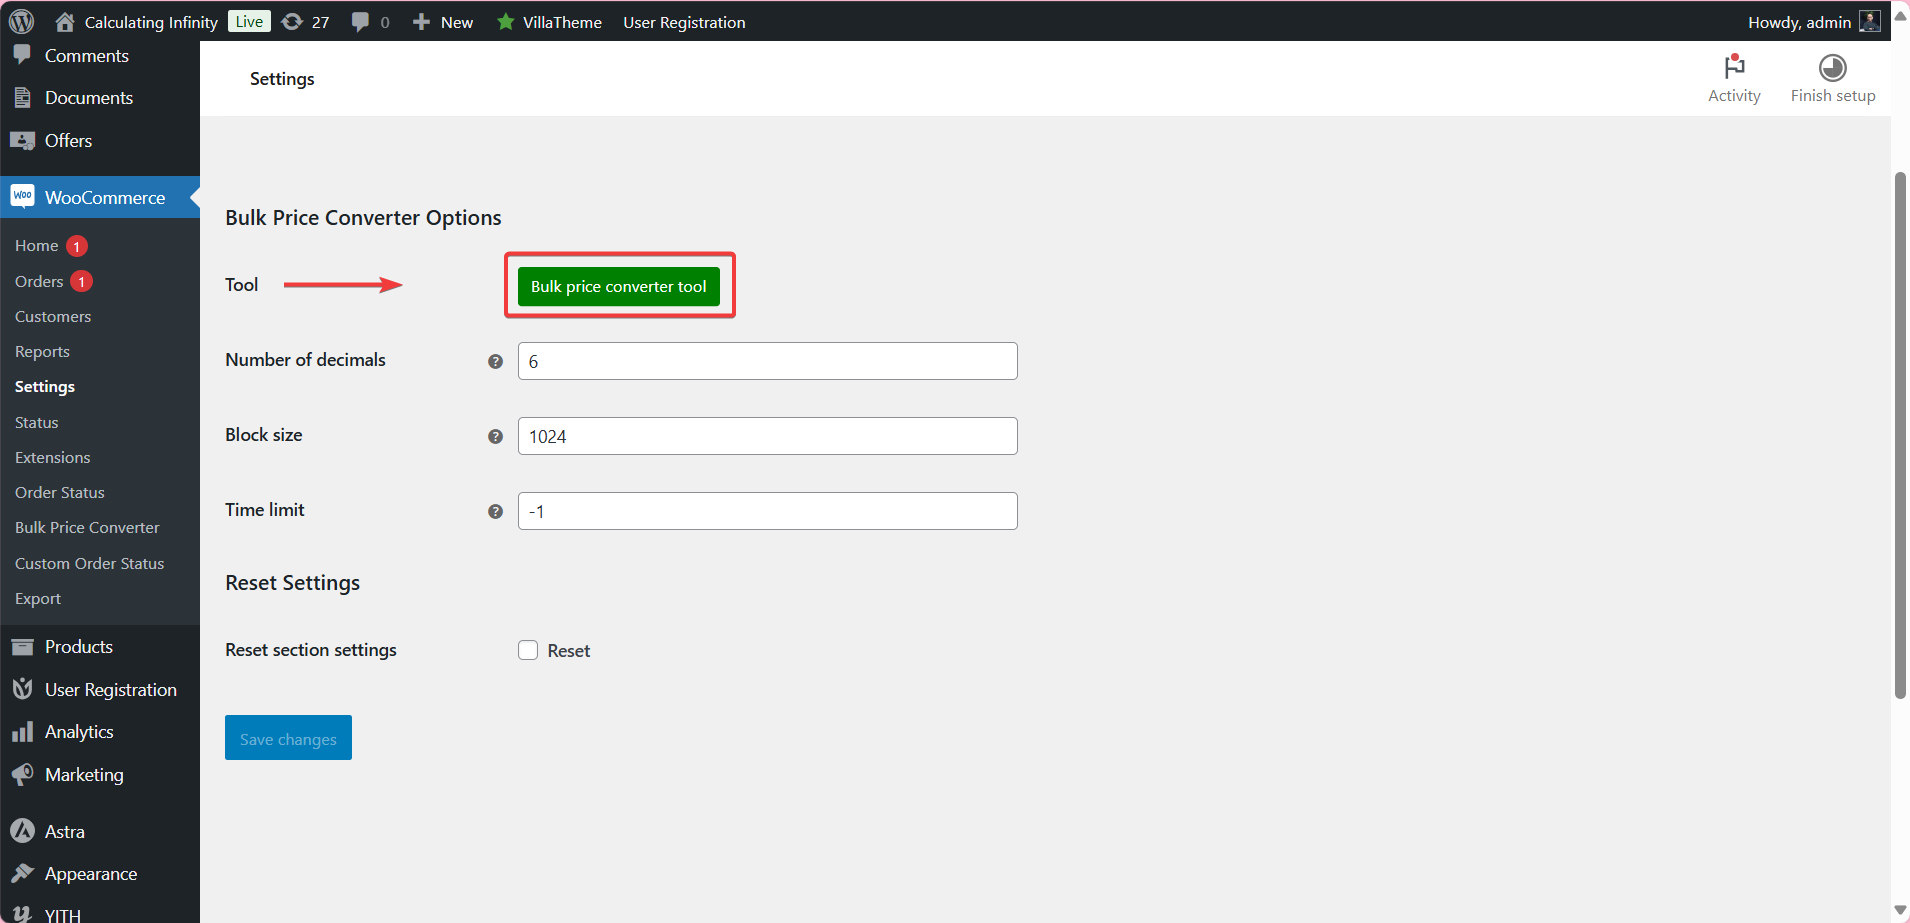
Here are some general options:

Direct Price: From here you can adjust prices directly without equations, you can enter a fixed price for all products.

Multiply all product prices by: If you want to increase prices by a certain percentage, you can put the factor here, you can specify a value greater than one, for example, if you choose 1.1 all prices will be increased by 10%.

Divide all product prices by: If you want to reduce prices by a certain percentage, here you can divide all products prices by a certain value. For example, if you choose 0.5, prices will be reduced by half.

Add to all product prices: From here, you can add a fixed amount to all product prices. For example, when you add 10, 10 will be added to each product price.

Subtract to all product prices: From here you can deduct a fixed amount from all product prices.

And certainly when you make any of these price changes, you must always make sure that the costs and profits are in their right place, that’s exactly where WooCommerce Cost of Goods: Product Cost & Profit Calculator helps you.

How to Edit Your Prices in Bulk in WooCommerce - Step4(2)png

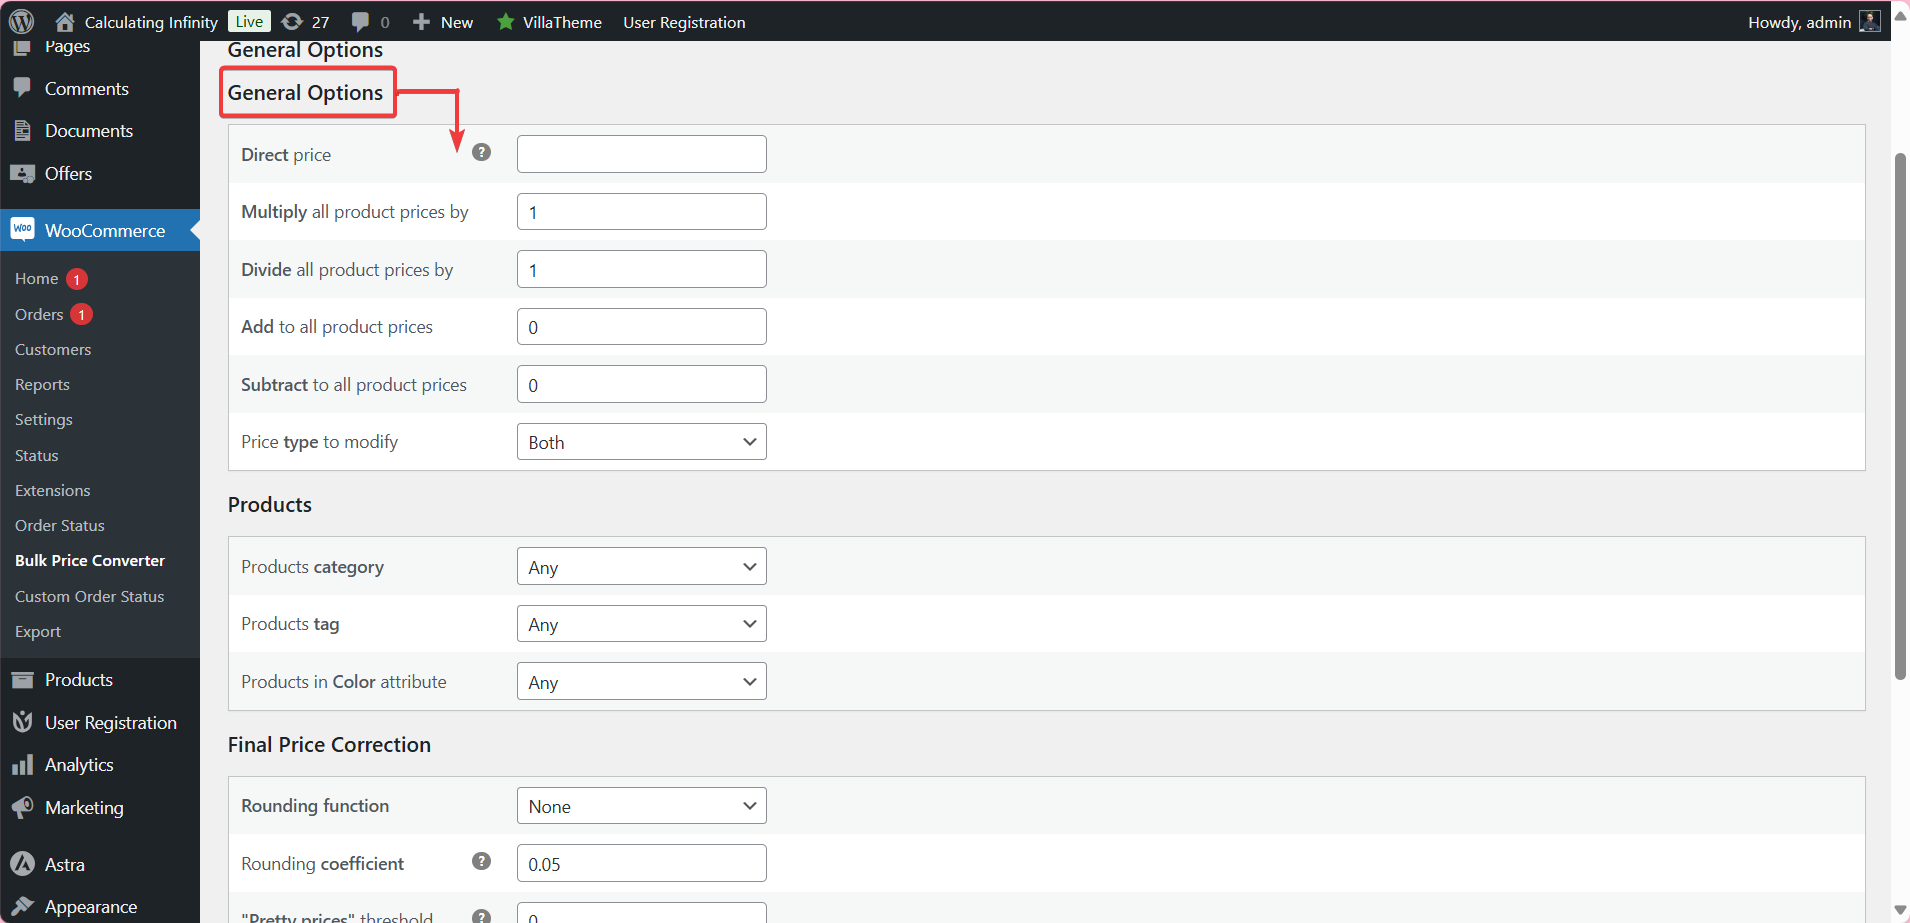
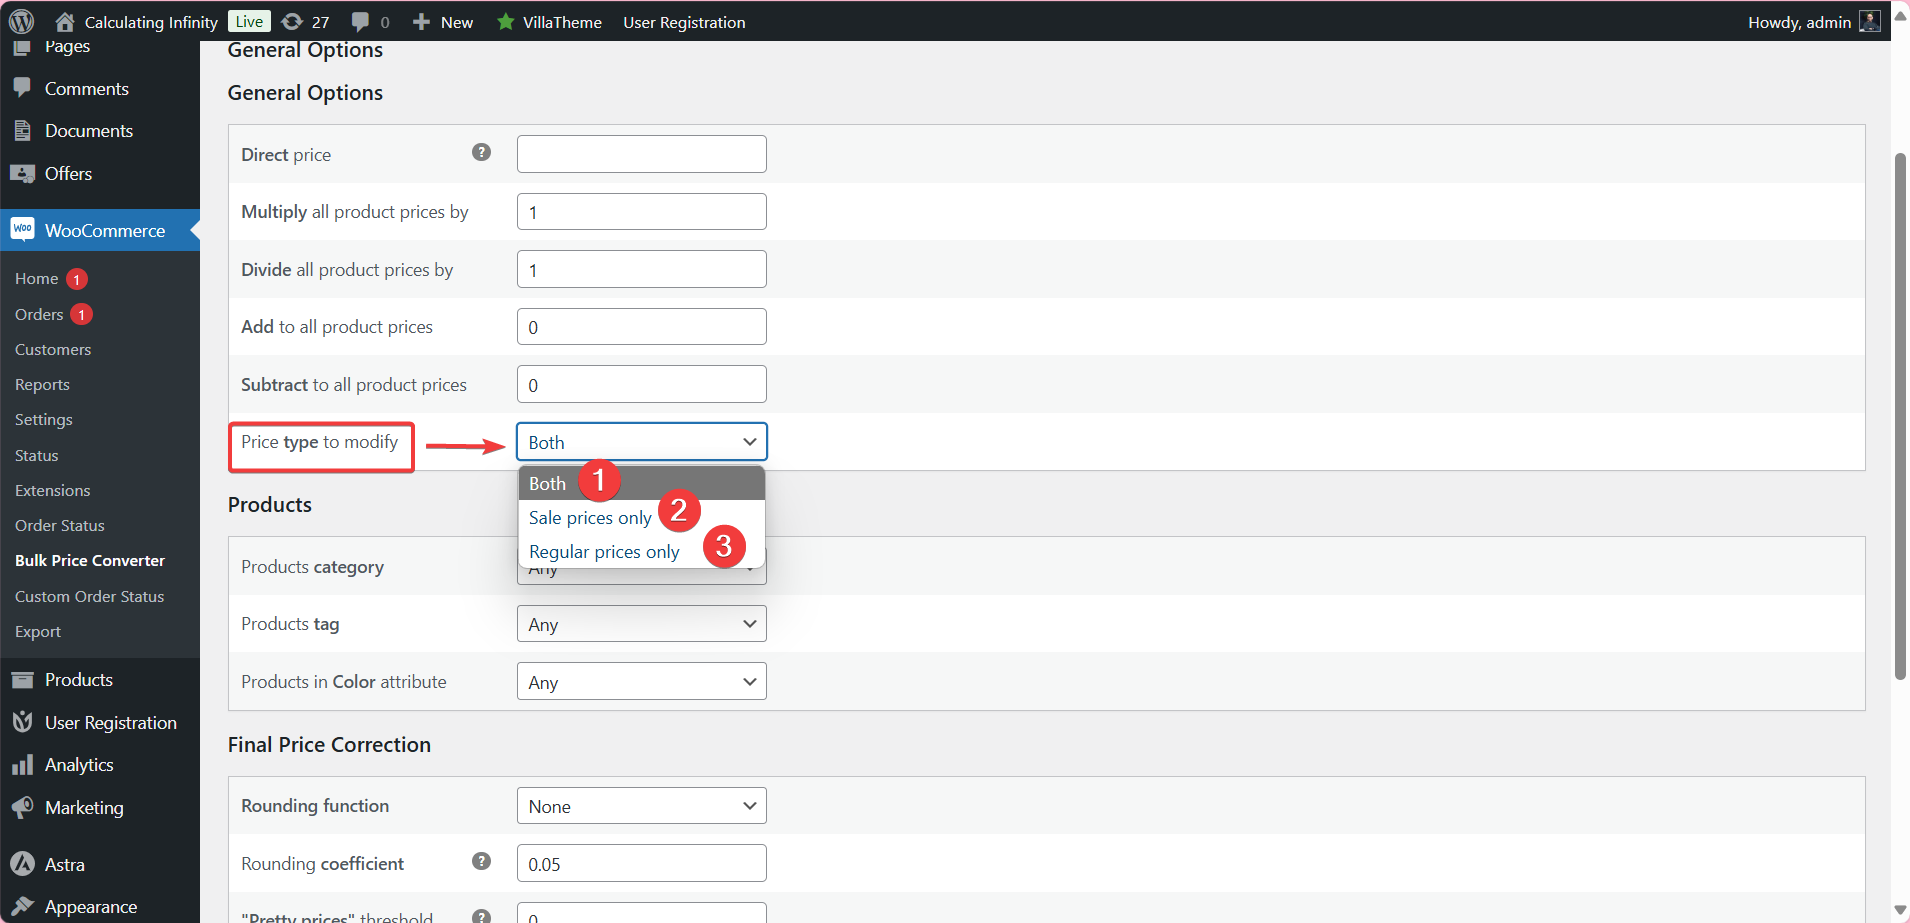
Price type to modify: In this option, you can choose the type of price you want to modify. 

Both: This means modifying the regular price and the sale price, if there are sale prices for the products. 

Regular Price: Modify regular prices only.

Sale Price: Modify the sale price only.

How to Edit Your Prices in Bulk in WooCommerce - Step4(3)

Products: Here you can specify the products you want to change prices for. 

Based on: #

Products category: You can select a specific category of products to apply modifications to.

Products tag: Here you are allowed to apply modifications to products that contain a specific tag.

Products in Color attribute: If you use color themes for products, you can choose a specific color to apply the modification to.

How to Edit Your Prices in Bulk in WooCommerce - Step4(4)

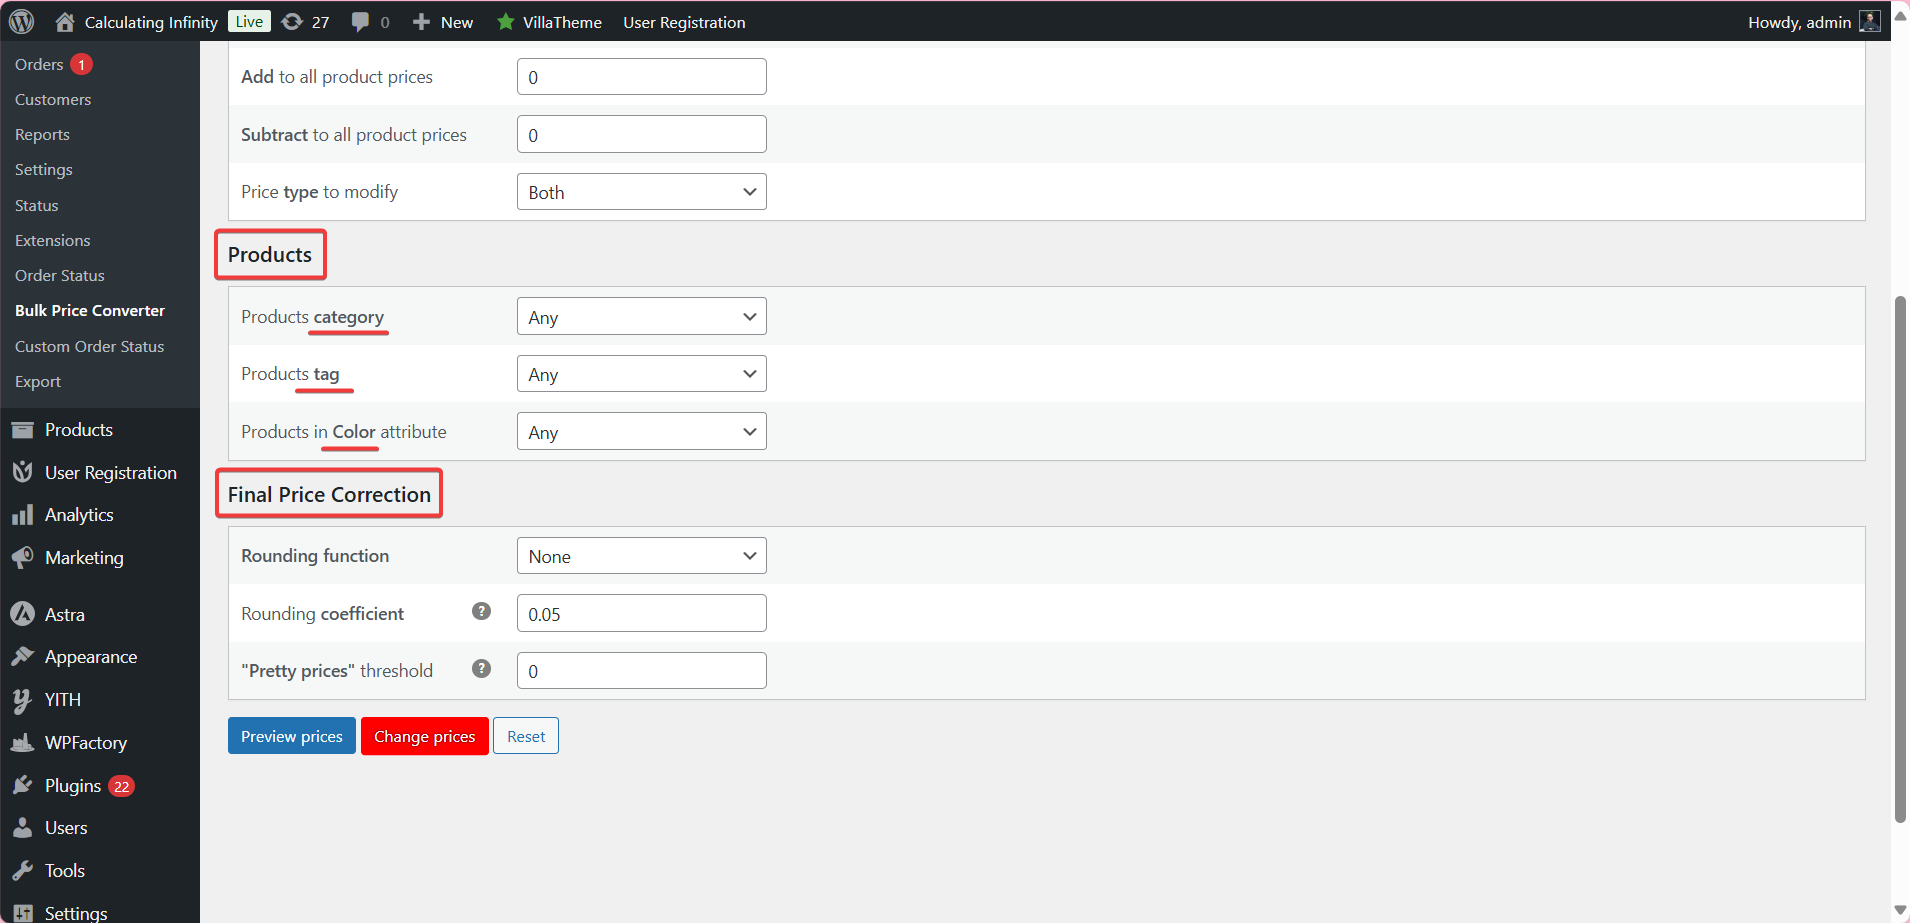
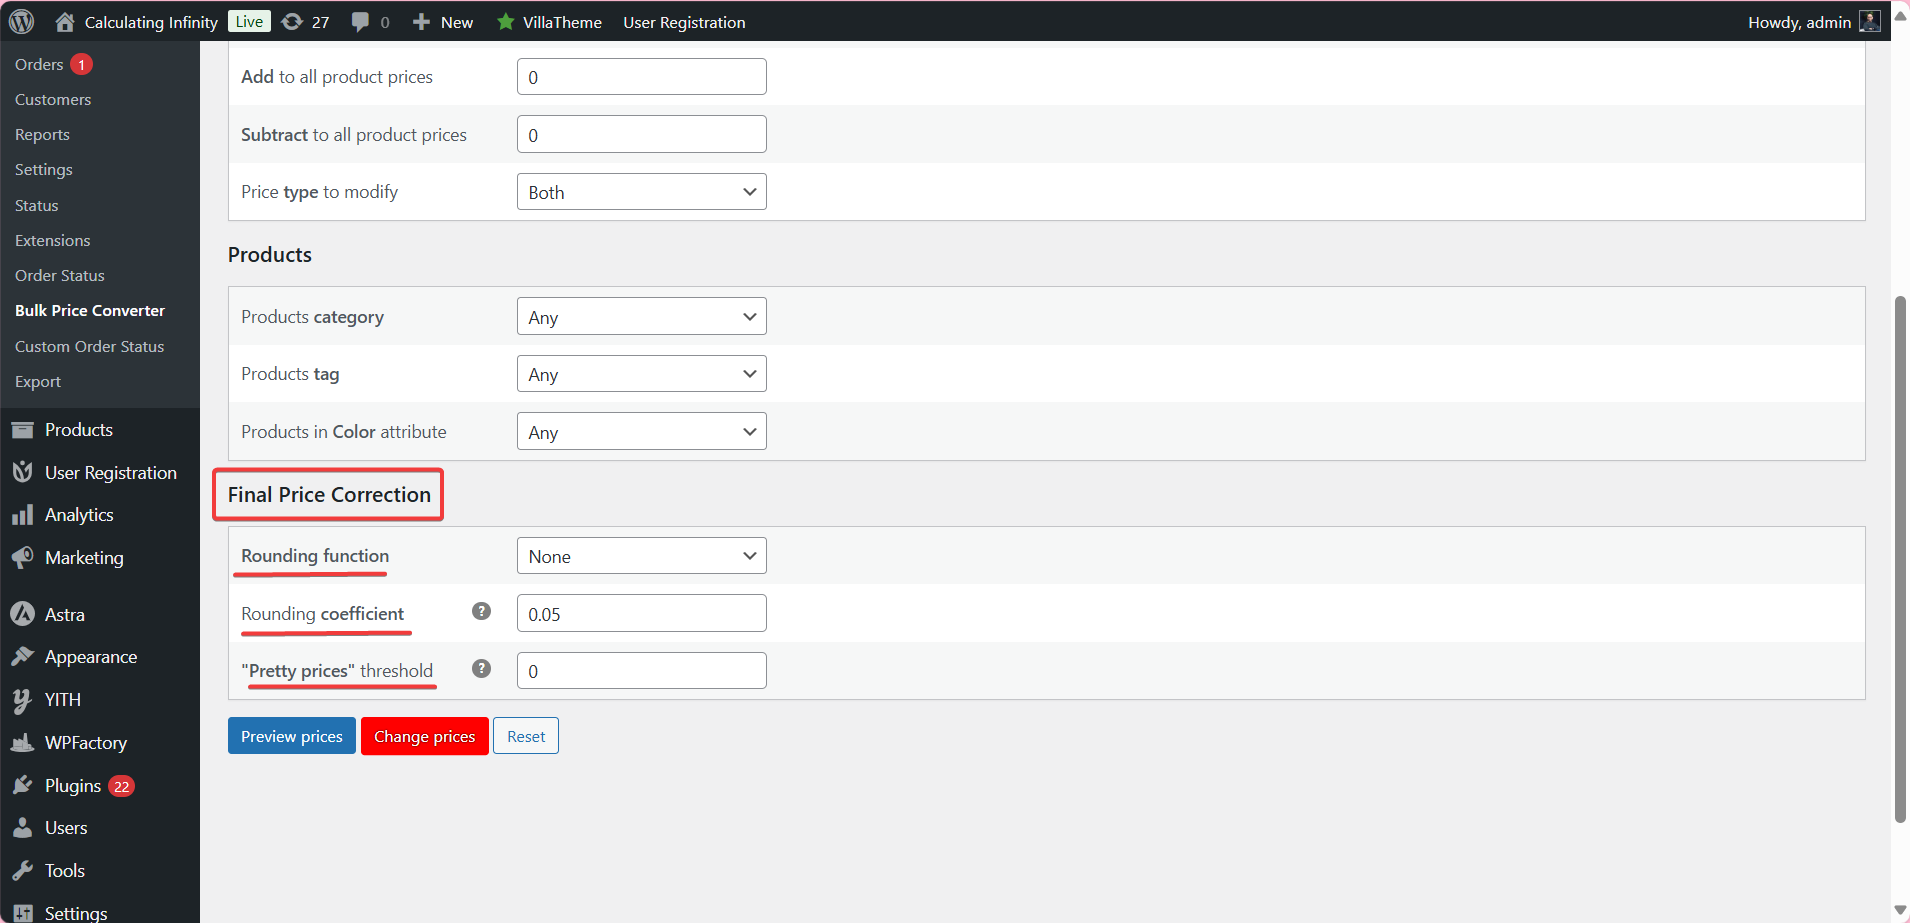
Final Price Correction #

These settings help in adjusting the final prices after applying the mathematical operations

Rounding function: This option allows you to specify how prices are rounded after adjustments. 

Rounding coefficient: If you want to round prices to the nearest certain value, you can enter the number here. For example, if you enter 0.5, and there is a price of 9.95, it will be rounded to 10.

“Pretty prices” threshold: This is what is called attractive pricing, meaning the price changes from 9.88. To 9.99, for example. This feature makes the price seem psychologically attractive.

How to Edit Your Prices in Bulk in WooCommerce - Step4(5)

Final Thoughts #

As we know, one of the most essential features every online store and your store must have is the ability to keep up with market changes, from changes in currency, competitors, holiday promotions or seasonal sales, or more. 

With features like selective bulk price edits, pricing calculations, preview and confirm price changes, you have full control over your pricing strategy, to always stay ahead of the curve.

So the WooCommerce Bulk Price Editor puts time control in your hands, saves lost hours, and increases productivity. And that means keeping up with the market trends, staying ahead of competition, and satisfying customers, which means? Higher revenue.

View Categories

Intro: How to Use the Plugin

Completed, processing, order on hold. If you run an online store using WooCommerce these terms are surely familiar to you. This is what we call Managing Order Status.

In this article, I’ll Walk with you to explore the concept of Order Status, the tool you can use to manage them, and how to install and set it up. Keep your eyes on this article to discover how to customize your order status.!

What is the Order Status for WooCommerce plugin? #

This plugin allows you to add custom order status, to reflect your specific business workflow as you want, although WooCommerce provides these order statues by default, but sometimes they are not enough to accurately reflect the real and customized state of orders, this is where the Additional Custom Order Status for WooCommerce comes in. So why does this plugin matter?

This plugin allows you to create and customize your order status as you want to suit your needs, ensuring a more efficient and smooth customer experience, and helping you streamline order management and enhance communication. 

Ok, and now How to install and set up this powerful plugin?  #

Follow me to learn how to add Order Status plugin to your WooCommerce store, step by step: 

Let’s get started!

Order Status for WooCommerce #

Step1:

  • Download The Plugin #

To get started you will need to download the “Additional Custom Order Status for WooCommerce” plugin that allows you to customize your order status.

 After downloading the plugin, from your WPFactory account, upload it to your WordPress site.

How to Customize Your Order Status for WooCommerce - step1

Step2: #

  • Access The Plugin #

Once the plugin is installed and activated, you can tailor it to fit your business needs as desired.

To access the plugin: Go to WPFactory tab > “Additional Custom Order Status for WooCommerce” 

How to Customize Your Order Status for WooCommerce - step2

Step3: #

  • General Options #

Order Status Options

From here you can sort the order statues as you want, either: 👇

  • Default: Here, you can use the default sorting in WooCommerce
  • By Title: By this option you can sort the orders by their titles, this means that order status will be sorted based on their names rather than the default WooCommerce order status.
  • Custom: This option allows you to customize the order status by adding the values in the box, this helps you to improve the order efficiency and helps you streamline order management.

How to Customize Your Order Status for WooCommerce - Step3

Step4: #

  • Add Order Status #

From here, you can create and edit any order states you want.
How to Customize Your Order Status for WooCommerce - step4

Click on Add New Status to add the order you want.

For example, you can add a new order status such as: “Under Manufacture” or “pending confirmation” or any other order status that suits your store’s needs and requirements. 

How to Customize Your Order Status for WooCommerce - Step4(2)

To add new order status: #

Add Title: here add the title of your order status, for example “Under Manufacture”

Status Slug: This option is set automatically from the order name, and you can not edit it after being saved.

Styling Options: from here you can customize the order style to suit your website. You can customize the text color and background color.

How to Customize Your Order Status for WooCommerce - step4(3)

Step5 #

General Options

Add to order bulk actions: From here you can update multiple requests at once to this new state.  

Action Button Options: Here you can modify the action buttons order as you want, from add it to list action button to add it to admin order preview action buttons.

Order Options: These settings are related to order itself, if you want to determine if the order is editable or not, and if it is paid or not.

How to Customize Your Order Status for WooCommerce - Step5

  • Email Options #

You can decide if you want to send an email when the order status changes or not, and customize the email address, subject and other settings. 

How to Customize Your Order Status for WooCommerce - step5(2)

Final Thoughts #

As simple as that, you can manage the status of your store easily and in simple steps! 

It’s simple but it can make a big difference, whether you’re handling digital products, bookings, tangible products, or anything else, it offers great flexibility in customizing order status. Enjoy smoother and more efficient order management!

View Categories

Intro: How to Use The Plugin 

Do you know what the key to attracting customers is? “Communicating with them personally”. 

When you personalize your communication with customers based on their needs, it builds trust and increases engagement. Whether you’re sending order confirmation, shipment notifications, or invoices, having a control over content, styling, recipients, and everything, can enhance the overall user experience and your store’s efficiency. 

So, What does this mean? It means that today we are here to provide you with the right tool that will allow you to customize your customer emails to meet the specific business needs you desire. 

I will walk you through this article to tell you how to customize your emails and recipients as you want.

Let’s start!

Custom Emails for WooCommerce
Step1: #

  • Download The Plugin #

To get started you will need to download the “WooCommerce Additional Custom Emails & Recipients plugin that allows you to add custom emails and recipients.

 After downloading the plugin, from your WPFactory account, upload it to your WordPress site.

How to Customize Emails and Recipients in WooCommerce - Step1

Step2: #

  • Go To The Plugin #

Once the plugin is installed and activated, you can tailor it to fit your business needs as desired.

To access the plugin: Go to WPFactory tab > WooCommerce Additional Custom Emails & Recipients.

How to Customize Emails and Recipients in WooCommerce - Step2

Step3: #

  • General Options #

After accessing the plugin, go to general options.

Number of custom emails: This option refers to the number of custom emails created using the plugin. You can create new custom emails according to your needs.

Enabled Triggers Group: These settings allow you to select the events or situations that will trigger the custom email being sent. 

Such as: Order status updated to, new order, subscriptions, etc.

Custom Triggers: This option allows you to add additional triggers to specify when to send email. 

There is a specific formula for this: 

  • Action: This is the name of the software events in WooCommerce. 
  • Action I Title: Here, you can add a description next to the event name.

For example: woocommerce_checkout_order_processed

How to Customize Emails and Recipients in WooCommerce - Step3

Base dir: It indicates the location of the basic file of your site.

Scheduler: This option is used to schedule emails to be sent automatically using WordPress scheduled tasks.

How to Customize Emails and Recipients in WooCommerce - Step3(2)

Step4 #

  • Scheduled Emails #

Here the emails that have been scheduled appear.

How to Customize Emails and Recipients in WooCommerce - Step4

Step5 #

  • Settings for Custom Email #

To customize settings for each specific email, go to WooCommerce > Settings > Emails

From here, you can customize all the email notifications that will be automatically sent to your users when specific events occur.

For example,  when an order is completed or canceled, a customized email notification is automatically sent to customers. 

You can customize the content, edit the recipient’s email address, edit the subject line and email content as you want. And you can disable or enable these email notifications whenever you want. 

How to Customize Emails and Recipients in WooCommerce - Step5

When you click on “Manage” at the dedicated page, it will take you to the settings page of this event.

How to Customize Emails and Recipients in WooCommerce - Step5(2)

Then, you will be here, you can enable/disable this event as you want by checking the box, and customize the other options.

How to Customize Emails and Recipients in WooCommerce - Step5(3)

Step 6 #

  • Email Sender Options #

From here, you can specify the sender’s options, his name, and address, and you can also customize the email template as you want, from font, colors, text, and others.

How to Customize Emails and Recipients in WooCommerce - Step6

Conclusion #

If you got here I congratulate you, now you have the ability to customize your email as you want with simple steps, and that means it can significantly improve your store’s communication with customers and teams. 

With the right plugin, you can easily add new custom email, personalize content, and ensure the right people get the right information at the right time. 

View Categories

Intro: How to Use The Plugin 

Sometimes as store owners, we face some challenges when it comes to shipping methods. Imagine with me that you can determine the shipping method used according to the product, the customer’s country, the payment method, or even according to the time and date, all in line with the shipping strategy of your store. How much will it facilitate your store’s operations and improve its performance?

In today’s article, I will guide you through the process of installing the powerful tool called The Conditional Shipping for WooCommerce plugin, a tool that will simplify your shipping strategies and optimize your store’s efficiency.

Walk with me to discover how to make the most of this amazing plugin, let’s go!

Conditional Shipping for WooCommerce

Step1: #

  • Download The Plugin #

The first thing you need to do is download the “The Conditional Shipping for WooCommerce plugin plugin from your WPFactory account, and upload it to your WordPress site.

WooCommerce shipping - Step1

Step2: #

  • Access The Plugin #

Once the plugin is installed and activated, you can tailor it to fit your business needs as desired.

To access the plugin: Go to WPFactory tab > WooCommerce Conditional Shipping: Restrict Shipping Options by Anything

Step3: #

  • General Options #

After accessing the plugin, go to general options. The first thing you need to do is enable the plugin using the checkbox shown in the image below. 

WooCommerce shipping - Step3

  • Logical Operators: #

It is used when there are multiple conditions that are enabled by shipping strategy. 

AND: This parameter is used when there are multiple conditions that must be correct to activate the process. 

For example, Enable free shipping if an order is over a certain amount AND if a product is in a “Free” shipping class.

Which means that the two conditions must be applied to complete the process. 

OR: This parameter is used when the operation can be achieved if only one of the conditions is true. 

For example, Enable free shipping if an order is over a certain amount OR if a product is in a “Free” shipping class.

Which means if the order is over a certain amount OR if a product is in free shipping class. 

WooCommerce shipping - Step3(2)

  • Add Product Variations  #

If the conditions are related to “Require Products”, “Exclude Products”, this option affects them. Enabling this option means that you will be able to add variations for products such as size, color to the product list. 

  • Require All #

If you enable the “Require All” option it means that ALL  products in the cart must be valid.

This option affects only these conditions: 

  • Require Products
  • Require Product Categories
  • Require Product Tags
  • Require Product Shipping Classes
  • Cart Instead of Package #

When this option is enabled, it means that you will not apply the conditions to the package (products grouped together) but the conditions will be applied to all products in the cart individually. This means that if you have a set of products in the cart, conditions such as “Minimum Order Amount”, “Maximum Order Amount”, “Require Products”, “Exclude Products”, etc, will be reviewed for all the products within the cart instead of a specific package or set of products. 

  • Use Shipping Instances #

Enabling this option allows you to assign different conditions to shipping cases. Such as flat rate, in different shipping areas or in the same region. 

  • Debug #

When you enable this option, a record will be added in the status section of WooCommerce. This log can help track errors. 

WooCommerce shipping - Step3(3)

Step4 #

  • Order Amount #

When this section is enabled, you will be able to specify a minimum order amount based on the shipping method.

You can put the amount you want at the shipping method you want to apply.

    • Flat Rate: A shipping method that allows the seller to specify a fixed shipping cost that applies for all orders regardless of the weight or size of the product or the customer’s location.
    • Free Shipping: The stores offer free shipping to customers, usually when they meet certain conditions, such as a minimum order.
  • Local Pickup: An option that allows customers to receive their orders directly from a specific store location or warehouse instead of shipping them.

And the same thing for Maximum Order Amount.

WooCommerce shipping - Step4

Step5 #

  • Cities #

    • Require Cities #

When this option is enabled, you can specify a condition related to the cities with which the shipping methods can be used.

You can specify the shipping method you want to use for each city by putting the city name in the box.

WooCommerce shipping - Step5

    • Exclude Cities #

You can also identify the cities you want to exclude from some shipping methods.

WooCommerce shipping - Step5(2)

Step6 #

  • User Roles  #

And the same thing here, this section allows you to specify the roles that are allowed to use specific shipping methods, or the roles you want to exclude with some specific shipping methods.

WooCommerce shipping - Step6

Step7 #

  • Users #

When this option is enabled, you can then specify the user IDs that can benefit from different shipping methods or exclude them.

WooCommerce shipping - Step7

Step8 #

  • Payment Gateways #

Here you can specify the payment methods you want to include or exclude with shipping methods.

WooCommerce shipping - Step8

Step9 #

  • Products #

Here you can enter the names of the products you want to include or exclude in the shipping method you want.

WooCommerce shipping - Step9

Step10 #

  • Product Categories #

Here, you can select entire product categories to include or exclude it from the shipping method, instead of selecting individually.

WooCommerce shipping - Step10

Step11 #

  • Product Tags #

Product tags are keywords assigned to products in WooCommerce to provide extra details and improve searchability.

Here you can specify the product tags you want to include or exclude from any shipping method.

WooCommerce shipping - Step11

Step12 #

  • Product Shipping Classes #

This feature allows store owners to apply specific shipping rates or rules to a group of products that share similar shipping requirements such as size, weight, or anything else.

When this option is enabled, you can determine which product shipping classes you want to include or exclude.

WooCommerce shipping - Step12

Step13 #

  • Date/Time #

From here, you can specify the hours, days, or months during which you want to enable or exclude methods. For example, you can disable the local pickup option after 8 PM, or enable free shipping only during specific seasons.

WooCommerce shipping - Step13

Final Words #

This way, you have complete flexibility in controlling your shipping strategy with just one tool and with high ease. Leading to improved and streamlined operations that align perfectly with your store.

View Categories

Intro: How to Use The Plugin 

Owning an online store means managing a vast amount of data, product information, customer details, order specifics, order items, and much more. This large amount of data means that it must be analyzed, protected from any violations or loss, and the ability to export it to other platforms for seamless workflow integration.

Which ultimately means you need one tool that brings all these functionalities together, right? 

Well, you’re in the right place! In this article, I’ll introduce you to one of the most essential tools for exporting customer data, product details, order information, and more.

Here’s how to set it up, follow along:

Products, Order & Customers Export for WooCommerce

Step1: #

  • Download The Plugin #

Download the “Export WooCommerce Products, Order & Customers” plugin from your WPFactory account, and upload it to your WordPress site.

How to export WooCommerce products - Step1

Step2: #

  • Access The Plugin #

As the plugin is installed and activated, you can customize it for your business requirements as you want.

To access the plugin: Go to WPFactory tab >Export WooCommerce Products, Order & Customers.

Step3: #

  • General Options

Export Options: These options are used to customize how data is exported from your store.

CSV Separator: This option allows you to specify the separator that will be used to separate data within a CSV file. The most common separator is a comma (“,”), and you can use any form of separator.

CSV Warp: With this option, you can specify whether the values in the CSV file should be enclosed in a quotation mark (“) or not. 

UTF-8 BOM: It is a special sequence at the beginning of the file, when activated, allows text editors and other programs to detect the encoding used (UTF-8).

Content Length Header: These settings are used to control header in the HTTP response when loading CSV and XML. Activating this option means that the content length header will be sent with the file when it is uploaded. 

User Capability: This option allows you to specify the permission of the user who can access the export tool. 

Default option: Manage options, which is usually limited to administrators.

Alternative settings: Manage WooCommerce, which can give administrators and store managers access to the tool.

How to export WooCommerce products - Step3

Step4: #

  • Secondary Separators Options #

These options allow additional separations to be specified if the data contains multiple elements that must be separated. 

For example, you need a separator between the value and the price in the same field.

How to export WooCommerce products - Step4

Step5: #

  • Advanced Options  #

Block Size: This option determines the size of the data that is processed each time during the data export. The number 1024 represents the block size in bytes.

Time Limit: Specify the maximum time allowed to execute the export operation. The value -1 means there is no limit time, allowing the export to continue until completion.

Ajax Download: When this option is enabled, Ajax is used to load data asynchronously (the user does not need to wait for the page to load completely).

How to export WooCommerce products - Step5

Step6 #

  • Export Products Options #

From here, you can specify the items you want to export by choosing them from the left table and moving them to the right table, and then pressing save.

How to export WooCommerce products - Step6

Additional Export Products Meta Fields #

These settings allow you to add custom fields (Meta Fields), to the product export process. These fields are used to include additional information that is not included by default in the data that is exported.  

How to export WooCommerce products - Step6(2)

Export Product Filter Options #

Here you can filter the data that will be exported by date.

How to export WooCommerce products - Step6(3)

Step7 #

  • Orders #

This option allows you to choose which fields to include when exporting orders. 

How to export WooCommerce products - Step7

Step8 #

  • Orders Items #

This page is designed to export details of items associated with each order in your store.

How to export WooCommerce products - Step8

Step9 #

  • Customer Export Option #

And the same thing here, export customer options provide you the ability for selecting data to extract from customer databases.

How to export WooCommerce products - Step9

Step10 #

  • Customers from Orders #

This option allows you to export the information of customers who have placed orders in your stores. Customers are extracted based on information available in orders, not from the public user database.

How to export WooCommerce products - Step10

Final Thoughts #

Exporting data is a vital skill for any WooCommerce store owner!

And now, you can effortlessly export any data just through the previous steps. This makes the process of dealing with data, no matter how large, easier and simpler, ensuring your store’s efficiency and safeguarding your valuable information. And this helps you share the information with third parties or integrate it with essential business tools.

View Categories

Intro: How to Use the Plugin

Imagine that we all live on this planet without an ID number that identifies us legally, between countries, or to prove our identity. Without thinking the situation will be tragic, complex, things will go off track and we will get a lot of problems and challenges. The same thing applies to products, every product needs an ID number to distinguish it from others, making it easier to track in inventory. 

Therefore, to keep everything on the right track, and ensure seamless product identification, and simplify searches, there must be a tool that facilitates this work. So? EAN Barcode Generator: UPC, ISBN & GTIN Inventory Plugin in WooCommerce is here to make this process easier for you in just a few minutes.

And now, let’s dive in and see how we can install and use this amazing plugin! Let’s start

EAN for WooCommerce

Step1: #

  • Download The Plugin #

Download the “WooCommerce EAN Barcode Generator: UPC, ISBN & GTIN Inventory plugin from your WPFactory account, and upload it to your WordPress site.

How to Setup EAN Barcode Generator - Step1

Step2: #

  • Access The Plugin #

As the plugin is installed and activated, you can customize it for your business requirements as you want.

To access the plugin: Go to WPFactory tab >WooCommerce EAN Barcode Generator: UPC, ISBN & GTIN Inventory.

How to Setup EAN Barcode Generator - Step2

Step3: #

  • General Options #

After accessing the plugin, go to general options. The first thing you need to do is enable the plugin using the checkbox shown in the image below. 

How to Setup EAN Barcode Generator - Step3

  • Type Options: #

This option allows you to select the type of barcode used. If you choose the automatic option, it will automatically choose the most appropriate barcode type. 

EAN-8: A short barcode with 8 digits.

UPC-A: A common barcode in the US with 12 digits.

EAN-13: A standard global barcode with 13 digits.

ISBN-13: Used for books with 13 digits.

JAN: A barcode commonly used in Japan.

EAN-14: An extended barcode with 14 digits.

How to Setup EAN Barcode Generator - Step3(2)

  • Title #

From the title box, you can name the field that will appear on the product edit page.

  • Admin product edit page #

From here you can specify where the barcode field will appear on the product edit page.

For example:

  • Variation: After pricing 
  • Variation: After dimensions
  • Variation: After all

How to Setup EAN Barcode Generator - Step3(3)

  • Check if valid #

Enable this box if you want to check the entered barcode is valid.

  • Require #

When enabled, the EAN barcode will be required on the admin product edit page.

This option enables you to search the product using the EAN barcode in the admin area. This helps you find products faster.

  • Admin product list column #

If you enable this option, will add an EAN column to the products list in the admin area. This will show the EAN codes directly in the product list.

How to Setup EAN Barcode Generator - Step3(4)

  • Single product page #

If you want to display the EAN barcode on each product page, check this option. This will enable the customers to see the EAN barcode directly on the product page.

Here you can customize the format of how the EAN will appear and where it will appear on the single product page.

Enable these options if you want to show the EAN barcode on the shop page, cart page, checkout page, and on searching. 

How to Setup EAN Barcode Generator - Step3(5)

  • Product structured data #

If you enable this option, this will add EAN barcode to the product structured data, which will improve the compatibility with search engines like Google Search Console. 

How to Setup EAN Barcode Generator - Step3(6)

  • Orders & Email #

Enable this if you want to add the EAN to new order items meta.

  • REST API #

It is used to integrate and facilitate the connection between WooCommerce and other applications, such as inventory management or marketing tools, through the REST API.

When enabled, the EAN code will be included in the REST API response for products.

And you can add EAN to each order object in REST API responses.

How to Setup EAN Barcode Generator - Step3(7)

Step4: #

  • Product Tools #

These tools help manage EAN for products in your WooCommerce store. They allow you to generate, assign, copy, delete, or transfer EAN data for products.

Important notes! 

No Undo: There is no way to prevent changes after running these tools, so process carefully.

  • Generate Tool #

The purpose of this tool is to automatically generate EAN barcode for all products.

There are many options:

Type:  you can specify the type of EAN benign generated.

Country prefix: Here enter the starting country prefix “country code”, and the ending one. 

Prefix Length: Enter the number of characters in the prefix.

Seed: A unique identifier to ensure EAN are distinct.

How to Setup EAN Barcode Generator - Step4

  • Copy from products attribute #

You can copy EAN from the product attribute for all products. And you can put custom product attributes

How to Setup EAN Barcode Generator - Step4(2)

  • Assign from the list #

Assigning EAN from the list for all products, means assigning pre-prepared EAN numbers from the custom list to your store’s products automatically. You can select the product category to include when assigning the EANs

Reuse Deleted: Reassign EANs from deleted products to the list.

  • Delete #

And you can delete all EANs for all products.

How to Setup EAN Barcode Generator - Step4(3)

  • Copy to Product Attribute  #

You can copy EAN to the product attribute, by selecting the attribute you want.

  • Get State #

This tool will not assign/delete any EANs, instead, it will count how many products in your shop do not have EAN.

How to Setup EAN Barcode Generator - Step4(4)

  • Variable Products #

Includes both parent products and their variations for bulk actions.

Automatic Action: Automates EAN generation or updates for products.

Periodic Action: Sets actions to be automatically performed on a periodic basis, for all products.

Interval: Specify the frequency in seconds

  • Bulk Actions #

Add options to the products> Bulk Actions menu for generating or deleting EANs directly in bulk.

How to Setup EAN Barcode Generator - Step4(5)

Step5 #

  • Order Tools #

These tools for managing products identify orders in your WooCommerce store.

Add: Add EAN for all products.

Delete: Delete EAN for all products. 

Order Search: This option allows you to search orders based on the EAN codes of the items.

How to Setup EAN Barcode Generator - Step5

Step6 #

  • Barcodes #

The first thing you must check “enable section” 

Admin product edit page: This option enables the barcode image to be shown on the admin product edit page.

Admin product list column: This add barcode column in the admin product edit page.

Single product page: And you can show a barcode image on a single product page on the frontend by checking the single product page.

And if you want you can display it on the shop and cart page. 

How to Setup EAN Barcode Generator - Step6

Step7 #

  • Plugin Compatibility options #

This section provides compatibility settings for the barcode plugin with other WooCommerce plugins. If you want this, you need to install the plugin you need and enable the specific section.

How to Setup EAN Barcode Generator - Step7

Step8 #

  • 2D Barcode Options #

If you want to store less data in less space, you need 2D Barcode. 2D Barcode offers greater flexibility and allows for significantly larger data storage.

When you enable this option, 2D Barcode settings in the plugin are activated. 

You can Show barcode image on admin product edit page, cart page, shop page, checkout page, and you can add barcode column to admin product list by checking the box. 

How to Setup EAN Barcode Generator - Step8

Step9 #

These settings are specific to the print Barcode (PDF). When you enable this option, the barcode will be pretend. You can customize various printing properties as you want, such as: page size, orientation, unit, and other printing features. Also, you can specify the max barcode per page, column, and cells. 

How to Setup EAN Barcode Generator - Step9

  • Advanced Options #

Enable this option if you want to skip the products without barcodes from printing. 

And if you want to use the print tool, check the box and save changes to run the tool. 

How to Setup EAN Barcode Generator - Step9(2)

Step10 #

  • Advanced settings #

Meta key: this is the meta key that is used to store EAN barcode data in the database. The default format is _alg_ean.

Force Remote Image: If you enable this option, remote images will be forced to be used in barcode tables. 

Export – Import: If you want to export or import the plugin setting, enable this option. 

How to Setup EAN Barcode Generator - Step10

Step11 #

  • Extra Fields #

If you need to add extra fields per product such as: Title, Meta key, Admin product search, Single product page display (including variations), Search (frontend), and Product structured data. You can add them from here. 

How to Setup EAN Barcode Generator - Step11

Conclusion #

In my final words, if you want to facilitate the process of inventory management, and ensure smooth product tracking in your WooCommerce store, EAN Barcode Generator: UPC, ISBN & GTIN Inventory Plugin in WooCommerce is the right choice for you.

View Categories

Intro: How to Use the Plugin

Who wouldn’t want to protect their online store from fake accounts? I’m guessing your answer is the same as everyone else’s, absolutely no one.

Fak accounts and interactions with false emails or customers are among the challenges every online store owner faces.

Not only do these fake accounts compromise the authenticity of your customer database, but they can also lead to spam, misuse of resources, and even potential security risks. So, the solution? simply it’s the Email Verification Plugin. 

This amazing tool ensures that only genuine customers can register and interact with your store by asking users to confirm their accounts after registration. This helps you keep only real customers on your email list, and this helps you to improve overall data quality.

Let me walk you through this article on how to set up an email verification plugin in just a few simple steps. 

Email Verification for WooCommerce
Step1:  #

How to Set Up Email Verification Plugin in WooCommerce - Step1

Step2: #

  • Access the plugin #

Go to WooCommerce > Plugins > Click on Add New Plugin > Upload Plugins >Install Now.

How to Set Up Email Verification Plugin in WooCommerce - Step2

Step3: #

  • General Options #

From General options enable the “ login on activation” option. This option allows customers with verified accounts to login automatically. You can also set it so that customers with unverified accounts will be blocked.

How to Set Up Email Verification Plugin in WooCommerce - Step3

Step4: #

  • User Roles #

From this option, you can set the criteria for accounts verifications, such as if it’s a guest account, or based on user roles, and more.

How to Set Up Email Verification Plugin in WooCommerce - Step4

Step5: #

  • Messages Options #

This section allows you to customize the message that will be sent to your customers when their account is verified, when the process has failed, or for other status updates.

How to Set Up Email Verification Plugin in WooCommerce - Step5

Step6: #

  • Blocking #

From here, you can restrict customers’ access to specific content, pages, or products if their accounts are not verified. 

How to Set Up Email Verification Plugin in WooCommerce - Step6

  • Block Checkout #

If your customers haven’t verified their accounts, you can also block them from completing the checkout or adding products to their cart.

How to Set Up Email Verification Plugin in WooCommerce - Step6(2)

  • Block non-paying users #

This option allows you to block non-paying users from activating their accounts until they make a purchase that is marked as paid.

  • Role Checking #

You can also specify the roles this setting will apply to.

Using the “Block WooCommerce Order Email” option, you can prevent order emails from being sent to users who haven’t verified their email addresses.

How to Set Up Email Verification Plugin in WooCommerce - Step6(3)

Step7: #

  • Shortcodes #

From here, you can select the email verification shortcodes, such as the verification status, or a link to resend the verification email.

How to Set Up Email Verification Plugin in WooCommerce - Step7

Step8: #

  • Email Options #

The Email Option feature allows you to customize the emails sent to customers, such as activation, confirmation, or admin emails. Here, you can personalize the email content, subject, timing of the email, and even set a delay if needed. 

How to Set Up Email Verification Plugin in WooCommerce - Step8

Step9: #

  • Admin #

With the Admin Option, you can specify the roles that will require email verification, such as Administrator, Editor, or Author. Additionally, you can filter users based on their verification status.

When the verified column is enabled, a new column named “verified” will be added to the users’ list.

How to Set Up Email Verification Plugin in WooCommerce - Step9

Step10: #

  • Advanced Options #

The Block Auth Cookies option prevents the sending of authentication cookies if it is detected that unverified users are able to log in.

You can set the prevention to occur either after registration or after checkout.

How to Set Up Email Verification Plugin in WooCommerce - Step10

You can also delete unverified customers from your database.

How to Set Up Email Verification Plugin in WooCommerce - Step10(2)

Step11: #

  • Compatibility #

This section allows third parties, such as plugins or other solutions, that are compatible with these plugins. You can configure the settings within the plugin to work with compatible third parties, ensuring they align with each other’s functionality. 

How to Set Up Email Verification Plugin in WooCommerce - Step11

Final Words #

By using this plugin, users will need to verify their email before logging in to your website, so you can ensure that your email list is clean and that you’re dealing with real customers.

View Categories

Intro: How to Use the Plugin

When your customers walk into a physical store and see all the products’ colors, patterns, and options in front of them, it makes choosing what they want so much easier and accurate, right?

This is why some of your customers may feel afraid of shopping online, because they think it’s difficult to see all the details clearly, like colors, patterns, sizes, and options, or any other information they care about. But, let me tell you, there’s no need to worry.

By Variation Swatches: Color & Image in WooCommerce, you can give your customers the same clarity and confidence they have when they are shopping in a physical store. It lets them easily see every color, pattern, option, size, and more. It’s just like shopping in real life, which makes their decisions easier and more accurate.

Here’s a quick guide on how to add Variation Swatches: Color & Image in WooCommerce to your WooCommerce store. Follow these simple steps:

Variation Swatches for WooCommerce – Color & Image Swatches

Step1: #

  • Download The Plugin #

Download the “Variation Swatches: Color & Image in WooCommerce” plugin from your WPFactory account, and upload it to your WordPress site.

Variation Swatches for WooCommerce - Step1

Step2: #

  • Access The Plugin #

Go to WooCommerce > Settings > Variation swatches

Variation Swatches for WooCommerce - Step2

Step3: #

  • General Options #

From here, enable the Variation Swatches plugin for your WooCommerce store

Variation Swatches for WooCommerce - Step3

Step4: #

  • Add New Attributes #

Once you configure the general setting, go to the Product > Attributes in your WooCommerce dashboard

Variation Swatches for WooCommerce - Step4

Then, from “Types” section you can see the three attributes options:

  • Colors
  • Image
  • Labels

Variation Swatches for WooCommerce - Step4-2

Step5: #

  • Add New Attributes Values #

From here, you can create attributes values for each one. For example, under color attributes, you can add many options like Black, Red, Green, etc. And the same thing for Image Attributes, you can upload images that represent multiple features of your product and write descriptions about the product and its features using Label Attributes.

Variation Swatches for WooCommerce - Step5

Step6: #

  • Applying Attributes to Products #

After adding the attributes values, you can now apply them to your products. 

Go to product page > Select “Variable product” option > and apply these attributes to your product.

Variation Swatches for WooCommerce - Step6

Here, “Tips to Make Variation Swatches Better”: #

  • Keep it simple: Don’t use too many variations, as this can confuse your customers.
  • Use High-Quality Images: Make sure your swatch images are clear and represent the product’s details. 
  • Mobile Friendly Design: Don’t forget to test the swatches on mobile, to ensure they are easy to use on mobile devices.

In the end, these attributes will appear as switches for your customers, allowing them to select the color they want, choose the size, or browse through all the available images.

Variation Swatches for WooCommerce - tshirt-color-swatchFinal Words #

Smoother customer experience, a closer look at the product, a user-friendly interface, and accurate product details, all of these can be provided to your customers with the Variation Swatches plugin. This plugin makes the shopping experience feel more like real-life shopping, boosting your customers’ confidence in their purchasing decisions. And you know what that means? More sales and revenue, my friend!

View Categories

Intro: How to Use the Plugin

Is your stock running out due to high demand, or are you struggling with small, unprofitable orders?

I think that, as an eCommerce store owner, you might face some challenges in maintaining the right inventory while turning a profit at the same time, right?

Sometimes, customers may not meet the required order amount, or they might exceed the average order limit, which can negatively impact your inventory. Keeping your eye on your stock level and maintaining control over order size is critical to protecting your business operations and ensuring customer satisfaction.

So, let me guide you through this article on how to set Minimum/ Maximum order amount limits to streamline your operations and enhance customer satisfaction. Keep reading to take control of your orders like never before, in just simple steps!

Order Minimum-Maximum Amount for WooCommerce

Step1: #

  • Download The Plugin #

Download the “Order Minimum/Maximum Amount Limits for WooCommerce plugin from your WPFactory account, and upload it to your WordPress site.

How to Limit Order Minimum and Maximum Amounts in WooCommerce - step1

Step2: #

  • Access The Plugin #

As the plugin is installed, you can customize it for your business requirements.

Go to WPFactory tab > Order Minimum/Maximum Amount Limits for WooCommerce.

How to Limit Order Minimum and Maximum Amounts in WooCommerce - Step2

Step3: #

  • General Setting #

The first thing, from the “General” tab, you need to enable the plugin by checking the box.

Then, you need to specify the Amount Limits, you can set either Max, Min or both at the same time to limit the customer’s order. The next step you must specify the Amount Types which include several types such as quantity, sum, length, volume, etc. If no properties are specified in the box, all properties will be applied by default.

Or you can easily just activate the box below to include multiple “Amount types” and apply the check to all types. If “Or” is selected, only one of the selected types ( Sum Or quantity, etc ) needs to pass the amount check.  

How to Limit Order Minimum and Maximum Amounts in WooCommerce - Step3

  • Login Requirement #

If you enable the Login Requirement box, this will require users to login to access these requirements or see the Mni, Max for this order.

And you can specify the notification that will appear to users if they are not logged in, a notification will appear for them to log in so that they can complete the order.

How to Limit Order Minimum and Maximum Amounts - Step3(Login Requirement)

  • Checkout Options #

This option allows you to Block users from completing the checkout process if the amounts don’t meet the Min, Max limit.

How to Limit Order Minimum and Maximum Amounts in Woo-Step3(Checkout options)

Step4: #

  • Amounts #

Here, you can specify the min, max value for the total order or for the quantity of a single product. If you set a value of zero, this option will be ignored. For example, if you set the min to zero, this means that there are no limits to the quantity the customer can purchase.

How to Limit Order Minimum and Maximum Amounts in WooCommerce - Step4

Step5: #

  • Fees #

If you don’t want to block customers who exceed the applicable limit, you can charge extra fees to those who exceed the specified order limit.

How to Limit Order Minimum and Maximum Amounts in WooCommerce - Step5

Step6: #

  • Messages #

From the messages tab, you can customize the messages that will appear to your customers when they exceed the requirement limit. You can also choose the positions, where these messages will appear (e.g, before cart notice, before cart table, checkout, etc).

How to Limit Order Minimum and Maximum Amounts in WooCommerce - Step6

Step7: #

  • User Roles #

You can specify the Amounts Limit based on user roles, as shown in the image below. For example, you can set different limits for custom roles, guest, editor, and more. 

How to Limit Order Minimum and Maximum Amounts in WooCommerce - Step7

Step8: #

  • Users #

Here, you can set a custom quantity limit allowed per user on each user’s profile edit page. Unlike user roles, where you set a quantity limit for an entire group, here you can set a custom quantity limit for each customer.

How to Limit Order Minimum and Maximum Amounts in WooCommerce - Step8

Step9: #

  • Product #

Here there are three options, you can set different amounts per product, product category and/or product tag. When you enable these options, additional fields will appear either on the product page, or in each product category, or on the product tag edit page.

How to Limit Order Minimum and Maximum Amounts in WooCommerce - Step9

Step10: #

  • Shipping #

Here, you can set the Amount Limits based on three shipping types :

  • Per Shipping Method
  • Per Shipping instance
  • Per Shipping Zone

You can customize the Min/Max Limits for each shipping method and specify the message that will appear. 

How to Limit Order Minimum and Maximum Amounts in WooCommerce - Step10

Step11: #

  • Payment Gateway #

The same thing applies to the payment methods used, you can customize different Amount Limits for each payment method.

How to Limit Order Minimum and Maximum Amounts in WooCommerce - step11

Step12: #

  • Membership #

The Amount per Membership feature allows you to assign specific amounts to users based on their membership level, compatible with plugins like WooCommerce Memberships, MemberPress, and SUMO Memberships.

In the Advanced: Priority Options section, you can control the order in which amounts are applied. Lower priority numbers (e.g., 30) are applied first, while higher numbers (e.g., 100) come later. If an amount is set to zero, it’s ignored, and the next applicable amount is used. 

How to Limit Order Minimum and Maximum Amounts in WooCommerce - Step12

Step13: #

  • Currencies #

If your store supports multiple currencies, you can configure the settings to set quantity limits based on each currency used in your store.

How to Limit Order Minimum and Maximum Amounts in WooCommerce - Step13

Step14: #

  • Coupons #

When a coupon is applied or activated, it overrides the minimum and maximum limits. However, you can also exclude certain coupon codes from bypassing these limits.

How to Limit Order Minimum and Maximum Amounts in WooCommerce - Step14

Step15 #

  • Cart Products & Cart Total #

In these two sections, Products Total and Cart Totals, you can require or skip minimum or maximum limits based on:

  1. Individual Products
  2. Categories 
  3. Tags

You can also include or exclude products, categories, or tags for both quantity and sum totals.

How to Limit Order Minimum and Maximum Amounts in WooCommerce - Step15

Step16: #

  • Compatibility #

This section ensures smooth integration with the product bundles plugin, and other options.

When this option is enabled, bundled items are included in the total amount calculation in the cart. For example, if a bundle includes multiple products, its price will be counted as a part of the total amount when checking the min/max limits.

This option only affects the total amount type.

How to Limit Order Minimum and Maximum Amounts in WooCommerce - Step16

Here, with the WooCommerce Subscriptions plugin, it skip min/max checks if a customer has Subscriptions switching items in their cart.

Also, if you enable the exchange rates section, you can integrate with the Currency Switcher for WooCommerce to automatically update exchange rates. Just set the calculation method to activate this feature.

How to Limit Order Minimum and Maximum Amounts in WooCommerce - Step16 (2)

Conclusion #

With the Minimum/ Maximum order amount limits plugin, you can seamlessly configure these limits for individual products, specific categories, or your entire store. This flexibility allows you to streamline operations, maintain inventory control, and boost your profits. All with just a few simple steps.

View Categories

Intro: How to Use the Plugin

Table of Contents

Ever wonder why your customers reach the checkout page but don’t complete the purchase? There are several reasons why your customers might leave the checkout process halfway and exit the site. One of the reasons could be the complicated checkout experience, using the default checkout page, or the checkout page isn’t customized according to the customers desires and requirements.

Checkout page of an eCommerce website should be as simple as possible and easy to navigate, because the checkout page is one of the most critical pages in your website, as it’s where the sale is finalized. The more complex the checkout page, the more customers and money may be lost.

So, here are the steps to customize the checkout page to make it more unique for your customers and provide a smoother experience with Custom Checkout Fields Editor for WooCommerce plugin.

Custom Checkout Fields for WooCommerce

Step 1: #

customize checkout page - Step 1

Step2: #

  • Go to WooCommerce > Settings > Click on Custom Checkout fields tab.

customize checkout page - Step 2

From here you can customize and add numbers of different fields. You can add anything you want to appear on the checkout page, such as text, country, number, color, URL, tabs, and anything else.

Step 3: #

  • Customize fields as needed

From here, you can control the number of fields you want to add or remove, their type, content, the position it displays, and other settings.

customize checkout page - Step 3


With these simple steps, you will have customized and improved your customer experience and in return, you will have obtained additional information about your customers to provide them with the best customized experience.

View Categories

Intro: How to Use the Plugin

“You have 10$ left and you get free shipping” How many times have you seen this type of popup and run to add some items to your cart to hit that free shipping threshold? 

We all love getting something for free, and free shipping is one of the most attractive offers for customers. If they can reach the minimum order in a few steps, they will often do so. This is why adding a free shipping bar to your WooCommerce store is a smart way to increase order rate and encourage your customers to spend more.

In this article, we will talk about How to Add a Free Shipping Bar to WooCommerce” to tell your customers how much more they need to spend to get free shipping.

Here’s how to set it up:

Step 1: #

  • Go to WooCommerce > Settings > Shipping tab

Add free shipping bar - Step 1


Step2: #

➡️ Then, specify your shipping zones, where you want to offer free shipping.

  • Give your zone a name like:

➡️ Local

➡️ Domestic

➡️ International

  • Then, select the regions or countries that this zone will cover, or you can select all the countries.

Add free shipping bar - Step 2


Step3: #

➡️ Add a Shipping Method

After you have determined the shipping zone, now choose the shipping method for this zone.

Add free shipping bar - Step 3

  • You have three shipping methods:

➡️ Flat Rate: Here you can specify a specific shipping cost.

➡️ Free Shipping: Here you can choose this option if you want to provide free shipping for orders above a certain amount.

➡️ Local Pickup: Choose local pickup if you provide an option for customers to pickup the order themselves.


Step4: #

➡️ Choose the free shipping option 

Add free shipping bar - Step 4

Then, specify the requirements you want to apply for the free shipping option like a minimum order amount, a free shipping coupon, or both of them.

For example, choose a minimum order to apply for free shipping such as “free shipping over $40”.


After you have made the shipping settings for WooCommerce, now install the Free Shipping Bar: Amount Left for Free Shipping for WooCommerce

Free Shipping Over Amount Bar for WooCommerce

Step 1: #

➡️ Download the “Free Shipping Barplugin from your WPFactory account, and upload it to your WordPress site.

WPFactory Free shipping bar Plugin - Step 1


Step 2: #

  • Go to the Plugin Settings

Once installed, enable the plugin to enable the amount left tracking.

WPFactory Free shipping bar Plugin - Step 2


Step3: #

  • Here, customize the message you want to show to customers to let them know how much more they need to spend to get free shipping.

For example, “$20 left for free shipping” “You’re just $10 a way from free shipping”.

WPFactory Free shipping bar Plugin - Step 3


Step4: #

  • From here you can specify whether you want to show messages to customers in a cart, mini cart, or at checkout.

WPFactory Free shipping bar Plugin - Step 4


And you can specify where the content will appear through the position box.

Step4 Free shipping

Step5:

  • Default WooCommerce Notice

This option allows you to enable or disable the entire section, for example, if you want to display a specific notice like The remaining amount for free shipping.

The notice appears with the name: notice, error, or success.

Step5 free shipping

You can customize the notice, including the text, color, size, and font, to match your store’s layout.

Step5 2

Step6:

  • Add to Cart Notice Options

This option allows you to enable or disable a special notice that appears when a customer adds a product to the cart. 

The notice can vary, such as “The remaining amount to qualify for free shipping, The minimum amount for shipping, or The total cart value.”

Step6. free shipping

Step7:

  • Manual Min Amount Options

This option allows you to manually enter the minimum shipping amount if you are using non-standard shipping methods for free shipping. 

If the minimum amount is zero or negative, it will be ignored.

Step7. free shipping

You can also set the minimum shipping amount based on user roles, currencies and/or shipping zones.

Step72.free shipping

Step8:

  • Progress Bar Options

Here, this progress bar shows customers how much more they need to spend to qualify for free shipping

Step8. free shipping

This is all you need to implement Free Shipping Bar: Amount Left for Free Shipping for WooCommerce, to increase your sales and encourage customers to buy more. 

View Categories

Intro: How to Use the Plugin

Letting your customers “submit their own price “or “negotiate the price with you “and then you can reject or accept the offer based on your pricing strategy is an effective way to enhance customer engagement and make them feel empowered and valued. This is known as “Open price “or “Name your price“ 

WooCommerce Open Price name your price plugin 1

Here’s step-by-step guide to implement this plugin on your WooCommerce store:

Step 1: #

  • Install and activate the “Name your price “plugin from your WordPress dashboard.

At the Admin Panel, go to Plugins > Add New and Upload Plugin

Step 1


Step 2: #

  • Go to the Plugin Settings

As the plugin is installed, you can customize it for your business requirements.

Go to WooCommerce > Settings > price offer tab.

Step2


Step 3: #

  • Customize your General Settings

From here you can control and modify what you want.

You can specify the plugin activation for all products or for specific items.

Step3

You can also “Exclude“certain products such as:

  • Out of stock 
  • Products with price 

You can also determine who can place offers from your customers, from “User Visibility option

Step3 2

  • Selected Products Options     

If you enable the option “enable for selected products only” for products options above, these options are complementary to this section.

If you enable the “per product” option, new settings will be added for each product. And the same thing for each variation of a variable product variation.

Selected Products Options

  • Advanced Options

Here you can specify advanced options such as exclude or restrict some payment gateways.

And you can exclude the price offers if you apply a coupon code.

Advanced Options #

Step 4: #

  • Admin Options

Enable the “Product Meta Box“ to add a section on each product page in your WooCommerce store, allowing you to see and manage the price offers from your customers, where you can accept or reject them.

You can customize this box as you like, with the details and information you want to appear, for example the offer amount, status, customer information.

Step4


Step5: #

  • Email Settings

From here you can determine how you will receive a notification from your customers when someone sends an offer.

Enter some information such as:

  • Email recipient’s address.
  • Email subject.
  • Email Template: What the message you want to send an offer is received.

Step5


Step6: #

  • Customize the Style

You can customize the look and style that suits your store’s look as you want from Button | Form | Styling section

Step6


  • Button

From here, you can customize your buttons names from label box and position on single product page and archive pages.

Step62

  • Form

Here, you can customize your form by adding or removing some fields like customer name, customer email, etc. Also, you can add the minimal price and maximal price, and quantity.

Form

Form2

Step7: #

  • Responding to Offers

– When your customers make an offer, you can respond to them with

Reject: Decline the offer.

Accept: Approve the offer and proceed with the transaction.

Counteroffer: Provide a counteroffer to the customer.

By going to the Offers Section of your dashboard > and then Click on the offer number to view the offer details

Actions

Step7 1

You can reject, accept, or counteroffer > Click on update after choosing one of the three responses.

Step7

  • Auto Accept Offers

There is a new feature known as Auto Accept Offers that is available in the Pro version of Name Your Price Plugin. In a nutshell, this feature will automatically accept customer offers that meet a predefined minimum price. 

For instance, such a threshold can be $5.00 whereby any offer that is less than $5.00 will be processed as a regular offer and any offer of $5.00 or more will automatically be accepted. Then, the product will be added to the cart automatically. 

That’s all you need to know about “How to Allow Customers to Submit Offers on WooCommerce”